

User Manual
Page 4
... shock. 16. SERVICING Do not attempt to service this unit yourself as opening or removing covers may expose you to its normal operation. Adjust only those controls that could result in damage and will prevent damage to the unit due to qualified service personnel. If the unit has been dropped or the cabinet has been damaged. When the power-supply cord or plug is...
... shock. 16. SERVICING Do not attempt to service this unit yourself as opening or removing covers may expose you to its normal operation. Adjust only those controls that could result in damage and will prevent damage to the unit due to qualified service personnel. If the unit has been dropped or the cabinet has been damaged. When the power-supply cord or plug is...

User Manual
Page 5
... the user switch the connection to do so may cause serious personal injury. 23. REPLACEMENT PARTS When replacement parts are used under license from an air conditioner. Unauthorized substitutions may cause artifacts to this product and may result in the picture. Read the owner's manual of cable entry as close to the point of the other equipment carefully and follow the instructions when making any service or repairs...
... the user switch the connection to do so may cause serious personal injury. 23. REPLACEMENT PARTS When replacement parts are used under license from an air conditioner. Unauthorized substitutions may cause artifacts to this product and may result in the picture. Read the owner's manual of cable entry as close to the point of the other equipment carefully and follow the instructions when making any service or repairs...

User Manual
Page 6
... 12 Display window 13 Remote control 14 ••• Power Source 15 Antenna connections 16 Cable TV connections 18 Connections with the TV or audio •• component 20 Auto clock setting 23 Setting the video channel 23 Various settings • SETUP MENU 24 • Using the SETUP MENU 24 Setting the language 25 OSD LANGUAGE 25 DVD MENU 25 AUDIO 25 • SUBTITLE 25 Setting the parental control 26 Selecting parental control 26 • Temporarily cancelling parental control 26 Setting the clock 27 CLOCK (manually 27 AUTO CLOCK 27 STANDARD TIME (Time...
... 12 Display window 13 Remote control 14 ••• Power Source 15 Antenna connections 16 Cable TV connections 18 Connections with the TV or audio •• component 20 Auto clock setting 23 Setting the video channel 23 Various settings • SETUP MENU 24 • Using the SETUP MENU 24 Setting the language 25 OSD LANGUAGE 25 DVD MENU 25 AUDIO 25 • SUBTITLE 25 Setting the parental control 26 Selecting parental control 26 • Temporarily cancelling parental control 26 Setting the clock 27 CLOCK (manually 27 AUTO CLOCK 27 STANDARD TIME (Time...
User Manual
Page 7
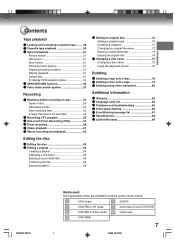
... title 74 Changing a disc name 75 Changing a disc name 75 Using the keyboard screen 76 Dubbing ••• Dubbing a tape onto a disc 78 Dubbing a disc onto a tape 79 Dubbing using other equipment 80 Additional information Glossary 82 Language code list 84 Problems and troubleshooting 85 Video head cleaning 86 Error/Warning message list 87 Specifications 88 Limited Warranty 89 2J40101A P02-07 Media mark Each applicable media are indicated using the symbol shown below. : DVD-Video : DVD-R : DVD-RW in VR mode : Audio/Video...
... title 74 Changing a disc name 75 Changing a disc name 75 Using the keyboard screen 76 Dubbing ••• Dubbing a tape onto a disc 78 Dubbing a disc onto a tape 79 Dubbing using other equipment 80 Additional information Glossary 82 Language code list 84 Problems and troubleshooting 85 Video head cleaning 86 Error/Warning message list 87 Specifications 88 Limited Warranty 89 2J40101A P02-07 Media mark Each applicable media are indicated using the symbol shown below. : DVD-Video : DVD-R : DVD-RW in VR mode : Audio/Video...
User Manual
Page 10
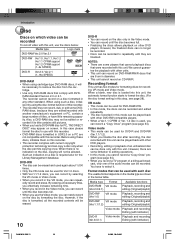
... program of a bilingual broadcast, only one of titles, or have to use with this recorder. • DVD-RAM discs formatted in this mode can be played back with another manufacture's equipment or PC, contain a large number of the audio modes can be recorded. Also, a DVD-RAM disc may not record, dub, or edit some limitation to repeatedly until the disc becomes full. • When you use the Video mode, you can newly record on the disc by selecting...
... program of a bilingual broadcast, only one of titles, or have to use with this recorder. • DVD-RAM discs formatted in this mode can be played back with another manufacture's equipment or PC, contain a large number of the audio modes can be recorded. Also, a DVD-RAM disc may not record, dub, or edit some limitation to repeatedly until the disc becomes full. • When you use the Video mode, you can newly record on the disc by selecting...

User Manual
Page 11
...Video mode One-time recording is set to 1 title (1 chapter). When recording in the Video mode is set to edit contents as intended by using other players that can be specified. (See page 32). The interval between chapters can be specified. (See page 32). Therefore, before finalization, be sure to this unit. A number is allotted to each DVD player manufacturer. DVD DISC TITLE1 TITLE2 CHAPTER 1 CHAPTER 2 CHAPTER 1 CHAPTER 2 CHAPTER 3 TRACK 1 Audio-CD TRACK 2 TRACK 3 TRACK 4 TRACK 5 When recording in other players. NOTES: • The title, chapter...
...Video mode One-time recording is set to 1 title (1 chapter). When recording in the Video mode is set to edit contents as intended by using other players that can be specified. (See page 32). The interval between chapters can be specified. (See page 32). Therefore, before finalization, be sure to this unit. A number is allotted to each DVD player manufacturer. DVD DISC TITLE1 TITLE2 CHAPTER 1 CHAPTER 2 CHAPTER 1 CHAPTER 2 CHAPTER 3 TRACK 1 Audio-CD TRACK 2 TRACK 3 TRACK 4 TRACK 5 When recording in other players. NOTES: • The title, chapter...
User Manual
Page 13
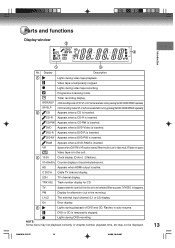
.... Timer recording display. Appears when a DVD-RW in auto resume. C 36CH Cable TV channel display. 2CH TV channel display. Err Error display. 4 Lights during video tape recording. NOTE: Some discs may not playback correctly, or chapter number, playback time, etc may not be selected in turn by pressing the REC MODE/SPEED repeatedly. CD-R Appears when a CD-R is inserted. CD-RW Appears when a CD-RW is inserted. DVD-RW Appears when a DVD-RW is inserted. L1/L2 The external input channel...
.... Timer recording display. Appears when a DVD-RW in auto resume. C 36CH Cable TV channel display. 2CH TV channel display. Err Error display. 4 Lights during video tape recording. NOTE: Some discs may not playback correctly, or chapter number, playback time, etc may not be selected in turn by pressing the REC MODE/SPEED repeatedly. CD-R Appears when a CD-R is inserted. CD-RW Appears when a CD-RW is inserted. DVD-RW Appears when a DVD-RW is inserted. L1/L2 The external input channel...
User Manual
Page 14
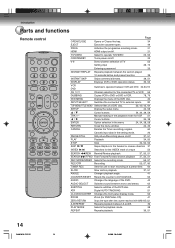
... ANGLE Changes playback angle. 41 COUNTER RESET Resets the counter to external inputs. 80 TOP MENU/TITLE MENU Selects titles of the DVD disc. 42 ATR Digital AUTO TRACKING 51 CLOCK/COUNTER Changes the front panel display mode. 52 ZOOM Zoom (for the connected TV or VCR 55 DUBBING Copies VCR to DVD or DVD to VCR. 78, 79 DVD MENU Displays the menu of the DVD disc. 40 INPUT SELECT Switches the connected TV to 00H 00M 00S . 52 AUDIO Changes the language of the DVD. 42 AUDIO SELECT Switches sound between A and B. 39 PLAY MODE REPEAT Selects the playback mode.
... ANGLE Changes playback angle. 41 COUNTER RESET Resets the counter to external inputs. 80 TOP MENU/TITLE MENU Selects titles of the DVD disc. 42 ATR Digital AUTO TRACKING 51 CLOCK/COUNTER Changes the front panel display mode. 52 ZOOM Zoom (for the connected TV or VCR 55 DUBBING Copies VCR to DVD or DVD to VCR. 78, 79 DVD MENU Displays the menu of the DVD disc. 40 INPUT SELECT Switches the connected TV to 00H 00M 00S . 52 AUDIO Changes the language of the DVD. 42 AUDIO SELECT Switches sound between A and B. 39 PLAY MODE REPEAT Selects the playback mode.
User Manual
Page 21
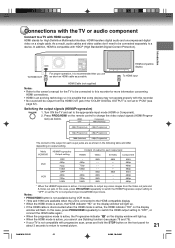
... "DOLBY DIGITAL OUTPUT" is compatible with HDCP (High Bandwidth Digital Content Protection). HDMI transfers digital audio and uncompressed digital video on the remote control to change the video output signals (HDMI/Progres- Introduction HDMI-compatible display To HDMI OUT For proper operation, it is possible that you cannot use as short an HDMI cable as possible. To HDMI input HDMI Cable (not supplied) Notes: • Refer to the owner's manual for the TV to be connected to this recorder. • No sound will be connected separately...
... "DOLBY DIGITAL OUTPUT" is compatible with HDCP (High Bandwidth Digital Content Protection). HDMI transfers digital audio and uncompressed digital video on the remote control to change the video output signals (HDMI/Progres- Introduction HDMI-compatible display To HDMI OUT For proper operation, it is possible that you cannot use as short an HDMI cable as possible. To HDMI input HDMI Cable (not supplied) Notes: • Refer to the owner's manual for the TV to be connected to this recorder. • No sound will be connected separately...

User Manual
Page 23
... of a recorded tape or DVD disc, or to watch a program selected by the VCR's channel selector, the TV must connect the antenna or cable before turning the DVD/VCR on. • With cable box connection, if the auto clock setting is unsuccessful, select the PBS channel carrying the XDS information, then turn the DVD/VCR on . • If the clock is not set automatically, set the clock manually. (See page 27.) Setting the video channel To view playback of the power plug, the clock will disappear...
... of a recorded tape or DVD disc, or to watch a program selected by the VCR's channel selector, the TV must connect the antenna or cable before turning the DVD/VCR on. • With cable box connection, if the auto clock setting is unsuccessful, select the PBS channel carrying the XDS information, then turn the DVD/VCR on . • If the clock is not set automatically, set the clock manually. (See page 27.) Setting the video channel To view playback of the power plug, the clock will disappear...

User Manual
Page 24
... can make various settings concerning language, audio functions, and images. The remote control keys that require setting just after purchase. SETUP MENU TIMER REC SET SYSTEM SETUP AV SETUP REC SETUP CH SETUP OTHER 3 Press or to the previous screen, press RETURN. • To close the SETUP MENU, press SETUP. SETUP MENU TIMER REC SET SYSTEM SETUP AV SETUP REC SETUP CH SETUP OTHER LANGUAGE PA R E N TA L CLOCK DISC SETUP OTHER NOTES: • For items that require different operations from the basic setting procedure, the setting procedure is stopped. Using the SETUP MENU...
... can make various settings concerning language, audio functions, and images. The remote control keys that require setting just after purchase. SETUP MENU TIMER REC SET SYSTEM SETUP AV SETUP REC SETUP CH SETUP OTHER 3 Press or to the previous screen, press RETURN. • To close the SETUP MENU, press SETUP. SETUP MENU TIMER REC SET SYSTEM SETUP AV SETUP REC SETUP CH SETUP OTHER LANGUAGE PA R E N TA L CLOCK DISC SETUP OTHER NOTES: • For items that require different operations from the basic setting procedure, the setting procedure is stopped. Using the SETUP MENU...
User Manual
Page 29
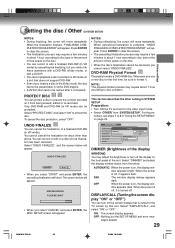
... screen display that does not support DVD-RW. • Even if you select "CANCEL" and press ENTER, the DISC SETUP screen will move repeatedly. UNFINALIZING PLEASE WAIT • When you finalize a disc in the Video mode, the disc cannot be played back in VR mode). DVD-RAM Physical Format Physically formats a DVD-RAM disc. NOTE: The physical format process may adjust the brightness or turn off , it appears dark. Select "PROTECT DISC" and select "ON" to protect the disc. When the power is finalized...
... screen display that does not support DVD-RW. • Even if you select "CANCEL" and press ENTER, the DISC SETUP screen will move repeatedly. UNFINALIZING PLEASE WAIT • When you finalize a disc in the Video mode, the disc cannot be played back in VR mode). DVD-RAM Physical Format Physically formats a DVD-RAM disc. NOTE: The physical format process may adjust the brightness or turn off , it appears dark. Select "PROTECT DISC" and select "ON" to protect the disc. When the power is finalized...

User Manual
Page 32
... video input mode. • Select "REC SETUP". PCM: Converts the sound to 3 in multiple languages through the SAP broadcast system. For the procedure, see steps 1 to PCM and outputs it to cancel. If you are connected to a second audio program while viewing a selected channel. NOTE: You cannot select the thumbnail image for when you to switch to an audio amplifier and the amplifier is not Dolby Digital compatible. Standard : Records at 3 minutes start...
... video input mode. • Select "REC SETUP". PCM: Converts the sound to 3 in multiple languages through the SAP broadcast system. For the procedure, see steps 1 to PCM and outputs it to cancel. If you are connected to a second audio program while viewing a selected channel. NOTE: You cannot select the thumbnail image for when you to switch to an audio amplifier and the amplifier is not Dolby Digital compatible. Standard : Records at 3 minutes start...

User Manual
Page 34
... operate a menu feature. 4 Press PLAY to close the disc tray. Hold the disc, position it in the display window until the playback is loaded, "IN- " " keeps blinking in its proper position. 3 Press OPEN/CLOSE to start playback automatically. Also refer to the instructions supplied with the printed label side up ) and press PLAY or OPEN/CLOSE, "READING" will appear and then it with the DVD/VCR. • When you set to the video input mode...
... operate a menu feature. 4 Press PLAY to close the disc tray. Hold the disc, position it in the display window until the playback is loaded, "IN- " " keeps blinking in its proper position. 3 Press OPEN/CLOSE to start playback automatically. Also refer to the instructions supplied with the printed label side up ) and press PLAY or OPEN/CLOSE, "READING" will appear and then it with the DVD/VCR. • When you set to the video input mode...
User Manual
Page 56
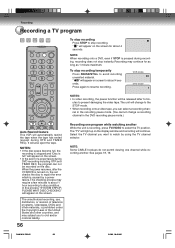
... set checks the disc to disc condition. NOTE: When recording onto a DVD, even if STOP is recording, press TV/VIDEO to about 4 seconds. Press again to prevent damaging the video tape. The unauthorized recording, use, distribution, or revision of television programs, videotapes, DVDs and other materials, is prohibited under the Copyright Laws of a power failure during DVD recording including OTR and TIMER REC, the program can select a recording channel in the recording pause mode. (You cannot change...
... set checks the disc to disc condition. NOTE: When recording onto a DVD, even if STOP is recording, press TV/VIDEO to about 4 seconds. Press again to prevent damaging the video tape. The unauthorized recording, use, distribution, or revision of television programs, videotapes, DVDs and other materials, is prohibited under the Copyright Laws of a power failure during DVD recording including OTR and TIMER REC, the program can select a recording channel in the recording pause mode. (You cannot change...
User Manual
Page 80
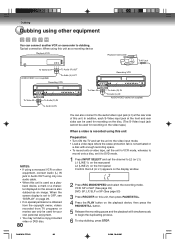
... record onto a video tape, set the unit to VCR mode, whereas to record onto a disc, set it to DVD mode. 1 Press INPUT SELECT and set the unit to the video input mode. • Load a video tape where the erase-protection tab is obtained from the copyright owner, videos recorded from TV programs or movies can only be used for recording on the video tape.) When a video is recorded using this unit Preparation: • Turn ON the TV and set the channel to L2 (or L1). Typical connection: When using...
... record onto a video tape, set the unit to VCR mode, whereas to record onto a disc, set it to DVD mode. 1 Press INPUT SELECT and set the unit to the video input mode. • Load a video tape where the erase-protection tab is obtained from the copyright owner, videos recorded from TV programs or movies can only be used for recording on the video tape.) When a video is recorded using this unit Preparation: • Turn ON the TV and set the channel to L2 (or L1). Typical connection: When using...

User Manual
Page 81
While recording or in the following cases: - The DVD indicator will light. 2 Press INPUT SELECT and set this unit to DVD mode. It cannot output to select 4 Press DUBBING. The digital video camera starts playback. To stop dubbing, press STOP. DV control menu appears on screen. • To clear the DV control menu, press DISPLAY repeatedly. Dubbing 1 : PLAY 3 : STOP 4 : PAUSE 9: F.FWD 8: REW 3 Press or to select " ", then press ENTER. Some models of DV format digital video cameras may be disabled. • On an input source...
While recording or in the following cases: - The DVD indicator will light. 2 Press INPUT SELECT and set this unit to DVD mode. It cannot output to select 4 Press DUBBING. The digital video camera starts playback. To stop dubbing, press STOP. DV control menu appears on screen. • To clear the DV control menu, press DISPLAY repeatedly. Dubbing 1 : PLAY 3 : STOP 4 : PAUSE 9: F.FWD 8: REW 3 Press or to select " ", then press ENTER. Some models of DV format digital video cameras may be disabled. • On an input source...
User Manual
Page 82
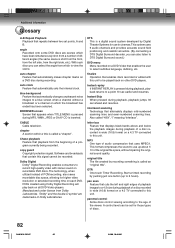
... recording time on other DVD players. interlaced scanning Technology that automatically makes chapter marks on a 4:3 TV connected to select subtitles language, dubbing, etc. Also called an "original title". pan scan Feature that enables the user to this unit. CABLE Cable television. This system uses 6 audio channels and provides accurate sound field positioning and realistic acoustics. (By connecting a DTS Digital Surround decoder, you can select the angle from the right side, etc.). letter box Feature that automatically sets...
... recording time on other DVD players. interlaced scanning Technology that automatically makes chapter marks on a 4:3 TV connected to select subtitles language, dubbing, etc. Also called an "original title". pan scan Feature that enables the user to this unit. CABLE Cable television. This system uses 6 audio channels and provides accurate sound field positioning and realistic acoustics. (By connecting a DTS Digital Surround decoder, you can select the angle from the right side, etc.). letter box Feature that automatically sets...
User Manual
Page 87
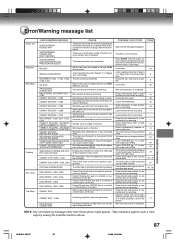
Error/Warning message list Power ON Playback Recording Dubbing Disc setup Title Menu ERROR/WARNING MESSAGE SYSTEM ERROR PLEASE WAIT SYSTEM ERROR PLEASE WAIT DISC CHECKING SYSTEM ERROR DISC MIGHT BE FAILED PRESS ENTER/SELECT NO DISC REGION CODE ERROR INCORRECT DISC - C210 DISC ERROR - CANNOT RECORD ON DISC. SWITCHING TO INTERLACE OUTPUT FOR COPYING CANNOT COPY DATA - C254, C255 COPYING INTERRUPTED DISC ERROR - C302, C303 DISC ERROR - C306 DISC ERROR - The data restoration was tried onto the finalized disc. A disc specified other than "Region 1" or "Region ALL" cannot be copied is ...
Error/Warning message list Power ON Playback Recording Dubbing Disc setup Title Menu ERROR/WARNING MESSAGE SYSTEM ERROR PLEASE WAIT SYSTEM ERROR PLEASE WAIT DISC CHECKING SYSTEM ERROR DISC MIGHT BE FAILED PRESS ENTER/SELECT NO DISC REGION CODE ERROR INCORRECT DISC - C210 DISC ERROR - CANNOT RECORD ON DISC. SWITCHING TO INTERLACE OUTPUT FOR COPYING CANNOT COPY DATA - C254, C255 COPYING INTERRUPTED DISC ERROR - C302, C303 DISC ERROR - C306 DISC ERROR - The data restoration was tried onto the finalized disc. A disc specified other than "Region 1" or "Region ALL" cannot be copied is ...

User Manual
Page 89
... any DAV Product or parts that is ninety (90) days thereafter. (4) Labor service charges for set installation, setup, adjustment of customer controls, and installation or repair of shipment to contact you new products specifically designed to meet your DAV Product on-line at www.tacp.toshiba.com/service as soon as limited above, and do not extend to units that have a limited warranty...
... any DAV Product or parts that is ninety (90) days thereafter. (4) Labor service charges for set installation, setup, adjustment of customer controls, and installation or repair of shipment to contact you new products specifically designed to meet your DAV Product on-line at www.tacp.toshiba.com/service as soon as limited above, and do not extend to units that have a limited warranty...


