

Owners Manual
Page 14
Introduction Parts and functions Remote control Page OPEN/CLOSE Opens or Closes the tray 31 EJECT Ejects the cassette tape 46 PROGRESSIVE Activates the progressive scanning mode 45 TV/VIDEO Select ... playback 34, 47, 48 34, 47, 48 REC MODE/SPEED Selects the recording mode 52, 54 REC/OTR Recording 52, 54 TIMER REC Sets the unit to start recording at a preset time 57 SLOW Slow motion playback 34, 48 ANGLE Changes playback angle 38 COUNTER RESET Resets the counter to 00H...
Introduction Parts and functions Remote control Page OPEN/CLOSE Opens or Closes the tray 31 EJECT Ejects the cassette tape 46 PROGRESSIVE Activates the progressive scanning mode 45 TV/VIDEO Select ... playback 34, 47, 48 34, 47, 48 REC MODE/SPEED Selects the recording mode 52, 54 REC/OTR Recording 52, 54 TIMER REC Sets the unit to start recording at a preset time 57 SLOW Slow motion playback 34, 48 ANGLE Changes playback angle 38 COUNTER RESET Resets the counter to 00H...

Owners Manual
Page 15
...60Hz). Operation • Aim the remote control at a time. • The / / / are dead or if the remote control is plugged in for the first time, wait for approximate 3 minutes before operating the unit. 15 7/25/05, 23:18 This will prevent battery acid from remote control if they are also used for an... extended period of time. Remote control basics • Press ON/STANDBY to turn the DVD/VCR on AC...
...60Hz). Operation • Aim the remote control at a time. • The / / / are dead or if the remote control is plugged in for the first time, wait for approximate 3 minutes before operating the unit. 15 7/25/05, 23:18 This will prevent battery acid from remote control if they are also used for an... extended period of time. Remote control basics • Press ON/STANDBY to turn the DVD/VCR on AC...
Owners Manual
Page 22
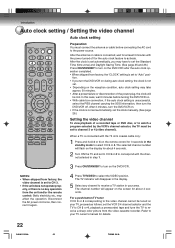
...VCR on . • With cable box connection, if the auto clock setting is set to CH 3. • If the unit does not operate prop- After 3 minutes, turn on the remote control for the auto clock feature to "Auto" posi- When a TV is no key operation from the video cassette recorder. erly... tune the TV to turn the DVD/VCR off for 3 seconds in step 1. 3 Press ON/STANDBY to receive a sharp color picture from the unit and/or the remote control: Static electricity, etc., may take approx. 30 minutes. • After a power failure or disconnection of a recorded tape or DVD disc, or ...
...VCR on . • With cable box connection, if the auto clock setting is set to CH 3. • If the unit does not operate prop- After 3 minutes, turn on the remote control for the auto clock feature to "Auto" posi- When a TV is no key operation from the video cassette recorder. erly... tune the TV to turn the DVD/VCR off for 3 seconds in step 1. 3 Press ON/STANDBY to receive a sharp color picture from the unit and/or the remote control: Static electricity, etc., may take approx. 30 minutes. • After a power failure or disconnection of a recorded tape or DVD disc, or ...

Owners Manual
Page 24
... with some discs. • Some discs may not see steps 1 to temporarily cancel the rating level, the message "The parental level of such discs. This unit can be encoded with those discs. • If you input a wrong number, press CANCEL. • Be sure to 7 discs contain content chil- dren age 15... R-rated discs cannot be played back. The new password entry box appears. 4 Enter new password. To reset the code press and hold number 7 on the remote control, then press and hold STOP on page 23. The parental level of 1- 8, "1" is turned off.
... with some discs. • Some discs may not see steps 1 to temporarily cancel the rating level, the message "The parental level of such discs. This unit can be encoded with those discs. • If you input a wrong number, press CANCEL. • Be sure to 7 discs contain content chil- dren age 15... R-rated discs cannot be played back. The new password entry box appears. 4 Enter new password. To reset the code press and hold number 7 on the remote control, then press and hold STOP on page 23. The parental level of 1- 8, "1" is turned off.
Owners Manual
Page 26
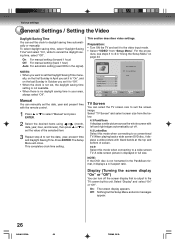
... Daylight Saving Time. Select "TV Screen" and select screen size from the below. 4:3 Pan&Scan It displays a wide picture across the whole screen with the remote control. 1 Press or to select "Manual" and press ENTER. 2 Select the desired items using or (month, date, year, hour, and minute), then press or... at the top and bottom of the selected item. 3 Repeat step 2 to a wide-screen TV. Manual You can turn off . 4:3 LetterBox Select this unit. The Setup Menu will close. On: The screen display appears. Display (Turning the screen display "On" or "Off") You can manually set the date, ...
... Daylight Saving Time. Select "TV Screen" and select screen size from the below. 4:3 Pan&Scan It displays a wide picture across the whole screen with the remote control. 1 Press or to select "Manual" and press ENTER. 2 Select the desired items using or (month, date, year, hour, and minute), then press or... at the top and bottom of the selected item. 3 Repeat step 2 to a wide-screen TV. Manual You can turn off . 4:3 LetterBox Select this unit. The Setup Menu will close. On: The screen display appears. Display (Turning the screen display "On" or "Off") You can manually set the date, ...
Owners Manual
Page 46
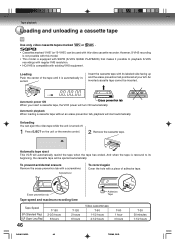
...tape Use only video cassette tapes marked or . • Cassettes marked "VHS" (or "S-VHS") can eject the video tape while the unit is rewound to playback S-VHS recordings with regular VHS resolution. • HQ VHS is automatically inserted. Unloading You can be used with ...video cassette recorder. Loading Push the center of adhesive tape. And when the tape is turned off. 1 Press EJECT on the unit or the remote control. 2 Remove the cassette tape. Insert the cassette tape with a screwdriver. An inverted cassette tape cannot be ejected automatically. Automatic tape...
...tape Use only video cassette tapes marked or . • Cassettes marked "VHS" (or "S-VHS") can eject the video tape while the unit is rewound to playback S-VHS recordings with regular VHS resolution. • HQ VHS is automatically inserted. Unloading You can be used with ...video cassette recorder. Loading Push the center of adhesive tape. And when the tape is turned off. 1 Press EJECT on the unit or the remote control. 2 Remove the cassette tape. Insert the cassette tape with a screwdriver. An inverted cassette tape cannot be ejected automatically. Automatic tape...
Owners Manual
Page 85
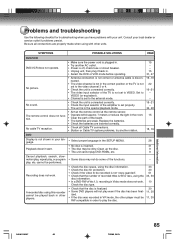
... connected correctly. • The video input selector of the TV is not set properly. • The unit is in the special playback mode. • Aim at the remote control at the remote sensor. • Operate within approx. 7 meters or reduce the light in the SETUP MENU. 28 • No disc is inserted. 31 Playback...
... connected correctly. • The video input selector of the TV is not set properly. • The unit is in the special playback mode. • Aim at the remote control at the remote sensor. • Operate within approx. 7 meters or reduce the light in the SETUP MENU. 28 • No disc is inserted. 31 Playback...


