
Printable Spec Sheet
Page 2
...). Product design and specifications subject to record television programming. REGZA LINK is not recommended). See owner's manual for CD audio playback. Auto Finalization with Audio Scan FF/REW 2x(fwd), 5x(back), 20x, 40x Slow-Motion 1/2(fwd), 1/4(back), 1/8x, 1/16x Instant Skip ✓ Zoom (magnifications) ✓ Editing Features Playlist/Rename Title/ Chapter Creation (User and Auto) Timer Back Up (at standby mode) 30 sec. HDMI, the HDMI logo and High...
...). Product design and specifications subject to record television programming. REGZA LINK is not recommended). See owner's manual for CD audio playback. Auto Finalization with Audio Scan FF/REW 2x(fwd), 5x(back), 20x, 40x Slow-Motion 1/2(fwd), 1/4(back), 1/8x, 1/16x Instant Skip ✓ Zoom (magnifications) ✓ Editing Features Playlist/Rename Title/ Chapter Creation (User and Auto) Timer Back Up (at standby mode) 30 sec. HDMI, the HDMI logo and High...
Owner's Manual - English
Page 3
... CLAMP ELECTRIC SERVICE EQUIPMENT NEC - NATIONAL ELECTRICAL CODE S2898A ANTENNA DISCHARGE UNIT (NEC SECTION 810-20) GROUNDING CONDUCTORS (NEC SECTION 810-21) GROUND CLAMP POWER SERVICE GROUNDING ELECTRODE SYSTEM (NEC ART 250, PART H) Recording Playback Editing Function Setup Others E7K7AUD_D-R410KU_EN.indd 3 EN 3 2007/12/14 15:02:35 The safeguards incorporated in the unit. Heed all instructions. 5. Do not install near water...
... CLAMP ELECTRIC SERVICE EQUIPMENT NEC - NATIONAL ELECTRICAL CODE S2898A ANTENNA DISCHARGE UNIT (NEC SECTION 810-20) GROUNDING CONDUCTORS (NEC SECTION 810-21) GROUND CLAMP POWER SERVICE GROUNDING ELECTRODE SYSTEM (NEC ART 250, PART H) Recording Playback Editing Function Setup Others E7K7AUD_D-R410KU_EN.indd 3 EN 3 2007/12/14 15:02:35 The safeguards incorporated in the unit. Heed all instructions. 5. Do not install near water...
Owner's Manual - English
Page 4
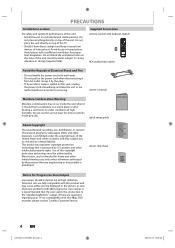
... to our Authorized Service Center for Progressive Scan Output Consumers should note that is prohibited. Supplied Accessories remote control with batteries (AAx2) RCA audio/video cables Avoid the Hazards of Electrical Shock and Fire • Do not handle the power cord with 480 progressive scan output, it by the plug. • If, by Macrovision. Do not use , distribution, or revision of television programs, videotapes, DVDs and other countries...
... to our Authorized Service Center for Progressive Scan Output Consumers should note that is prohibited. Supplied Accessories remote control with batteries (AAx2) RCA audio/video cables Avoid the Hazards of Electrical Shock and Fire • Do not handle the power cord with 480 progressive scan output, it by the plug. • If, by Macrovision. Do not use , distribution, or revision of television programs, videotapes, DVDs and other countries...
Owner's Manual - English
Page 5
.... Sound will play back on remote control toward the radio. This means the remote control is not used. Dolby Digital Recording "Dolby® Digital Recording enables consumers to remote control, press and hold a button on recordable DVD discs. All Rights Reserved. Cleaning the Disc Lens • If this unit still does not perform properly although you refer to the relevant sections and to "TROUBLESHOOTING" in camera of cellular phone). Press a button on all DVD-video players...
.... Sound will play back on remote control toward the radio. This means the remote control is not used. Dolby Digital Recording "Dolby® Digital Recording enables consumers to remote control, press and hold a button on recordable DVD discs. All Rights Reserved. Cleaning the Disc Lens • If this unit still does not perform properly although you refer to the relevant sections and to "TROUBLESHOOTING" in camera of cellular phone). Press a button on all DVD-video players...
Owner's Manual - English
Page 6
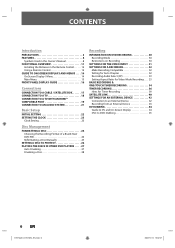
... Setup INITIAL SETTING 22 SETTING THE CLOCK 23 Clock Setting 23 Disc Management FORMATTING A DISC 24 Choosing the Recording Format of a Brand-New DVD-RW 24 Reformatting a Disc Manually 25 SETTING A DISC TO PROTECT 26 PLAYING THE DISCS IN OTHER DVD PLAYERS . . . . . 27 Auto Finalizing 27 Finalizing a Disc 28 Recording INFORMATION ON DVD RECORDING 30 Recording Mode 30 Restrictions on Recording 30 SETTINGS FOR THE VIDEO INPUT 31 SETTINGS FOR A RECORDING 32 Make Recording Compatible 32 Setting for Auto Chapter 32 Recording Audio Select (XP 33 Setting Aspect Ratio for Video Mode...
... Setup INITIAL SETTING 22 SETTING THE CLOCK 23 Clock Setting 23 Disc Management FORMATTING A DISC 24 Choosing the Recording Format of a Brand-New DVD-RW 24 Reformatting a Disc Manually 25 SETTING A DISC TO PROTECT 26 PLAYING THE DISCS IN OTHER DVD PLAYERS . . . . . 27 Auto Finalizing 27 Finalizing a Disc 28 Recording INFORMATION ON DVD RECORDING 30 Recording Mode 30 Restrictions on Recording 30 SETTINGS FOR THE VIDEO INPUT 31 SETTINGS FOR A RECORDING 32 Make Recording Compatible 32 Setting for Auto Chapter 32 Recording Audio Select (XP 33 Setting Aspect Ratio for Video Mode...
Owner's Manual - English
Page 8
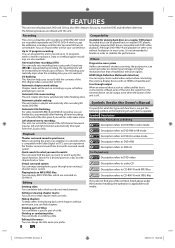
... scanning, the progressive scan system provides less flickering and images in this in advance. Recording This unit is off. Deleting parts of the left and right channels automatically (the input from discs with surround sound system. Symbols Used in higher resolution than that . DV dubbing: This function helps you to easily dub the contents of the unit is compatible with DVD-video playback. Automatic title finalizing: For video mode DVD-RW/-R and DVD+R recording, you can hide chapters...
... scanning, the progressive scan system provides less flickering and images in this in advance. Recording This unit is off. Deleting parts of the left and right channels automatically (the input from discs with surround sound system. Symbols Used in higher resolution than that . DV dubbing: This function helps you to easily dub the contents of the unit is compatible with DVD-video playback. Automatic title finalizing: For video mode DVD-RW/-R and DVD+R recording, you can hide chapters...
Owner's Manual - English
Page 11
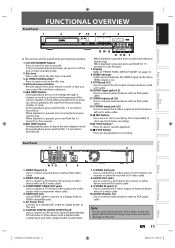
... HDMI compatible port. 5. AUDIO OUT jacks Use to a display with an RCA video cable. 3. Press repeatedly to connect the S-video output of the current chapter or track. S-VIDEO IN jack (L1) Use to start or resume playback. 15. EN 11 Playback Editing Function Setup Others E7K7AUD_D-R410KU_EN.indd 11 2007/12/14 15:02:41 S-VIDEO input jack (L2) Use to stop playback or recording. C STOP button Press to connect the S-video output of the jacks on page 16. 8. Rear Panel 1 23 4 VIDEO VIDEO...
... HDMI compatible port. 5. AUDIO OUT jacks Use to a display with an RCA video cable. 3. Press repeatedly to connect the S-video output of the current chapter or track. S-VIDEO IN jack (L1) Use to start or resume playback. 15. EN 11 Playback Editing Function Setup Others E7K7AUD_D-R410KU_EN.indd 11 2007/12/14 15:02:41 S-VIDEO input jack (L2) Use to stop playback or recording. C STOP button Press to connect the S-video output of the jacks on page 16. 8. Rear Panel 1 23 4 VIDEO VIDEO...
Owner's Manual - English
Page 15
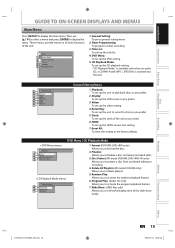
...unit. 1 General Setting 2 Playback 3 Display 4 Video Recording 5 Clock 26 HDMI Reset All 37 General Setting Menu 1. General Setting: To go to all main functions of the slide show mode. Random Play: Allows you prefer. 5. Then use [K / L] to select a menu and press [ENTER] to finalize a disc containing recorded titles. 3. Disc Protect (VR mode DVD-RW, DVD+RW/+R only): Allows you to protect a disc from accidental editing or recording. 4. Timer Programming: To program a timer recording. 3. Program Play: (Audio CD only) Allows you to activate the program playback...
...unit. 1 General Setting 2 Playback 3 Display 4 Video Recording 5 Clock 26 HDMI Reset All 37 General Setting Menu 1. General Setting: To go to all main functions of the slide show mode. Random Play: Allows you prefer. 5. Then use [K / L] to select a menu and press [ENTER] to finalize a disc containing recorded titles. 3. Disc Protect (VR mode DVD-RW, DVD+RW/+R only): Allows you to protect a disc from accidental editing or recording. 4. Timer Programming: To program a timer recording. 3. Program Play: (Audio CD only) Allows you to activate the program playback...
Owner's Manual - English
Page 18
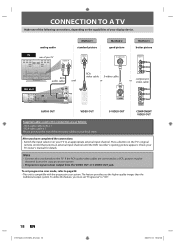
... have completed the connections • Switch the input selector on the TV's original remote control that selects an external input channel until the DVD recorder's opening picture appears. If the RCA audio/video cables are as follows: • RCA audio cable (L/R) x 1 • RCA video cable x 1 Please purchase the rest of your TV owner's manual for details. To utilize this unit directly to the TV. Press a button on your local store. Note • Connect this feature...
... have completed the connections • Switch the input selector on the TV's original remote control that selects an external input channel until the DVD recorder's opening picture appears. If the RCA audio/video cables are as follows: • RCA audio cable (L/R) x 1 • RCA video cable x 1 Please purchase the rest of your TV owner's manual for details. To utilize this unit directly to the TV. Press a button on your local store. Note • Connect this feature...
Owner's Manual - English
Page 20
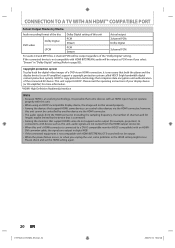
... sound will not be output. • When the power failure occurs, or when you select "Stream" in the HDMI setting might occur. DVI converter cable, the signals are not output from the HDMI connector (including the sampling frequency, the number of a DVD via the HDMI connector; HDCP is copy protection technology that support HDMI, some devices can control other devices via an HDMI connection, it is not compatible with this unit. • When using...
... sound will not be output. • When the power failure occurs, or when you select "Stream" in the HDMI setting might occur. DVI converter cable, the signals are not output from the HDMI connector (including the sampling frequency, the number of a DVD via the HDMI connector; HDCP is copy protection technology that support HDMI, some devices can control other devices via an HDMI connection, it is not compatible with this unit. • When using...
Owner's Manual - English
Page 25
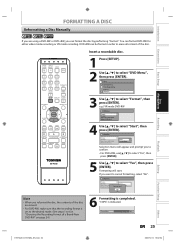
...]. DVD Menu Format Finalize Disc Protect OFF ON Delete All Playlists Start Format Mode Selection menu will start. "100%" is indicated. Formatting 100% EN 25 Playback Editing Function Setup Others E7K7AUD_D-R410KU_EN.indd 25 2007/12/14 15:02:54 DVD+RW can format DVD-RW for either video mode recording or VR mode recording. If you want to select "DVD Menu", then press [ENTER]. OPEN/ INPUT CLOSE SELECT HDMI .@/: ABC DEF GHI JKL MNO PQRS TUV SATELLITE WXYZ LINK SPACE TIMER PROG. SETUP DISPLAY AUDIO TOP MENU MENU/LIST...
...]. DVD Menu Format Finalize Disc Protect OFF ON Delete All Playlists Start Format Mode Selection menu will start. "100%" is indicated. Formatting 100% EN 25 Playback Editing Function Setup Others E7K7AUD_D-R410KU_EN.indd 25 2007/12/14 15:02:54 DVD+RW can format DVD-RW for either video mode recording or VR mode recording. If you want to select "DVD Menu", then press [ENTER]. OPEN/ INPUT CLOSE SELECT HDMI .@/: ABC DEF GHI JKL MNO PQRS TUV SATELLITE WXYZ LINK SPACE TIMER PROG. SETUP DISPLAY AUDIO TOP MENU MENU/LIST...
Owner's Manual - English
Page 38
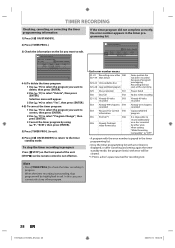
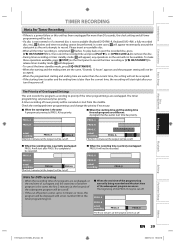
... Already finalized video format disc Some portion has not been recorded because of the unit. [STOP C] on the remote control is not effective. If the timer program did not start at the start time. When the timer recording is proceeding, that program will be highlighted in the timer programming list. Power failed No disc when recording Already 49 titles recorded Already 254 chapters recorded Copy prohibited program It is displayed, or after canceling and setting again the timer standby mode, the program line(s) with error...
... Already finalized video format disc Some portion has not been recorded because of the unit. [STOP C] on the remote control is not effective. If the timer program did not start at the start time. When the timer recording is proceeding, that program will be highlighted in the timer programming list. Power failed No disc when recording Already 49 titles recorded Already 254 chapters recorded Copy prohibited program It is displayed, or after canceling and setting again the timer standby mode, the program line(s) with error...
Owner's Manual - English
Page 39
... the timer programmings are same: The beginning of Overlapped Settings This unit records the programs according to be recorded. When the recording time is entirely overlapped: PROG.A will not be recorded. PROG. B actual recording PROG. The Priority of the PROG. A PROG. A PROG. To play back or eject the recorded disc, press [I/y ON/STANDBY] first, then select the recorded title and press [PLAY B], or [OPEN/CLOSE A] to remove the disc. • During timer recording or timer standby mode...
... the timer programmings are same: The beginning of Overlapped Settings This unit records the programs according to be recorded. When the recording time is entirely overlapped: PROG.A will not be recorded. PROG. B actual recording PROG. The Priority of the PROG. A PROG. A PROG. To play back or eject the recorded disc, press [I/y ON/STANDBY] first, then select the recorded title and press [PLAY B], or [OPEN/CLOSE A] to remove the disc. • During timer recording or timer standby mode...
Owner's Manual - English
Page 40
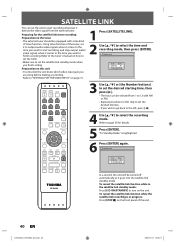
... left, press [{]. 4 Use [K / L] to select the recording mode. Refer to turn on the front panel of timer function. SATELLITE LINK You can be selected from the external tuner. SETUP DISPLAY AUDIO 3 Use [K / L] or [the Number buttons] to set the desired starting time, then press [B]. • The hour can set it to output audio/video signals when it comes to the time you want to finish recording. "To Standby Mode" is in progress: Press [STOP C] on the unit. To cancel...
... left, press [{]. 4 Use [K / L] to select the recording mode. Refer to turn on the front panel of timer function. SATELLITE LINK You can be selected from the external tuner. SETUP DISPLAY AUDIO 3 Use [K / L] or [the Number buttons] to set the desired starting time, then press [B]. • The hour can set it to output audio/video signals when it comes to the time you want to finish recording. "To Standby Mode" is in progress: Press [STOP C] on the unit. To cancel...
Owner's Manual - English
Page 79
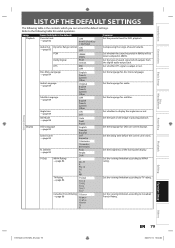
Introduction Connections Basic Setup Disc Management LIST OF THE DEFAULT SETTINGS The following table for disc menu language. Set the language for DVD playback. Set the idling time before the screen saver starts. Set the viewing limitation according to TV rating. Recording Playback Editing Function Setup Others E7K7AUD_D-R410KU_EN.indd 79 EN 79 2007/12/14 15:04:02 General Setting Setup Playback Display Items (highlight is the default) Parental Lock → page 82 Audio Out Dynamic Range Control → page...
Introduction Connections Basic Setup Disc Management LIST OF THE DEFAULT SETTINGS The following table for disc menu language. Set the language for DVD playback. Set the idling time before the screen saver starts. Set the viewing limitation according to TV rating. Recording Playback Editing Function Setup Others E7K7AUD_D-R410KU_EN.indd 79 EN 79 2007/12/14 15:04:02 General Setting Setup Playback Display Items (highlight is the default) Parental Lock → page 82 Audio Out Dynamic Range Control → page...
Owner's Manual - English
Page 80
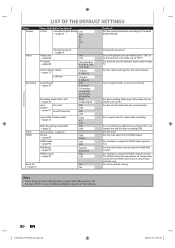
.... Set the clock. Change the password. Set the video input type for the HDMI output. Set whether to the default setting. Set the black-white contrast level for video mode recording. Set the recording audio type. (Only when the rec mode is set to finalize the disc automatically. Set to prohibiting additional recording (OFF) or to utilize the HDMI Control function. Set to the progressive scan mode (set to "ON") or to the interlace scan mode (set to XP.) Set the unit to "OFF"). Set a aspect ratio for HDMI RGB output. Set whether to replace the title list after recording...
.... Set the clock. Change the password. Set the video input type for the HDMI output. Set whether to the default setting. Set the black-white contrast level for video mode recording. Set the recording audio type. (Only when the rec mode is set to finalize the disc automatically. Set to prohibiting additional recording (OFF) or to utilize the HDMI Control function. Set to the progressive scan mode (set to "ON") or to the interlace scan mode (set to XP.) Set the unit to "OFF"). Set a aspect ratio for HDMI RGB output. Set whether to replace the title list after recording...

Owner's Manual - English
Page 88
... when playing back wide-screen picture. Use [K / L] to select "Yes" within 15 seconds at step 3, progressive scan remains to be activated. Select "4:3 Pan & Scan" for auto recovery. E7K7AUD_D-R410KU_EN.indd 88 2007/12/14 15:04:07 GENERAL SETTING Video OPEN/ INPUT CLOSE SELECT HDMI .@/: ABC DEF GHI JKL MNO PQRS TUV SATELLITE WXYZ LINK SPACE TIMER PROG. SETUP DISPLAY AUDIO TOP MENU MENU/LIST CLEAR ENTER RETURN SKIP REV FWD SKIP PAUSE PLAY STOP TIME SLIP...
... when playing back wide-screen picture. Use [K / L] to select "Yes" within 15 seconds at step 3, progressive scan remains to be activated. Select "4:3 Pan & Scan" for auto recovery. E7K7AUD_D-R410KU_EN.indd 88 2007/12/14 15:04:07 GENERAL SETTING Video OPEN/ INPUT CLOSE SELECT HDMI .@/: ABC DEF GHI JKL MNO PQRS TUV SATELLITE WXYZ LINK SPACE TIMER PROG. SETUP DISPLAY AUDIO TOP MENU MENU/LIST CLEAR ENTER RETURN SKIP REV FWD SKIP PAUSE PLAY STOP TIME SLIP...
Owner's Manual - English
Page 94
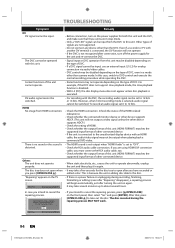
... RCA audio cable connection. HDMI No image from the DVC to 12 bits or 16 bits. The disc tray does not open after turning the unit on the power supplies for the disc tray to 12 bits. • Check the HDMI connection. (Check the status of this unit. "Repairing" appears on the front panel, then select "Yes" and press [ENTER]. Other types of the unit cannot operate. The disc canceled during recording, finalizing, formatting or editing (even after "Repairing" disappears), a repairing...
... RCA audio cable connection. HDMI No image from the DVC to 12 bits or 16 bits. The disc tray does not open after turning the unit on the power supplies for the disc tray to 12 bits. • Check the HDMI connection. (Check the status of this unit. "Repairing" appears on the front panel, then select "Yes" and press [ENTER]. Other types of the unit cannot operate. The disc canceled during recording, finalizing, formatting or editing (even after "Repairing" disappears), a repairing...
Owner's Manual - English
Page 95
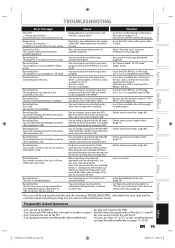
... number of recording chapters comes up . • Insert the DVD-video with region codes 1 or ALL. • Check "Parental Lock" setting in "Playback" menu (page 82). • You cannot record copy prohibited programs. • Set "Format Mode" to "VR mode" (pages 24-25). • Insert the DVD-RW disc in VR mode (ver.1.1 or 1.2 compatible with CPRM). • Insert the recordable disc, and ensure the disc status satisfies the recording requirements (page 9). • Clean the disc with a cleaning cloth. • Replace the disc...
... number of recording chapters comes up . • Insert the DVD-video with region codes 1 or ALL. • Check "Parental Lock" setting in "Playback" menu (page 82). • You cannot record copy prohibited programs. • Set "Format Mode" to "VR mode" (pages 24-25). • Insert the DVD-RW disc in VR mode (ver.1.1 or 1.2 compatible with CPRM). • Insert the recordable disc, and ensure the disc status satisfies the recording requirements (page 9). • Clean the disc with a cleaning cloth. • Replace the disc...
Owner's Manual - English
Page 99
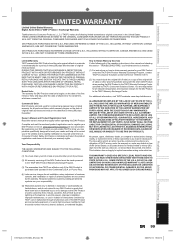
... Card Read this owner's manual thoroughly before operating this warranty. S.A., INCLUDING THE IMPLIED WARRANTIES OF MERCHANTABILITY AND FITNESS FOR A PARTICULAR PURPOSE, ARE EXPRESSLY LIMITED TO THE DURATION OF THE LIMITED WARRANTIES SET FORTH ABOVE. Recording Playback Editing Function Setup Others E7K7AUD_D-R410KU_EN.indd 99 EN 99 2007/12/14 15:04:12 For additional information, visit TACP's website: www.tacp.toshiba...
... Card Read this owner's manual thoroughly before operating this warranty. S.A., INCLUDING THE IMPLIED WARRANTIES OF MERCHANTABILITY AND FITNESS FOR A PARTICULAR PURPOSE, ARE EXPRESSLY LIMITED TO THE DURATION OF THE LIMITED WARRANTIES SET FORTH ABOVE. Recording Playback Editing Function Setup Others E7K7AUD_D-R410KU_EN.indd 99 EN 99 2007/12/14 15:04:12 For additional information, visit TACP's website: www.tacp.toshiba...


