Printable Spec Sheet
Page 1
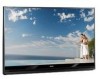
...feature that turns the TV off if you won't have to wait to 75%, this system doubles the contrast of our TALEN™ XHD models for deeper, more three-dimensional images. Utilizing DLP® chip technology from Texas Instruments, and advanced optics, Toshiba micro-display projection TVs bring home... a Quick Restart™ feature, ensuring you fall asleep and the signal turns to scale down a 1080 signal. Convenience Suite - By increasing black levels by up to enjoy the show. PRELIMINARY 65HM167 65" Diagonal 1080p DLP® TV shown on optional stand ST6587 1080p Full HD Display -
...feature that turns the TV off if you won't have to wait to 75%, this system doubles the contrast of our TALEN™ XHD models for deeper, more three-dimensional images. Utilizing DLP® chip technology from Texas Instruments, and advanced optics, Toshiba micro-display projection TVs bring home... a Quick Restart™ feature, ensuring you fall asleep and the signal turns to scale down a 1080 signal. Convenience Suite - By increasing black levels by up to enjoy the show. PRELIMINARY 65HM167 65" Diagonal 1080p DLP® TV shown on optional stand ST6587 1080p Full HD Display -
Service Manual
Page 4
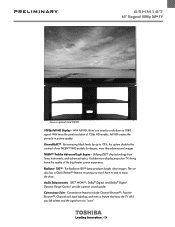
... and hold button down. Ļ Service Mode display 3. While holding the MUTE button, press MENU button on the adjusting item. The variable range depends on TV set. Set VOLUME to FFH. Exiting Service Mode Press the POWER button once to...
... and hold button down. Ļ Service Mode display 3. While holding the MUTE button, press MENU button on the adjusting item. The variable range depends on TV set. Set VOLUME to FFH. Exiting Service Mode Press the POWER button once to...
Service Manual
Page 6
... generally decrease over the expected service life and will not operate until the lamp unit is generally the case with all projection TVs that can affect the useful service life of the lamp, your experience may result in the colors and/or brightness of the many variables that ... light source for safe replacement by this happens). If you use and user settings. however, if the lamp unit is a mercury lamp with care. Turn off the TV and unplug the power cord before it has cooled will be reduced and the lamp may break, exposing sharp edges or pinch points. CAUTION...
... generally decrease over the expected service life and will not operate until the lamp unit is generally the case with all projection TVs that can affect the useful service life of the lamp, your experience may result in the colors and/or brightness of the many variables that ... light source for safe replacement by this happens). If you use and user settings. however, if the lamp unit is a mercury lamp with care. Turn off the TV and unplug the power cord before it has cooled will be reduced and the lamp may break, exposing sharp edges or pinch points. CAUTION...
Service Manual
Page 7
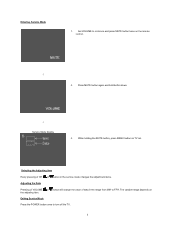
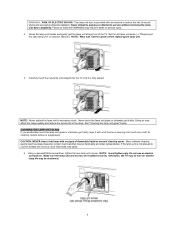
...: NEVER clean a hot lamp with an interlock to reduce the risk of electric shock and excessive ultraviolet radiation. NOTE: Hand-tighten only. Otherwise, the TV may ignite. 6. Set the old lamp unit aside (-> "Disposing of the lamp. CLEANING THE LAMP UNIT GLASS If you accidentally touch the lamp unit glass...the service life of the used lamp unit" on and the lamp life may be flammable at least one (1) hour, such chemicals may no turn on Owners' Manual). Failure to excessive shock. Grasp the lamp unit handle and gently pull the lamp unit straight out of flammable liquid or ...
...: NEVER clean a hot lamp with an interlock to reduce the risk of electric shock and excessive ultraviolet radiation. NOTE: Hand-tighten only. Otherwise, the TV may ignite. 6. Set the old lamp unit aside (-> "Disposing of the lamp. CLEANING THE LAMP UNIT GLASS If you accidentally touch the lamp unit glass...the service life of the used lamp unit" on and the lamp life may be flammable at least one (1) hour, such chemicals may no turn on Owners' Manual). Failure to excessive shock. Grasp the lamp unit handle and gently pull the lamp unit straight out of flammable liquid or ...
Service Manual
Page 8
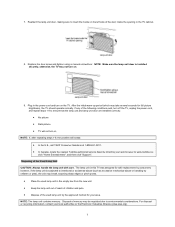
... the lamp unit door is subjected to ensure that the lamp unit and lamp unit door are installed correctly: x No picture x Dark picture x TV will not turn on the TV. Disposing of children and pets. NOTE: The lamp unit contains mercury. Disposal of the used lamp unit in the.... 8. The lamp unit in the power cord and turn off the TV, unplug the power cord, and repeat steps 1-9 to intentional or accidental abuse (such as excessive mechanical abuse or handling by directing your web browser to www.toshiba.ca; however, if the lamp unit is installed securely; x Dispose of ...
... the lamp unit door is subjected to ensure that the lamp unit and lamp unit door are installed correctly: x No picture x Dark picture x TV will not turn on the TV. Disposing of children and pets. NOTE: The lamp unit contains mercury. Disposal of the used lamp unit in the.... 8. The lamp unit in the power cord and turn off the TV, unplug the power cord, and repeat steps 1-9 to intentional or accidental abuse (such as excessive mechanical abuse or handling by directing your web browser to www.toshiba.ca; however, if the lamp unit is installed securely; x Dispose of ...

Service Manual
Page 17
x Prepare FW and data in . Firmware and Data Updating After SEINE unit changed, perform the following . x After replacing SEINE or Main unit, perform the following . 16 x Insert SD card and then plug AC in the SD card media. LED Indication During the Software Updating Three LED indicators show the updating progress or status. FIRMWARE AND DATA UPLOADING CONCEPT WARNING: All application and program data will be upgraded. DO NOT upgrade while the TV is turned ON.
x Prepare FW and data in . Firmware and Data Updating After SEINE unit changed, perform the following . x After replacing SEINE or Main unit, perform the following . 16 x Insert SD card and then plug AC in the SD card media. LED Indication During the Software Updating Three LED indicators show the updating progress or status. FIRMWARE AND DATA UPLOADING CONCEPT WARNING: All application and program data will be upgraded. DO NOT upgrade while the TV is turned ON.
Service Manual
Page 19
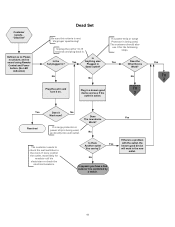
... . Customer reports.. "Dead Set" Defined as no Power, no picture, and no sound using Remote Control and Power button. (No LED indication) Dead Set 2007 Toshiba DLP Television DLP-07-1 Be sure this criteria is controlled by a switch. Is the Yes Set plugged in the new outlet. If a power strip or... it No Work now? Yes If there is being used , The customer should also use it for 10-15 seconds and plug back in and turn it on.
... . Customer reports.. "Dead Set" Defined as no Power, no picture, and no sound using Remote Control and Power button. (No LED indication) Dead Set 2007 Toshiba DLP Television DLP-07-1 Be sure this criteria is controlled by a switch. Is the Yes Set plugged in the new outlet. If a power strip or... it No Work now? Yes If there is being used , The customer should also use it for 10-15 seconds and plug back in and turn it on.
Service Manual
Page 22
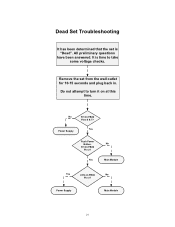
Power Supply Main Module ” 2007 Toshiba America Consumer Products, LLC. 8 of 12 21 SMART2007003_Version 20Q DLP_1.0.4 No 5V On PB80 Pins 6 & 7? It is "Dead". Yes Power Supply Push Power Button. 3V On PB80 Pin 2? Yes No Main Module Yes 2.6V on at this time. All preliminary questions have been answered. Remove the set is time to turn it on PB80 No Pin 3? Do not attempt to take some voltage checks. Dead Set Troubleshooting It has been determined that the set from the wall outlet for 10-15 seconds and plug back in.
Power Supply Main Module ” 2007 Toshiba America Consumer Products, LLC. 8 of 12 21 SMART2007003_Version 20Q DLP_1.0.4 No 5V On PB80 Pins 6 & 7? It is "Dead". Yes Power Supply Push Power Button. 3V On PB80 Pin 2? Yes No Main Module Yes 2.6V on at this time. All preliminary questions have been answered. Remove the set is time to turn it on PB80 No Pin 3? Do not attempt to take some voltage checks. Dead Set Troubleshooting It has been determined that the set from the wall outlet for 10-15 seconds and plug back in.
Owners Manual
Page 3
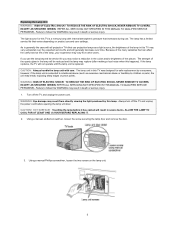
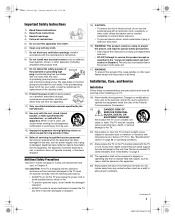
...or vibration; When a cart is dropped and the cabinet or enclosure surface has been damaged or the TV does not operate normally, take the following precautions: • ALWAYS turn off the TV and unplug the power cord to avoid possible electric shock or fire. • To prevent personal injury,...the apparatus. 23) Always place the back of fire, keep candles or other . fully insert. 16) WARNING: This product contains a lamp to project the picture, and requires special safety precautions: • See Chapter 9 for your outlet, consult an electrician for long periods of Wide blade the ...
...or vibration; When a cart is dropped and the cabinet or enclosure surface has been damaged or the TV does not operate normally, take the following precautions: • ALWAYS turn off the TV and unplug the power cord to avoid possible electric shock or fire. • To prevent personal injury,...the apparatus. 23) Always place the back of fire, keep candles or other . fully insert. 16) WARNING: This product contains a lamp to project the picture, and requires special safety precautions: • See Chapter 9 for your outlet, consult an electrician for long periods of Wide blade the ...
Owners Manual
Page 4
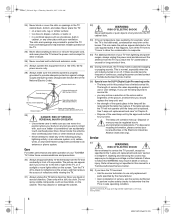
...near overhead power lines or other electrical circuits. • Never attempt to install any kind into the TV cabinet slots. 33) If the air temperature rises suddenly (for your TOSHIBA TV, follow this equipment from the TV and as directly in the colors and/or brightness of it as a ladder or screwdriver) can ... AM 24) Never block or cover the slots or openings in the lamp will not operate until the lamp unit is being turned on or off. Never place the TV: • on a bed, sofa, rug, or similar surface; • too close to an antenna or phone system. and • the strength...
...near overhead power lines or other electrical circuits. • Never attempt to install any kind into the TV cabinet slots. 33) If the air temperature rises suddenly (for your TOSHIBA TV, follow this equipment from the TV and as directly in the colors and/or brightness of it as a ladder or screwdriver) can ... AM 24) Never block or cover the slots or openings in the lamp will not operate until the lamp unit is being turned on or off. Never place the TV: • on a bed, sofa, rug, or similar surface; • too close to an antenna or phone system. and • the strength...
Owners Manual
Page 6
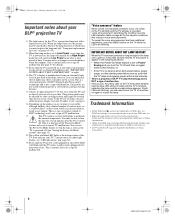
..." on page 4. 6) Depending on the media you are blinking, you will switch to get hot, it is NOT a sign of TV malfunction. "Lamp unit replacement and care" on pages 63-65). 2) When the lamp mode is set the Power-On Mode feature to stop the fans as soon as directly in screen... feet away from the TV and as the TV is turned off and then on again within a few minutes; The picture quality may be in but will need to the TV for this happens. 50HM67_EN.book Page 6 Thursday, March 29, 2007 11:28 AM Important notes about your DLP® projection TV 1) The light source for...
..." on page 4. 6) Depending on the media you are blinking, you will switch to get hot, it is NOT a sign of TV malfunction. "Lamp unit replacement and care" on pages 63-65). 2) When the lamp mode is set the Power-On Mode feature to stop the fans as soon as directly in screen... feet away from the TV and as the TV is turned off and then on again within a few minutes; The picture quality may be in but will need to the TV for this happens. 50HM67_EN.book Page 6 Thursday, March 29, 2007 11:28 AM Important notes about your DLP® projection TV 1) The light source for...
Owners Manual
Page 11
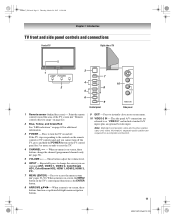
...and connections Front of TV Right side of the TV screen (- Repeatedly press to instantly close an on page 62 for a complete connection. 11 HM67 (E/F) Web 213:276 Press to the controls on -screen, these buttons change the source you cannot turn the TV on and off the TV, press and hold the... POWER button on the TV control panel for 5 or more seconds to as the ENTER button. 8 ARROWS BbC c - Press to change ...
...and connections Front of TV Right side of the TV screen (- Repeatedly press to instantly close an on page 62 for a complete connection. 11 HM67 (E/F) Web 213:276 Press to the controls on -screen, these buttons change the source you cannot turn the TV on and off the TV, press and hold the... POWER button on the TV control panel for 5 or more seconds to as the ENTER button. 8 ARROWS BbC c - Press to change ...

Owners Manual
Page 14
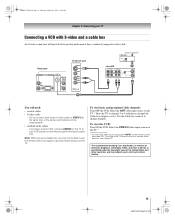
...civil and criminal liability. 14 HM67 (E/F) Web 213:276 Select the VIDEO 1 video input source on the TV.* * To select the video input source, press INPUT on the TV.* To view the VCR: Turn ON the VCR. page 23). The unauthorized recording, use an S-video cable (plus the audio cables) to... VIDEO 2 on the TV to your VCR has S-video, use , distribution, or revision of television programs, videotapes, DVDs,...
...civil and criminal liability. 14 HM67 (E/F) Web 213:276 Select the VIDEO 1 video input source on the TV.* * To select the video input source, press INPUT on the TV.* To view the VCR: Turn ON the VCR. page 23). The unauthorized recording, use an S-video cable (plus the audio cables) to... VIDEO 2 on the TV to your VCR has S-video, use , distribution, or revision of television programs, videotapes, DVDs,...
Owners Manual
Page 15
...of the United States and other devices, see Chapter 3. If you to civil and criminal liability. 15 HM67 (E/F) Web 213:276 To view the VCR: Turn ON the VCR. page 23). The unauthorized recording, use the remote control to program or access certain features on the..., or revision of video cable to change channels. Do not connect both types of television programs, videotapes, DVDs, and other materials is set to your TV Connecting a VCR with S-video and a cable box An S-video connection will provide better picture performance than a standard (composite) video cable. To view basic and ...
...of the United States and other devices, see Chapter 3. If you to civil and criminal liability. 15 HM67 (E/F) Web 213:276 To view the VCR: Turn ON the VCR. page 23). The unauthorized recording, use the remote control to program or access certain features on the..., or revision of video cable to change channels. Do not connect both types of television programs, videotapes, DVDs, and other materials is set to your TV Connecting a VCR with S-video and a cable box An S-video connection will provide better picture performance than a standard (composite) video cable. To view basic and ...
Owners Manual
Page 16
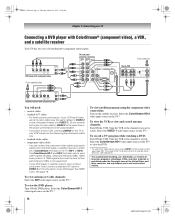
... on the satellite receiver. Do not connect both types of to your VCR's audio out terminal using the component video connections: Turn on the TV.* To record a TV program while watching a DVD: Turn ON the VCR. If your DVD player or satellite receiver does not have a mono VCR, connect L/MONO on the... panel. page 23). If your DVD player has HDMI video, see Chapter 3. Select the ColorStream HD-2 video input source on the TV.* To view the DVD player: Turn ON the DVD player. Tune the VCR to the channel to VIDEO 2 on the remote control (- To view antenna or Cable channels...
... on the satellite receiver. Do not connect both types of to your VCR's audio out terminal using the component video connections: Turn on the TV.* To record a TV program while watching a DVD: Turn ON the VCR. If your DVD player or satellite receiver does not have a mono VCR, connect L/MONO on the... panel. page 23). If your DVD player has HDMI video, see Chapter 3. Select the ColorStream HD-2 video input source on the TV.* To view the DVD player: Turn ON the DVD player. Tune the VCR to the channel to VIDEO 2 on the remote control (- To view antenna or Cable channels...
Owners Manual
Page 17
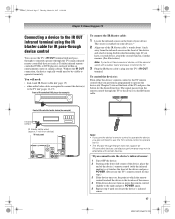
...have a second device, attach the second wand in a similar manner. (See illustration.) Note: If you cannot locate the device's infrared sensor: 1 Turn OFF the device. 2 Starting at the lower left corner of the device, place the end of the device's remote control (with a rubber band ...does not support all IR-controlled devices; satisfactory performance may not be visible to operate the TV. • The IR pass-through the TV) many infrared remote-controlled devices (such as Toshiba infrared remotecontrolled VCRs or DVD players) enclosed within an entertainment center or similar cabinet. You...
...have a second device, attach the second wand in a similar manner. (See illustration.) Note: If you cannot locate the device's infrared sensor: 1 Turn OFF the device. 2 Starting at the lower left corner of the device, place the end of the device's remote control (with a rubber band ...does not support all IR-controlled devices; satisfactory performance may not be visible to operate the TV. • The IR pass-through the TV) many infrared remote-controlled devices (such as Toshiba infrared remotecontrolled VCRs or DVD players) enclosed within an entertainment center or similar cabinet. You...
Owners Manual
Page 19
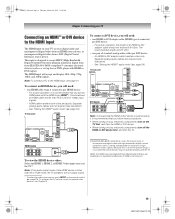
... device - Because this is an evolving technology, it is recommended that you follow these procedures: • When turning on your electronic components, turn on your electronic components, turn off your TV receives digital audio and uncompressed digital video from an HDMI source device, or uncompressed digital video from EIA/CEA-861...8482; or DVI device to the HDMI input The HDMI input on the TV first, and then the HDMI or DVI device. • When turning off the HDMI or DVI device first, and then the TV. For proper operation, it is possible that some devices may not operate ...
... device - Because this is an evolving technology, it is recommended that you follow these procedures: • When turning on your electronic components, turn on your electronic components, turn off your TV receives digital audio and uncompressed digital video from an HDMI source device, or uncompressed digital video from EIA/CEA-861...8482; or DVI device to the HDMI input The HDMI input on the TV first, and then the HDMI or DVI device. • When turning off the HDMI or DVI device first, and then the TV. For proper operation, it is possible that some devices may not operate ...
Owners Manual
Page 20
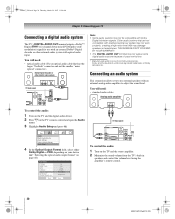
...2: Connecting your device (- You will need : • standard audio cables Analog audio amplifier LINE IN LR To control the audio: 1 Turn on the TV and the digital audio device. 2 Press Y on page 48). Audio Setup PC Audio HDMI 1 Audio MTS Language Optical Output Format Dolby ...Digital Dynamic Range Control Reset No Auto Stereo English Dolby Digital Compressed Done To control the audio: 1 Turn on your TV Connecting a digital audio system The TV's DIGITAL AUDIO OUT terminal outputs a Dolby®* Digital g or 2-channel down-mixed PCM (pulse-code modulation) ...
...2: Connecting your device (- You will need : • standard audio cables Analog audio amplifier LINE IN LR To control the audio: 1 Turn on the TV and the digital audio device. 2 Press Y on page 48). Audio Setup PC Audio HDMI 1 Audio MTS Language Optical Output Format Dolby ...Digital Dynamic Range Control Reset No Auto Stereo English Dolby Digital Compressed Done To control the audio: 1 Turn on your TV Connecting a digital audio system The TV's DIGITAL AUDIO OUT terminal outputs a Dolby®* Digital g or 2-channel down-mixed PCM (pulse-code modulation) ...
Owners Manual
Page 23
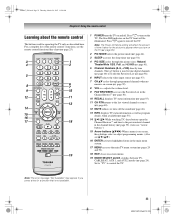
... information as well as program details, when available (- page 24). Note: The error message "Not Available" may appear if you turn on the TV, The blue LED indicator on and off. page 41). 5 Channel Numbers (0-9, -/100) directly tune channels. page 55). 11 CH RTN returns to... used to tune digital channels (- For a complete list of time it takes for a function that is on -screen (- page 25). 1 POWER turns the TV on the TV front will affect the amount of the remote control's functions, see "Arrow buttons.") 15 Arrow buttons (BbC c) When a menu is not available. ...
... information as well as program details, when available (- page 24). Note: The error message "Not Available" may appear if you turn on the TV, The blue LED indicator on and off. page 41). 5 Channel Numbers (0-9, -/100) directly tune channels. page 55). 11 CH RTN returns to... used to tune digital channels (- For a complete list of time it takes for a function that is on -screen (- page 25). 1 POWER turns the TV on the TV front will affect the amount of the remote control's functions, see "Arrow buttons.") 15 Arrow buttons (BbC c) When a menu is not available. ...
Owners Manual
Page 24
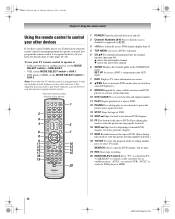
... play or record mode to pause the picture; Note: Even after the TV remote control is not preprogrammed to operate, you must first program the remote control to recognize the device (if you have a non-Toshiba device or a Toshiba device that the remote control is programmed, it may not work on some... To view one program while recording another, press to select TV mode. SET UP Accesses a DVD's setup menu in the CABLE/SAT mode. pages 26-28). Point the remote control directly at the device. 16 17 18 19 1 POWER Turns the selected device on any other devices If you will need...
... play or record mode to pause the picture; Note: Even after the TV remote control is not preprogrammed to operate, you must first program the remote control to recognize the device (if you have a non-Toshiba device or a Toshiba device that the remote control is programmed, it may not work on some... To view one program while recording another, press to select TV mode. SET UP Accesses a DVD's setup menu in the CABLE/SAT mode. pages 26-28). Point the remote control directly at the device. 16 17 18 19 1 POWER Turns the selected device on any other devices If you will need...


