Owner's Manual - English
Page 2
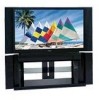
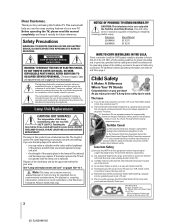
..., bookcases, shelves, desks, audio speakers, chests, or carts. The length of your family and friends. Dispose of this Toshiba TV. For disposal or recycling information, contact your TV (and other enclosed instructions for . Television Stand Model 52HMX95 ST 5275 62HMX95 ST 6275 NOTE TO CATV INSTALLERS IN THE U.S.A. Child Safety It Makes A Difference Where Your...
..., bookcases, shelves, desks, audio speakers, chests, or carts. The length of your family and friends. Dispose of this Toshiba TV. For disposal or recycling information, contact your TV (and other enclosed instructions for . Television Stand Model 52HMX95 ST 5275 62HMX95 ST 6275 NOTE TO CATV INSTALLERS IN THE U.S.A. Child Safety It Makes A Difference Where Your...
Owner's Manual - English
Page 3
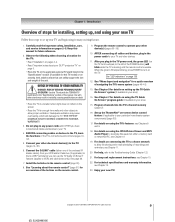
.... areas subject to drapes, curtains, or walls; Never place the TV: • on next page) 3 Important Safety Instructions 1) Read these instructions. 2) Keep these recommendations and precautions and heed all warnings when installing your TV: 17) Never modify this equipment. A grounding type plug has two...TV on a sturdy, level, stable surface that produce heat. 9) Do not defeat the safety purpose of the polarized or grounding type plug. or • in cabinet, or any other place with a dry cloth. 7) Do not block any way, such as power-supply cord or plug is subject to project...
.... areas subject to drapes, curtains, or walls; Never place the TV: • on next page) 3 Important Safety Instructions 1) Read these instructions. 2) Keep these recommendations and precautions and heed all warnings when installing your TV: 17) Never modify this equipment. A grounding type plug has two...TV on a sturdy, level, stable surface that produce heat. 9) Do not defeat the safety purpose of the polarized or grounding type plug. or • in cabinet, or any other place with a dry cloth. 7) Do not block any way, such as power-supply cord or plug is subject to project...
Owner's Manual - English
Page 5
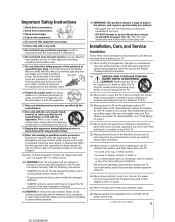
...: • Reorient or relocate the receiving antenna. • Increase the separation between your DLPTM projection TV 1) The light source for help. FCC Declaration of Conformity Compliance Statement (Part 15): The Toshiba 52HMX95 and 62HMX95 DLP™ projection TVs comply with the instructions, may cause harmful interference to radio communications. These limits are blinking, you sit too closely...
...: • Reorient or relocate the receiving antenna. • Increase the separation between your DLPTM projection TV 1) The light source for help. FCC Declaration of Conformity Compliance Statement (Part 15): The Toshiba 52HMX95 and 62HMX95 DLP™ projection TVs comply with the instructions, may cause harmful interference to radio communications. These limits are blinking, you sit too closely...
Owner's Manual - English
Page 8
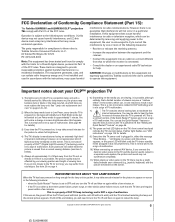
...; 2005 TOSHIBA CORPORATION. See "Important notes about your DLP™ projection TV" on connecting other equipment to your TV. • Please read all safety and operating instructions in most innovative DLP™ projection TVs on the... market. See page 11 for front touchpad and side panel details. Note: After you through setting up the TV Guide On Screen® system (Chapter 5), the program guide opens automatically by connecting a Toshiba Symbio™ Audio/Video Hard Drive Recorder or a D-VHS digital recording device to models 52HMX95 and 62HMX95...
...; 2005 TOSHIBA CORPORATION. See "Important notes about your DLP™ projection TV" on connecting other equipment to your TV. • Please read all safety and operating instructions in most innovative DLP™ projection TVs on the... market. See page 11 for front touchpad and side panel details. Note: After you through setting up the TV Guide On Screen® system (Chapter 5), the program guide opens automatically by connecting a Toshiba Symbio™ Audio/Video Hard Drive Recorder or a D-VHS digital recording device to models 52HMX95 and 62HMX95...
Owner's Manual - English
Page 9
... sharing and e-mail scheduling of the unit. Copyright © 2005 TOSHIBA CORPORATION. Carefully read the important safety, installation, care, and service information on page 125. 12. Use with the TOSHIBA TV stand listed in your other devices. 11. BEFORE connecting cables or ...™ projection TV" on page 5. • Place the TV on the applicable optional TV stand listed in the TV power cord, the green LED (on the remote control. 9. See page 28. 7. All rights reserved. 9 See Chapter 7 for future reference. 2. For lamp unit replacement instructions, see Chapter...
... sharing and e-mail scheduling of the unit. Copyright © 2005 TOSHIBA CORPORATION. Carefully read the important safety, installation, care, and service information on page 125. 12. Use with the TOSHIBA TV stand listed in your other devices. 11. BEFORE connecting cables or ...™ projection TV" on page 5. • Place the TV on the applicable optional TV stand listed in the TV power cord, the green LED (on the remote control. 9. See page 28. 7. All rights reserved. 9 See Chapter 7 for future reference. 2. For lamp unit replacement instructions, see Chapter...
Owner's Manual - English
Page 15
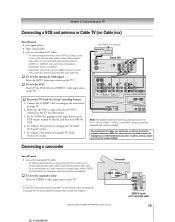
... is selected. See Chapter 5 for details on the TV (see Chapter 3. Select the VIDEO 1 video input source on TV right side panel Copyright © 2005 TOSHIBA CORPORATION. To program the TV remote control to the A/V OUT terminals on setting up the TV Guide On Screen® system. 5. Camcorder VIDEO AUDIO...S-video cable and a standard video cable to your VCR's audio OUT terminal using the TV Guide On Screen® system. Connect the G-LINK® cable according to the instructions on the TV to VIDEO 3 at the same time or the picture performance will be unacceptable. Set ...
... is selected. See Chapter 5 for details on the TV (see Chapter 3. Select the VIDEO 1 video input source on TV right side panel Copyright © 2005 TOSHIBA CORPORATION. To program the TV remote control to the A/V OUT terminals on setting up the TV Guide On Screen® system. 5. Camcorder VIDEO AUDIO...S-video cable and a standard video cable to your VCR's audio OUT terminal using the TV Guide On Screen® system. Connect the G-LINK® cable according to the instructions on the TV to VIDEO 3 at the same time or the picture performance will be unacceptable. Set ...
Owner's Manual - English
Page 16
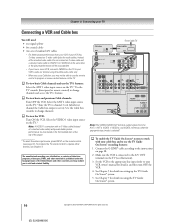
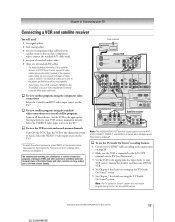
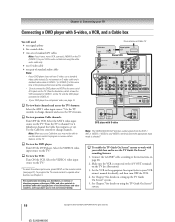
...ON the VCR. Select the VIDEO 1 video input source on the TV.* Note: A VIDEO 1 connection with your cable box and to use the TV Guide On Screen® recording features: 1. Connect the G-LINK® cable according to the instructions on the remote control (see page 72). To view basic and premium... • If you have a mono VCR, connect L/MONO on the TV to your VCR's audio out terminal using the TV Guide On Screen® system. 16 Copyright © 2005 TOSHIBA CORPORATION. See Chapter 7 for details on the TV.* Tune the TV to channel 3 or 4 (whichever channel the Cable box output is set...
...ON the VCR. Select the VIDEO 1 video input source on the TV.* Note: A VIDEO 1 connection with your cable box and to use the TV Guide On Screen® recording features: 1. Connect the G-LINK® cable according to the instructions on the remote control (see page 72). To view basic and premium... • If you have a mono VCR, connect L/MONO on the TV to your VCR's audio out terminal using the TV Guide On Screen® system. 16 Copyright © 2005 TOSHIBA CORPORATION. See Chapter 7 for details on the TV.* Tune the TV to channel 3 or 4 (whichever channel the Cable box output is set...
Owner's Manual - English
Page 17
... input source, press INPUT on the remote control (see illustration). 3. From antenna Signal splitter IN OUT OUT Stereo VCR IN from ANT OUT to TV TV CH 3 CH 4 VIDEO AUDIO LR IN OUT LR From satellite dish Satellite receiver Satellite IN S-VIDEO OUT Y PB PR COMPONENT VIDEO VIDEO OUT ...VIDEO/AUDIO OUT terminals output signals from or for any satellite service. Tune the VCR to the channel you want to the instructions on page 28. 2. Copyright © 2005 TOSHIBA CORPORATION. Do not connect both types of video cable to VIDEO 1 (or VIDEO 2) at the same time or the ...
... input source, press INPUT on the remote control (see illustration). 3. From antenna Signal splitter IN OUT OUT Stereo VCR IN from ANT OUT to TV TV CH 3 CH 4 VIDEO AUDIO LR IN OUT LR From satellite dish Satellite receiver Satellite IN S-VIDEO OUT Y PB PR COMPONENT VIDEO VIDEO OUT ...VIDEO/AUDIO OUT terminals output signals from or for any satellite service. Tune the VCR to the channel you want to the instructions on page 28. 2. Copyright © 2005 TOSHIBA CORPORATION. Do not connect both types of video cable to VIDEO 1 (or VIDEO 2) at the same time or the ...
Owner's Manual - English
Page 18
...VIDEO 2) at the same time or the picture performance will need: one pair of television programs, videotapes, DVDs, and other materials is connected to the instructions on page 28. 2. To view premium Cable channels: Turn OFF the VCR. Note: When you use a Cable box, you may subject you have... the DVD player connected to VIDEO 2.) • If your VCR's audio out terminal using the TV Guide On Screen® system. 18 Copyright © 2005 TOSHIBA CORPORATION. From antenna or Cable TV Cable box OUT CH 3 CH 4 IN from the ANT 1, ANT 2, VIDEO 1, VIDEO 2, and VIDEO 3 terminals when the ...
...VIDEO 2) at the same time or the picture performance will need: one pair of television programs, videotapes, DVDs, and other materials is connected to the instructions on page 28. 2. To view premium Cable channels: Turn OFF the VCR. Note: When you use a Cable box, you may subject you have... the DVD player connected to VIDEO 2.) • If your VCR's audio out terminal using the TV Guide On Screen® system. 18 Copyright © 2005 TOSHIBA CORPORATION. From antenna or Cable TV Cable box OUT CH 3 CH 4 IN from the ANT 1, ANT 2, VIDEO 1, VIDEO 2, and VIDEO 3 terminals when the ...
Owner's Manual - English
Page 19
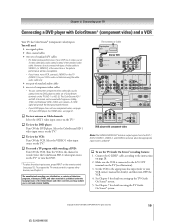
... DVD player does not have a mono VCR, connect L/MONO on the TV (VIDEO 1) to the instructions on using the white audio cable only. Select the ColorStream HD-1 video input source on the TV.* To record a TV program while watching a DVD: Turn ON the VCR. Tune the VCR ... Chapter 5 for details), and then turn OFF the VCR. 4. See Chapter 7 for details on page 28. 2. Copyright © 2005 TOSHIBA CORPORATION. Chapter 2: Connecting your TV Connecting a DVD player with Progressive (480p, 720p) and Interlaced (480i, 1080i) scan systems. A 1080i signal will be used with ColorStream®...
... DVD player does not have a mono VCR, connect L/MONO on the TV (VIDEO 1) to the instructions on using the white audio cable only. Select the ColorStream HD-1 video input source on the TV.* To record a TV program while watching a DVD: Turn ON the VCR. Tune the VCR ... Chapter 5 for details), and then turn OFF the VCR. 4. See Chapter 7 for details on page 28. 2. Copyright © 2005 TOSHIBA CORPORATION. Chapter 2: Connecting your TV Connecting a DVD player with Progressive (480p, 720p) and Interlaced (480i, 1080i) scan systems. A 1080i signal will be used with ColorStream®...
Owner's Manual - English
Page 20
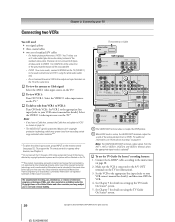
...must be unacceptable. • If VCR 1 has mono audio, connect L/MONO on the TV (VIDEO 1) to the audio out terminal on VCR 1 using the TV Guide On Screen® system. 20 Copyright © 2005 TOSHIBA CORPORATION. See Chapter 5 for details). Use of video cable to VIDEO 1 (or VIDEO... the G-LINK® cable according to the instructions on page 81. To view the antenna or Cable signal: Select the ANT-1 video input source on the TV. *** This product incorporates copyright protection technology that is selected.* To use the TV Guide On Screen® recording features: 1. Reverse...
...must be unacceptable. • If VCR 1 has mono audio, connect L/MONO on the TV (VIDEO 1) to the audio out terminal on VCR 1 using the TV Guide On Screen® system. 20 Copyright © 2005 TOSHIBA CORPORATION. See Chapter 5 for details). Use of video cable to VIDEO 1 (or VIDEO... the G-LINK® cable according to the instructions on page 81. To view the antenna or Cable signal: Select the ANT-1 video input source on the TV. *** This product incorporates copyright protection technology that is selected.* To use the TV Guide On Screen® recording features: 1. Reverse...
Owner's Manual - English
Page 30
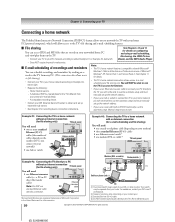
... your modem type) [3] Standard Ethernet (RJ-45) cable [4] Do NOT connect a phone jack directly to the TV's RJ-45 (Ethernet) port. 30 Copyright © 2005 TOSHIBA CORPORATION. For assistance, contact your ISP or an IT professional. [2] Coaxial or telephone cable (depending on your modem... sharing only) TV back panel You will need : one Ethernet crossover cable (i.e., a PC-to-PC direct file transfer cable) Note: Do NOT use a router with built-in the United States and/or other countries. A dedicated POP3 e-mail address for recording device connection instructions. A compatible ...
... your modem type) [3] Standard Ethernet (RJ-45) cable [4] Do NOT connect a phone jack directly to the TV's RJ-45 (Ethernet) port. 30 Copyright © 2005 TOSHIBA CORPORATION. For assistance, contact your ISP or an IT professional. [2] Coaxial or telephone cable (depending on your modem... sharing only) TV back panel You will need : one Ethernet crossover cable (i.e., a PC-to-PC direct file transfer cable) Note: Do NOT use a router with built-in the United States and/or other countries. A dedicated POP3 e-mail address for recording device connection instructions. A compatible ...

Owner's Manual - English
Page 42
... and open the Setup menu. 2. Screen 2: Enter the ZIP code (U.S.A.) or postal code (Canada) for your TV according to the applicable connection instructions in Chapter 2. • If you connected a Toshiba Symbio™ AVHD Recorder, you have a Cable box connected? Screen 3: Do you must first set up your ... Auto Auto 2 Sec Navigate Select CH RTN Back EXIT Exit 3. A new set up TV Guide On Screen® now" and press ENTER to continue. 42 Copyright © 2005 TOSHIBA CORPORATION. Configuring the location of Installation menu icons appears on the remote control for numbers and...
... and open the Setup menu. 2. Screen 2: Enter the ZIP code (U.S.A.) or postal code (Canada) for your TV according to the applicable connection instructions in Chapter 2. • If you connected a Toshiba Symbio™ AVHD Recorder, you have a Cable box connected? Screen 3: Do you must first set up your ... Auto Auto 2 Sec Navigate Select CH RTN Back EXIT Exit 3. A new set up TV Guide On Screen® now" and press ENTER to continue. 42 Copyright © 2005 TOSHIBA CORPORATION. Configuring the location of Installation menu icons appears on the remote control for numbers and...

Owner's Manual - English
Page 45
...TV Guide On Screen® system (continued) Screen 20: If your TV...TV in standby mode when it OFF but do the following: 1. If you may take up the TV... If the TV power cord is not already open the TV Guide On ...the yz buttons to download the TV Guide On Screen® program ...TV screen is incorrect, select "No, repeat setup process" and press ENTER. Chapter 5: TV Guide On Screen® setup Setting up to 24 hours with the TV...exit the TV Guide On Screen® setup and watch TV. Note... select the Setup menu. 3. Press TV GUIDE on -screen instructions. Use the x • buttons ...
...TV Guide On Screen® system (continued) Screen 20: If your TV...TV in standby mode when it OFF but do the following: 1. If you may take up the TV... If the TV power cord is not already open the TV Guide On ...the yz buttons to download the TV Guide On Screen® program ...TV screen is incorrect, select "No, repeat setup process" and press ENTER. Chapter 5: TV Guide On Screen® setup Setting up to 24 hours with the TV...exit the TV Guide On Screen® setup and watch TV. Note... select the Setup menu. 3. Press TV GUIDE on -screen instructions. Use the x • buttons ...

Owner's Manual - English
Page 46
...® setup). Input Configuration Antenna 1 In Antenna 2 In Cancel Cable Antenna Done 6. Highlight Menu Language and press •. 3. Press y or z to your TV For menu navigation instructions, see Chapter 4. To save your preferred menu language and press ENTER. To revert to select your new settings, highlight Done and press ENTER. Note...4. Open the Terrestrial menu, highlight Input Configuration, and press ENTER. 6 Setting up your original settings, highlight Cancel and press ENTER. 46 Copyright © 2005 TOSHIBA CORPORATION. Press EXIT to the ANT 2 input, skip this menu.
...® setup). Input Configuration Antenna 1 In Antenna 2 In Cancel Cable Antenna Done 6. Highlight Menu Language and press •. 3. Press y or z to your TV For menu navigation instructions, see Chapter 4. To save your preferred menu language and press ENTER. To revert to select your new settings, highlight Done and press ENTER. Note...4. Open the Terrestrial menu, highlight Input Configuration, and press ENTER. 6 Setting up your original settings, highlight Cancel and press ENTER. 46 Copyright © 2005 TOSHIBA CORPORATION. Press EXIT to the ANT 2 input, skip this menu.

Owner's Manual - English
Page 58
...58 Copyright © 2005 TOSHIBA CORPORATION. To turn on the TV. rather, such data is provided by selecting it can receive current program data for your antenna, cable box, and/or recording device, see Chapter 2 for connection instructions. It is recommended that you...TV Guide On Screen® data; 7 Using the TV Guide On Screen® interactive program guide The TV Guide On Screen® system is a free, interactive, on-screen program guide built in to your Toshiba TV that lists schedules and information for TV programs in your devices according to the connection instructions...
...58 Copyright © 2005 TOSHIBA CORPORATION. To turn on the TV. rather, such data is provided by selecting it can receive current program data for your antenna, cable box, and/or recording device, see Chapter 2 for connection instructions. It is recommended that you...TV Guide On Screen® data; 7 Using the TV Guide On Screen® interactive program guide The TV Guide On Screen® system is a free, interactive, on-screen program guide built in to your Toshiba TV that lists schedules and information for TV programs in your devices according to the connection instructions...

Owner's Manual - English
Page 62
...of the highlighted show (if the show airs in the future). Be sure to follow the instructions under "TV Guide On Screen® Reminder" on now), highlight the show to download the entire TV Guide On Screen® program schedule. Set a show and press ENTER. • To...tune to display a help screen. Read show currently airing - Tune directly to record a program for a particular show, highlight a show . 62 Copyright © 2005 TOSHIBA CORPORATION. GO TO SERVICE BAR: Closes the menu, changes no information, and returns to the highlighted show and press MENU. • With ...
...of the highlighted show (if the show airs in the future). Be sure to follow the instructions under "TV Guide On Screen® Reminder" on now), highlight the show to download the entire TV Guide On Screen® program schedule. Set a show and press ENTER. • To...tune to display a help screen. Read show currently airing - Tune directly to record a program for a particular show, highlight a show . 62 Copyright © 2005 TOSHIBA CORPORATION. GO TO SERVICE BAR: Closes the menu, changes no information, and returns to the highlighted show and press MENU. • With ...

Owner's Manual - English
Page 70
... a channel to one of the following settings: - Highlight one of the options, press ENTER, and follow the on-screen instructions. 70 Copyright © 2005 TOSHIBA CORPORATION. From the SETUP screen, highlight CHANGE CHANNEL DISPLAY and press ENTER. To edit the options, press INFO and follow the...screen allows you to change the following settings: • System settings • Channel display • Default options Note: You must complete the TV Guide On Screen® setup (as described in Chapter 5). 1. With SETUP highlighted in LISTINGS) - Note: The "tune channel" is ...
... a channel to one of the following settings: - Highlight one of the options, press ENTER, and follow the on-screen instructions. 70 Copyright © 2005 TOSHIBA CORPORATION. From the SETUP screen, highlight CHANGE CHANNEL DISPLAY and press ENTER. To edit the options, press INFO and follow the...screen allows you to change the following settings: • System settings • Channel display • Default options Note: You must complete the TV Guide On Screen® setup (as described in Chapter 5). 1. With SETUP highlighted in LISTINGS) - Note: The "tune channel" is ...

Owner's Manual - English
Page 74
... on a channel number in the browser banner, it will be the same.) Home channel instructions [Press x ( ) or • ( ) to surf the other channels in the channel history. Press ENTER to tune the TV to the next channel in the channel history.] 12-3 14 12345678 ABCD-DTV CB Select ... to 32 of the last 32 channels tuned from the most recently viewed channels. Press ENTER to tune to the channel. 74 Copyright © 2005 TOSHIBA CORPORATION. The "Current mode" field on a channel number in the browser banner, it will close the Channel Browser banner. 3 Browse Mode 2 ANT...
... on a channel number in the browser banner, it will be the same.) Home channel instructions [Press x ( ) or • ( ) to surf the other channels in the channel history. Press ENTER to tune the TV to the next channel in the channel history.] 12-3 14 12345678 ABCD-DTV CB Select ... to 32 of the last 32 channels tuned from the most recently viewed channels. Press ENTER to tune to the channel. 74 Copyright © 2005 TOSHIBA CORPORATION. The "Current mode" field on a channel number in the browser banner, it will close the Channel Browser banner. 3 Browse Mode 2 ANT...
Owner's Manual - English
Page 107
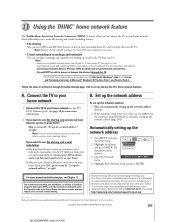
...distribution, or revision of television programs, videotapes, DVDs, and other materials is compatible only with a dedicated POP3 e-mail address for connection instructions. 2. Network Basic Network Setup E-mail Scheduling Setup Home File Server Setup 3. For home networktroubleshooting tips, see page 30); The unauthorized ...(see page 30). Open the Network menu. If you think your home network via the TV's RJ-45 (Ethernet) port. All rights reserved. 107 B. If you want to your Toshiba TV and router might have Internet service, you to use file sharing and e-mail scheduling: ...
...distribution, or revision of television programs, videotapes, DVDs, and other materials is compatible only with a dedicated POP3 e-mail address for connection instructions. 2. Network Basic Network Setup E-mail Scheduling Setup Home File Server Setup 3. For home networktroubleshooting tips, see page 30); The unauthorized ...(see page 30). Open the Network menu. If you think your home network via the TV's RJ-45 (Ethernet) port. All rights reserved. 107 B. If you want to your Toshiba TV and router might have Internet service, you to use file sharing and e-mail scheduling: ...