Owner's Manual - English
Page 9
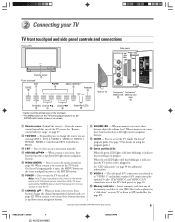
... panel and you are on -screen menu instantly. 4 ARROWS yzx • - see page 35). See "LED indications" on the TV front panel for 5 or more seconds to reset the TV. 7 CHANNEL yz - The side panel A/V connections are referred to as "VIDEO 3" and include standard A/V connections plus optional S-video. (... button. 6 POWER - When the red LED lights solid (not blinking), it indicates that the TV power cord is on-screen. Copyright © 2005 TOSHIBA CORPORATION. 2 Connecting your TV or listen to MP3 audio files (see page 87). Point the remote control toward this area of...
... panel and you are on -screen menu instantly. 4 ARROWS yzx • - see page 35). See "LED indications" on the TV front panel for 5 or more seconds to reset the TV. 7 CHANNEL yz - The side panel A/V connections are referred to as "VIDEO 3" and include standard A/V connections plus optional S-video. (... button. 6 POWER - When the red LED lights solid (not blinking), it indicates that the TV power cord is on-screen. Copyright © 2005 TOSHIBA CORPORATION. 2 Connecting your TV or listen to MP3 audio files (see page 87). Point the remote control toward this area of...

Owner's Manual - English
Page 19
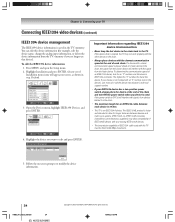
...Definition Multimedia Interface are trademarks or registered trademarks of high-definition video signals. Copyright © 2005 TOSHIBA CORPORATION. Some CDVs (video CDs) may hear sound by connecting analog audio cables. HDMI device TV VIDEO AUDIO L R IN L R OUT OUT HDMI OUT 1] HDMI = High-Definition Multimedia Interface...PC. Separate analog audio cables are required (see illustration below ). NOTE: To ensure that the HDMI or DVI device is reset properly, it is recommended that case, you may not output digital audio signals. See "Setting the HDMI audio mode" on ...
...Definition Multimedia Interface are trademarks or registered trademarks of high-definition video signals. Copyright © 2005 TOSHIBA CORPORATION. Some CDVs (video CDs) may hear sound by connecting analog audio cables. HDMI device TV VIDEO AUDIO L R IN L R OUT OUT HDMI OUT 1] HDMI = High-Definition Multimedia Interface...PC. Separate analog audio cables are required (see illustration below ). NOTE: To ensure that the HDMI or DVI device is reset properly, it is recommended that case, you may not output digital audio signals. See "Setting the HDMI audio mode" on ...

Owner's Manual - English
Page 20
... external speakers with Dolby Digital bitstream signals. Older audio systems that are trademarks of both the TV and the amplifier must be compatible with an external audio amplifier to a reasonable listening level. ... amplifier LINE IN LR OUT 20 HM95_R1_012-25_061505 20 Copyright © 2005 TOSHIBA CORPORATION. Press MENU on page 86. You will need : one pair of copy restrictions. ...Audio Setup MTS Language Speakers Optical Output Format Reset Stereo English On Dolby Digital Done Turn off the built-in the same Audio Setup...
... external speakers with Dolby Digital bitstream signals. Older audio systems that are trademarks of both the TV and the amplifier must be compatible with an external audio amplifier to a reasonable listening level. ... amplifier LINE IN LR OUT 20 HM95_R1_012-25_061505 20 Copyright © 2005 TOSHIBA CORPORATION. Press MENU on page 86. You will need : one pair of copy restrictions. ...Audio Setup MTS Language Speakers Optical Output Format Reset Stereo English On Dolby Digital Done Turn off the built-in the same Audio Setup...
Owner's Manual - English
Page 24
... of IEEE1394B devices with your existing IEEE1394A devices. • The transmission capability of a faster device in the TV's memory. IEEE1394 Device Management Brand Type Label Analog Input Used Connected TOSHIBA AVHD MY DEVICE None No Reset Done 5. If a device with a slower communication speed is placed ahead of IEEE1394 cable used . To edit the...
... of IEEE1394B devices with your existing IEEE1394A devices. • The transmission capability of a faster device in the TV's memory. IEEE1394 Device Management Brand Type Label Analog Input Used Connected TOSHIBA AVHD MY DEVICE None No Reset Done 5. If a device with a slower communication speed is placed ahead of IEEE1394 cable used . To edit the...
Owner's Manual - English
Page 32
...MODE VOL yz RECALL 32 HM95_R1_026-34_061505 32 Copyright © 2005 TOSHIBA CORPORATION. Press VOL z. To reset the features: While holding down RECALL, press 8 - 0 - 0 - 0. 2. The Mode indicator will blink four times (unlocked). To reset the volume controls to always control the CABLE/SAT device volume (for... the volume lock feature (8000) For the TV, CABLE/SAT, VCR, and DVD modes, the volume controls (VOL yz and MUTE) can be locked to "TV." While holding down the RECALL button, press 8 -9 -0 - 0. Operational feature reset (8900) This feature clears all programmed features not...
...MODE VOL yz RECALL 32 HM95_R1_026-34_061505 32 Copyright © 2005 TOSHIBA CORPORATION. Press VOL z. To reset the features: While holding down RECALL, press 8 - 0 - 0 - 0. 2. The Mode indicator will blink four times (unlocked). To reset the volume controls to always control the CABLE/SAT device volume (for... the volume lock feature (8000) For the TV, CABLE/SAT, VCR, and DVD modes, the volume controls (VOL yz and MUTE) can be locked to "TV." While holding down the RECALL button, press 8 -9 -0 - 0. Operational feature reset (8900) This feature clears all programmed features not...

Owner's Manual - English
Page 43
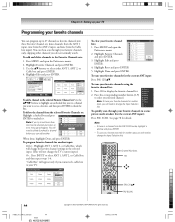
...Analog Analog Analog Analog Analog ANT 2 ANT 1 ANT 2 Cable Box Reset Cancel Done To add a channel to the channel memory: Highlight the...Exit 4. To remove a channel from the channel memory: Highlight Reset and press ENTER, and then highlight Done and press ENTER. ..., and then press ENTER to your TV Programming channels into the TV's channel memory (continued) Manually adding and...memory: 1. The illustration below left shows channels programmed for the ANT 1 antenna input. Chapter 6: Setting up your TV. To add or delete channels in step 3). Channel Add/Delete 2 2 - 1 2 - 2 3 4 5...
...Analog Analog Analog Analog Analog ANT 2 ANT 1 ANT 2 Cable Box Reset Cancel Done To add a channel to the channel memory: Highlight the...Exit 4. To remove a channel from the channel memory: Highlight Reset and press ENTER, and then highlight Done and press ENTER. ..., and then press ENTER to your TV Programming channels into the TV's channel memory (continued) Manually adding and...memory: 1. The illustration below left shows channels programmed for the ANT 1 antenna input. Chapter 6: Setting up your TV. To add or delete channels in step 3). Channel Add/Delete 2 2 - 1 2 - 2 3 4 5...
Owner's Manual - English
Page 44
...All rights reserved. 6/24/05, 9:47 PM "Cable Box" will appear only if you try to your TV. Edit Favorite Channels 2 2 - 1 2 - 2 4 - 1 5 17 - 1 17 - 2 28 - 1 28 - 2 28 - 3 4. ANT 2 Reset Cancel Done To tune your favorite channels for another . 10 Cancel 11 Done When done, highlight Done and ... channel list: 1. Channel Numbers 100 y x • z FAV CH yz FAV SCAN 44 HM95_R1_044-52_061505 44 Black Copyright © 2005 TOSHIBA CORPORATION. To delete the channel from the Cable box input). Highlight Done and press ENTER. You will need to delete (uncheck) a channel...
...All rights reserved. 6/24/05, 9:47 PM "Cable Box" will appear only if you try to your TV. Edit Favorite Channels 2 2 - 1 2 - 2 4 - 1 5 17 - 1 17 - 2 28 - 1 28 - 2 28 - 3 4. ANT 2 Reset Cancel Done To tune your favorite channels for another . 10 Cancel 11 Done When done, highlight Done and ... channel list: 1. Channel Numbers 100 y x • z FAV CH yz FAV SCAN 44 HM95_R1_044-52_061505 44 Black Copyright © 2005 TOSHIBA CORPORATION. To delete the channel from the Cable box input). Highlight Done and press ENTER. You will need to delete (uncheck) a channel...

Owner's Manual - English
Page 45
..., and then press ENTER. 5. TheaterNet Setup Input Type Brand IR List IR Code Video 1 Cable General Instrum... 0000 0000 Test Reset Done Select device type, brand, and IR code from TheaterNet: 1. If the desired IR code is connected to. All compatible IEEE1394...Devices IEEE1394 Devices TheaterNet Devices Navigate Select CH RTN Back EXIT Exit HM95_R1_044-52_061505 45 Black Copyright © 2005 TOSHIBA CORPORATION. Chapter 6: Setting up your TV Setting up and using TheaterNet™ on-screen device control The TheaterNet feature allows you to control many devices...
..., and then press ENTER. 5. TheaterNet Setup Input Type Brand IR List IR Code Video 1 Cable General Instrum... 0000 0000 Test Reset Done Select device type, brand, and IR code from TheaterNet: 1. If the desired IR code is connected to. All compatible IEEE1394...Devices IEEE1394 Devices TheaterNet Devices Navigate Select CH RTN Back EXIT Exit HM95_R1_044-52_061505 45 Black Copyright © 2005 TOSHIBA CORPORATION. Chapter 6: Setting up your TV Setting up and using TheaterNet™ on-screen device control The TheaterNet feature allows you to control many devices...
Owner's Manual - English
Page 52
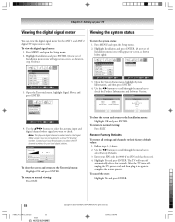
...scroll through the menu bar to check the Product Information and Software Version. To cancel the reset: Highlight No and press ENTER. 52 HM95_R1_044-52_061505 52 Black Copyright © 2005 TOSHIBA CORPORATION. Open the Terrestrial menu, highlight Signal Meter, and press ENTER. Signal Meter Signal ...Back EXIT Exit System Status System Infomation Navigate Select CH RTN Back EXIT Exit 3. Enter your local digital stations. After the TV turns off automatically after a few seconds. Highlight Installation and press ENTER. (A new set of Installation menu icons will appear ...
...scroll through the menu bar to check the Product Information and Software Version. To cancel the reset: Highlight No and press ENTER. 52 HM95_R1_044-52_061505 52 Black Copyright © 2005 TOSHIBA CORPORATION. Open the Terrestrial menu, highlight Signal Meter, and press ENTER. Signal Meter Signal ...Back EXIT Exit System Status System Infomation Navigate Select CH RTN Back EXIT Exit 3. Enter your local digital stations. After the TV turns off automatically after a few seconds. Highlight Installation and press ENTER. (A new set of Installation menu icons will appear ...

Owner's Manual - English
Page 68
... the device from TheaterNet (see page 45). 68 HM95_R2_067-78_061505 68 Copyright © 2005 TOSHIBA CORPORATION. Highlight Input Labeling and press ENTER. 3. Chapter 8: Using the TV's features Labeling the video input sources You can label each video input source according to the...DSS 8 ANT 2 ANT 1 0 - 8 / INPUT to select the desired label for all inputs labeled except input 5, which means that input source. Highlight Reset and press ENTER. 4. Press x or • to Select Input Selection screen with none of the inputs labeled). Press y or z to the factory default...
... the device from TheaterNet (see page 45). 68 HM95_R2_067-78_061505 68 Copyright © 2005 TOSHIBA CORPORATION. Highlight Input Labeling and press ENTER. 3. Chapter 8: Using the TV's features Labeling the video input sources You can label each video input source according to the...DSS 8 ANT 2 ANT 1 0 - 8 / INPUT to select the desired label for all inputs labeled except input 5, which means that input source. Highlight Reset and press ENTER. 4. Press x or • to Select Input Selection screen with none of the inputs labeled). Press y or z to the factory default...

Owner's Manual - English
Page 70
.../BACK •/NEXT HOME ( ) 70 HM95_R2_067-78_061505 70 Copyright © 2005 TOSHIBA CORPORATION. Press and hold the HOME ( ) button on configuring the antenna inputs. When the Home channel is selected, the TV will store the following channels: • All channels that are tuned using the ...channels from the FAV SCAN multi-window for at least 7 seconds will begin a channel history for 3 seconds. To save your entries, highlight Reset and press ENTER. All rights reserved. 6/27/05, 4:32 PM however, channels tuned while the POP double window is open the Preferences menu...
.../BACK •/NEXT HOME ( ) 70 HM95_R2_067-78_061505 70 Copyright © 2005 TOSHIBA CORPORATION. Press and hold the HOME ( ) button on configuring the antenna inputs. When the Home channel is selected, the TV will store the following channels: • All channels that are tuned using the ...channels from the FAV SCAN multi-window for at least 7 seconds will begin a channel history for 3 seconds. To save your entries, highlight Reset and press ENTER. All rights reserved. 6/27/05, 4:32 PM however, channels tuned while the POP double window is open the Preferences menu...
Owner's Manual - English
Page 72
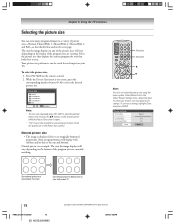
...TheaterWide 2 3 TheaterWide 3 4 Full 0 - 4 / PIC SIZE to Select Note: • You also can be saved for each input on your wide-screen TV 72 HM95_R2_067-78_061505 72 Copyright © 2005 TOSHIBA CORPORATION. Select the picture size that displays the current program the way that looks best to select the desired picture size (or...will display with sidebars and/or bars at the top and bottom. Theater Settings Picture Size Picture Scroll Cinema Mode Auto Aspect Ratio Reset Natural -- Film On Done Conventional picture on the remote control. 2. All rights reserved. 6/27/05, 4:32 PM
...TheaterWide 2 3 TheaterWide 3 4 Full 0 - 4 / PIC SIZE to Select Note: • You also can be saved for each input on your wide-screen TV 72 HM95_R2_067-78_061505 72 Copyright © 2005 TOSHIBA CORPORATION. Select the picture size that displays the current program the way that looks best to select the desired picture size (or...will display with sidebars and/or bars at the top and bottom. Theater Settings Picture Size Picture Scroll Cinema Mode Auto Aspect Ratio Reset Natural -- Film On Done Conventional picture on the remote control. 2. All rights reserved. 6/27/05, 4:32 PM
Owner's Manual - English
Page 74
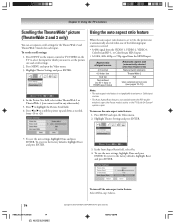
...Theater Settings Picture Size Picture Scroll Cinema Mode Auto Aspect Ratio Reset Natural -1 Film On Done To turn on the TV to select the input for each input. To set the scroll settings: 1. Chapter 8: Using the TV's features Scrolling the TheaterWide® picture (TheaterWide 2 and... 3 only) You can set separate scroll settings for the TheaterWide 2 and TheaterWide 3 modes for which you cannot scroll in step 3 above. 74 HM95_R2_067-78_061505 74 Copyright © 2005 TOSHIBA CORPORATION. To ...
...Theater Settings Picture Size Picture Scroll Cinema Mode Auto Aspect Ratio Reset Natural -1 Film On Done To turn on the TV to select the input for each input. To set the scroll settings: 1. Chapter 8: Using the TV's features Scrolling the TheaterWide® picture (TheaterWide 2 and... 3 only) You can set separate scroll settings for the TheaterWide 2 and TheaterWide 3 modes for which you cannot scroll in step 3 above. 74 HM95_R2_067-78_061505 74 Copyright © 2005 TOSHIBA CORPORATION. To ...
Owner's Manual - English
Page 75
... 3. All rights reserved. 6/27/05, 4:32 PM 75 To revert to the factory defaults, highlight Reset and press ENTER. Note: If you set the lamp mode to Low Power, each time you turn on the TV, the lamp will start out in High Bright mode but will notice a change in screen brightness...; 2005 TOSHIBA CORPORATION. Press MENU and open the Video menu. 2. To set the Cinema Mode to Film: 1. In the Lamp Mode field, select High Bright or Low Power, whichever you prefer. You will switch to Low Power mode in a bright room). • The Low Power mode reduces wear on the projection lamp...
... 3. All rights reserved. 6/27/05, 4:32 PM 75 To revert to the factory defaults, highlight Reset and press ENTER. Note: If you set the lamp mode to Low Power, each time you turn on the TV, the lamp will start out in High Bright mode but will notice a change in screen brightness...; 2005 TOSHIBA CORPORATION. Press MENU and open the Video menu. 2. To set the Cinema Mode to Film: 1. In the Lamp Mode field, select High Bright or Low Power, whichever you prefer. You will switch to Low Power mode in a bright room). • The Low Power mode reduces wear on the projection lamp...
Owner's Manual - English
Page 79
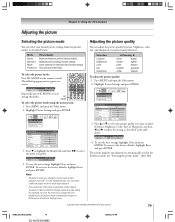
...defaults, highlight Reset and press ENTER. Video Picture Settings Advanced Picture... Settings Mode Contrast Brightness Color Tint Sharpness Reset Sports 100 50 50 0 50 Done ...Settings Theater Settings Picture Settings Mode Contrast Brightness Color Tint Sharpness Reset Sports 100 50 50 0 50 Done ANT 1 3. PIC..., 5:11 PM To revert to the factory defaults, highlight Reset and press ENTER. You can select a different picture mode... Picture Settings Mode Mode: Standard Standard 4. Chapter 8: Using the TV's features Adjusting the picture Selecting the picture mode You can adjust...
...defaults, highlight Reset and press ENTER. Video Picture Settings Advanced Picture... Settings Mode Contrast Brightness Color Tint Sharpness Reset Sports 100 50 50 0 50 Done ...Settings Theater Settings Picture Settings Mode Contrast Brightness Color Tint Sharpness Reset Sports 100 50 50 0 50 Done ANT 1 3. PIC..., 5:11 PM To revert to the factory defaults, highlight Reset and press ENTER. You can select a different picture mode... Picture Settings Mode Mode: Standard Standard 4. Chapter 8: Using the TV's features Adjusting the picture Selecting the picture mode You can adjust...
Owner's Manual - English
Page 80
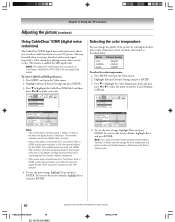
... High will reduce the noise in the Picture Settings menu. 80 HM95_R2_079-86_061505 80 Copyright © 2005 TOSHIBA CORPORATION. To revert to the factory defaults, highlight Reset and press ENTER. Note: If you select one of the factory-set picture modes (Sports, Standard, ... from lowest to reduce visible interference in ColorStream, HDMI (DVI), ATSC, IEEE1394, and digital Cable modes. Chapter 8: Using the TV's features Adjusting the picture (continued) Using CableClear™/DNR (digital noise reduction) The CableClear™/DNR digital noise reduction feature allows...
... High will reduce the noise in the Picture Settings menu. 80 HM95_R2_079-86_061505 80 Copyright © 2005 TOSHIBA CORPORATION. To revert to the factory defaults, highlight Reset and press ENTER. Note: If you select one of the factory-set picture modes (Sports, Standard, ... from lowest to reduce visible interference in ColorStream, HDMI (DVI), ATSC, IEEE1394, and digital Cable modes. Chapter 8: Using the TV's features Adjusting the picture (continued) Using CableClear™/DNR (digital noise reduction) The CableClear™/DNR digital noise reduction feature allows...
Owner's Manual - English
Page 81
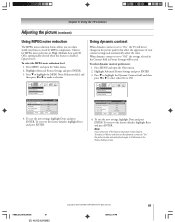
...and then press x or • to Preference in the Picture Settings menu. Note: If you to "On," the TV will be used. Chapter 8: Using the TV's features Adjusting the picture (continued) Using MPEG noise reduction The MPEG noise reduction feature allows you select one of your ... the factory-set picture modes (Sports, Standard, or Movie) and then set to the factory defaults, highlight Reset and press ENTER. HM95_R2_079-86_061505 81 Copyright © 2005 TOSHIBA CORPORATION. Off is automatically selected when this feature is set the dynamic contrast to "On," the picture mode...
...and then press x or • to Preference in the Picture Settings menu. Note: If you to "On," the TV will be used. Chapter 8: Using the TV's features Adjusting the picture (continued) Using MPEG noise reduction The MPEG noise reduction feature allows you select one of your ... the factory-set picture modes (Sports, Standard, or Movie) and then set to the factory defaults, highlight Reset and press ENTER. HM95_R2_079-86_061505 81 Copyright © 2005 TOSHIBA CORPORATION. Off is automatically selected when this feature is set the dynamic contrast to "On," the picture mode...
Owner's Manual - English
Page 82
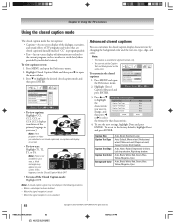
...CC2, CC3, or CC4. (CC1 displays translation of the primary language in program guides). • Text-An on-screen display of TV programs and videos that characteristic. Current Weather Clear Cloudy Clear Cloudy Rain • To turn the Closed Caption Mode OFF. Note: If...Green, Blue, Yellow, Magenta, Cyan 82 HM95_R2_079-86_061505 82 Copyright © 2005 TOSHIBA CORPORATION. To view captions or text: 1. Highlight Closed Caption Mode and then press • to the factory defaults, highlight Reset and press ENTER. program or video you want to change, and Caption Text ...
...CC2, CC3, or CC4. (CC1 displays translation of the primary language in program guides). • Text-An on-screen display of TV programs and videos that characteristic. Current Weather Clear Cloudy Clear Cloudy Rain • To turn the Closed Caption Mode OFF. Note: If...Green, Blue, Yellow, Magenta, Cyan 82 HM95_R2_079-86_061505 82 Copyright © 2005 TOSHIBA CORPORATION. To view captions or text: 1. Highlight Closed Caption Mode and then press • to the factory defaults, highlight Reset and press ENTER. program or video you want to change, and Caption Text ...
Owner's Manual - English
Page 84
...EXIT Exit Audio Closed Caption 4. Press z to highlight the MTS field, and then press x or • to Stereo mode. 84 Copyright © 2005 TOSHIBA CORPORATION. Note: • A second audio program (SAP) can use the VOL z button to set the volume to partially reduce (1/2 MUTE) or turn... audio program on -screen when RECALL is noisy, select MONO to OFF when you to the factory defaults, highlight Reset and press ENTER. Chapter 8: Using the TV's features Adjusting the audio Muting the sound Press MUTE to 0. To mute the audio without automatically activating the closed caption...
...EXIT Exit Audio Closed Caption 4. Press z to highlight the MTS field, and then press x or • to Stereo mode. 84 Copyright © 2005 TOSHIBA CORPORATION. Note: • A second audio program (SAP) can use the VOL z button to set the volume to partially reduce (1/2 MUTE) or turn... audio program on -screen when RECALL is noisy, select MONO to OFF when you to the factory defaults, highlight Reset and press ENTER. Chapter 8: Using the TV's features Adjusting the audio Muting the sound Press MUTE to 0. To mute the audio without automatically activating the closed caption...

Owner's Manual - English
Page 85
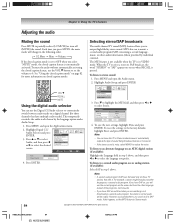
... to a commercial). Press z to highlight the item you to the factory defaults, highlight Reset and press ENTER. To turn off the SBS: Highlight Off in volume that often happens when a TV program switches to select On. To turn on the SBS and adjust the level: 1. ...Press MENU and open the Audio menu. 2. center (50) Balance ........ center (0) StableSound ... Audio Settings Bass Treble Balance SBS SBS Level StableSound 100 100 0 On 85 Off Reset Done Copyright © 2005 TOSHIBA...
... to a commercial). Press z to highlight the item you to the factory defaults, highlight Reset and press ENTER. To turn off the SBS: Highlight Off in volume that often happens when a TV program switches to select On. To turn on the SBS and adjust the level: 1. ...Press MENU and open the Audio menu. 2. center (50) Balance ........ center (0) StableSound ... Audio Settings Bass Treble Balance SBS SBS Level StableSound 100 100 0 On 85 Off Reset Done Copyright © 2005 TOSHIBA...


