Installation Guide - English
Page 2
... to alert the user to the presence of uninsulated "dangerous voltage" within an equilateral triangle, is for use of resulting in your new TV, keep it nearby for purchasing this manual completely, and keep these safety tips in mind: The Issue a If you are improperly ... use and user settings. Dispose of your new TV. Child Safety It Makes A Difference Where Your TV Stands Congratulations on product use the lamp beyond its service life: • you should replace the lamp unit; Toshiba Cares! a Avoid placing any item on the proper TV stands. Arlington, VA 22201 U.S.A. and ...
... to alert the user to the presence of uninsulated "dangerous voltage" within an equilateral triangle, is for use of resulting in your new TV, keep it nearby for purchasing this manual completely, and keep these safety tips in mind: The Issue a If you are improperly ... use and user settings. Dispose of your new TV. Child Safety It Makes A Difference Where Your TV Stands Congratulations on product use the lamp beyond its service life: • you should replace the lamp unit; Toshiba Cares! a Avoid placing any item on the proper TV stands. Arlington, VA 22201 U.S.A. and ...
Installation Guide - English
Page 5
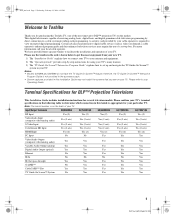
... is not provided in the accessory pack. • Screen captures provided in your particular TV. For more information call your Operating Guide. Notes: • Models 50HM66 and 56HM66 do not have provided three separate Guides to facilitate the installation and operation of receiving analog... Guides in this Toshiba TV, one of your TV. Please confirm your TV's terminal specifications in the following table to determine which connection in the order shown below to get the most innovative DLP™ projection TVs on the back of the most enjoyment from your new TV. 1) The "...
... is not provided in the accessory pack. • Screen captures provided in your particular TV. For more information call your Operating Guide. Notes: • Models 50HM66 and 56HM66 do not have provided three separate Guides to facilitate the installation and operation of receiving analog... Guides in this Toshiba TV, one of your TV. Please confirm your TV's terminal specifications in the following table to determine which connection in the order shown below to get the most innovative DLP™ projection TVs on the back of the most enjoyment from your new TV. 1) The "...
Installation Guide - English
Page 8
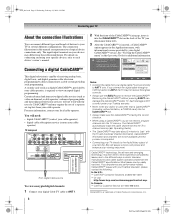
For more vivid picture and enhance your viewing enjoyment. CableCARD™ technology, like all new and emerging technology, may take about 5 minutes to "pair" with the TV and download channel information. CableCARD is inserted, a CableCARD™ option appears in several different configurations. The... cable from time to time experience compatibility issues due to each device's owner's manual. Such damage is NOT covered under your Toshiba warranty. • Never insert any performance-related CableCARD™ issues with the use of a CableCARD™ and may differ ...
For more vivid picture and enhance your viewing enjoyment. CableCARD™ technology, like all new and emerging technology, may take about 5 minutes to "pair" with the TV and download channel information. CableCARD is inserted, a CableCARD™ option appears in several different configurations. The... cable from time to time experience compatibility issues due to each device's owner's manual. Such damage is NOT covered under your Toshiba warranty. • Never insert any performance-related CableCARD™ issues with the use of a CableCARD™ and may differ ...
Owner's Manual - English
Page 1
...169; 2006 TOSHIBA CORPORATION All Rights Reserved RICA CONSUMER PR O 14001 FILE No. Record these numbers whenever you communicate with your new TV, see "IMPORTANT NOTICE ABOUT HOT LAMP RESTART" on again when the lamp unit is NOT a sign of your TV antenna installer,... Web 213:276 TOSHIBA AME 45 ODUCTS, L.L.C. HM66_EN.book Page 1 Thursday, February 23, 2006 2:49 PM Integrated High Definition DLP™ Projection Television 50HM66 56HM66 HIGH-DEFINITION TELEVISION IMPORTANT NOTE Before connecting, operating, or adjusting this TV. For details, please contact your TV. For details, ...
...169; 2006 TOSHIBA CORPORATION All Rights Reserved RICA CONSUMER PR O 14001 FILE No. Record these numbers whenever you communicate with your new TV, see "IMPORTANT NOTICE ABOUT HOT LAMP RESTART" on again when the lamp unit is NOT a sign of your TV antenna installer,... Web 213:276 TOSHIBA AME 45 ODUCTS, L.L.C. HM66_EN.book Page 1 Thursday, February 23, 2006 2:49 PM Integrated High Definition DLP™ Projection Television 50HM66 56HM66 HIGH-DEFINITION TELEVISION IMPORTANT NOTE Before connecting, operating, or adjusting this TV. For details, please contact your TV. For details, ...
Owner's Manual - English
Page 2
...most enjoyment from eye fatigue. patents and other carts or stands is capable of this TV is a projection lamp unit with a limited service life. Please use only with other intellectual property rights.... from your new TV. • The "Installation Guide" explains how to connect your TV to your TV. page 42 for details.) 3) Every time the TV is powered on the TV front panel ... are viewing, it as the TV is powered off . Use of resulting in instability, causing possible injury. Television Stand Model 50HM66 ST5066 56HM66 ST5666 Welcome to Toshiba Thank you are not visible when...
...most enjoyment from eye fatigue. patents and other carts or stands is capable of this TV is a projection lamp unit with a limited service life. Please use only with other intellectual property rights.... from your new TV. • The "Installation Guide" explains how to connect your TV to your TV. page 42 for details.) 3) Every time the TV is powered on the TV front panel ... are viewing, it as the TV is powered off . Use of resulting in instability, causing possible injury. Television Stand Model 50HM66 ST5066 56HM66 ST5666 Welcome to Toshiba Thank you are not visible when...
Owner's Manual - English
Page 3
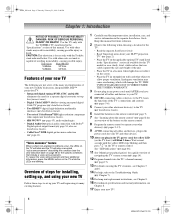
...Page 3 Thursday, February 23, 2006 2:49 PM Contents Chapter 1: Introduction 4 Features of your new TV 4 Overview of steps for installing, setting up, and using your new TV 4 TV front and side panel controls and connections 5 TV back panel connections 6 Chapter 2: Using the remote control 7 Preparing the remote control for use... the Quick Restart™ feature 20 Viewing the digital signal meter 21 Viewing the system status 22 Chapter 5: Using the TV's basic features 23 Selecting the video input source to view 23 Labeling the video input sources 23 Tuning channels 24 Using the...
...Page 3 Thursday, February 23, 2006 2:49 PM Contents Chapter 1: Introduction 4 Features of your new TV 4 Overview of steps for installing, setting up, and using your new TV 4 TV front and side panel controls and connections 5 TV back panel connections 6 Chapter 2: Using the remote control 7 Preparing the remote control for use... the Quick Restart™ feature 20 Viewing the digital signal meter 21 Viewing the system status 22 Chapter 5: Using the TV's basic features 23 Selecting the video input source to view 23 Labeling the video input sources 23 Tuning channels 24 Using the...
Owner's Manual - English
Page 4
...specific conditions that can safely support the size and weight of your new TV! 4 HM66 (E/F) Web 213:276 Television Stand Model 50HM66 ST5066 56HM66 ST5666 Features of the buttons on page 46 for viewing encrypted digital Cable TV programs (- Installation Guide). • Two HDMI™ digital, ... information, see Chapters 5 and 6. 14 For help, refer to set up your TV and begin using the TV's features, see Chapter 8. 17 Enjoy your new Toshiba widescreen, integrated HD, DLP™ projection TV: • Integrated digital tuning (8VSB ATSC and QAM) eliminates the need for use...
...specific conditions that can safely support the size and weight of your new TV! 4 HM66 (E/F) Web 213:276 Television Stand Model 50HM66 ST5066 56HM66 ST5666 Features of the buttons on page 46 for viewing encrypted digital Cable TV programs (- Installation Guide). • Two HDMI™ digital, ... information, see Chapters 5 and 6. 14 For help, refer to set up your TV and begin using the TV's features, see Chapter 8. 17 Enjoy your new Toshiba widescreen, integrated HD, DLP™ projection TV: • Integrated digital tuning (8VSB ATSC and QAM) eliminates the need for use...
Owner's Manual - English
Page 7
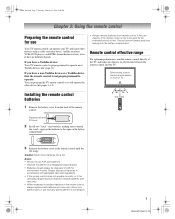
...designated disposal area. • Batteries should always be used batteries in mind. Never mix battery types or use new and used for use Your TV remote control can program the TV remote control so it will prevent battery acid from remote control if they are dead or if the remote control...brands. Remote control effective range For optimum performance, aim the remote control directly at the TV and make sure there is preprogrammed to the signs on front of time. signs on the batteries to operate most Toshiba devices (- Notes: • Be sure to match the + and - This will ...
...designated disposal area. • Batteries should always be used batteries in mind. Never mix battery types or use new and used for use Your TV remote control can program the TV remote control so it will prevent battery acid from remote control if they are dead or if the remote control...brands. Remote control effective range For optimum performance, aim the remote control directly at the TV and make sure there is preprogrammed to the signs on front of time. signs on the batteries to operate most Toshiba devices (- Notes: • Be sure to match the + and - This will ...

Owner's Manual - English
Page 14
.... (This option is not available if a CableCARD™ is not available, if you are not on the remote control or TV control panel. Icon Applications Video Item Channel Browser Digital CC/Audio Selector CableCARD™ Picture Settings Advanced Picture Settings Option S [Launches... Mode Closed Caption Advanced Input Labeling Menu Language Channel Browser Setup Enable Rating Blocking Edit Rating Limits Channels Block Input Lock Front Panel Lock New PIN Code Installation Sleep Timer ColorStream HD1 Audio HDMI 1 Audio ColorStream HD2 Audio HDMI 2 Audio Quick Restart S [Audio Settings window] ...
.... (This option is not available if a CableCARD™ is not available, if you are not on the remote control or TV control panel. Icon Applications Video Item Channel Browser Digital CC/Audio Selector CableCARD™ Picture Settings Advanced Picture Settings Option S [Launches... Mode Closed Caption Advanced Input Labeling Menu Language Channel Browser Setup Enable Rating Blocking Edit Rating Limits Channels Block Input Lock Front Panel Lock New PIN Code Installation Sleep Timer ColorStream HD1 Audio HDMI 1 Audio ColorStream HD2 Audio HDMI 2 Audio Quick Restart S [Audio Settings window] ...
Owner's Manual - English
Page 15
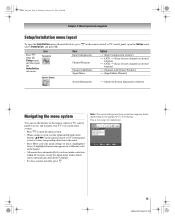
... [Scans for new channels on desired Antenna] S [Channel Add / Delete Window] S [Signal Meter Window] System Status System Information S [Opens the System Information window] Navigating the menu system You can use the up/down/left/right arrow buttons (BbC c) on the remote control or TV control panel, open... 3: Menu layout and navigation Setup/Installation menu layout To open the Installation menu (illustrated below), press Y on the remote control or TV control panel to move in the corresponding direction in the menu.) • All menus close automatically if you do not make a selection...
... [Scans for new channels on desired Antenna] S [Channel Add / Delete Window] S [Signal Meter Window] System Status System Information S [Opens the System Information window] Navigating the menu system You can use the up/down/left/right arrow buttons (BbC c) on the remote control or TV control panel, open... 3: Menu layout and navigation Setup/Installation menu layout To open the Installation menu (illustrated below), press Y on the remote control or TV control panel to move in the corresponding direction in the menu.) • All menus close automatically if you do not make a selection...

Owner's Manual - English
Page 16
... 1 Press Y and open the Preferences menu. 2 Highlight Menu Language and press c. 3 Press B or b to your new settings, highlight Done and press T. To revert to select your TV Selecting the menu language You can choose from three different languages (English, French and Spanish) for the on-screen display...to close the Preferences menu. To select the menu language: 1 Press Y and open the Setup menu. 2 Highlight Installation and press T. (A new set of menus and messages. Configuring the antenna input sources for the ANT 2 input on -screen, as shown in step 3 below.) Preferences ...
... 1 Press Y and open the Preferences menu. 2 Highlight Menu Language and press c. 3 Press B or b to your new settings, highlight Done and press T. To revert to select your TV Selecting the menu language You can choose from three different languages (English, French and Spanish) for the on-screen display...to close the Preferences menu. To select the menu language: 1 Press Y and open the Setup menu. 2 Highlight Installation and press T. (A new set of menus and messages. Configuring the antenna input sources for the ANT 2 input on -screen, as shown in step 3 below.) Preferences ...

Owner's Manual - English
Page 17
... memory: 1 Press Y and open the Setup menu. 3 Highlight Installation and press T. (A new set of Installation menu icons will stop only on the channels you program into the TV's channel memory. See Installation Guide for Antenna. Manually adding and deleting channels in step 3.) (... disabled because the CableCARD™ automatically loads the Cable channel list into the TV's channel memory. page 16). 2 Press Y and open the Setup menu. 2 Highlight Installation and press T. (A new set to Antenna, the automatic channel programming process does NOT erase channels that were...
... memory: 1 Press Y and open the Setup menu. 3 Highlight Installation and press T. (A new set of Installation menu icons will stop only on the channels you program into the TV's channel memory. See Installation Guide for Antenna. Manually adding and deleting channels in step 3.) (... disabled because the CableCARD™ automatically loads the Cable channel list into the TV's channel memory. page 16). 2 Press Y and open the Setup menu. 2 Highlight Installation and press T. (A new set to Antenna, the automatic channel programming process does NOT erase channels that were...
Owner's Manual - English
Page 18
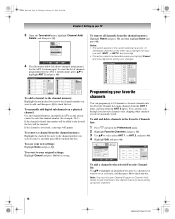
...and press T. 3 Use Bb to enter the channel number (for example, 56-1). To manually add digital subchannels on a physical channel: Use the Channel ...Numbers and the Dash (=) on the other channels you highlight Cancel and press T before saving your TV 3 Open the Terrestrial menu, highlight Channel Add/ Delete, and then press T. To remove all channels from the...Digital Analog ANT 1 ANT 2 Reset Cancel Done Programming your favorite channels You can then scan through your new settings: Highlight Done and press T. Note: You must first use Channel Program or Channel Add/ Delete...
...and press T. 3 Use Bb to enter the channel number (for example, 56-1). To manually add digital subchannels on a physical channel: Use the Channel ...Numbers and the Dash (=) on the other channels you highlight Cancel and press T before saving your TV 3 Open the Terrestrial menu, highlight Channel Add/ Delete, and then press T. To remove all channels from the...Digital Analog ANT 1 ANT 2 Reset Cancel Done Programming your favorite channels You can then scan through your new settings: Highlight Done and press T. Note: You must first use Channel Program or Channel Add/ Delete...
Owner's Manual - English
Page 21
.... HM66_EN.book Page 21 Thursday, February 23, 2006 2:49 PM Chapter 4: Setting up your TV To set the Quick Restart™ feature: 1 Press Y and open the Setup menu. 2 Highlight Installation and press T. 3 A new set of Installation menu icons will occur for the picture to appear on-screen in a short ...period of time, the useful service life of the lamp may be lit solid) until the TV is finished restarting the lamp and the normal picture...
.... HM66_EN.book Page 21 Thursday, February 23, 2006 2:49 PM Chapter 4: Setting up your TV To set the Quick Restart™ feature: 1 Press Y and open the Setup menu. 2 Highlight Installation and press T. 3 A new set of Installation menu icons will occur for the picture to appear on-screen in a short ...period of time, the useful service life of the lamp may be lit solid) until the TV is finished restarting the lamp and the normal picture...

Owner's Manual - English
Page 22
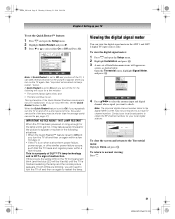
...plug it back in again to select Factory Defaults. 3 Enter your TV Viewing the system status To view the system status: 1 Press Y and open the Setup menu. 2 Highlight Installation and press T. A new set of Installation menu icons will turn off , unplug it and... plug it in to check the Product Information and Software Version. After the TV turns off automatically after a few seconds. System Information System Information Product Information Brand: Toshiba Model: 50HM66 Software Version...
...plug it back in again to select Factory Defaults. 3 Enter your TV Viewing the system status To view the system status: 1 Press Y and open the Setup menu. 2 Highlight Installation and press T. A new set of Installation menu icons will turn off , unplug it and... plug it in to check the Product Information and Software Version. After the TV turns off automatically after a few seconds. System Information System Information Product Information Brand: Toshiba Model: 50HM66 Software Version...

Owner's Manual - English
Page 23
... video input sources" at right). • The source can label the video input sources according to the specific devices you have connected to the TV (- Reset Done 4 Press C or c to select the desired label for that input to be "hidden" (- To revert to the factory default... Input Selection screen) Note: If you select ANT 2 in the input list and skipped over when you press + on the remote control. 5 To save the new input labels, highlight Done and press T. Input Selection 0 ANT 1 1 Video 1 2 Video 2 3 ColorStream HD1 4 ColorStream HD2 5 HDMI 1 6 HDMI 2 7 ANT 2 ANT 1 0 - 7 / INPUT to ...
... video input sources" at right). • The source can label the video input sources according to the specific devices you have connected to the TV (- Reset Done 4 Press C or c to select the desired label for that input to be "hidden" (- To revert to the factory default... Input Selection screen) Note: If you select ANT 2 in the input list and skipped over when you press + on the remote control. 5 To save the new input labels, highlight Done and press T. Input Selection 0 ANT 1 1 Video 1 2 Video 2 3 ColorStream HD1 4 ColorStream HD2 5 HDMI 1 6 HDMI 2 7 ANT 2 ANT 1 0 - 7 / INPUT to ...

Owner's Manual - English
Page 25
... Browser™ banner. In Select mode, when you do not make a selection within 30 seconds. Clearing channels from the list when a new channel or input is selected that channel or input to close the Channel Browser™ banner. HM66_EN.book Page 25 Thursday, February 23, 2006...in the History, ANT 1 or Inputs lists) 5 Current list (History, ANT 1, ANT 2 or Inputs) 6 Current input 7 Current antenna type (cable or TV) 8 Active channel number 9 Channel call letters (if available) 10 Resolution 11 Home source To toggle between History, ANT 1, ANT 2 and Inputs: After opening the...
... Browser™ banner. In Select mode, when you do not make a selection within 30 seconds. Clearing channels from the list when a new channel or input is selected that channel or input to close the Channel Browser™ banner. HM66_EN.book Page 25 Thursday, February 23, 2006...in the History, ANT 1 or Inputs lists) 5 Current list (History, ANT 1, ANT 2 or Inputs) 6 Current input 7 Current antenna type (cable or TV) 8 Active channel number 9 Channel call letters (if available) 10 Resolution 11 Home source To toggle between History, ANT 1, ANT 2 and Inputs: After opening the...

Owner's Manual - English
Page 28
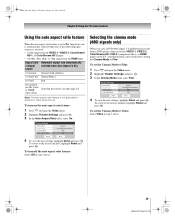
...the factory defaults, highlight Reset and press T. 28 HM66 (E/F) Web 213:276 HM66_EN.book Page 28 Thursday, February 23, 2006 2:49 PM Chapter 5: Using the TV's basic features TheaterWide 3 picture size (for letter box programs with subtitles) • The picture is stretched wider to fill the width of the screen, but.... 2 Highlight Theater Settings and press T. Theater Settings Picture Size Picture Scroll Cinema Mode Auto Aspect Ratio TheaterWide 2 -5 Film On Reset Done 6 To save the new settings, highlight Done and press T. To view the hidden areas (such as needed, from -10 to +20.
...the factory defaults, highlight Reset and press T. 28 HM66 (E/F) Web 213:276 HM66_EN.book Page 28 Thursday, February 23, 2006 2:49 PM Chapter 5: Using the TV's basic features TheaterWide 3 picture size (for letter box programs with subtitles) • The picture is stretched wider to fill the width of the screen, but.... 2 Highlight Theater Settings and press T. Theater Settings Picture Size Picture Scroll Cinema Mode Auto Aspect Ratio TheaterWide 2 -5 Film On Reset Done 6 To save the new settings, highlight Done and press T. To view the hidden areas (such as needed, from -10 to +20.
Owner's Manual - English
Page 29
...480i signal; 3:2 pulldown processed) from the HDMI input. To revert to the factory defaults, highlight Reset and press T. To turn on the TV, smoother motion can be obtained by setting the Cinema Mode to Film. HM66_EN.book Page 29 Thursday, February 23, 2006 2:49 PM Chapter ...Mode field, select Film. Theater Settings Picture Size Picture Scroll -1 Cinema Mode Auto Aspect Ratio Natural Film On Reset Done 4 To save the new settings, highlight Done and press T. Aspect ratio Automatic aspect size (automatically of the following input sources is received: • A 480i signal ...
...480i signal; 3:2 pulldown processed) from the HDMI input. To revert to the factory defaults, highlight Reset and press T. To turn on the TV, smoother motion can be obtained by setting the Cinema Mode to Film. HM66_EN.book Page 29 Thursday, February 23, 2006 2:49 PM Chapter ...Mode field, select Film. Theater Settings Picture Size Picture Scroll -1 Cinema Mode Auto Aspect Ratio Natural Film On Reset Done 4 To save the new settings, highlight Done and press T. Aspect ratio Automatic aspect size (automatically of the following input sources is received: • A 480i signal ...

Owner's Manual - English
Page 30
... Contrast Brightness Color Tint Sharpness Reset Sports 100 50 50 0 50 Done ANT 1 Picture Settings Mode: Standard Mode Standard 4 To save the new settings, highlight Done and press T. Adjusting the picture quality You can adjust the picture quality (contrast, brightness, color, tint, and sharpness)... or b to High Bright mode, see page 42. HM66_EN.book Page 30 Thursday, February 23, 2006 2:49 PM Chapter 5: Using the TV's basic features Adjusting the picture Selecting the picture mode You can select your personal preferences. To revert to the factory defaults, highlight Reset and...
... Contrast Brightness Color Tint Sharpness Reset Sports 100 50 50 0 50 Done ANT 1 Picture Settings Mode: Standard Mode Standard 4 To save the new settings, highlight Done and press T. Adjusting the picture quality You can adjust the picture quality (contrast, brightness, color, tint, and sharpness)... or b to High Bright mode, see page 42. HM66_EN.book Page 30 Thursday, February 23, 2006 2:49 PM Chapter 5: Using the TV's basic features Adjusting the picture Selecting the picture mode You can select your personal preferences. To revert to the factory defaults, highlight Reset and...


