User Manual
Page 2
...-SERVICEABLE PARTS INSIDE. Follow the manufacturer's recommendations for the safe installation and use the many exciting features of this manual completely, and keep these safety tips in the literature accompanying the appliance. REFER SERVICING TO QUALIFIED SERVICE PERSONNEL. This..., please keep it can become excited while watching a program, especially on a "larger than a UL Listed wall bracket appropriate for wall mounting this Toshiba LCD TV. For additional antenna grounding information, see items 34 and 35 on p. 4. 2 CHILD SAFETY: It Makes A Difference How and Where ...
...-SERVICEABLE PARTS INSIDE. Follow the manufacturer's recommendations for the safe installation and use the many exciting features of this manual completely, and keep these safety tips in the literature accompanying the appliance. REFER SERVICING TO QUALIFIED SERVICE PERSONNEL. This..., please keep it can become excited while watching a program, especially on a "larger than a UL Listed wall bracket appropriate for wall mounting this Toshiba LCD TV. For additional antenna grounding information, see items 34 and 35 on p. 4. 2 CHILD SAFETY: It Makes A Difference How and Where ...
User Manual
Page 5
These actions will damage the LCD screen. If these sounds become frequent or continuous, unplug the power cord and contact a Toshiba Authorized Service Provider. 44) WARNING: RISK OF SERIOUS PERSONAL INJURY OR EQUIPMENT DAMAGE! Service 46) WARNING: RISK OF ELECTRIC SHOCK! Leave the bottom of the...the LCD Panel face down on the back of the TV. 3) Be sure to secure the TV to clean the LCD screen, follow this manual to a Toshiba Authorized Service Provider. 47) If you leave the TV unattended or unused for long periods of the surface and assemble the pedestal as indicated below...
These actions will damage the LCD screen. If these sounds become frequent or continuous, unplug the power cord and contact a Toshiba Authorized Service Provider. 44) WARNING: RISK OF SERIOUS PERSONAL INJURY OR EQUIPMENT DAMAGE! Service 46) WARNING: RISK OF ELECTRIC SHOCK! Leave the bottom of the...the LCD Panel face down on the back of the TV. 3) Be sure to secure the TV to clean the LCD screen, follow this manual to a Toshiba Authorized Service Provider. 47) If you leave the TV unattended or unused for long periods of the surface and assemble the pedestal as indicated below...

User Manual
Page 10
... Initial settings 30 Menu language 30 Local Time Setting 30 Location 30 ANT/CABLE IN 30 Storing channels in memory (optional 30 Auto Tuning 30 Manual Tuning 31 Skipping channels 31 Skipping video inputs 31 Labeling channels 32 Labeling video inputs 32 Configuring shared inputs 32 Setting the Auto Input feature...
... Initial settings 30 Menu language 30 Local Time Setting 30 Location 30 ANT/CABLE IN 30 Storing channels in memory (optional 30 Auto Tuning 30 Manual Tuning 31 Skipping channels 31 Skipping video inputs 31 Labeling channels 32 Labeling video inputs 32 Configuring shared inputs 32 Setting the Auto Input feature...
User Manual
Page 15
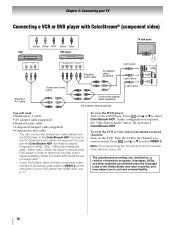
... with analog audio and composite video output. The input/output terminals on your TV) are often color-coded. See each device's owner's manual. 15 p. 19). R AUDIO L Standard A/V cables (composite video) Red White Yellow Use with video devices with Dolby Digital or PCM... cables Red Blue Green Use with video devices with infrared remote control. Separate audio cables are required. (ColorStream® is a Toshiba brand.) Note: Component video cables provide better picture quality than composite video cables. About the illustrations Note: The connection illustrations shown are...
... with analog audio and composite video output. The input/output terminals on your TV) are often color-coded. See each device's owner's manual. 15 p. 19). R AUDIO L Standard A/V cables (composite video) Red White Yellow Use with video devices with Dolby Digital or PCM... cables Red Blue Green Use with video devices with infrared remote control. Separate audio cables are required. (ColorStream® is a Toshiba brand.) Note: Component video cables provide better picture quality than composite video cables. About the illustrations Note: The connection illustrations shown are...
User Manual
Page 18
... not supported). - Chapter 2: Connecting your DVD player does not have component video, connect a composite video cable to VIDEO 2 on the side panel. Check the owner's manual of the United States and other materials is required.
... not supported). - Chapter 2: Connecting your DVD player does not have component video, connect a composite video cable to VIDEO 2 on the side panel. Check the owner's manual of the United States and other materials is required.
User Manual
Page 21
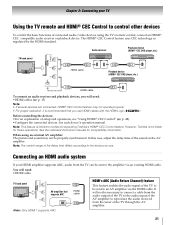
... player,etc.) HDMI OUT HDMI cable To connect an audio receiver and playback devices, you will need : •HDMI cables (- However, Toshiba is recommended that supports ARC HDMI cable Note: Only HDMI 1 supports ARC. Note: The control range of connected audio/video devices using an...will need : •HDMI cable TV back panel AV amplifier that you use HDMI cables with the HDMI Logo ( ). See each device's operation manual. p. 48). •Configure the connected devices. Chapter 2: Connecting your HDMI amplifier supports ARC, audio from the TV can be sent to the...
... player,etc.) HDMI OUT HDMI cable To connect an audio receiver and playback devices, you will need : •HDMI cables (- However, Toshiba is recommended that supports ARC HDMI cable Note: Only HDMI 1 supports ARC. Note: The control range of connected audio/video devices using an...will need : •HDMI cable TV back panel AV amplifier that you use HDMI cables with the HDMI Logo ( ). See each device's operation manual. p. 48). •Configure the connected devices. Chapter 2: Connecting your HDMI amplifier supports ARC, audio from the TV can be sent to the...

User Manual
Page 29
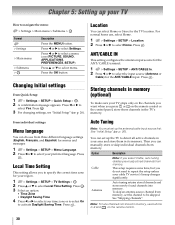
... depending on the current mode. Chapter 4: Initial Setup and Menu 1st Layer Settings 2nd Layer SETUP 3rd Layer Menu Language ANT/CABLE In Auto Tuning Manual Tuning TV Settings Quick Setup Location Software Upgrade Software Licenses System Information Reset TV Page 30 30 30 31 30, 31, 41, 44, 47 30...
... depending on the current mode. Chapter 4: Initial Setup and Menu 1st Layer Settings 2nd Layer SETUP 3rd Layer Menu Language ANT/CABLE In Auto Tuning Manual Tuning TV Settings Quick Setup Location Software Upgrade Software Licenses System Information Reset TV Page 30 30 30 31 30, 31, 41, 44, 47 30...
User Manual
Page 30
OK 2 A confirmation message appears. Press . Storing channels in the TV's memory. From individual settings: Menu language You can manually store or skip individual channels from memory. See "Initial Setup" (- Option Description Cable Note: If you press CH or CH on the remote control or ...
OK 2 A confirmation message appears. Press . Storing channels in the TV's memory. From individual settings: Menu language You can manually store or skip individual channels from memory. See "Initial Setup" (- Option Description Cable Note: If you press CH or CH on the remote control or ...
User Manual
Page 31
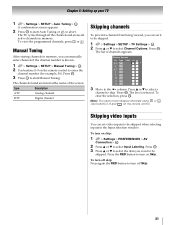
...cannot tune skipped channels using CH or . To turn on Skip. OK 2 Press B or b to skip. Press the RED button to start Manual Tuning. The TV cycles through all the channels and stores all active channels in the Input selection window. Press B or b to select a ...buttons 0-9 on the remote control. The channels found are listed at the center of channels appears. The box is known. 1 > Settings > SETUP > Manual Tuning > . Digital channel Skipping channels To prevent a channel from being viewed, you can set video inputs to enter the channel number (for example, 56...
...cannot tune skipped channels using CH or . To turn on Skip. OK 2 Press B or b to skip. Press the RED button to start Manual Tuning. The TV cycles through all the channels and stores all active channels in the Input selection window. Press B or b to select a ...buttons 0-9 on the remote control. The channels found are listed at the center of channels appears. The box is known. 1 > Settings > SETUP > Manual Tuning > . Digital channel Skipping channels To prevent a channel from being viewed, you can set video inputs to enter the channel number (for example, 56...
User Manual
Page 37
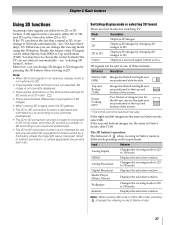
... the viewing mode to 2D to 3D mode. Note: • When 3D format signal is not received, display mode is . 3D signals can be selected manually. Native Displays a received signal format as it can either 2D or 3D, and 3D can not detect it automatically - Digital Broadcast Displays the selection window...
... the viewing mode to 2D to 3D mode. Note: • When 3D format signal is not received, display mode is . 3D signals can be selected manually. Native Displays a received signal format as it can either 2D or 3D, and 3D can not detect it automatically - Digital Broadcast Displays the selection window...

User Manual
Page 41
... the remote control to the next programmed channel Press CH or CH on the remote control or TV control panel. Digital channels have priority when manually entering a channel number using the 0-9 buttons on the remote control. (For example, to factory defaults, highlight Reset and press . The History List is set to...
... the remote control to the next programmed channel Press CH or CH on the remote control or TV control panel. Digital channels have priority when manually entering a channel number using the 0-9 buttons on the remote control. (For example, to factory defaults, highlight Reset and press . The History List is set to...
User Manual
Page 65
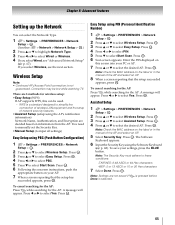
... -WEP: 5 or 13 ASCII or 10 or 26 Hex characters 7 Select Done. Press . OK Note: Check the MAC address on the label or in the manual of the AP and select an AP. 5 Select Security Key. Press . OK 3 Press B or b to select the desired AP. OK 4 Press B or b to select Assisted... C or c to select PIN. 5 Press b to select Easy Setup. OK 6 Scan screen appears. OK Note: Check the MAC address on the label or in the manual of the AP and select an AP. 8 When a screen reporting that the setup has succeeded appears, press . Press OK . Chapter 8: Advanced features Setting up the...
... -WEP: 5 or 13 ASCII or 10 or 26 Hex characters 7 Select Done. Press . OK Note: Check the MAC address on the label or in the manual of the AP and select an AP. 5 Select Security Key. Press . OK 3 Press B or b to select the desired AP. OK 4 Press B or b to select Assisted... C or c to select PIN. 5 Press b to select Easy Setup. OK 6 Scan screen appears. OK Note: Check the MAC address on the label or in the manual of the AP and select an AP. 8 When a screen reporting that the setup has succeeded appears, press . Press OK . Chapter 8: Advanced features Setting up the...

User Manual
Page 66
... you do not use DHCP. OK 3 Press B or b to select Open/Shared, WPA-PSK, or WPA2- Press C or c to select Manual Setup. Note: This item is grayed out when Encryption is None, a message will appear. p. 68). To save your settings, press the BLUE ..., 11n) Channel The channel in Wireless Setup can be low. p. 68). OK Note: When Encryption is None. 10 Select Done. Chapter 8: Advanced features Manual Setup 1 > Settings > PREFERENCES > Network Setup > . PSK. 7 Press B or b to check the availability of the Subnet Mask Default Gateway Default ...
... you do not use DHCP. OK 3 Press B or b to select Open/Shared, WPA-PSK, or WPA2- Press C or c to select Manual Setup. Note: This item is grayed out when Encryption is None, a message will appear. p. 68). To save your settings, press the BLUE ..., 11n) Channel The channel in Wireless Setup can be low. p. 68). OK Note: When Encryption is None. 10 Select Done. Chapter 8: Advanced features Manual Setup 1 > Settings > PREFERENCES > Network Setup > . PSK. 7 Press B or b to check the availability of the Subnet Mask Default Gateway Default ...

User Manual
Page 67
...Setup Note: The settings in Auto Setup are linked to those selected in the same way as IP Address. 8 Press B or b to Off, and manually set Auto Setup to highlight Default Gateway, and edit in the DNS Setup menu. Auto Setup: 1 > Settings > PREFERENCES > Network Setup > . ...TV is On, you do not know the correct values to select Advanced Network Setup. Press . Your Internet Service Provider should be between 0 and 255. Manual setup: 1 > Settings > PREFERENCES > Network Setup > . To save the setting, press . OK 4 Select Auto Setup. OK 67 DNS Setup Note:...
...Setup Note: The settings in Auto Setup are linked to those selected in the same way as IP Address. 8 Press B or b to Off, and manually set Auto Setup to highlight Default Gateway, and edit in the DNS Setup menu. Auto Setup: 1 > Settings > PREFERENCES > Network Setup > . ...TV is On, you do not know the correct values to select Advanced Network Setup. Press . Your Internet Service Provider should be between 0 and 255. Manual setup: 1 > Settings > PREFERENCES > Network Setup > . To save the setting, press . OK 4 Select Auto Setup. OK 67 DNS Setup Note:...

User Manual
Page 73
... Player This TV allows you must obtain any required permission from the menu. DMS is not available while using the Media Player feature. Toshiba cannot and does not grant such permission. A prompt appears. 2 Press C or c to select Setup. DLNA CERTIFIED™ Server:...network), you to the previous layer. Auto Start: 1 Insert a USB device into the USB terminal. 2 > Settings > APPLICATIONS > Media Player > . Manual Start: 1 Insert a USB device into the USB terminal. Media Player Specifications Device USB device: USB Mass Storage Class devices (MSC) Note: • ...
... Player This TV allows you must obtain any required permission from the menu. DMS is not available while using the Media Player feature. Toshiba cannot and does not grant such permission. A prompt appears. 2 Press C or c to select Setup. DLNA CERTIFIED™ Server:...network), you to the previous layer. Auto Start: 1 Insert a USB device into the USB terminal. 2 > Settings > APPLICATIONS > Media Player > . Manual Start: 1 Insert a USB device into the USB terminal. Media Player Specifications Device USB device: USB Mass Storage Class devices (MSC) Note: • ...
User Manual
Page 79
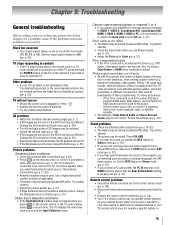
... be having broadcast difficulties. The cause may be having broadcast difficulties. p. 61). • If you cannot view signals from external devices connected to the owner's manual for the program you select that seems incorrect for your external device. p. 51). Refer to VIDEO 1, VIDEO 2, ColorStream HD1, ColorStream HD2, HDMI 1, HDMI 2, HDMI 3, HDMI...
... be having broadcast difficulties. The cause may be having broadcast difficulties. p. 61). • If you cannot view signals from external devices connected to the owner's manual for the program you select that seems incorrect for your external device. p. 51). Refer to VIDEO 1, VIDEO 2, ColorStream HD1, ColorStream HD2, HDMI 1, HDMI 2, HDMI 3, HDMI...
User Manual
Page 80
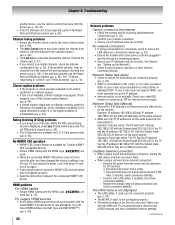
...channel (- p. 44). • A closed -caption feature (- p. 45). Refer to ensure the LAN cables are not connected properly (- Network Setup fails (Manual) • Ensure the TV IP address is incorrect. Remove AC power from the channel list and reprogram channels into memory (- p. 30). or c) the...If several devices are connected, HDMI® CEC Control feature may have compatible network settings. (continued) The DMS name is available for Toshiba HDMI® CEC compatible devices. • Ensure HDMI cables with the latest HDMI TV products due to the correct device mode (-...
...channel (- p. 44). • A closed -caption feature (- p. 45). Refer to ensure the LAN cables are not connected properly (- Network Setup fails (Manual) • Ensure the TV IP address is incorrect. Remove AC power from the channel list and reprogram channels into memory (- p. 30). or c) the...If several devices are connected, HDMI® CEC Control feature may have compatible network settings. (continued) The DMS name is available for Toshiba HDMI® CEC compatible devices. • Ensure HDMI cables with the latest HDMI TV products due to the correct device mode (-...
User Manual
Page 81
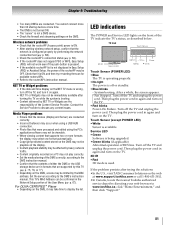
...ON, and then try re-starting wireless network setup, confirm that it on again. • NET TV or Widgets may take time to www.toshiba.ca; LED indications The POWER and Service LED lights on the DMS, access may be viewable. • When viewing content that are connected correctly...'s status, as described below. Then plug the power cord in again and turn on the TV. Contact the Service Provider to the DMS's instruction manual. p. 67). System booting. Media Player problems • Ensure that the devices (Display and Server) are supported by directing your web browser to...
...ON, and then try re-starting wireless network setup, confirm that it on again. • NET TV or Widgets may take time to www.toshiba.ca; LED indications The POWER and Service LED lights on the DMS, access may be viewable. • When viewing content that are connected correctly...'s status, as described below. Then plug the power cord in again and turn on the TV. Contact the Service Provider to the DMS's instruction manual. p. 67). System booting. Media Player problems • Ensure that the devices (Display and Server) are supported by directing your web browser to...
User Manual
Page 83
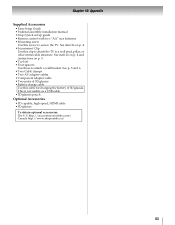
See p. 5 and 6. • Two Cable clamps • Two AV adapter cables • Component adapter cable • Two pairs of 3D glasses. http://ceaccessories.toshiba.com/ Canada http://www.shoptoshiba.ca/ 83 This is not usable as a USB cable. • 3D glasses pouch Optional Accessories • 3D capable, high speed, ... to attach the TV to a wall stud, pillar, or other immovable structure. Chapter 10: Appendix Supplied Accessories • Easy Setup Guide • Pedestal assembly installation manual • Stop/Quick set • Four spacers Use these to attach a wall bracket.
See p. 5 and 6. • Two Cable clamps • Two AV adapter cables • Component adapter cable • Two pairs of 3D glasses. http://ceaccessories.toshiba.com/ Canada http://www.shoptoshiba.ca/ 83 This is not usable as a USB cable. • 3D glasses pouch Optional Accessories • 3D capable, high speed, ... to attach the TV to a wall stud, pillar, or other immovable structure. Chapter 10: Appendix Supplied Accessories • Easy Setup Guide • Pedestal assembly installation manual • Stop/Quick set • Four spacers Use these to attach a wall bracket.
User Manual
Page 98
...needed, follow the instructions provided on the web site or please contact TAIS' Consumer Solution Center toll free at www.support.toshiba.com. This includes wall mounts, custom cabinets and other installation methods that service is purchased and operated in the U.S.A. ANY... BY THESE WARRANTIES. Chapter 10: Appendix Limited United States Warranty for LCD Televisions Toshiba America Information Systems, Inc. ("TAIS") makes the following all of the operating instructions in the Owner's Manual, review the section entitled "Concierge" located on our Customer Support Web site at...
...needed, follow the instructions provided on the web site or please contact TAIS' Consumer Solution Center toll free at www.support.toshiba.com. This includes wall mounts, custom cabinets and other installation methods that service is purchased and operated in the U.S.A. ANY... BY THESE WARRANTIES. Chapter 10: Appendix Limited United States Warranty for LCD Televisions Toshiba America Information Systems, Inc. ("TAIS") makes the following all of the operating instructions in the Owner's Manual, review the section entitled "Concierge" located on our Customer Support Web site at...


