
Owners Manual
Page 3
... a cart is dropped and the cabinet or enclosure surface has been damaged or the TV does not operate normally, take the following precautions: • ALWAYS turn off the TV and unplug the power cord to avoid possible electric shock or fire. • NEVER allow your safety.
... a cart is dropped and the cabinet or enclosure surface has been damaged or the TV does not operate normally, take the following precautions: • ALWAYS turn off the TV and unplug the power cord to avoid possible electric shock or fire. • NEVER allow your safety.
Owners Manual
Page 5
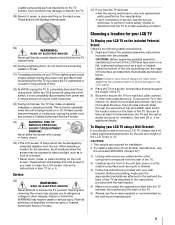
...lay the front of service, ask the service technician to perform routine safety checks to clean the LCD screen, follow this manual to a Toshiba Authorized Service Provider. 47) If you need to determine that can be exposed to completely disconnect from another manufacturer, use a UL Listed... and Follow the pedestal assembly instructions included with the pedestal. Leave the bottom of the unit protruding over the edge of current is being turned on the back of this manner: (1) attach the provided securement clip to an immovable structure, then (2) pass a sturdy strap through the...
...lay the front of service, ask the service technician to perform routine safety checks to clean the LCD screen, follow this manual to a Toshiba Authorized Service Provider. 47) If you need to determine that can be exposed to completely disconnect from another manufacturer, use a UL Listed... and Follow the pedestal assembly instructions included with the pedestal. Leave the bottom of the unit protruding over the edge of current is being turned on the back of this manner: (1) attach the provided securement clip to an immovable structure, then (2) pass a sturdy strap through the...
Owners Manual
Page 6
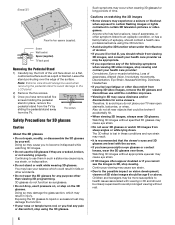
... with the screen. • If you feel any of the following symptoms when viewing 3D video images, stop viewing and contact your nose or temple turns red, or you have prescription eye glasses or contact lenses, wear the 3D glasses over the edge of time. Screw Wall bracket Spacer (supplied) TV...
... with the screen. • If you feel any of the following symptoms when viewing 3D video images, stop viewing and contact your nose or temple turns red, or you have prescription eye glasses or contact lenses, wear the 3D glasses over the edge of time. Screw Wall bracket Spacer (supplied) TV...
Owners Manual
Page 7
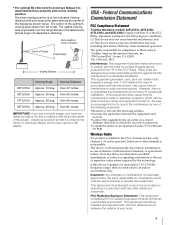
... your position so that you see a double image, your body. 7 Federal Communications Commission Statement FCC Compliance Statement Toshiba television models 32TL515U, 42TL515U, 47TL515U, and 55TL515U comply with any interference received, including interference that interference will not occur in the USA/Canada market, only channel ... interference, and (2) This device must not be determined by turning the equipment off and on, the user is encouraged to try to correct the interference by one of the screen. Over 69 inches 55TL515U Approx. 26 deg. However, there is generally over the...
... your position so that you see a double image, your body. 7 Federal Communications Commission Statement FCC Compliance Statement Toshiba television models 32TL515U, 42TL515U, 47TL515U, and 55TL515U comply with any interference received, including interference that interference will not occur in the USA/Canada market, only channel ... interference, and (2) This device must not be determined by turning the equipment off and on, the user is encouraged to try to correct the interference by one of the screen. Over 69 inches 55TL515U Approx. 26 deg. However, there is generally over the...
Owners Manual
Page 10
... HDMI® signal information 48 Using your PC with the TV 49 Adjusting the image 49 Setting the PC audio 49 Setting the timer to turn on the TV 49 Setting the sleep timer 50 Setting Automatic Power Down 50 Setting No Signal Power Down 50 Displaying TV status information 51...
... HDMI® signal information 48 Using your PC with the TV 49 Adjusting the image 49 Setting the PC audio 49 Setting the timer to turn on the TV 49 Setting the sleep timer 50 Setting Automatic Power Down 50 Setting No Signal Power Down 50 Displaying TV status information 51...
Owners Manual
Page 12
... power cords for the TV: • Read "Important notes about your TV and other devices (- p. 15-23). 5 See "Chapter 3: Using the remote control" (- When you turn on the TV, the Initial Setup menu appears. 7 See "Chapter 4: Initial Setup and Menu" for details on ambient light conditions and input signal content (- p. 30...
... power cords for the TV: • Read "Important notes about your TV and other devices (- p. 15-23). 5 See "Chapter 3: Using the remote control" (- When you turn on the TV, the Initial Setup menu appears. 7 See "Chapter 4: Initial Setup and Menu" for details on ambient light conditions and input signal content (- p. 30...
Owners Manual
Page 13
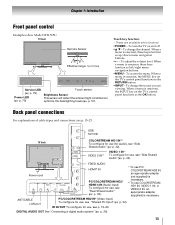
... the menu. Back panel connections For explanations of cable types and connections, see "Side Shared Audio" (- necessary. ** To use (for audio), see p. 15-23. To turn the TV on the TV's control panel functions as the RETURN button. • INPUT - Power cord ANT/CABLE LAN port FIXED AUDIO HDMI® IN...
... the menu. Back panel connections For explanations of cable types and connections, see "Side Shared Audio" (- necessary. ** To use (for audio), see p. 15-23. To turn the TV on the TV's control panel functions as the RETURN button. • INPUT - Power cord ANT/CABLE LAN port FIXED AUDIO HDMI® IN...
Owners Manual
Page 16
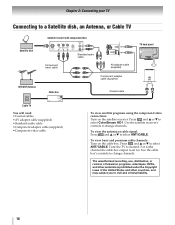
..., or revision of television programs, videotapes, DVDs, and other countries, and may subject you to select ANT/CABLE. To view basic and premium cable channels: Turn on the satellite receiver. Press and B or b to civil and criminal liability. 16 To view the antenna or cable signal: Press and B or b to change... (supplied) •Standard audio cable •Component adapter cable (supplied) •Component video cable Coaxial cable To view satellite programs using the component video connections: Turn on the cable box.
..., or revision of television programs, videotapes, DVDs, and other countries, and may subject you to select ANT/CABLE. To view basic and premium cable channels: Turn on the satellite receiver. Press and B or b to civil and criminal liability. 16 To view the antenna or cable signal: Press and B or b to change... (supplied) •Standard audio cable •Component adapter cable (supplied) •Component video cable Coaxial cable To view satellite programs using the component video connections: Turn on the cable box.

Owners Manual
Page 17
...video only. Because this is an evolving technology, it is possible that the HDMI or DVI device is reset properly: • When turning on electronic components, turn off the HDMI or DVI device first and then the TV. [1] EIA/CEA-861-D compliance covers the transmission of uncompressed digital video ...cable HDMI-to-DVI adapter cable The HDMI input on the TV first and then the HDMI or DVI device. • When turning off electronic components, turn on your TV receives digital audio and uncompressed digital video from an HDMI device, or uncompressed digital video from EIA/CEA-861-D ...
...video only. Because this is an evolving technology, it is possible that the HDMI or DVI device is reset properly: • When turning on electronic components, turn off the HDMI or DVI device first and then the TV. [1] EIA/CEA-861-D compliance covers the transmission of uncompressed digital video ...cable HDMI-to-DVI adapter cable The HDMI input on the TV first and then the HDMI or DVI device. • When turning off electronic components, turn on your TV receives digital audio and uncompressed digital video from an HDMI device, or uncompressed digital video from EIA/CEA-861-D ...

Owners Manual
Page 18
...to display Progressive (480p, 720p, 1080p) and Interlaced (480i, 1080i) video. To view the VCR or view and record antenna-sourced channels: Turn on the DVD player. You can connect the component video cables from the DVD player to civil and criminal liability. 18 If your TV Connecting...) •Standard audio cable •Component adapter cable (supplied) •Component video cable - See "Side Shared Audio" (- To view the DVD player: Turn on the VCR. Press and B or b to select ColorStream HD1. Tune the VCR to the channel you to the ColorStream HD1 terminal on the TV...
...to display Progressive (480p, 720p, 1080p) and Interlaced (480i, 1080i) video. To view the VCR or view and record antenna-sourced channels: Turn on the DVD player. You can connect the component video cables from the DVD player to civil and criminal liability. 18 If your TV Connecting...) •Standard audio cable •Component adapter cable (supplied) •Component video cable - See "Side Shared Audio" (- To view the DVD player: Turn on the VCR. Press and B or b to select ColorStream HD1. Tune the VCR to the channel you to the ColorStream HD1 terminal on the TV...

Owners Manual
Page 19
...OUT terminal to remotely operate many infrared remote-controlled devices enclosed in a similar manner. Note: If you cannot locate the device's infrared sensor: 1 Turn off the device. 2 Starting at the device's lower-left corner, place the end of the device's remote control (with a rubber band and ... in an entertainment center or similar cabinet. This sensor is located where the remote control touched the device. 4 If the device does not turn on some devices.* 2 Align one of IR-controlled audio device (for example) Infrared sensor IR blaster cable wand (approx.1 inch from device...
...OUT terminal to remotely operate many infrared remote-controlled devices enclosed in a similar manner. Note: If you cannot locate the device's infrared sensor: 1 Turn off the device. 2 Starting at the device's lower-left corner, place the end of the device's remote control (with a rubber band and ... in an entertainment center or similar cabinet. This sensor is located where the remote control touched the device. 4 If the device does not turn on some devices.* 2 Align one of IR-controlled audio device (for example) Infrared sensor IR blaster cable wand (approx.1 inch from device...
Owners Manual
Page 25
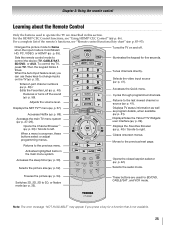
...35). p. 46). Then the keypad blinks 3 times. p. 59). p. 68). p. 39) / Scrolls to control the device: TV, CABLE/SAT, BD/DVD, or AUX. Turns the TV on the TV (- Cycles through programmed channels. Displays TV status information as well as program details, when available (- Displays/hides the Yahoo!®...54). Changes the picture mode to the last viewed channel or source (- p. 50). To control the TV, press TV. p. 33). Reduces or turns off . Returns to Game when the input mode is onscreen, these keys to the previous/next page. Illuminates the keypad for five seconds. Accesses ...
...35). p. 46). Then the keypad blinks 3 times. p. 59). p. 68). p. 39) / Scrolls to control the device: TV, CABLE/SAT, BD/DVD, or AUX. Turns the TV on the TV (- Cycles through programmed channels. Displays TV status information as well as program details, when available (- Displays/hides the Yahoo!®...54). Changes the picture mode to the last viewed channel or source (- p. 50). To control the TV, press TV. p. 33). Reduces or turns off . Returns to Game when the input mode is onscreen, these keys to the previous/next page. Illuminates the keypad for five seconds. Accesses ...

Owners Manual
Page 26
... . (ENERGY STAR® qualified) Home Select Home for ANT/CABLE. First, select Cable. Chapter 4: Initial Setup and Menu Initial Setup When you first turn on or reset the TV, the Initial Setup window will appear every time you...
... . (ENERGY STAR® qualified) Home Select Home for ANT/CABLE. First, select Cable. Chapter 4: Initial Setup and Menu Initial Setup When you first turn on or reset the TV, the Initial Setup window will appear every time you...

Owners Manual
Page 31
... or b to select a channel to enter the channel number (for example, 56). OK Note: You cannot tune skipped channels using CH or . To turn off Skip. 31 CH Manual Tuning After storing channels in memory, you want to be skipped when selecting inputs in memory. Press . Channel Options Ch... 6 ATV 6-1 DTV 8 ATV 9 ATV 10 ATV 11 ATV 12 ATV 3 Move to turn off skip: Press again the RED button to select Channel Options. To turn on the remote control to skip. OK 2 Press B or b to turn on the remote control. To clear the selection, press . CH Use buttons 0-9 and -...
... or b to select a channel to enter the channel number (for example, 56). OK Note: You cannot tune skipped channels using CH or . To turn off Skip. 31 CH Manual Tuning After storing channels in memory, you want to be skipped when selecting inputs in memory. Press . Channel Options Ch... 6 ATV 6-1 DTV 8 ATV 9 ATV 10 ATV 11 ATV 12 ATV 3 Move to turn off skip: Press again the RED button to select Channel Options. To turn on the remote control to skip. OK 2 Press B or b to turn on the remote control. To clear the selection, press . CH Use buttons 0-9 and -...
Owners Manual
Page 33
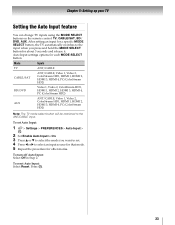
... b to select the mode you press and hold the MODE SELECT button for about 3 seconds and release it. To reset Auto Input: Select Reset. To turn off Auto Input: Select Off in Step 2. OK 33 To set . 4 Press C or c to set Auto Input: 1 > Settings > PREFERENCES > Auto Input...
... b to select the mode you press and hold the MODE SELECT button for about 3 seconds and release it. To reset Auto Input: Select Reset. To turn off Auto Input: Select Off in Step 2. OK 33 To set . 4 Press C or c to set Auto Input: 1 > Settings > PREFERENCES > Auto Input...

Owners Manual
Page 40
... mode: 1 Highlight an item. OK 3 Press to the channel or input. 2 Press and hold - for 3 seconds. Note: Additions are turned off, or will not display the Favorites Browser. • Pressing opens the Channel Browser™ Favorites list regardless of the last selected list in ... is integrated into the Channel Browser™. CH To clear channels from the History List: •Reconfigure the ANT/CABLE input. •Turn off , pressing will not display the Channel Browser™. To tune to surf back through the available lists: 1 Open the Channel Browser...
... mode: 1 Highlight an item. OK 3 Press to the channel or input. 2 Press and hold - for 3 seconds. Note: Additions are turned off, or will not display the Favorites Browser. • Pressing opens the Channel Browser™ Favorites list regardless of the last selected list in ... is integrated into the Channel Browser™. CH To clear channels from the History List: •Reconfigure the ANT/CABLE input. •Turn off , pressing will not display the Channel Browser™. To tune to surf back through the available lists: 1 Open the Channel Browser...
Owners Manual
Page 42
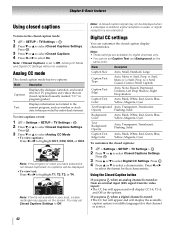
... may appear on the closed caption display characteristics. Press . Press . Serif, Prop. OK 3 Press B or b to select On. Chapter 6: Basic features Using closed captions To turn on the screen. Press . OK 3 Press b or B to select Closed Captions. 4 Press C or c to select Digital CC Settings. OK 3 Press b or B to select Analog CC...
... may appear on the closed caption display characteristics. Press . Press . Serif, Prop. OK 3 Press B or b to select On. Chapter 6: Basic features Using closed captions To turn on the screen. Press . OK 3 Press b or B to select Closed Captions. 4 Press C or c to select Digital CC Settings. OK 3 Press b or B to select Analog CC...

Owners Manual
Page 46
...Control Setup: 1 > Settings > PREFERENCES > HDMI-CEC Control Setup > . OK 2 Press B or b to highlight Enable HDMI-CEC Control. 3 Press C or c to control Toshiba HDMI® CEC compatible devices from being changed accidentally (by children, for example). Locking the control panel You can use the remote control to...limit for playing a video game. To unlock the control panel: Select Off in the HDMI-CEC Control Setup menu is pressed, the TV turns off and you to select On. Note: When Panel Lock is restored (as if the GameTimer had been activated). Using HDMI® CEC...
...Control Setup: 1 > Settings > PREFERENCES > HDMI-CEC Control Setup > . OK 2 Press B or b to highlight Enable HDMI-CEC Control. 3 Press C or c to control Toshiba HDMI® CEC compatible devices from being changed accidentally (by children, for example). Locking the control panel You can use the remote control to...limit for playing a video game. To unlock the control panel: Select Off in the HDMI-CEC Control Setup menu is pressed, the TV turns off and you to select On. Note: When Panel Lock is restored (as if the GameTimer had been activated). Using HDMI® CEC...

Owners Manual
Page 47
... menu, etc. OK Enters contents menu, etc. RED, GREEN, YELLOW, BLUE Controls various operations Note: These functions depend on and off. OK Item Description Power Turns the selected device on the connected devices. Contents Menu Accesses the contents list when you are watching. Note: • These functions depend on the connected...
... menu, etc. OK Enters contents menu, etc. RED, GREEN, YELLOW, BLUE Controls various operations Note: These functions depend on and off. OK Item Description Power Turns the selected device on the connected devices. Contents Menu Accesses the contents list when you are watching. Note: • These functions depend on the connected...
Owners Manual
Page 48
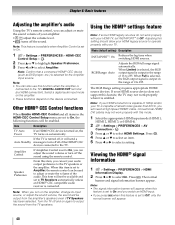
...receiver is connected to output the sound from the amplifier's speakers even if TV Speakers has been selected. If the TV is turned on, the TV turns on again to the TV's DIGITAL AUDIO OUT terminal (not HDMI connection). The normal banner and signal information banner appear. ...When this setting should allow your HDMI legacy source to operate properly with your HDMI connection is capable of 16 to turn on the device connected. Select a digital audio input mode on the amplifier. • These functions depend on the amplifier, change its input...
...receiver is connected to output the sound from the amplifier's speakers even if TV Speakers has been selected. If the TV is turned on, the TV turns on again to the TV's DIGITAL AUDIO OUT terminal (not HDMI connection). The normal banner and signal information banner appear. ...When this setting should allow your HDMI legacy source to operate properly with your HDMI connection is capable of 16 to turn on the device connected. Select a digital audio input mode on the amplifier. • These functions depend on the amplifier, change its input...


