
Owners Manual
Page 1
... model number and serial number are on the back and side of steps for setting up your new TV, see page 12. www.support.toshiba.com Model number: Serial number: TD/M VX1A00206300 Note: To display a High Definition picture, the TV must be receiving a High Definition signal (such as an... Definition digital satellite program). Record these numbers whenever you communicate with your TV. Integrated High Definition LCD Television 32TL515U 42TL515U 47TL515U 55TL515U For an overview of your Toshiba dealer about this TV.
... model number and serial number are on the back and side of steps for setting up your new TV, see page 12. www.support.toshiba.com Model number: Serial number: TD/M VX1A00206300 Note: To display a High Definition picture, the TV must be receiving a High Definition signal (such as an... Definition digital satellite program). Record these numbers whenever you communicate with your TV. Integrated High Definition LCD Television 32TL515U 42TL515U 47TL515U 55TL515U For an overview of your Toshiba dealer about this TV.
Owners Manual
Page 8
...device could void the user's authority to transmit, or operational failure. Important: Any changes or modifications not expressly approved by the U.S. Picture Settings, Auto Brightness Sensor) may be co-located or operating in this TV is viewed from these symptoms. 1) An afterimage (ghost)...meet ENERGY STAR® requirements. ENERGY STAR® User Information ENERGY STAR User Information Statement: the factory default settings of time. therefore, Toshiba is displayed for compliance could automatically discontinue transmission in the USA/Canada market, only channel 1-11 can be ...
...device could void the user's authority to transmit, or operational failure. Important: Any changes or modifications not expressly approved by the U.S. Picture Settings, Auto Brightness Sensor) may be co-located or operating in this TV is viewed from these symptoms. 1) An afterimage (ghost)...meet ENERGY STAR® requirements. ENERGY STAR® User Information ENERGY STAR User Information Statement: the factory default settings of time. therefore, Toshiba is displayed for compliance could automatically discontinue transmission in the USA/Canada market, only channel 1-11 can be ...
Owners Manual
Page 10
...51 Power failure 51 Chapter 7: Picture and sound controls 52 Selecting the picture size 52 Scrolling the picture 54 Using the Auto Aspect feature 54 Using the 4:3 Stretch 54 Freezing the picture 54 Adjusting the picture 55 Selecting the picture mode 55 Adjusting the picture quality 55 Using the advanced picture settings features 56 Edge Enhancer 56 Dynamic... Auto Brightness Sensor 57 Backlight Adjustment Pro 57 ColorMaster 58 Base Color Adjustment 58 Color temperature 58 Resetting to the factory default 58 Setting the Expert Picture Settings 58 Test Pattern 58 RGB Filter 58
...51 Power failure 51 Chapter 7: Picture and sound controls 52 Selecting the picture size 52 Scrolling the picture 54 Using the Auto Aspect feature 54 Using the 4:3 Stretch 54 Freezing the picture 54 Adjusting the picture 55 Selecting the picture mode 55 Adjusting the picture quality 55 Using the advanced picture settings features 56 Edge Enhancer 56 Dynamic... Auto Brightness Sensor 57 Backlight Adjustment Pro 57 ColorMaster 58 Base Color Adjustment 58 Color temperature 58 Resetting to the factory default 58 Setting the Expert Picture Settings 58 Test Pattern 58 RGB Filter 58
Owners Manual
Page 11
White Balance 58 Resetting to the factory default 59 Locking the picture settings 59 Adjusting the audio 59 Muting the sound 59 Selecting stereo/SAP broadcasts 59 Adjusting...Volume 60 Using advanced sound features 61 Using surround sound 61 Chapter 8: Advanced features 62 Using your home network 62 Setting up the Network 63 Wireless Setup 63 Advanced Network Setup 65 Network Connection Test 66 Using the software keyboard 66 ...control codes 90 Limited United States Warranty for LCD Televisions 96 Limited Canadian Warranty for Toshiba Brand Flat Panel Televisions 97 Index 100 11
White Balance 58 Resetting to the factory default 59 Locking the picture settings 59 Adjusting the audio 59 Muting the sound 59 Selecting stereo/SAP broadcasts 59 Adjusting...Volume 60 Using advanced sound features 61 Using surround sound 61 Chapter 8: Advanced features 62 Using your home network 62 Setting up the Network 63 Wireless Setup 63 Advanced Network Setup 65 Network Connection Test 66 Using the software keyboard 66 ...control codes 90 Limited United States Warranty for LCD Televisions 96 Limited Canadian Warranty for Toshiba Brand Flat Panel Televisions 97 Index 100 11
Owners Manual
Page 12
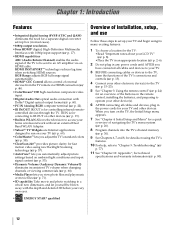
...;AutoView® lets you view photo files and play music or movie files (- p. 60). •Media Player lets you automatically adjust picture settings based on the remote control, installing the batteries, and preparing to operate your other device(s). 6 AFTER connecting all cables and devices to ...your TV (- Chapter 1: Introduction Features •Integrated digital tuning (8VSB ATSC and QAM) eliminates the need for a separate digital converter set-top box (in most cases). •1080p output resolution. •Four HDMI® digital, High-Definition Multimedia Interfaces with the ...
...;AutoView® lets you view photo files and play music or movie files (- p. 60). •Media Player lets you automatically adjust picture settings based on the remote control, installing the batteries, and preparing to operate your other device(s). 6 AFTER connecting all cables and devices to ...your TV (- Chapter 1: Introduction Features •Integrated digital tuning (8VSB ATSC and QAM) eliminates the need for a separate digital converter set-top box (in most cases). •1080p output resolution. •Four HDMI® digital, High-Definition Multimedia Interfaces with the ...
Owners Manual
Page 22
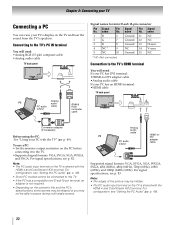
... •Analog audio cable TV back panel Signal names for mini D-sub 15-pin connector Pin Signal No. Note: • The edges of the picture may be hidden. • The PC audio input terminal on the content's title and the PC's specifications, some scenes may be skipped or you... PC: See "Using your PC's display on the TV and hear the sound from the TV's speakers. For configuration, see p. 83. For signal specifications, see "Setting the PC Audio" (- Analog audio cable HDMI-to the TV. •Supported signal formats: VGA, SVGA, XGA, WXGA, and SXGA. For configuration, see p. 82....
... •Analog audio cable TV back panel Signal names for mini D-sub 15-pin connector Pin Signal No. Note: • The edges of the picture may be hidden. • The PC audio input terminal on the content's title and the PC's specifications, some scenes may be skipped or you... PC: See "Using your PC's display on the TV and hear the sound from the TV's speakers. For configuration, see p. 83. For signal specifications, see "Setting the PC Audio" (- Analog audio cable HDMI-to the TV. •Supported signal formats: VGA, SVGA, XGA, WXGA, and SXGA. For configuration, see p. 82....
Owners Manual
Page 25
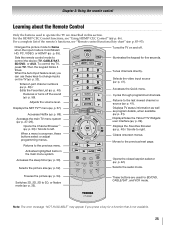
...set, you press a key for a function that is not available. 25 p. 67). Accesses Netflix (- Turns the TV on the TV (- Accesses the Quick menu. Displays TV status information as well as program details, when available (- Displays the Favorites Browser (- p. 50). p. 42). Selects the picture... timer (- p. 54). Then the keypad blinks 3 times. Reduces or turns off . Displays/hides the Yahoo!®TV Widgets user interface (- Sets the remote control mode to right. p. 51). Adjusts the volume level. Opens the closed caption selector (- p. 59). Illuminates the keypad for ...
...set, you press a key for a function that is not available. 25 p. 67). Accesses Netflix (- Turns the TV on the TV (- Accesses the Quick menu. Displays TV status information as well as program details, when available (- Displays the Favorites Browser (- p. 50). p. 42). Selects the picture... timer (- p. 54). Then the keypad blinks 3 times. Reduces or turns off . Displays/hides the Yahoo!®TV Widgets user interface (- Sets the remote control mode to right. p. 51). Adjusts the volume level. Opens the closed caption selector (- p. 59). Illuminates the keypad for ...
Owners Manual
Page 27
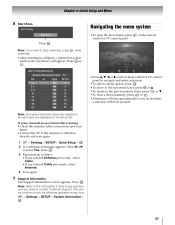
...problem and you selected Cable previously, select Antenna. 4 Scan again. 7 Support Information The Support Information screen appears. OK 3 Repeat set up to Step 6. •If you selected Antenna previously, select Cable. •If you need to stop scanning, press scanning. Press... . on the remote Picture Sound Applications Settings Preferences Setup •Press B, b, C, or c on the remote control or TV control panel to select Yes. Chapter 4: Initial Setup...
...problem and you selected Cable previously, select Antenna. 4 Scan again. 7 Support Information The Support Information screen appears. OK 3 Repeat set up to Step 6. •If you selected Antenna previously, select Cable. •If you need to stop scanning, press scanning. Press... . on the remote Picture Sound Applications Settings Preferences Setup •Press B, b, C, or c on the remote control or TV control panel to select Yes. Chapter 4: Initial Setup...
Owners Manual
Page 28
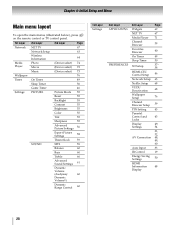
... Contrast 55 Brightness 55 Color 55 Tint 55 Sharpness 55 Advanced Picture Settings 56 Expert Picture Settings 58 TheaterLock 59 MTS 59 Balance 60 Bass 60 Treble 60 Advanced Sound Settings 61 Dynamic Volume (Audyssey 60 Dynamic Volume®) Dynamic Range Control 60 1st Layer Settings 2nd Layer APPLICATIONS PREFERENCES 3rd Layer Widgets NET TV Media...
... Contrast 55 Brightness 55 Color 55 Tint 55 Sharpness 55 Advanced Picture Settings 56 Expert Picture Settings 58 TheaterLock 59 MTS 59 Balance 60 Bass 60 Treble 60 Advanced Sound Settings 61 Dynamic Volume (Audyssey 60 Dynamic Volume®) Dynamic Range Control 60 1st Layer Settings 2nd Layer APPLICATIONS PREFERENCES 3rd Layer Widgets NET TV Media...
Owners Manual
Page 29
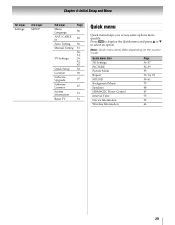
Quick menu Item 3D Settings PICTURE Picture Mode Repeat SOUND Background Music Speakers HDMI-CEC Player Control Interval Time Device Information Wireless Information Page 36-37 52-59 55 73, 74, 75 ... the Quick menu and press B or b to select an option. Chapter 4: Initial Setup and Menu 1st Layer Settings 2nd Layer SETUP 3rd Layer Menu Language ANT/CABLE In Auto Tuning Manual Tuning TV Settings Quick Setup Location Software Upgrade Software Licenses System Information Reset TV Page 30 30 30 31 30, 31...
Quick menu Item 3D Settings PICTURE Picture Mode Repeat SOUND Background Music Speakers HDMI-CEC Player Control Interval Time Device Information Wireless Information Page 36-37 52-59 55 73, 74, 75 ... the Quick menu and press B or b to select an option. Chapter 4: Initial Setup and Menu 1st Layer Settings 2nd Layer SETUP 3rd Layer Menu Language ANT/CABLE In Auto Tuning Manual Tuning TV Settings Quick Setup Location Software Upgrade Software Licenses System Information Reset TV Page 30 30 30 31 30, 31...
Owners Manual
Page 30
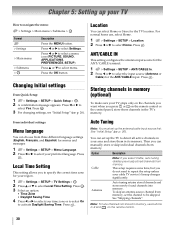
... or b to be skipped. To skip an antenna source channel from three different language settings (English, Français, and Español) for the TV location. Press C or c to select a menu icon (PICTURE, SOUND, APPLICATIONS, PREFERENCES, SETUP) Press B or b to select the input source ...(Antenna or Cable) for the ANT/CABLE terminal. 1 > Settings > SETUP > ANT/CABLE In. 2 Press C or c to select menu. Press ....
... or b to be skipped. To skip an antenna source channel from three different language settings (English, Français, and Español) for the TV location. Press C or c to select a menu icon (PICTURE, SOUND, APPLICATIONS, PREFERENCES, SETUP) Press B or b to select the input source ...(Antenna or Cable) for the ANT/CABLE terminal. 1 > Settings > SETUP > ANT/CABLE In. 2 Press C or c to select menu. Press ....

Owners Manual
Page 34
... to -2D conversion results may vary depending upon content quality and display device capability/ functionality/settings. • Wear the 3D glasses properly, otherwise you connect a device such as deformation ...and should be difficult to certain flashing images or lights contained in certain 3D television pictures or video games. About the connecting cable: Use a high-speed HDMI cable when ..., water, or abrasive cleaners, which are not subject to repair, but can occur. http://ceaccessories.toshiba.com/ Canada http://www.shoptoshiba.ca/ Note: Use 3D glasses of a dirty or coarse cloth ...
... to -2D conversion results may vary depending upon content quality and display device capability/ functionality/settings. • Wear the 3D glasses properly, otherwise you connect a device such as deformation ...and should be difficult to certain flashing images or lights contained in certain 3D television pictures or video games. About the connecting cable: Use a high-speed HDMI cable when ..., water, or abrasive cleaners, which are not subject to repair, but can occur. http://ceaccessories.toshiba.com/ Canada http://www.shoptoshiba.ca/ Note: Use 3D glasses of a dirty or coarse cloth ...

Owners Manual
Page 35
..., and 3D can change the viewing mode using the 3D button. If the TV can detect the fact that a signal is different depending on the Picture Size settings for 3D mode and 2D mode. • There are individual differences in perception of 3D images. • When viewing 3D images, wear the 3D...
..., and 3D can change the viewing mode using the 3D button. If the TV can detect the fact that a signal is different depending on the Picture Size settings for 3D mode and 2D mode. • There are individual differences in perception of 3D images. • When viewing 3D images, wear the 3D...

Owners Manual
Page 47
...connected devices. • The HDMI-CEC Player Control item is not available under these key functions, set to control and press . The Enable HDMI-CEC Control item is set the MODE SELECT switch on the remote control to open the Quick menu. 2 Select HDMI-CEC ...174; CEC Player Control menu functions: 1 Press to TV. O K Setup Menu Accesses the device's setup menu. Button Description Begins playback. Pauses the picture during play or record mode. Note: • These functions depend on and off. The connected HDMI® CEC device is selected. - A non-...
...connected devices. • The HDMI-CEC Player Control item is not available under these key functions, set to control and press . The Enable HDMI-CEC Control item is set the MODE SELECT switch on the remote control to open the Quick menu. 2 Select HDMI-CEC ...174; CEC Player Control menu functions: 1 Press to TV. O K Setup Menu Accesses the device's setup menu. Button Description Begins playback. Pauses the picture during play or record mode. Note: • These functions depend on and off. The connected HDMI® CEC device is selected. - A non-...

Owners Manual
Page 49
...on . center.* Vertical Position Moves the picture up/ within ±15 from and sharpen the picture. To reset PC Settings: Select Reset. OK 2 Press B or b to select Rear Shared Audio. 3 Press C or c to select Off. 49 To cancel the timer: 1 > Settings > APPLICATIONS > On Timer > OK...32). Time until Power On Desired amount of time before the TV turns on p. 41). 2 > Settings > PREFERENCES > Display Settings > . If the picture is not a sign of the picture are hidden, readjust Horizontal Position and Vertical Position. OK 3 Press B or b to Off, other menus...
...on . center.* Vertical Position Moves the picture up/ within ±15 from and sharpen the picture. To reset PC Settings: Select Reset. OK 2 Press B or b to select Rear Shared Audio. 3 Press C or c to select Off. 49 To cancel the timer: 1 > Settings > APPLICATIONS > On Timer > OK...32). Time until Power On Desired amount of time before the TV turns on p. 41). 2 > Settings > PREFERENCES > Display Settings > . If the picture is not a sign of the picture are hidden, readjust Horizontal Position and Vertical Position. OK 3 Press B or b to Off, other menus...

Owners Manual
Page 55
... darkened room. When in video mode and no signal is input, this selection is set to On. Note: • Any picture settings that picture mode. Standard Standard picture settings. Selection Pressing C Pressing c Backlight* darker lighter Contrast lower higher Brightness darker lighter Color...Movie 1 Movie 2 Lower contrast for the viewing of the entire screen. You can select your desired picture settings from the controller. Press . Press . Note: • The picture mode you adjust affect the current input only. Note: • PC mode is available for HDMI ...
... darkened room. When in video mode and no signal is input, this selection is set to On. Note: • Any picture settings that picture mode. Standard Standard picture settings. Selection Pressing C Pressing c Backlight* darker lighter Contrast lower higher Brightness darker lighter Color...Movie 1 Movie 2 Lower contrast for the viewing of the entire screen. You can select your desired picture settings from the controller. Press . Press . Note: • The picture mode you adjust affect the current input only. Note: • PC mode is available for HDMI ...

Owners Manual
Page 56
... select On or Off. To adjust the static gamma settings: 1 > Settings > PICTURE > Advanced Picture Settings > . Press . Chapter 7: Picture and sound controls Using the advanced picture settings features Note: Some of the Advanced Picture Settings features will be available for your contrast settings and then automatically adjusts the video. 1 > Settings > PICTURE > Advanced Picture Settings > . Note: When the Picture Mode is set to Game or PC, Edge Enhancer is...
... select On or Off. To adjust the static gamma settings: 1 > Settings > PICTURE > Advanced Picture Settings > . Press . Chapter 7: Picture and sound controls Using the advanced picture settings features Note: Some of the Advanced Picture Settings features will be available for your contrast settings and then automatically adjusts the video. 1 > Settings > PICTURE > Advanced Picture Settings > . Note: When the Picture Mode is set to Game or PC, Edge Enhancer is...

Owners Manual
Page 57
...; The differences may be available. DNR DNR lets you to reduce the noise effect. 1 > Settings > PICTURE > Advanced Picture Settings > . Press . Note: • If the Picture Mode is set to On, the TV optimizes the backlighting levels to select Low, Middle, High, Auto, or ...Game or PC, this feature is not available. Note: If the Picture Mode is from 0 to match the ambient light conditions. 1 > Settings > PICTURE > Advanced Picture Settings > . For the best results, use lower settings, as picture quality may not always be available. 57 OK 2 Press B ...
...; The differences may be available. DNR DNR lets you to reduce the noise effect. 1 > Settings > PICTURE > Advanced Picture Settings > . Press . Note: • If the Picture Mode is set to On, the TV optimizes the backlighting levels to select Low, Middle, High, Auto, or ...Game or PC, this feature is not available. Note: If the Picture Mode is from 0 to match the ambient light conditions. 1 > Settings > PICTURE > Advanced Picture Settings > . For the best results, use lower settings, as picture quality may not always be available. 57 OK 2 Press B ...

Owners Manual
Page 58
.... OK 2 Press B or b to select On. Note: When the Picture Mode is set to On, the list of each color. 1 > Settings > PICTURE > Expert Picture Settings > . Press . When you to adjust standard colors. 1 > Settings > PICTURE > Advanced Picture Settings > . Press . OK 2 Press B or b to select Color Temperature. 3 Press C or c to the factory default 1 > Settings > PICTURE > Advanced Picture Settings > . OK A confirmation screen appears. 3 Select Yes. RGB Filter...
.... OK 2 Press B or b to select On. Note: When the Picture Mode is set to On, the list of each color. 1 > Settings > PICTURE > Expert Picture Settings > . Press . When you to adjust standard colors. 1 > Settings > PICTURE > Advanced Picture Settings > . Press . OK 2 Press B or b to select Color Temperature. 3 Press C or c to the factory default 1 > Settings > PICTURE > Advanced Picture Settings > . OK A confirmation screen appears. 3 Select Yes. RGB Filter...

Owners Manual
Page 59
... TheaterLock is pressed. Press . To listen to a second audio program on the current input to 0. Chapter 7: Picture and sound controls Setting Type You can listen to select SAP. For example, you can adjust the white balance setting. 1 > Settings > PICTURE > Expert Picture Settings > . Adjusting the audio Muting the sound Press to adjust. Press C or c to partially reduce (1/2 Mute...
... TheaterLock is pressed. Press . To listen to a second audio program on the current input to 0. Chapter 7: Picture and sound controls Setting Type You can listen to select SAP. For example, you can adjust the white balance setting. 1 > Settings > PICTURE > Expert Picture Settings > . Adjusting the audio Muting the sound Press to adjust. Press C or c to partially reduce (1/2 Mute...


