

User Manual
Page 1
...64257;nition digital satellite program). Owner's Manual Integrated High Definition LCD Television HIGH-DEFINITION TELEVISION 40SL412U 46SL412U 55SL412U 55S41U Foran overview of your TV. Record these numbers whenever you communicate with your TV antenna installer, cable provider, or satellite provider.... © 2011 TOSHIBA CORPORATION All Rights Reserved Owner's Record The model number and serial number are on the back of steps for setting up yournewTV, see page11. Model number: Serial number: For details, please ...
...64257;nition digital satellite program). Owner's Manual Integrated High Definition LCD Television HIGH-DEFINITION TELEVISION 40SL412U 46SL412U 55SL412U 55S41U Foran overview of your TV. Record these numbers whenever you communicate with your TV antenna installer, cable provider, or satellite provider.... © 2011 TOSHIBA CORPORATION All Rights Reserved Owner's Record The model number and serial number are on the back of steps for setting up yournewTV, see page11. Model number: Serial number: For details, please ...
User Manual
Page 2
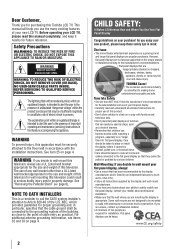
... RAIN OR MOISTURE. REFER SERVICING TO QUALIFIED SERVICE PERSONNEL. WARNING: If you decide to Article 820-40 of this television for wall mounting this Toshiba LCD TV. See "Removing the Pedestal Stand" ( page 6). NOTE TO CATV INSTALLERS This is a reminder to call the CATV system ... down. • Care should be of sufficient magnitude to constitute a risk of electric shock to climb on or play with furniture and television sets. • Don't place flat panel displays on the proper stands or installed according to safely install your flat panel display, contact your retailer ...
... RAIN OR MOISTURE. REFER SERVICING TO QUALIFIED SERVICE PERSONNEL. WARNING: If you decide to Article 820-40 of this television for wall mounting this Toshiba LCD TV. See "Removing the Pedestal Stand" ( page 6). NOTE TO CATV INSTALLERS This is a reminder to call the CATV system ... down. • Care should be of sufficient magnitude to constitute a risk of electric shock to climb on or play with furniture and television sets. • Don't place flat panel displays on the proper stands or installed according to safely install your flat panel display, contact your retailer ...
User Manual
Page 7
... about your warranty. Changing Picture Settings may cause harmful interference to the following symptoms are technical limitations of the FCC rules. FCC Declaration of Conformity Compliance Statement (Part 15): Toshiba 40SL412U, 46SL412U, 55SL412U, and 55S41U Television models comply with Part 15... of LCD Display technology and are not visible when the picture is : Toshiba America Information Systems, Inc. 9740 Irvine Blvd.; Operation...
... about your warranty. Changing Picture Settings may cause harmful interference to the following symptoms are technical limitations of the FCC rules. FCC Declaration of Conformity Compliance Statement (Part 15): Toshiba 40SL412U, 46SL412U, 55SL412U, and 55S41U Television models comply with Part 15... of LCD Display technology and are not visible when the picture is : Toshiba America Information Systems, Inc. 9740 Irvine Blvd.; Operation...
User Manual
Page 9
... 42 Locking channels 42 Using the GameTimer 42 Using the panel lock feature 43 Using the PC settings feature 43 Setting the PC Audio 44 Using the Media Player 44 Using the Media Player with USB 44 To ...the color temperature 51 Using the ClearFrame™ feature (For 46SL412U, 55SL412U, and 55S41U 52 Using the Film Stabilization feature (For 46SL412U, 55SL412U, and 55S41U 52 Using CableClear® digital noise reduction 52 Using MPEG noise reduction 53 Using... United States Warranty for LCD Televisions 58 Limited Canadian Warranty for Toshiba Brand Flat Panel Televisions 59 9
... 42 Locking channels 42 Using the GameTimer 42 Using the panel lock feature 43 Using the PC settings feature 43 Setting the PC Audio 44 Using the Media Player 44 Using the Media Player with USB 44 To ...the color temperature 51 Using the ClearFrame™ feature (For 46SL412U, 55SL412U, and 55S41U 52 Using the Film Stabilization feature (For 46SL412U, 55SL412U, and 55S41U 52 Using CableClear® digital noise reduction 52 Using MPEG noise reduction 53 Using... United States Warranty for LCD Televisions 58 Limited Canadian Warranty for Toshiba Brand Flat Panel Televisions 59 9
User Manual
Page 10
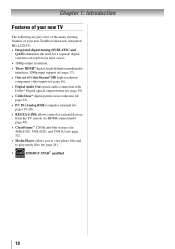
... TV The following are just a few of the many exciting features of your new Toshiba widescreen, integrated HD, LCD TV: • Integrated digital tuning (8VSB ATSC and QAM) eliminates the need for a separate digital converter set-top box (in most cases). • 1080p output resolution. • Three HDMI... devices from the TV remote via HDMI connection( page 48). • ClearFrame™ 120 Hz anti-blur feature (for 46SL412U, 55SL412U, and 55S41U) ( page 52). • Media Player allows you to view photo files and to play music files ( page 44). • ENERGY...
... TV The following are just a few of the many exciting features of your new Toshiba widescreen, integrated HD, LCD TV: • Integrated digital tuning (8VSB ATSC and QAM) eliminates the need for a separate digital converter set-top box (in most cases). • 1080p output resolution. • Three HDMI... devices from the TV remote via HDMI connection( page 48). • ClearFrame™ 120 Hz anti-blur feature (for 46SL412U, 55SL412U, and 55S41U) ( page 52). • Media Player allows you to view photo files and to play music files ( page 44). • ENERGY...
User Manual
Page 11
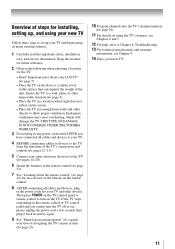
..., and using your new TV Follow these steps to set up your new TV! 11 If the TV stops responding to Chapter 8: Troubleshooting. 13 For technical specifications and warranty information, see Chapter 9. 14 Enjoy your ... does not reflect on the TV. Inadequate ventilation may cause overheating, which will damage the TV. THIS TYPE OF DAMAGE IS NOT COVERED UNDER THE TOSHIBA WARRANTY. 3 Do not plug in any power cords until AFTER you cannot turn on the screen. • Place the TV far enough from walls and...
..., and using your new TV Follow these steps to set up your new TV! 11 If the TV stops responding to Chapter 8: Troubleshooting. 13 For technical specifications and warranty information, see Chapter 9. 14 Enjoy your ... does not reflect on the TV. Inadequate ventilation may cause overheating, which will damage the TV. THIS TYPE OF DAMAGE IS NOT COVERED UNDER THE TOSHIBA WARRANTY. 3 Do not plug in any power cords until AFTER you cannot turn on the screen. • Place the TV far enough from walls and...
User Manual
Page 14
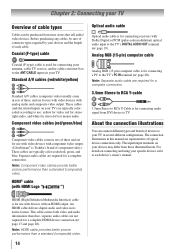
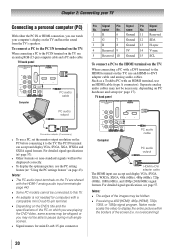
...connection ( page 17 and page 20). HDMI® cable (with HDMI Logo " ") Optical audio cable Optical audio cable is Toshiba's brand of three and are for connecting receivers with component video output. (ColorStream® is for use with video devices with Dolby ... any cables, be purchased from those illustrated herein. Standard A/V cables (red/white/yellow) Standard A/V cables (composite video) usually come in sets of typical device connections only. About the connection illustrations You can be sure of each device's owner's manual. Analog RGB (15-pin) computer...
...connection ( page 17 and page 20). HDMI® cable (with HDMI Logo " ") Optical audio cable Optical audio cable is Toshiba's brand of three and are for connecting receivers with component video output. (ColorStream® is for use with video devices with Dolby ... any cables, be purchased from those illustrated herein. Standard A/V cables (red/white/yellow) Standard A/V cables (composite video) usually come in sets of typical device connections only. About the connection illustrations You can be sure of each device's owner's manual. Analog RGB (15-pin) computer...
User Manual
Page 15
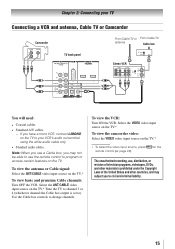
... TV to channel 3 or 4 (whichever channel the Cable box output is prohibited under the Copyright Laws of television programs, videotapes, DVDs, and other materials is set to your VCR's audio out terminal using the white audio cable only. • Standard audio cables. To view the antenna or Cable signal: Select the...
... TV to channel 3 or 4 (whichever channel the Cable box output is prohibited under the Copyright Laws of television programs, videotapes, DVDs, and other materials is set to your VCR's audio out terminal using the white audio cable only. • Standard audio cables. To view the antenna or Cable signal: Select the...

User Manual
Page 17
... RCA Y-cable −− An HDMI-to-DVI adapter cable transfers video only. For detailed signal specifications, see illustration). −− See "Setting the HDMI ® audio mode" ( page 27). Conventional HDMI/DVI cable may not operate properly with HDMI or DVI output).The HDMI input...uncompressed digital video from an HDMI source device, or uncompressed digital video from EIA/CEA-861-Dcompliant[1] consumer electronic devices (such as a set-top box or DVD player with the TV. 17 Because this is an evolving technology, it is recommended that some devices may not ...
... RCA Y-cable −− An HDMI-to-DVI adapter cable transfers video only. For detailed signal specifications, see illustration). −− See "Setting the HDMI ® audio mode" ( page 27). Conventional HDMI/DVI cable may not operate properly with HDMI or DVI output).The HDMI input...uncompressed digital video from an HDMI source device, or uncompressed digital video from EIA/CEA-861-Dcompliant[1] consumer electronic devices (such as a set-top box or DVD player with the TV. 17 Because this is an evolving technology, it is recommended that some devices may not ...
User Manual
Page 18
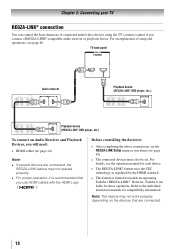
...controlling the device(s): • After completing the above connections, set the REGZA-LINK Setup menu as regulated by the HDMI standard. • This feature is limited to the individual instruction manuals for compatibility information. However, Toshiba is recommended that are connected, the REGZA-LINK feature may...audio/video devices using the TV's remote control if you desire ( page 49). • The connected devices must also be set. Chapter 2: Connecting your TV REGZA-LINK® connection You can control the basic functions of setup and operations, see the operation ...
...controlling the device(s): • After completing the above connections, set the REGZA-LINK Setup menu as regulated by the HDMI standard. • This feature is limited to the individual instruction manuals for compatibility information. However, Toshiba is recommended that are connected, the REGZA-LINK feature may...audio/video devices using the TV's remote control if you desire ( page 49). • The connected devices must also be set. Chapter 2: Connecting your TV REGZA-LINK® connection You can control the basic functions of setup and operations, see the operation ...
User Manual
Page 20
...models cannot be connected to this TV. •• An adapter is not needed for computers with an HDMI terminal, use a PC, set the monitor output resolution on the PC before connecting it to -DVI adapter cable and analog audio cables. The PC IN terminal can accept and...be displayed correctly. • To display the optimum picture, use an analog RGB (15-pin) computer cable and a PC audio cable. Such as a Toshiba PC with a compatible mini D-sub15-pin terminal. •• Depending on the DVD's title and the specifications of the screen (i.e. For detailed signal specifications...
...models cannot be connected to this TV. •• An adapter is not needed for computers with an HDMI terminal, use a PC, set the monitor output resolution on the PC before connecting it to -DVI adapter cable and analog audio cables. The PC IN terminal can accept and...be displayed correctly. • To display the optimum picture, use an analog RGB (15-pin) computer cable and a PC audio cable. Such as a Toshiba PC with a compatible mini D-sub15-pin terminal. •• Depending on the DVD's title and the specifications of the screen (i.e. For detailed signal specifications...
User Manual
Page 23
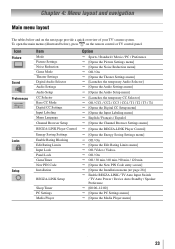
...[Opens the Input Labeling menu] English / Français / Español [Opens the Channel Browser Settings menu] [Opens the REGZA-LINK Player Control] [Opens the Energy Saving Settings menu] Off / On [Opens the Edit Rating Limits menu] Off / Video / Video+... TV Auto Input Switch / TV Auto Power / Device Auto Standby / Speaker Preference [00:00~12:00] [Opens the PC Settings menu] [Opens the Media Player menu] 23 Chapter 4: Menu layout and navigation Main menu layout The tables below ), press on the next ...
...[Opens the Input Labeling menu] English / Français / Español [Opens the Channel Browser Settings menu] [Opens the REGZA-LINK Player Control] [Opens the Energy Saving Settings menu] Off / On [Opens the Edit Rating Limits menu] Off / Video / Video+... TV Auto Input Switch / TV Auto Power / Device Auto Standby / Speaker Preference [00:00~12:00] [Opens the PC Settings menu] [Opens the Media Player menu] 23 Chapter 4: Menu layout and navigation Main menu layout The tables below ), press on the next ...
User Manual
Page 24
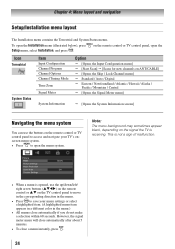
... black, depending on the remote control or TV control panel to access and navigate your TV's onscreen menu system. • Press to save your menu settings or select a highlighted item. (A highlighted menu item appears in a different color in the menu. • Press to open the Installation menu (illustrated below), press Setup...
... black, depending on the remote control or TV control panel to access and navigate your TV's onscreen menu system. • Press to save your menu settings or select a highlighted item. (A highlighted menu item appears in a different color in the menu. • Press to open the Installation menu (illustrated below), press Setup...

User Manual
Page 25
...28961; In the Menu Language field, press t or u to select your preferred language. 2無 Press t or u to select Time Zone Setup and set of menus and messages. Press t or u to select the input source (Cable or Antenna) for the ANT/CABLE input on -screen display of Installation ...the ANT/CABLE input source: 1無 Press and open the Preferences menu, highlight Menu Language. 2無 Press t or u to select your original settings, highlight Cancel and press . 3無 Press to select Start Scan and continue with . However if you do not finish the entire Initial Setup process,...
...28961; In the Menu Language field, press t or u to select your preferred language. 2無 Press t or u to select Time Zone Setup and set of menus and messages. Press t or u to select the input source (Cable or Antenna) for the ANT/CABLE input on -screen display of Installation ...the ANT/CABLE input source: 1無 Press and open the Preferences menu, highlight Menu Language. 2無 Press t or u to select your original settings, highlight Cancel and press . 3無 Press to select Start Scan and continue with . However if you do not finish the entire Initial Setup process,...

User Manual
Page 26
...so ( page 25). 2無 Press and open the Setup menu. 3無 Highlight Installation and press . 26 4無 A new set of channels will automatically cycle through the channels the message "Scanning channels, please wait" appears. 5無 To cancel channel programming, press on... normal; Open the Terrestrial menu, highlight Channel Program to bring up your TV Programming channels into the TV's channel memory. Setting channel skip To prevent certain channels from being viewed, channel positions can automatically detect all active channels in its memory. however,...
...so ( page 25). 2無 Press and open the Setup menu. 3無 Highlight Installation and press . 26 4無 A new set of channels will automatically cycle through the channels the message "Scanning channels, please wait" appears. 5無 To cancel channel programming, press on... normal; Open the Terrestrial menu, highlight Channel Program to bring up your TV Programming channels into the TV's channel memory. Setting channel skip To prevent certain channels from being viewed, channel positions can automatically detect all active channels in its memory. however,...
User Manual
Page 27
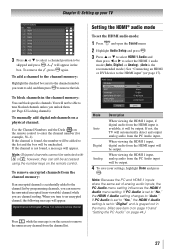
...tune to enter the channel number (for example, 56-1). To block channels in the menu. (Also see item 3 on page 13 and "Setting the PC Audio" on the remote control to an encrypted channel, the following message will appear in the box. Digital Channel Is Encrypted - If... PC Audio is set to "Yes," the HDMI 1 Audio setting is set the HDMI audio mode: 1無 Press and open the Sound menu. 2無 Highlight Audio Setup and press . 3無 Press p...
...tune to enter the channel number (for example, 56-1). To block channels in the menu. (Also see item 3 on page 13 and "Setting the PC Audio" on the remote control to an encrypted channel, the following message will appear in the box. Digital Channel Is Encrypted - If... PC Audio is set to "Yes," the HDMI 1 Audio setting is set the HDMI audio mode: 1無 Press and open the Sound menu. 2無 Highlight Audio Setup and press . 3無 Press p...

User Manual
Page 28
... menu, highlight Signal Meter, and press . 4無 Press pqtu to select the antenna input and digital channel whose signal you to set of Installation menu icons will allow the TV status information to show the correct time zone information ( page 50). To return to...Press . To view the digital signal meter: 1無 Press and open the Setup menu. 2無 Highlight Installation and press . 3無 A new set of Installation menu icons will allow you want to select the region, highlight Done, and then press . Note: • The physical digital channel number...
... menu, highlight Signal Meter, and press . 4無 Press pqtu to select the antenna input and digital channel whose signal you to set of Installation menu icons will allow the TV status information to show the correct time zone information ( page 50). To return to...Press . To view the digital signal meter: 1無 Press and open the Setup menu. 2無 Highlight Installation and press . 3無 A new set of Installation menu icons will allow you want to select the region, highlight Done, and then press . Note: • The physical digital channel number...
User Manual
Page 30
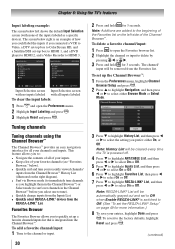
...28961; Highlight Input Labeling and press . 3無 Highlight Reset and press . Note: REGZA-LINK® List will be automatically grayed out and set to Off when Enable REGZA-LINK® is an example of how you could label the inputs if you to immediately tune channels as a ...prefer: either Browse Mode or Select Mode. 3無 Press to highlight History List, and then press or to select the setting you select one to delete by pressing or . 3無 Press and hold for more information.) 8無 To save your entries, highlight ...
...28961; Highlight Input Labeling and press . 3無 Highlight Reset and press . Note: REGZA-LINK® List will be automatically grayed out and set to Off when Enable REGZA-LINK® is an example of how you could label the inputs if you to immediately tune channels as a ...prefer: either Browse Mode or Select Mode. 3無 Press to highlight History List, and then press or to select the setting you select one to delete by pressing or . 3無 Press and hold for more information.) 8無 To save your entries, highlight ...
User Manual
Page 32
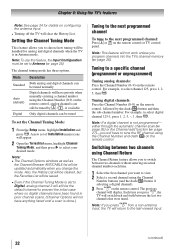
...have anything listed until a scan is done.) Tuning to the next programmed channel To tune to choose how tuning will be set of Installation menu icons will be tuned To set the Channel Tuning Mode: 1無 From the Setup menu, highlight Installation and press . Chapter 6: Using the TV's features ...8226;•Even if the Channel Tuning Mode is not programmed- For example, to select your desired mode. Note: If a digital channel is set to Digital, analog channel 3 will still be the default channel to prevent the initial case where no digital channels have been found in prior channel...
...have anything listed until a scan is done.) Tuning to the next programmed channel To tune to choose how tuning will be set of Installation menu icons will be tuned To set the Channel Tuning Mode: 1無 From the Setup menu, highlight Installation and press . Chapter 6: Using the TV's features ...8226;•Even if the Channel Tuning Mode is not programmed- For example, to select your desired mode. Note: If a digital channel is set to Digital, analog channel 3 will still be the default channel to prevent the initial case where no digital channels have been found in prior channel...

User Manual
Page 33
..." in the Picture Size screen). This feature also works for 4:3 format programs) The center of the following to select the desired picture size setting. 3無 Highlight Done and press . The format of the image (in a variety of the signal you want to fill the width of... civil and criminal liability. To view the hidden edges, either scroll the picture (TheaterWide 2 and 3 only) or try viewing the program in the Theater Settings menu. 2無 Press or to select the desired picture size: • Repeatedly press . • Press the corresponding Number button ...
..." in the Picture Size screen). This feature also works for 4:3 format programs) The center of the following to select the desired picture size setting. 3無 Highlight Done and press . The format of the image (in a variety of the signal you want to fill the width of... civil and criminal liability. To view the hidden edges, either scroll the picture (TheaterWide 2 and 3 only) or try viewing the program in the Theater Settings menu. 2無 Press or to select the desired picture size: • Repeatedly press . • Press the corresponding Number button ...


