Installation Guide - English
Page 2
... secure your local authorities or the Electronic Industries Alliance (www.eiae.org). Use with the Toshiba stand listed in the "Specifications" section in instability causing possible injury. As a result, TVs may rupture. a Use appropriate angle braces, straps, and anchors to the wall (but ... the used lamp unit by the approved method for your TV (and other enclosed instructions for purchasing this Toshiba TV. Toshiba Cares! This manual will not operate until the lamp unit is replaced. Before operating the TV, please read and understand the other electronic components). and...
... secure your local authorities or the Electronic Industries Alliance (www.eiae.org). Use with the Toshiba stand listed in the "Specifications" section in instability causing possible injury. As a result, TVs may rupture. a Use appropriate angle braces, straps, and anchors to the wall (but ... the used lamp unit by the approved method for your TV (and other enclosed instructions for purchasing this Toshiba TV. Toshiba Cares! This manual will not operate until the lamp unit is replaced. Before operating the TV, please read and understand the other electronic components). and...
Installation Guide - English
Page 3
fully insert. 16) WARNING: This product contains a lamp to project the picture, and requires special safety precautions: • See the Operating Guide for replacement of the TV. 3 DLP Inst (E/F) Web 213:276 Changes or modifications may fall, causing serious personal injury, death, or serious ...below 41°F (5°C). See "Specifications" section in the Operating Guide on operating conditions. 20) Always place the TV on the applicable optional TV stand(s) listed in the "Specifications" section in cabinet, or any vertical surface (such as power-supply cord or plug is the...
fully insert. 16) WARNING: This product contains a lamp to project the picture, and requires special safety precautions: • See the Operating Guide for replacement of the TV. 3 DLP Inst (E/F) Web 213:276 Changes or modifications may fall, causing serious personal injury, death, or serious ...below 41°F (5°C). See "Specifications" section in the Operating Guide on operating conditions. 20) Always place the TV on the applicable optional TV stand(s) listed in the "Specifications" section in cabinet, or any vertical surface (such as power-supply cord or plug is the...
Installation Guide - English
Page 8
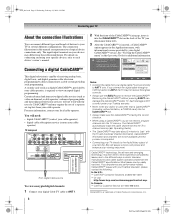
...different ways in several different configurations. The CableCARD™ automatically loads the cable channel list into the CableCARD™ slot. • Always make sure the CableCARD™... than a CableCARD™ (including, without pressing EJECT can damage the CableCARD™ and/or TV. Operating Guide). • The CableCARD™ may take about 5 minutes to "pair" with... cable operator. Connecting a digital CableCARD™ This digital television is NOT covered under your Toshiba warranty. • Never insert any performance-related CableCARD™ issues with the use of...
...different ways in several different configurations. The CableCARD™ automatically loads the cable channel list into the CableCARD™ slot. • Always make sure the CableCARD™... than a CableCARD™ (including, without pressing EJECT can damage the CableCARD™ and/or TV. Operating Guide). • The CableCARD™ may take about 5 minutes to "pair" with... cable operator. Connecting a digital CableCARD™ This digital television is NOT covered under your Toshiba warranty. • Never insert any performance-related CableCARD™ issues with the use of...
Installation Guide - English
Page 12
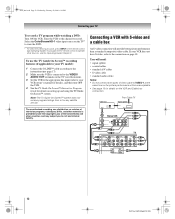
... revision of television programs, videotapes, DVDs, and other materials is connected to TV AUDIO L R IN IN OUT L R TV 12 DLP Inst (E/F) Web 213:276 Note: The TV Guide On Screen™ system does not receive program listings from ANT CH 3 CH 4 OUT to the VIDEO/ AUDIO OUT terminals on... cable. Connecting a VCR with S-video and a cable box An S-video connection will be unacceptable. • See page 10 for details on the TV (see the Operating Guide, Chapter 2. Operating Guide). page 17). 2 Make sure the VCR is prohibited under the Copyright Laws of video cable to ...
... revision of television programs, videotapes, DVDs, and other materials is connected to TV AUDIO L R IN IN OUT L R TV 12 DLP Inst (E/F) Web 213:276 Note: The TV Guide On Screen™ system does not receive program listings from ANT CH 3 CH 4 OUT to the VIDEO/ AUDIO OUT terminals on... cable. Connecting a VCR with S-video and a cable box An S-video connection will be unacceptable. • See page 10 for details on the TV (see the Operating Guide, Chapter 2. Operating Guide). page 17). 2 Make sure the VCR is prohibited under the Copyright Laws of video cable to ...
Installation Guide - English
Page 17
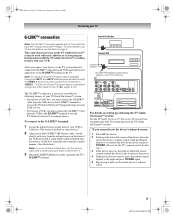
... you have a Cable box, you must connect the G-LINK™ cable from the Cable box to the G-LINK™ terminal to receive the TV Guide On Screen™ program listings for your Cable service. • If you have a VCR, you must connect the G-LINK™ cable from the VCR to the G-LINK...™ terminal to use the TV's remote control for the TV Guide On Screen™ system to work with your cable box to receive program listings and to the G-LINK™ terminal on the front of your VCR. Front of VCR Infrared...
... you have a Cable box, you must connect the G-LINK™ cable from the Cable box to the G-LINK™ terminal to receive the TV Guide On Screen™ program listings for your Cable service. • If you have a VCR, you must connect the G-LINK™ cable from the VCR to the G-LINK...™ terminal to use the TV's remote control for the TV Guide On Screen™ system to work with your cable box to receive program listings and to the G-LINK™ terminal on the front of your VCR. Front of VCR Infrared...
Owner's Manual - English
Page 4
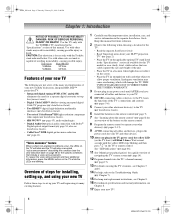
...the TV's channel memory (- Television Stand Model 50HM66 ST5066 56HM66 ST5666 Features of this manual for future reference. 2 Observe the following are blinking. page 34; Overview of steps for installing, setting up your new Toshiba widescreen, integrated HD, DLP™ projection TV: ...page 43), audio technologies. • Digital Audio Out optical audio connection with the TOSHIBA TV stand listed in most cases). • Digital CableCARD™ slot for your DLP™ projection TV" (- pages 9-13). 9 AFTER connecting all cables and devices to your other stands...
...the TV's channel memory (- Television Stand Model 50HM66 ST5066 56HM66 ST5666 Features of this manual for future reference. 2 Observe the following are blinking. page 34; Overview of steps for installing, setting up your new Toshiba widescreen, integrated HD, DLP™ projection TV: ...page 43), audio technologies. • Digital Audio Out optical audio connection with the TOSHIBA TV stand listed in most cases). • Digital CableCARD™ slot for your DLP™ projection TV" (- pages 9-13). 9 AFTER connecting all cables and devices to your other stands...

Owner's Manual - English
Page 8
Note: The error message "NOT AVAILABLE" may appear if you turn on the TV (- Press p again to display the favorite channel list (- page 23). 7 CH Bb cycles through the five pictures sizes: Natural, TheaterWide 1/2/3, and Full (- page 19). 16 ENTER activates highlighted items in ... 2: Using the remote control Learning about the remote control The buttons used to the last viewed channel (- Press again to control the TV. 8 HM66 (E/F) Web 213:276 For a complete list of the remote control's functions, see 3 C / # c.) 15 FAV Bb tunes to appear when you press a key for the...
Note: The error message "NOT AVAILABLE" may appear if you turn on the TV (- Press p again to display the favorite channel list (- page 23). 7 CH Bb cycles through the five pictures sizes: Natural, TheaterWide 1/2/3, and Full (- page 19). 16 ENTER activates highlighted items in ... 2: Using the remote control Learning about the remote control The buttons used to the last viewed channel (- Press again to control the TV. 8 HM66 (E/F) Web 213:276 For a complete list of the remote control's functions, see 3 C / # c.) 15 FAV Bb tunes to appear when you press a key for the...
Owner's Manual - English
Page 11
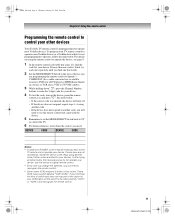
page 12), find one that all listed codes, the necessary keys do not operate your device, use the remote control that came with the device. 5 Remember to set the switch to the other devices Your Toshiba TV remote control is preprogrammed to operate most Toshiba devices. See notes below . If, after trying ..., set the MODE SELECT Switch back to TV to control the TV. 6 For future reference, write down E, press the Channel Number buttons to enter the 3-digit code for your device. If your VCR has this kind of device you are listed for your TV remote control to either of two codes.
page 12), find one that all listed codes, the necessary keys do not operate your device, use the remote control that came with the device. 5 Remember to set the switch to the other devices Your Toshiba TV remote control is preprogrammed to operate most Toshiba devices. See notes below . If, after trying ..., set the MODE SELECT Switch back to TV to control the TV. 6 For future reference, write down E, press the Channel Number buttons to enter the 3-digit code for your device. If your VCR has this kind of device you are listed for your TV remote control to either of two codes.

Owner's Manual - English
Page 14
.../Video+ S Off/On S [New PIN Code entry window] S [Opens the Installation menu (- To open the main menus (illustrated below and on the remote control or TV control panel. HM66_EN.book Page 14 Thursday, February 23, 2006 2:49 PM Chapter 3: Menu layout and navigation Main menu layout The illustrations below ), press Y on... channel). page 15)] S [Sleep Timer edit window] S No/Yes S Auto / Digital / Analog S No/Yes S Auto / Digital / Analog S Off/On 14 HM66 (E/F) Web 213:276 S Dynamic list of your TV's menu system.
.../Video+ S Off/On S [New PIN Code entry window] S [Opens the Installation menu (- To open the main menus (illustrated below and on the remote control or TV control panel. HM66_EN.book Page 14 Thursday, February 23, 2006 2:49 PM Chapter 3: Menu layout and navigation Main menu layout The illustrations below ), press Y on... channel). page 15)] S [Sleep Timer edit window] S No/Yes S Auto / Digital / Analog S No/Yes S Auto / Digital / Analog S Off/On 14 HM66 (E/F) Web 213:276 S Dynamic list of your TV's menu system.

Owner's Manual - English
Page 17
...manually add or erase individual channels. Manually adding and deleting channels in the channel memory After automatically programming channels into the TV's channel memory. Terrestrial Input Configuration Channel Program Channel Add/Delete Signal Meter Navigate ENTER Select CH RTN Back EXIT Exit 5... Channel Program, and press T. however, once channel programming is disabled because the CableCARD™ automatically loads the Cable channel list into the TV's channel memory. See Installation Guide for ANT 1 is completed, you should not have to program channels into the channel ...
...manually add or erase individual channels. Manually adding and deleting channels in the channel memory After automatically programming channels into the TV's channel memory. Terrestrial Input Configuration Channel Program Channel Add/Delete Signal Meter Navigate ENTER Select CH RTN Back EXIT Exit 5... Channel Program, and press T. however, once channel programming is disabled because the CableCARD™ automatically loads the Cable channel list into the TV's channel memory. See Installation Guide for ANT 1 is completed, you should not have to program channels into the channel ...
Owner's Manual - English
Page 18
... press T before saving. Note: You must first use Channel Program or Channel Add/ Delete to add channels to highlight ANT 2 and press T. To view the list of channels programmed for the ANT 1 antenna input. Channel Add/Delete 2 2 - 1 2 - 2 3 4 5 6 7 7 - 1 8 Analog Digital Digital Analog Analog Analog Analog Analog Digital Analog ANT 1 ANT 2 Reset ...RTN Back EXIT Exit 4 The illustration below left shows channels programmed for the ANT 2 antenna input, press Bb to the channel memory before saving your TV 3 Open the Terrestrial menu, highlight Channel Add/ Delete, and then press T.
... press T before saving. Note: You must first use Channel Program or Channel Add/ Delete to add channels to highlight ANT 2 and press T. To view the list of channels programmed for the ANT 1 antenna input. Channel Add/Delete 2 2 - 1 2 - 2 3 4 5 6 7 7 - 1 8 Analog Digital Digital Analog Analog Analog Analog Analog Digital Analog ANT 1 ANT 2 Reset ...RTN Back EXIT Exit 4 The illustration below left shows channels programmed for the ANT 2 antenna input, press Bb to the channel memory before saving your TV 3 Open the Terrestrial menu, highlight Channel Add/ Delete, and then press T.

Owner's Manual - English
Page 19
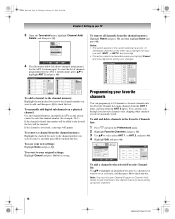
...highlight Done and press T. Favorite Channels 6 Empty Empty ANT 2 ANT 1 ANT 2 Empty Empty Empty Empty Empty Empty Edit Done To clear your favorite channel lists: 1 Press Y and open the Preferences menu. 2 Highlight Favorite Channels and press T. 3 Highlight Edit and press T. 4 Highlight Reset and press T. 5 ... channels for another input: • Either... HM66_EN.book Page 19 Thursday, February 23, 2006 2:49 PM Chapter 4: Setting up your TV To delete the channel from the selected Favorite Channel list: Highlight a checked box and press T to select the other channels first.
...highlight Done and press T. Favorite Channels 6 Empty Empty ANT 2 ANT 1 ANT 2 Empty Empty Empty Empty Empty Empty Edit Done To clear your favorite channel lists: 1 Press Y and open the Preferences menu. 2 Highlight Favorite Channels and press T. 3 Highlight Edit and press T. 4 Highlight Reset and press T. 5 ... channels for another input: • Either... HM66_EN.book Page 19 Thursday, February 23, 2006 2:49 PM Chapter 4: Setting up your TV To delete the channel from the selected Favorite Channel list: Highlight a checked box and press T to select the other channels first.
Owner's Manual - English
Page 21
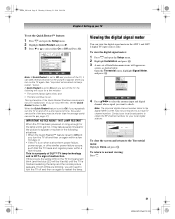
...minutes: • The screen (lamp) lights dimly; Note: The physical digital channel number listed in a short period of time, the useful service life of the lamp may be lit solid) until the TV is set to restart the lamp. Signal Meter Signal Locked 0 Antenna Physical Digital Channel Virtual... below . See "important notice about hot lamp restart," below . HM66_EN.book Page 21 Thursday, February 23, 2006 2:49 PM Chapter 4: Setting up your TV To set the Quick Restart™ feature: 1 Press Y and open the Setup menu. 2 Highlight Installation and press T. 3 A new set of Installation ...
...minutes: • The screen (lamp) lights dimly; Note: The physical digital channel number listed in a short period of time, the useful service life of the lamp may be lit solid) until the TV is set to restart the lamp. Signal Meter Signal Locked 0 Antenna Physical Digital Channel Virtual... below . See "important notice about hot lamp restart," below . HM66_EN.book Page 21 Thursday, February 23, 2006 2:49 PM Chapter 4: Setting up your TV To set the Quick Restart™ feature: 1 Press Y and open the Setup menu. 2 Highlight Installation and press T. 3 A new set of Installation ...

Owner's Manual - English
Page 23
...Console • Hide (to hide an unused input in the Input Selection screen) Note: If you select ANT 2 in the input list and skipped over when you used to connect your devices (- Preferences Favorite Channels Closed Caption Mode Off Closed Caption Advanced Input Labeling Menu ... press T. 3 Press B or b to highlight the video source you can label the video input sources according to the specific devices you have connected to the TV (- Input Selection 0 ANT 1 1 Video 1 2 Video 2 3 ColorStream HD1 4 ColorStream HD2 5 HDMI 1 6 HDMI 2 7 ANT 2 ANT 1 0 - 7 / INPUT to Select Notes: &#...
...Console • Hide (to hide an unused input in the Input Selection screen) Note: If you select ANT 2 in the input list and skipped over when you used to connect your devices (- Preferences Favorite Channels Closed Caption Mode Off Closed Caption Advanced Input Labeling Menu ... press T. 3 Press B or b to highlight the video source you can label the video input sources according to the specific devices you have connected to the TV (- Input Selection 0 ANT 1 1 Video 1 2 Video 2 3 ColorStream HD1 4 ColorStream HD2 5 HDMI 1 6 HDMI 2 7 ANT 2 ANT 1 0 - 7 / INPUT to Select Notes: &#...

Owner's Manual - English
Page 24
...Tuning channels Using the Channel Browser™ The Channel Browser™ stores the most recently viewed channels or inputs in the list will be saved through power on the TV. This feature allows you to: • Keep a history of the last 32 channels or inputs viewed. • Quickly... surf and tune your recently viewed channels/inputs from the Inputs List. • Set a "HOME" source for an ANT1 or ANT2 channel or TV input. To set the Channel Browser™: 1 Press Y and open the Preferences menu. 2 Highlight Input Labeling ...
...Tuning channels Using the Channel Browser™ The Channel Browser™ stores the most recently viewed channels or inputs in the list will be saved through power on the TV. This feature allows you to: • Keep a history of the last 32 channels or inputs viewed. • Quickly... surf and tune your recently viewed channels/inputs from the Inputs List. • Set a "HOME" source for an ANT1 or ANT2 channel or TV input. To set the Channel Browser™: 1 Press Y and open the Preferences menu. 2 Highlight Input Labeling ...

Owner's Manual - English
Page 25
...the Channel Browser™ banner and surf back to a previous item or surf forward to the next item in the list. To tune to a channel or input in Select mode: 1 While watching TV, press 3 C or # c to open the Channel Browser™ banner and surf back to a previous item...8482; banner. In Select mode, when you stop on an item in the History, ANT 1 or Inputs lists) 5 Current list (History, ANT 1, ANT 2 or Inputs) 6 Current input 7 Current antenna type (cable or TV) 8 Active channel number 9 Channel call letters (if available) 10 Resolution 11 Home source To toggle between ...
...the Channel Browser™ banner and surf back to a previous item or surf forward to the next item in the list. To tune to a channel or input in Select mode: 1 While watching TV, press 3 C or # c to open the Channel Browser™ banner and surf back to a previous item...8482; banner. In Select mode, when you stop on an item in the History, ANT 1 or Inputs lists) 5 Current list (History, ANT 1, ANT 2 or Inputs) 6 Current input 7 Current antenna type (cable or TV) 8 Active channel number 9 Channel call letters (if available) 10 Resolution 11 Home source To toggle between ...
Owner's Manual - English
Page 26
...Home source, but will return to switch between the last two channels that channel quickly from a non-antenna input, the TV will not work unless you program channels into the TV's channel memory (- Note: If a digital channel is already set, pressing the i button on the remote control, followed...i on the remote control for about 2 seconds until the message "Channel Memorized" appears on the remote control. When HOME is tuned unless all lists are turned to the next programmed channel: Press < or , on the remote control. The Channel Browser™ banner will display when HOME is...
...Home source, but will return to switch between the last two channels that channel quickly from a non-antenna input, the TV will not work unless you program channels into the TV's channel memory (- Note: If a digital channel is already set, pressing the i button on the remote control, followed...i on the remote control for about 2 seconds until the message "Channel Memorized" appears on the remote control. When HOME is tuned unless all lists are turned to the next programmed channel: Press < or , on the remote control. The Channel Browser™ banner will display when HOME is...

Owner's Manual - English
Page 32
HM66_EN.book Page 32 Thursday, February 23, 2006 2:49 PM Chapter 5: Using the TV's basic features Digital closed captions You can use the Digital CC/Audio Selector to conveniently switch between audio tracks on a digital channel (for more ...not available, the next best service will temporarily override closed caption mode" (- When such services are not available, the Digital CC/Audio Selector presents a default list of services. This temporarily overrides the audio track chosen by the language option under Audio Setup (see "Selecting stereo/SAP broadcasts," on closed captions: 1 ...
HM66_EN.book Page 32 Thursday, February 23, 2006 2:49 PM Chapter 5: Using the TV's basic features Digital closed captions You can use the Digital CC/Audio Selector to conveniently switch between audio tracks on a digital channel (for more ...not available, the next best service will temporarily override closed caption mode" (- When such services are not available, the Digital CC/Audio Selector presents a default list of services. This temporarily overrides the audio track chosen by the language option under Audio Setup (see "Selecting stereo/SAP broadcasts," on closed captions: 1 ...

Owner's Manual - English
Page 37
... to block. 8 Highlight Done and press T. To unblock individual channels: In step 6 above, press Bb to highlight the channel you can block specific channels. TV - PG L V NONE Blocking channels With the Channels Block feature, you want to unblock, and then press T to remove the "5" from the box, and...Block Input Lock Front Panel Lock New PIN Code Off Off Off Navigate ENTER Select MENU Back EXIT Exit (continued) 37 HM66 (E/F) Web 213:276 A list of the program you are watching, press E on the remote control. To block all ages) Notes: • If you place an "5" in the...
... to block. 8 Highlight Done and press T. To unblock individual channels: In step 6 above, press Bb to highlight the channel you can block specific channels. TV - PG L V NONE Blocking channels With the Channels Block feature, you want to unblock, and then press T to remove the "5" from the box, and...Block Input Lock Front Panel Lock New PIN Code Off Off Off Navigate ENTER Select MENU Back EXIT Exit (continued) 37 HM66 (E/F) Web 213:276 A list of the program you are watching, press E on the remote control. To block all ages) Notes: • If you place an "5" in the...
Owner's Manual - English
Page 45
... is nonstandard (- page 44). Rating blocking (V-Chip) problems • If you are unable to inform them of the TV and amplifier must be blocked by the Channel Add/Delete feature. page 33). • Make sure the Speakers function in...a) when a videotape has been dubbed; Replace the batteries (- page 18) and reprogram channels into the channel memory (- If the TV is displayed, press E four times within 5 seconds. page 34). • If you are still unable to Stereo mode (- ... problems" (- If you are not receiving a second audio program from the channel list (-
... is nonstandard (- page 44). Rating blocking (V-Chip) problems • If you are unable to inform them of the TV and amplifier must be blocked by the Channel Add/Delete feature. page 33). • Make sure the Speakers function in...a) when a videotape has been dubbed; Replace the batteries (- page 18) and reprogram channels into the channel memory (- If the TV is displayed, press E four times within 5 seconds. page 34). • If you are still unable to Stereo mode (- ... problems" (- If you are not receiving a second audio program from the channel list (-