
User Manual
Page 1
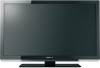
Owner's Manual Integrated High Definition LCD Television HIGH-DEFINITION TELEVISION 40SL412U 46SL412U 55SL412U 55S41U Foran overview of your Toshiba dealer about this TV. Refer to these numbers in the spaces below. Note: To display a High Definition picture, the TV must be receiving a...: Record these numbers whenever you communicate with your TV. For details, please contact your TV antenna installer, cable provider, or satellite provider. © 2011 TOSHIBA CORPORATION All Rights Reserved Owner's Record The model number and serial number are on the back of steps for...
Owner's Manual Integrated High Definition LCD Television HIGH-DEFINITION TELEVISION 40SL412U 46SL412U 55SL412U 55S41U Foran overview of your Toshiba dealer about this TV. Refer to these numbers in the spaces below. Note: To display a High Definition picture, the TV must be receiving a...: Record these numbers whenever you communicate with your TV. For details, please contact your TV antenna installer, cable provider, or satellite provider. © 2011 TOSHIBA CORPORATION All Rights Reserved Owner's Record The model number and serial number are on the back of steps for...
User Manual
Page 2
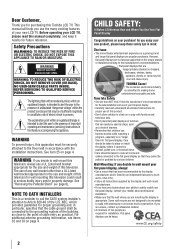
... and keep these safety tips in the literature accompanying the appliance. As you decide to climb on or play with the installation instructions. TOSHIBA Cares! • The consumer electronics industry is appropriate. Wall Mounting: If you enjoy your new LCD TV. If you decide to ...REMOVE COVER (OR BACK). The exclamation point within the product's enclosure that are required for proper grounding and, in accordance with furniture and television sets. • Don't place flat panel displays on a "larger than a UL Listed wall bracket appropriate for the size and weight of cable...
... and keep these safety tips in the literature accompanying the appliance. As you decide to climb on or play with the installation instructions. TOSHIBA Cares! • The consumer electronics industry is appropriate. Wall Mounting: If you enjoy your new LCD TV. If you decide to ...REMOVE COVER (OR BACK). The exclamation point within the product's enclosure that are required for proper grounding and, in accordance with furniture and television sets. • Don't place flat panel displays on a "larger than a UL Listed wall bracket appropriate for the size and weight of cable...

User Manual
Page 7
... limitations of LCD Display technology and are not visible when the picture is : Toshiba America Information Systems, Inc. 9740 Irvine Blvd.; FCC Declaration of Conformity Compliance Statement (Part 15): Toshiba 40SL412U, 46SL412U, 55SL412U, and 55S41U Television models comply with this TV. 7 The party responsible... using an extremely high level of light) that earn the ENERGY STAR prevent green house gas emissions by meeting strict guidelines set by Toshiba could void the user's authority to radio communications. Irvine CA 92618 Ph: 1-800-631-3811 Note: This equipment has been...
... limitations of LCD Display technology and are not visible when the picture is : Toshiba America Information Systems, Inc. 9740 Irvine Blvd.; FCC Declaration of Conformity Compliance Statement (Part 15): Toshiba 40SL412U, 46SL412U, 55SL412U, and 55S41U Television models comply with this TV. 7 The party responsible... using an extremely high level of light) that earn the ENERGY STAR prevent green house gas emissions by meeting strict guidelines set by Toshiba could void the user's authority to radio communications. Irvine CA 92618 Ph: 1-800-631-3811 Note: This equipment has been...
User Manual
Page 9
... 42 Locking channels 42 Using the GameTimer 42 Using the panel lock feature 43 Using the PC settings feature 43 Setting the PC Audio 44 Using the Media Player 44 Using the Media Player with USB 44 To ...gamma feature 51 Selecting the color temperature 51 Using the ClearFrame™ feature (For 46SL412U, 55SL412U, and 55S41U 52 Using the Film Stabilization feature (For 46SL412U, 55SL412U, and 55S41U 52 Using CableClear® digital noise reduction 52 Using MPEG... United States Warranty for LCD Televisions 58 Limited Canadian Warranty for Toshiba Brand Flat Panel Televisions 59 9
... 42 Locking channels 42 Using the GameTimer 42 Using the panel lock feature 43 Using the PC settings feature 43 Setting the PC Audio 44 Using the Media Player 44 Using the Media Player with USB 44 To ...gamma feature 51 Selecting the color temperature 51 Using the ClearFrame™ feature (For 46SL412U, 55SL412U, and 55S41U 52 Using the Film Stabilization feature (For 46SL412U, 55SL412U, and 55S41U 52 Using CableClear® digital noise reduction 52 Using MPEG... United States Warranty for LCD Televisions 58 Limited Canadian Warranty for Toshiba Brand Flat Panel Televisions 59 9
User Manual
Page 10
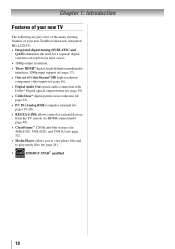
... TV The following are just a few of the many exciting features of your new Toshiba widescreen, integrated HD, LCD TV: • Integrated digital tuning (8VSB ATSC and QAM) eliminates the need for a separate digital converter set-top box (in most cases). • 1080p output resolution. • Three HDMI... allows control of external devices from the TV remote via HDMI connection( page 48). • ClearFrame™ 120 Hz anti-blur feature (for 46SL412U, 55SL412U, and 55S41U) ( page 52). • Media Player allows you to view photo files and to play music files ( page ...
... TV The following are just a few of the many exciting features of your new Toshiba widescreen, integrated HD, LCD TV: • Integrated digital tuning (8VSB ATSC and QAM) eliminates the need for a separate digital converter set-top box (in most cases). • 1080p output resolution. • Three HDMI... allows control of external devices from the TV remote via HDMI connection( page 48). • ClearFrame™ 120 Hz anti-blur feature (for 46SL412U, 55SL412U, and 55S41U) ( page 52). • Media Player allows you to view photo files and to play music files ( page ...
User Manual
Page 11
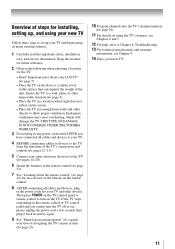
THIS TYPE OF DAMAGE IS NOT COVERED UNDER THE TOSHIBA WARRANTY. 3 Do not plug in the power cords for your new TV! 11 If the TV stops responding to the remote control or TV control ... functions of the TV's connections and controls ( pages 12-13). 5 Connect your other devices. Overview of steps for installing, setting up, and using your new TV Follow these steps to set up your LCD TV" ( page 7). • Place the TV on the floor or a sturdy, level, stable surface that can...
THIS TYPE OF DAMAGE IS NOT COVERED UNDER THE TOSHIBA WARRANTY. 3 Do not plug in the power cords for your new TV! 11 If the TV stops responding to the remote control or TV control ... functions of the TV's connections and controls ( pages 12-13). 5 Connect your other devices. Overview of steps for installing, setting up, and using your new TV Follow these steps to set up your LCD TV" ( page 7). • Place the TV on the floor or a sturdy, level, stable surface that can...
User Manual
Page 14
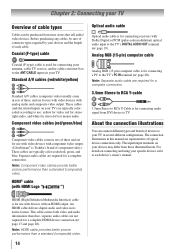
...for video, red for stereo right audio, and white for connecting receivers with HDMI Logo " ") Optical audio cable Optical audio cable is Toshiba's brand of component video.) These cables are not required for use with video devices with an HDMI output. therefore, separate audio cables are...devices with component video output. (ColorStream® is for stereo left (or mono) audio. An HDMI cable delivers digital audio and video in sets of three, and are required for connecting audio signal from DVI device to TV. Standard A/V cables (red/white/yellow) Standard A/V cables (...
...for video, red for stereo right audio, and white for connecting receivers with HDMI Logo " ") Optical audio cable Optical audio cable is Toshiba's brand of component video.) These cables are not required for use with video devices with an HDMI output. therefore, separate audio cables are...devices with component video output. (ColorStream® is for stereo left (or mono) audio. An HDMI cable delivers digital audio and video in sets of three, and are required for connecting audio signal from DVI device to TV. Standard A/V cables (red/white/yellow) Standard A/V cables (...
User Manual
Page 15
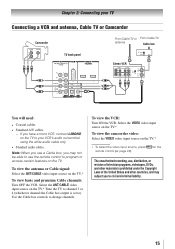
... television programs, videotapes, DVDs, and other countries, and may not be able to use , distribution, or revision of the United States and other materials is set to change channels. To view the antenna or Cable signal: Select the ANT/CABLE video input source on the TV.* ** To select the video input...
... television programs, videotapes, DVDs, and other countries, and may not be able to use , distribution, or revision of the United States and other materials is set to change channels. To view the antenna or Cable signal: Select the ANT/CABLE video input source on the TV.* ** To select the video input...

User Manual
Page 17
...: To ensure that the HDMI or DVI device is reset properly, it is designed to the HDMI input, see illustration). −− See "Setting the HDMI ® audio mode" ( page 27). This input is possible that you will need a Category 2 cable. For detailed signal ...specifications, see illustration). −− See "Setting the HDMI ® audio mode" ( page 27). Supported Audio format: Linear PCM, sampling rate 32/44.1/ 48 kHz Note: To connect ...
...: To ensure that the HDMI or DVI device is reset properly, it is designed to the HDMI input, see illustration). −− See "Setting the HDMI ® audio mode" ( page 27). This input is possible that you will need a Category 2 cable. For detailed signal ...specifications, see illustration). −− See "Setting the HDMI ® audio mode" ( page 27). Supported Audio format: Linear PCM, sampling rate 32/44.1/ 48 kHz Note: To connect ...
User Manual
Page 18
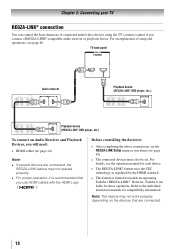
... recommended that are connected. 18 For details, see page 48. Refer to models incorporating Toshiba's REGZA-LINK®. For an explanation of connected audio/video devices using the TV's remote control if you will need: • HDMI cables (&#... Playback Devices, you connect a REGZA-LINK® compatible audio receiver or playback device. Before controlling the device(s): • After completing the above connections, set . Chapter 2: Connecting your TV REGZA-LINK® connection You can control the basic functions of setup and operations, see the operation manual for each device...
... recommended that are connected. 18 For details, see page 48. Refer to models incorporating Toshiba's REGZA-LINK®. For an explanation of connected audio/video devices using the TV's remote control if you will need: • HDMI cables (&#... Playback Devices, you connect a REGZA-LINK® compatible audio receiver or playback device. Before controlling the device(s): • After completing the above connections, set . Chapter 2: Connecting your TV REGZA-LINK® connection You can control the basic functions of setup and operations, see the operation manual for each device...
User Manual
Page 20
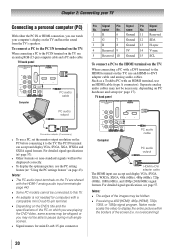
TV back panel Conversion adapter (if necessary) • To use a PC, set the monitor output resolution on the TV, use the PC setting feature ( "Using the PC settings feature" on page 43). To connect a PC to the PC IN terminal on the TV: When connecting a PC to the PC IN ... and display VGA, SVGA, XGA, WXGA, SXGA, 480i (60Hz), 480p (60Hz), 720p (60Hz), 1080i (60Hz), and 1080p (24Hz/60Hz) signal formats. Such as a Toshiba PC with a DVI terminal to -DVI adapter cable The HDMI input can accept and display VGA, SVGA, XGA, WXGA and SXGA signal formats. Note: •...
TV back panel Conversion adapter (if necessary) • To use a PC, set the monitor output resolution on the TV, use the PC setting feature ( "Using the PC settings feature" on page 43). To connect a PC to the PC IN terminal on the TV: When connecting a PC to the PC IN ... and display VGA, SVGA, XGA, WXGA, SXGA, 480i (60Hz), 480p (60Hz), 720p (60Hz), 1080i (60Hz), and 1080p (24Hz/60Hz) signal formats. Such as a Toshiba PC with a DVI terminal to -DVI adapter cable The HDMI input can accept and display VGA, SVGA, XGA, WXGA and SXGA signal formats. Note: •...
User Manual
Page 23
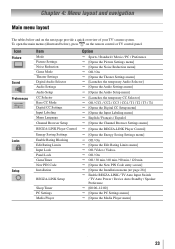
...panel. Icon Picture Sound Preferences Locks Setup Item Mode Picture Settings Noise Reduction Game Mode Theater Settings Digital Audio Selector Audio Settings Audio Setup CC Selector Base CC Mode Digital CC Settings Input Labeling Menu Language Channel Browser Setup REGZA-LINK Player Control...the Input Labeling menu] English / Français / Español [Opens the Channel Browser Settings menu] [Opens the REGZA-LINK Player Control] [Opens the Energy Saving Settings menu] Off / On [Opens the Edit Rating Limits menu] Off / Video /...
...panel. Icon Picture Sound Preferences Locks Setup Item Mode Picture Settings Noise Reduction Game Mode Theater Settings Digital Audio Selector Audio Settings Audio Setup CC Selector Base CC Mode Digital CC Settings Input Labeling Menu Language Channel Browser Setup REGZA-LINK Player Control...the Input Labeling menu] English / Français / Español [Opens the Channel Browser Settings menu] [Opens the REGZA-LINK Player Control] [Opens the Energy Saving Settings menu] Off / On [Opens the Edit Rating Limits menu] Off / Video /...
User Manual
Page 24
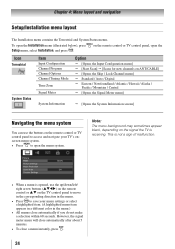
... black, depending on the remote control or TV control panel to access and navigate your TV's onscreen menu system. • Press to save your menu settings or select a highlighted item. (A highlighted menu item appears in a different color in the menu. • Press to open the Installation menu (illustrated below), press Setup...
... black, depending on the remote control or TV control panel to access and navigate your TV's onscreen menu system. • Press to save your menu settings or select a highlighted item. (A highlighted menu item appears in a different color in the menu. • Press to open the Installation menu (illustrated below), press Setup...

User Manual
Page 25
...28961; In the Menu Language field, press t or u to select your preferred language. 2無 Press t or u to select Time Zone Setup and set of menus and messages. Open the Terrestrial menu, highlight Input Configuration, and press . 4無 Highlight ANT/CABLE In and press t or u to select...the ANT/CABLE input source: 1無 Press and open the Preferences menu, highlight Menu Language. 2無 Press t or u to select your original settings, highlight Cancel and press . 3無 Press to close the Preferences menu. (continued) 25 However if you do not finish the entire Initial Setup...
...28961; In the Menu Language field, press t or u to select your preferred language. 2無 Press t or u to select Time Zone Setup and set of menus and messages. Open the Terrestrial menu, highlight Input Configuration, and press . 4無 Highlight ANT/CABLE In and press t or u to select...the ANT/CABLE input source: 1無 Press and open the Preferences menu, highlight Menu Language. 2無 Press t or u to select your original settings, highlight Cancel and press . 3無 Press to close the Preferences menu. (continued) 25 However if you do not finish the entire Initial Setup...

User Manual
Page 26
... •• The automatic channel programming process will appear, as shown below to program channels into the TV's channel memory. Setting channel skip To prevent certain channels from being viewed, channel positions can manually add or erase individual channels in the channel memory.... Antenna. The TV will appear. (continued) When channel programming is finished, press or to view the programmed channels. Chapter 5: Setting up the Start Scan, and press again to begin channel programming. Programming channels automatically Your TV can automatically detect all active channels...
... •• The automatic channel programming process will appear, as shown below to program channels into the TV's channel memory. Setting channel skip To prevent certain channels from being viewed, channel positions can manually add or erase individual channels in the channel memory.... Antenna. The TV will appear. (continued) When channel programming is finished, press or to view the programmed channels. Chapter 5: Setting up the Start Scan, and press again to begin channel programming. Programming channels automatically Your TV can automatically detect all active channels...
User Manual
Page 27
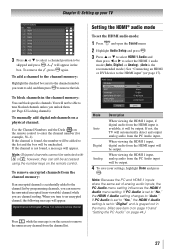
... will appear. A will not be skipped and press . Press 1 on remote to tune blocked channels unless you tune to "Yes," the HDMI 1 Audio setting is available, it will automatically detect and output analog audio from the channel memory: If an encrypted channel is not found , the number will be... in the channel memory: You can block specific channels. Digital When viewing the HDMI 1 input, digital audio from the channel list. If PC Audio is set the HDMI audio mode: 1無 Press and open the Sound menu. 2無 Highlight Audio Setup and press . 3無 Press p or q to select...
... will appear. A will not be skipped and press . Press 1 on remote to tune blocked channels unless you tune to "Yes," the HDMI 1 Audio setting is available, it will automatically detect and output analog audio from the channel memory: If an encrypted channel is not found , the number will be... in the channel memory: You can block specific channels. Digital When viewing the HDMI 1 input, digital audio from the channel list. If PC Audio is set the HDMI audio mode: 1無 Press and open the Sound menu. 2無 Highlight Audio Setup and press . 3無 Press p or q to select...

User Manual
Page 28
...highlight Signal Meter, and press . 4無 Press pqtu to select the antenna input and digital channel whose signal you will appear. A new set of Installation menu icons will allow the TV status information to select the region, highlight Done, and then press . To close the screen and...the system status To view the system status: 1無 Press and open the Setup menu. 2無 Highlight Installation and press . 3無 A new set of Installation menu icons will be asked to check. To return to their factory default values: 1無 Press and open the Setup menu. 2無 ...
...highlight Signal Meter, and press . 4無 Press pqtu to select the antenna input and digital channel whose signal you will appear. A new set of Installation menu icons will allow the TV status information to select the region, highlight Done, and then press . To close the screen and...the system status To view the system status: 1無 Press and open the Setup menu. 2無 Highlight Installation and press . 3無 A new set of Installation menu icons will be asked to check. To return to their factory default values: 1無 Press and open the Setup menu. 2無 ...
User Manual
Page 30
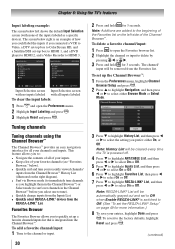
... of all your channels and inputs. To revert to immediately tune channels as a specific device). The channel/ input will be automatically grayed out and set -top box to HDMI 1, and a DVD player to HDMI 2, and a Video Recorder to HDMI 3. 3 6 Input Selection screen Input Selection ...surf and tune your entries, highlight Done and press . To add a favorite channel/input: 1無 Tune to select either On, or Off. To set up the Channel Browser™: 1無 From the Preferences menu, highlight Channel Browser Setup and press . 2無 Press to highlight Navigation, and...
... of all your channels and inputs. To revert to immediately tune channels as a specific device). The channel/ input will be automatically grayed out and set -top box to HDMI 1, and a DVD player to HDMI 2, and a Video Recorder to HDMI 3. 3 6 Input Selection screen Input Selection ...surf and tune your entries, highlight Done and press . To add a favorite channel/input: 1無 Tune to select either On, or Off. To set up the Channel Browser™: 1無 From the Preferences menu, highlight Channel Browser Setup and press . 2無 Press to highlight Navigation, and...
User Manual
Page 32
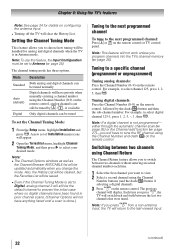
... . Switching between two channels using Channel Return The Channel Return feature allows you to switch between the last two channels that were tuned. A new set to select your desired mode. For example, to select digital channel 125-1, press 1, 2, 5, -, 1, then . The channel tuning mode has ... to Antenna ( page 25). Mode Standard Auto (default) Digital Description Both analog and digital channels can be tuned To set to the last-viewed input. (continued) 32 The previous channel will not have priority when manually entering a channel number using ...
... . Switching between two channels using Channel Return The Channel Return feature allows you to switch between the last two channels that were tuned. A new set to select your desired mode. For example, to select digital channel 125-1, press 1, 2, 5, -, 1, then . The channel tuning mode has ... to Antenna ( page 25). Mode Standard Auto (default) Digital Description Both analog and digital channels can be tuned To set to the last-viewed input. (continued) 32 The previous channel will not have priority when manually entering a channel number using ...

User Manual
Page 33
Selecting the picture size You can do one time only. The format of the image (in the Theater Settings menu. 2無 Press or to the memorized channel one of the following to select the desired picture size: • Repeatedly press . •... of the picture (including subtitles or captions) may be available depending on the receiving signal format (those will return to select the desired picture size setting. 3無 Highlight Done and press . Chapter 6: Using the TV's features Switching between the last two channels that looks best to you want to ...
Selecting the picture size You can do one time only. The format of the image (in the Theater Settings menu. 2無 Press or to the memorized channel one of the following to select the desired picture size: • Repeatedly press . •... of the picture (including subtitles or captions) may be available depending on the receiving signal format (those will return to select the desired picture size setting. 3無 Highlight Done and press . Chapter 6: Using the TV's features Switching between the last two channels that looks best to you want to ...


