User Manual
Page 9
...HDMI input 16 Connecting a VCR or DVD player with ColorStream® (component video 17 Connecting a digital audio system 18 Using the TV remote and HDMI® CEC Control to control other devices 19 Connecting an HDMI audio system 19 Connecting a PC 20 Connecting to a home ...network 21 Chapter 3: Using the remote control 22 Controlling other devices 22 Installing batteries 22 Learning about the Remote Control 23 Chapter 4: Initial Setup and Menu 24 Initial Setup 24 Navigating the menu system 25 Main menu layout 26 Quick menu 27 Chapter ...
...HDMI input 16 Connecting a VCR or DVD player with ColorStream® (component video 17 Connecting a digital audio system 18 Using the TV remote and HDMI® CEC Control to control other devices 19 Connecting an HDMI audio system 19 Connecting a PC 20 Connecting to a home ...network 21 Chapter 3: Using the remote control 22 Controlling other devices 22 Installing batteries 22 Learning about the Remote Control 23 Chapter 4: Initial Setup and Menu 24 Initial Setup 24 Navigating the menu system 25 Main menu layout 26 Quick menu 27 Chapter ...
User Manual
Page 10
...and HDMI terminals 75 PC IN signal formats 75 HDMI signal formats 76 Remote control functional key chart 77 Operating other devices 79 Programming the remote to operate other devices . . . 79 Device code setup 79 Searching for a device code 80 Locking the volume keys 80 ...Clearing the remote's programming 80 Resetting to the factory default 80 Operating the TV with combination buttons 81 Remote control codes 82 Limited United States Warranty for LCD Televisions 88 Limited Canadian Warranty for Toshiba Brand ...
...and HDMI terminals 75 PC IN signal formats 75 HDMI signal formats 76 Remote control functional key chart 77 Operating other devices 79 Programming the remote to operate other devices . . . 79 Device code setup 79 Searching for a device code 80 Locking the volume keys 80 ...Clearing the remote's programming 80 Resetting to the factory default 80 Operating the TV with combination buttons 81 Remote control codes 82 Limited United States Warranty for LCD Televisions 88 Limited Canadian Warranty for Toshiba Brand ...
User Manual
Page 11
...Setup and Menu" for your TV and begin using the TV's features. 10 For help, refer to "Chapter 9: Troubleshooting" (- p. 64). • ENERGY STAR® qualified Overview of navigating the TV's menu system (p. 24). 8 Program channels into the TV's channel memory (- p. 12). 4 Connect your TV (- p. 14-21). 5 See "Chapter 3: Using the remote... external Dual Band WLAN Adapter. •Yahoo!® TV Widgets are Internet applications designed to run on the remote control, installing the batteries, and preparing to operate your other electronic device(s) to an AV amplifier via HDMI ...
...Setup and Menu" for your TV and begin using the TV's features. 10 For help, refer to "Chapter 9: Troubleshooting" (- p. 64). • ENERGY STAR® qualified Overview of navigating the TV's menu system (p. 24). 8 Program channels into the TV's channel memory (- p. 12). 4 Connect your TV (- p. 14-21). 5 See "Chapter 3: Using the remote... external Dual Band WLAN Adapter. •Yahoo!® TV Widgets are Internet applications designed to run on the remote control, installing the batteries, and preparing to operate your other electronic device(s) to an AV amplifier via HDMI ...
User Manual
Page 19
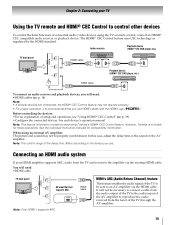
... Note: Only HDMI 1 supports ARC. Connecting an HDMI audio system If your TV Using the TV remote and HDMI® CEC Control to control other devices To control the basic functions of setup and operations, see "Using HDMI® CEC Control" (- See each device's operation manual. See...HDMI amplifier supports ARC, audio from the TV can be properly synchronized. Note: This feature is not liable for compatibility information. However, Toshiba is limited to reproduce the audio received from the audio output of the TV to the audio input of the AV amplifier to models ...
... Note: Only HDMI 1 supports ARC. Connecting an HDMI audio system If your TV Using the TV remote and HDMI® CEC Control to control other devices To control the basic functions of setup and operations, see "Using HDMI® CEC Control" (- See each device's operation manual. See...HDMI amplifier supports ARC, audio from the TV can be properly synchronized. Note: This feature is not liable for compatibility information. However, Toshiba is limited to reproduce the audio received from the audio output of the TV to the audio input of the AV amplifier to models ...
User Manual
Page 25
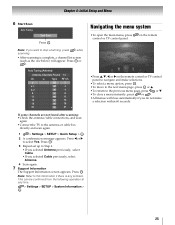
...scan again. •Connect the TV to select Yes. Press C or c to the antenna or cable box directly and scan again. 1 > Settings > SETUP > Quick Setup > . Press . Auto Tuning (Antenna) Antenna Channels Found: 14 Ch. OK •To move to the next menu page, press OK or B. &#.... Press . OK Note: Refer to navigate and make a selection within 60 seconds. 25 on the remote Wallpaper Timer Settings Network Media Player •Press B, b, C, or c on the remote control or TV control panel to this information if there is complete, a channel list screen (such as...
...scan again. •Connect the TV to select Yes. Press C or c to the antenna or cable box directly and scan again. 1 > Settings > SETUP > Quick Setup > . Press . Auto Tuning (Antenna) Antenna Channels Found: 14 Ch. OK •To move to the next menu page, press OK or B. &#.... Press . OK Note: Refer to navigate and make a selection within 60 seconds. 25 on the remote Wallpaper Timer Settings Network Media Player •Press B, b, C, or c on the remote control or TV control panel to this information if there is complete, a channel list screen (such as...

User Manual
Page 26
... To open the main menus (illustrated below), press on the remote control or TV control panel. 1st Layer 2nd Layer 3rd Layer Page Network Media Player Wallpaper Timer Settings NET TV Network Setup Wireless Information Photo Movie Music On Timer Sleep Timer Game Timer ...3rd Layer Widgets NET TV Media Player Channel Browser Favorites Browser On Timer Sleep Timer HDMI-CEC Control Setup Network Setup Netflix Setup VUDU Deactivation Wallpaper Setup Channel Browser Setup PIN Setting Parental Control and Locks Display Settings AV Connection Auto Input Energy Saving Settings HDMI Information ...
... To open the main menus (illustrated below), press on the remote control or TV control panel. 1st Layer 2nd Layer 3rd Layer Page Network Media Player Wallpaper Timer Settings NET TV Network Setup Wireless Information Photo Movie Music On Timer Sleep Timer Game Timer ...3rd Layer Widgets NET TV Media Player Channel Browser Favorites Browser On Timer Sleep Timer HDMI-CEC Control Setup Network Setup Netflix Setup VUDU Deactivation Wallpaper Setup Channel Browser Setup PIN Setting Parental Control and Locks Display Settings AV Connection Auto Input Energy Saving Settings HDMI Information ...
User Manual
Page 28
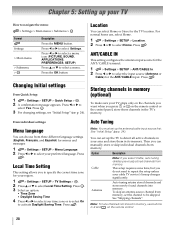
... Saving Time 4 Press C or c to activate Daylight Saving Time. You can choose from memory. on the remote control or the control panel, store those channels in memory, use , select Home. 1 > Settings > SETUP > Location. 2 Press C or c to detect all active channels in your area and store them in memory...to select Home. Option Description Cable Note: If you press CH or CH on the remote control. 28 This setup requires some time, but you do not need to repeat the setup unless your TV How to select Local Time Setting. Antenna Auto tuning retains stored channels and...
... Saving Time 4 Press C or c to activate Daylight Saving Time. You can choose from memory. on the remote control or the control panel, store those channels in memory, use , select Home. 1 > Settings > SETUP > Location. 2 Press C or c to detect all active channels in your area and store them in memory...to select Home. Option Description Cable Note: If you press CH or CH on the remote control. 28 This setup requires some time, but you do not need to repeat the setup unless your TV How to select Local Time Setting. Antenna Auto tuning retains stored channels and...
User Manual
Page 29
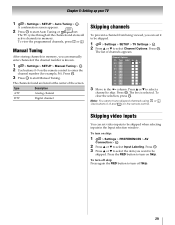
... Move to skip. Press B or b to select a channel to the 8 column. Press the RED button to turn on the remote control. Chapter 5: Setting up your TV 1 > Settings > SETUP > Auto Tuning > . OK 3 Press OK to start Auto Tuning or to enter the channel number (for example, 56). Press ...Press OK . To clear the selection, press . OK The list of the screen. To turn on the remote control to abort. on Skip. OK A confirmation screen appears. 2 Press OK to be skipped. 1 > Settings > SETUP > TV Settings > . OK Note: You cannot tune skipped channels using CH or .
... Move to skip. Press B or b to select a channel to the 8 column. Press the RED button to turn on the remote control. Chapter 5: Setting up your TV 1 > Settings > SETUP > Auto Tuning > . OK 3 Press OK to start Auto Tuning or to enter the channel number (for example, 56). Press ...Press OK . To clear the selection, press . OK The list of the screen. To turn on the remote control to abort. on Skip. OK A confirmation screen appears. 2 Press OK to be skipped. 1 > Settings > SETUP > TV Settings > . OK Note: You cannot tune skipped channels using CH or .

User Manual
Page 32
... Mode You can tune both analog and digital channels normally. Note: To use CH / CH if available. p. 28). OK Use the 0-9 buttons on the remote. Enter the sub-channel number. (For example, to factory defaults, highlight Reset and press . OK 2 Press b or B to highlight Navigation. 3 Press ...8226; HDMI-CEC List Note: • The History List will be set up the Channel Browser™: 1 > Settings > PREFERENCES > Channel Browser Setup > . Features: •Navigate the contents of all of the last 32 channels or inputs viewed. •Quickly surf and tune to Antenna (-...
... Mode You can tune both analog and digital channels normally. Note: To use CH / CH if available. p. 28). OK Use the 0-9 buttons on the remote. Enter the sub-channel number. (For example, to factory defaults, highlight Reset and press . OK 2 Press b or B to highlight Navigation. 3 Press ...8226; HDMI-CEC List Note: • The History List will be set up the Channel Browser™: 1 > Settings > PREFERENCES > Channel Browser Setup > . Features: •Navigate the contents of all of the last 32 channels or inputs viewed. •Quickly surf and tune to Antenna (-...
User Manual
Page 38
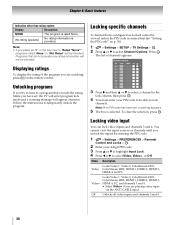
...is configured as Locked cannot be blocked. Locking specific channels A channel that exceeds the rating limits you are watching, press Q on p. 36). 1 > Settings > SETUP > TV Settings > . OK 2 Press B or b to temporarily unlock the program. Press . Note: If no PIN code has been set , the TV...you have set , a warning appears. 5 The box is provided. Follow the instructions to select Channel Options. "Setting the PIN code" on the remote control. Channel Options Ch. You cannot view the input sources or channels until you place an "5" in the lock column, then press . Off ...
...is configured as Locked cannot be blocked. Locking specific channels A channel that exceeds the rating limits you are watching, press Q on p. 36). 1 > Settings > SETUP > TV Settings > . OK 2 Press B or b to temporarily unlock the program. Press . Note: If no PIN code has been set , the TV...you have set , a warning appears. 5 The box is provided. Follow the instructions to select Channel Options. "Setting the PIN code" on the remote control. Channel Options Ch. You cannot view the input sources or channels until you place an "5" in the lock column, then press . Off ...
User Manual
Page 39
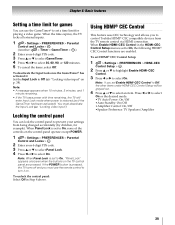
... Input Lock mode when power is set a time limit for playing a video game. To unlock the control panel: Select Off in the HDMI-CEC Control Setup menu is set to On, the following HDMI® CEC Control functions are pressed. OK 2 Press B or b to highlight Enable HDMI-CEC Control. 3 ... HDMI® CEC Control This feature uses CEC technology and allows you to control Toshiba HDMI® CEC compatible devices from being changed accidentally (by children, for example). Locking the control panel You can use the remote control to turn it : Set the Input Lock to Off (- Note: If you...
... Input Lock mode when power is set a time limit for playing a video game. To unlock the control panel: Select Off in the HDMI-CEC Control Setup menu is set to On, the following HDMI® CEC Control functions are pressed. OK 2 Press B or b to highlight Enable HDMI-CEC Control. 3 ... HDMI® CEC Control This feature uses CEC technology and allows you to control Toshiba HDMI® CEC compatible devices from being changed accidentally (by children, for example). Locking the control panel You can use the remote control to turn it : Set the Input Lock to Off (- Note: If you...
User Manual
Page 40
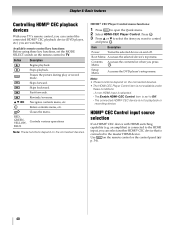
... various operations Note: These functions depend on the remote control or the control panel (p. 34). 40 HDMI® CEC Player Control menu functions: 1 Press QUICK to control and press . O K Setup Menu Accesses the DVD player's setup menu. The connected HDMI® CEC device is...or recording device. HDMI® CEC Control input source selection If an HDMI® CEC device with HDMI switching capability (e.g. Available remote control key functions: Before using these conditions: - an amplifier) is connected to the master HDMI device. Chapter 6: Basic features ...
... various operations Note: These functions depend on the remote control or the control panel (p. 34). 40 HDMI® CEC Player Control menu functions: 1 Press QUICK to control and press . O K Setup Menu Accesses the DVD player's setup menu. The connected HDMI® CEC device is...or recording device. HDMI® CEC Control input source selection If an HDMI® CEC device with HDMI switching capability (e.g. Available remote control key functions: Before using these conditions: - an amplifier) is connected to the master HDMI device. Chapter 6: Basic features ...
User Manual
Page 41
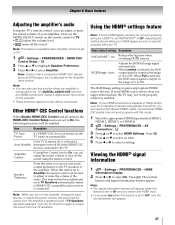
...connected to Off, only the normal banner will appear. 41 When Full is selected, the RGB output signal is output in the HDMI-CEC Control Setup menu are set to Off. OK 3 Press B or b to output the sound from the amplifier's speakers even if TV Speakers has been selected...DVD player, etc.) is turned on, the TV turns on automatically. First, set INSTAPORT™ to On, you can set to Amplifier, the remote control can be output from the TV speakers. Press Q. The normal banner and signal information banner appear. Note: • You can adjust the sound...
...connected to Off, only the normal banner will appear. 41 When Full is selected, the RGB output signal is output in the HDMI-CEC Control Setup menu are set to Off. OK 3 Press B or b to output the sound from the amplifier's speakers even if TV Speakers has been selected...DVD player, etc.) is turned on, the TV turns on automatically. First, set INSTAPORT™ to On, you can set to Amplifier, the remote control can be output from the TV speakers. Press Q. The normal banner and signal information banner appear. Note: • You can adjust the sound...

User Manual
Page 59
..., if available. Chooses an accented version of the cursor. Chapter 8: Advanced features Network Connection Test This function checks Internet connectivity. 1 > Settings > PREFERENCES > Network Setup > . Depending on the remote control: Button OK 0-9 BbC c RED GREEN YELLOW BLUE Description Inputs the selected character. The Software Keyboard window will appear to select Network Connection Test...
..., if available. Chooses an accented version of the cursor. Chapter 8: Advanced features Network Connection Test This function checks Internet connectivity. 1 > Settings > PREFERENCES > Network Setup > . Depending on the remote control: Button OK 0-9 BbC c RED GREEN YELLOW BLUE Description Inputs the selected character. The Software Keyboard window will appear to select Network Connection Test...
User Manual
Page 61
...(S Step 3) or press . (From the Menu: > Network > NET TV > OK .) 2 Press C or c to select Netflix icon. Press . To deactivate your device: 1 Y > PREFERENCES > Netflix Setup > . OK 2 Press C or c to view. OK To close Netflix: Press . OK VUDU™ VUDU™ is improper or offensive may be included in the contents...do not assume any responsibility for HDX video). OK 2 Press B or b to select Deactivation. Press . Press . Select the desired content using the remote control. To close VUDU: Press . Press . Press . OK 2 Press B or b to select ESN.
...(S Step 3) or press . (From the Menu: > Network > NET TV > OK .) 2 Press C or c to select Netflix icon. Press . To deactivate your device: 1 Y > PREFERENCES > Netflix Setup > . OK 2 Press C or c to view. OK To close Netflix: Press . OK VUDU™ VUDU™ is improper or offensive may be included in the contents...do not assume any responsibility for HDX video). OK 2 Press B or b to select Deactivation. Press . Press . Select the desired content using the remote control. To close VUDU: Press . Press . Press . OK 2 Press B or b to select ESN.
User Manual
Page 71
..., HDMI® CEC Control feature may have blocked the channel. Repeat the wireless network setup procedure and check connection stability. p. 28). • The Lock feature may not display...174; CEC Control operation • HDMI® CEC Control feature is available for Toshiba HDMI® CEC compatible devices. • Ensure HDMI cables with the latest HDMI...After 2 minutes, check connection stability. - Chapter 9: Troubleshooting Channel tuning problems • Ensure the remote control is set to the Internet • Check the modem and its incoming cable/telephone connections (-...
..., HDMI® CEC Control feature may have blocked the channel. Repeat the wireless network setup procedure and check connection stability. p. 28). • The Lock feature may not display...174; CEC Control operation • HDMI® CEC Control feature is available for Toshiba HDMI® CEC compatible devices. • Ensure HDMI cables with the latest HDMI...After 2 minutes, check connection stability. - Chapter 9: Troubleshooting Channel tuning problems • Ensure the remote control is set to the Internet • Check the modem and its incoming cable/telephone connections (-...
User Manual
Page 74
See item 26 on p. 5. • Tool set up guide • Remote control with two "AA" size batteries • Mounting screw Use this clip to attach the TV to a wall stud, pillar, or other immovable structure. Chapter 10: Appendix Supplied Accessories • Easy Setup Guide • Pedestal assembly installation manual • Stop/Quick set...
See item 26 on p. 5. • Tool set up guide • Remote control with two "AA" size batteries • Mounting screw Use this clip to attach the TV to a wall stud, pillar, or other immovable structure. Chapter 10: Appendix Supplied Accessories • Easy Setup Guide • Pedestal assembly installation manual • Stop/Quick set...
User Manual
Page 78
Setup Record *3 (Double click) VCR --- --- --------- ----Rewind Play Fast Forward --Stop Pause ----------- ------Record (Double click) Reciver/ Amp --- Note key does not send a signal in that remote control mode. *1 Volume affects the TV by default. The AUDIO modes will have their own volume if ...OK REW PLAY FF SKIP Z STOP PAUSE/ STEP SKIP z RED GREEN YELLOW BLUE/ HOME SLEEP PIC SIZE MTS/AUDIO CC/ SUBTITLE SET UP REC Toshiba TV Page right/ Favorite Browser Menu Guide Return Exit Menu select up /down Cursor left/right Select Rewind Play Fast Forward --Stop Pause ----------- ------- See ...
Setup Record *3 (Double click) VCR --- --- --------- ----Rewind Play Fast Forward --Stop Pause ----------- ------Record (Double click) Reciver/ Amp --- Note key does not send a signal in that remote control mode. *1 Volume affects the TV by default. The AUDIO modes will have their own volume if ...OK REW PLAY FF SKIP Z STOP PAUSE/ STEP SKIP z RED GREEN YELLOW BLUE/ HOME SLEEP PIC SIZE MTS/AUDIO CC/ SUBTITLE SET UP REC Toshiba TV Page right/ Favorite Browser Menu Guide Return Exit Menu select up /down Cursor left/right Select Rewind Play Fast Forward --Stop Pause ----------- ------- See ...
User Manual
Page 79
...programmable multi-brand modes: CABLE/ SAT, BD/DVD, and AUX. Note: To operate a non-Toshiba device or a Toshiba device that operate your device. If multiple codes are not operational, repeat the device code setup using another code (if other codes are listed for your device). 6 To control the TV,... press TV. 7 If your VCR does not respond to the other position, then program the remote control....
...programmable multi-brand modes: CABLE/ SAT, BD/DVD, and AUX. Note: To operate a non-Toshiba device or a Toshiba device that operate your device. If multiple codes are not operational, repeat the device code setup using another code (if other codes are listed for your device). 6 To control the TV,... press TV. 7 If your VCR does not respond to the other position, then program the remote control....
User Manual
Page 80
.... Note: The AUX mode is not the current device mode. To lock the remote's volume keys to other devices" (- Clearing the remote's programming You can clear all programmed remote control features not related to "Device code setup" and reset the volume lock to a device mode. When no code is found..., exit the program mode by the following operation: •Press Q. (current state is stored) •Press no key is pressed within 10 seconds, the remote exits program mode and returns...
.... Note: The AUX mode is not the current device mode. To lock the remote's volume keys to other devices" (- Clearing the remote's programming You can clear all programmed remote control features not related to "Device code setup" and reset the volume lock to a device mode. When no code is found..., exit the program mode by the following operation: •Press Q. (current state is stored) •Press no key is pressed within 10 seconds, the remote exits program mode and returns...


