Owner's Manual - English
Page 4
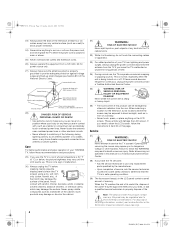
... Electric Code). Gently wipe the display panel surface (the TV screen) using a dry, soft cloth only (cotton, flannel, etc.). Never strike the screen with a sharp or heavy object. 36) • The LCD screen of the TV. When the TV reaches the end of its useful life, dispose of the...due to determine that the TV is not a sign of mercury. Such products may be exposed to make occasional snapping or popping sounds. Never attempt to clean the LCD screen, follow these sounds become frequent or continuous, unplug the power cord and contact a Toshiba Authorized Service Center. 35...
... Electric Code). Gently wipe the display panel surface (the TV screen) using a dry, soft cloth only (cotton, flannel, etc.). Never strike the screen with a sharp or heavy object. 36) • The LCD screen of the TV. When the TV reaches the end of its useful life, dispose of the...due to determine that the TV is not a sign of mercury. Such products may be exposed to make occasional snapping or popping sounds. Never attempt to clean the LCD screen, follow these sounds become frequent or continuous, unplug the power cord and contact a Toshiba Authorized Service Center. 35...
Owner's Manual - English
Page 6
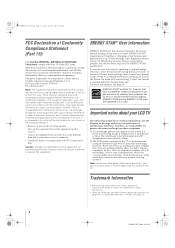
...these symptoms. 1) An afterimage (ghost) may appear on -screen target may not work with this equipment. ENERGY STAR® qualified TV. marks. The afterimage is manufactured using an extremely high level... correct the interference by the U.S. Important notes about your LCD TV The following two conditions: (1) this device may cause undesired operation. Operation is subject..., July 22, 2008 5:25 PM FCC Declaration of Conformity Compliance Statement (Part 15): The Toshiba 42RV535U, 46RV535U and 52RV535U Televisions comply with Part 15 of time. This equipment generates, uses, and...
...these symptoms. 1) An afterimage (ghost) may appear on -screen target may not work with this equipment. ENERGY STAR® qualified TV. marks. The afterimage is manufactured using an extremely high level... correct the interference by the U.S. Important notes about your LCD TV The following two conditions: (1) this device may cause undesired operation. Operation is subject..., July 22, 2008 5:25 PM FCC Declaration of Conformity Compliance Statement (Part 15): The Toshiba 42RV535U, 46RV535U and 52RV535U Televisions comply with Part 15 of time. This equipment generates, uses, and...
Owner's Manual - English
Page 9
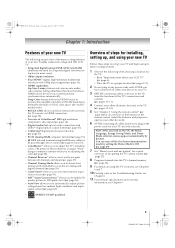
... you turn off the On-Screen demonstration mode by setting the Demo Mode to accurately perform synchronization automatically. page 43). • ENERGY STAR® qualified Overview of steps for installing, setting up your TV and begin using its many exciting features of your new Toshiba widescreen, integrated HD, LCD TV: • Integrated digital tuning (8VSB...
... you turn off the On-Screen demonstration mode by setting the Demo Mode to accurately perform synchronization automatically. page 43). • ENERGY STAR® qualified Overview of steps for installing, setting up your TV and begin using its many exciting features of your new Toshiba widescreen, integrated HD, LCD TV: • Integrated digital tuning (8VSB...
Owner's Manual - English
Page 10
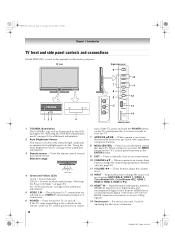
... adjust the volume level. 12 INPUT - When a menu is on-screen, the MENU button on -screen menu. 10 CHANNEL Bb - Press to turn off . TV front Right side panel 6 10 7 11 8 9 12 5 13 1 23 4 1 TOSHIBA Illumination The TOSHIBA logo will detect the ambient light conditions to as the ENTER button. ...HDMI 2, HDMI 3, HDMI 4, PC). 13 HDMI™ IN - 52RV535U_EN.book Page 10 Tuesday, July 22, 2008 5:25 PM Chapter 1: Introduction TV front and side panel controls and connections Model 42RV535U is used in this remote sensor. page 27). HDMI connection is on and off the...
... adjust the volume level. 12 INPUT - When a menu is on-screen, the MENU button on -screen menu. 10 CHANNEL Bb - Press to turn off . TV front Right side panel 6 10 7 11 8 9 12 5 13 1 23 4 1 TOSHIBA Illumination The TOSHIBA logo will detect the ambient light conditions to as the ENTER button. ...HDMI 2, HDMI 3, HDMI 4, PC). 13 HDMI™ IN - 52RV535U_EN.book Page 10 Tuesday, July 22, 2008 5:25 PM Chapter 1: Introduction TV front and side panel controls and connections Model 42RV535U is used in this remote sensor. page 27). HDMI connection is on and off the...
Owner's Manual - English
Page 19
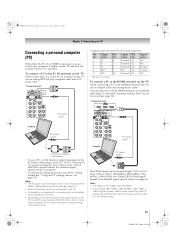
... of the screen (i.e. Computer PC audio output The HDMI input can accept and display VGA, SVGA, XGA, WXGA, and SXGA signal formats. name No. For detailed signal specifications, see page 64. • To display the optimum picture, use an analog RGB (15-pin) computer cable and a PC audio cable. TV upper back...
... of the screen (i.e. Computer PC audio output The HDMI input can accept and display VGA, SVGA, XGA, WXGA, and SXGA signal formats. name No. For detailed signal specifications, see page 64. • To display the optimum picture, use an analog RGB (15-pin) computer cable and a PC audio cable. TV upper back...
Owner's Manual - English
Page 21
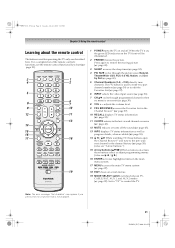
...The = button is used for a function that is on, the green LED indicator on -screen (- page 30). 8 VOL + - page 37). 10 RECALL displays TV status information (- page 55). 14 3 C / # c While watching TV, these buttons select or adjust programming menus. (Also see the remote control functional key chart... (page 23). 1 POWER turns the TV on -screen menus. 19 MODE SELECT switch switches between TV, CABLE/SAT, AUX 1, and AUX 2 modes (- adjusts the volume level. 9 FAV BROWSER accesses the Favorites List...
...The = button is used for a function that is on, the green LED indicator on -screen (- page 30). 8 VOL + - page 37). 10 RECALL displays TV status information (- page 55). 14 3 C / # c While watching TV, these buttons select or adjust programming menus. (Also see the remote control functional key chart... (page 23). 1 POWER turns the TV on -screen menus. 19 MODE SELECT switch switches between TV, CABLE/SAT, AUX 1, and AUX 2 modes (- adjusts the volume level. 9 FAV BROWSER accesses the Favorites List...
Owner's Manual - English
Page 22
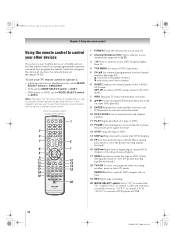
... need to use your other devices. b selects the next lower channel. 6 GUIDE Displays the channel guide in the AUX mode. 7 INFO Displays TV status information on-screen. 8 BbC c Press to navigate DVD menus (may not operate certain features on any other devices If you have not already done so) (- ... a DVD player or HTIB. 22 RV535U (E/F) Web 213:276 If this happens and you wish to use those features, you have a non-Toshiba device or a Toshiba device that the remote control is programmed, it may not work on and off. 2 Channel Numbers (0-9) Press to directly access channels (as opposed...
... need to use your other devices. b selects the next lower channel. 6 GUIDE Displays the channel guide in the AUX mode. 7 INFO Displays TV status information on-screen. 8 BbC c Press to navigate DVD menus (may not operate certain features on any other devices If you have not already done so) (- ... a DVD player or HTIB. 22 RV535U (E/F) Web 213:276 If this happens and you wish to use those features, you have a non-Toshiba device or a Toshiba device that the remote control is programmed, it may not work on and off. 2 Channel Numbers (0-9) Press to directly access channels (as opposed...
Owner's Manual - English
Page 28
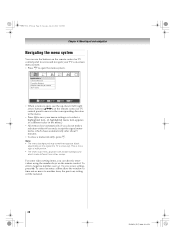
This is open, use the up/down/left/right arrow buttons (BbC c) on -screen menu system. • Press Y to another item; 52RV535U_EN.book Page 28 Tuesday, July 22, 2008 5:25 PM Chapter 4: Menu layout and navigation Navigating the menu ...system You can directly enter values using the number keys on the signal the TV is receiving. To enter a negative number, use the buttons on the remote control or TV control panel to access and navigate your menu settings or to save a new setting, press T. To cancel an...
This is open, use the up/down/left/right arrow buttons (BbC c) on -screen menu system. • Press Y to another item; 52RV535U_EN.book Page 28 Tuesday, July 22, 2008 5:25 PM Chapter 4: Menu layout and navigation Navigating the menu ...system You can directly enter values using the number keys on the signal the TV is receiving. To enter a negative number, use the buttons on the remote control or TV control panel to access and navigate your menu settings or to save a new setting, press T. To cancel an...

Owner's Manual - English
Page 29
... Demo Mode To use , press c to select Home and press T. For normal TV usage, please select [Normal (Off)]. To restart the on-screen demonstration, press Y on the remote or on -screen demonstration will automatically restart after 120 seconds of menus and messages. Initial Setup Menu Language...choose from three different languages (English, French and Spanish) for the on -screen demonstration, select Store (On). To enable the on -screen display of inactivity. Initial Setup Energy Saving Mode To use this TV for displaying in the Setup menu (- 52RV535U_EN.book Page 29 Tuesday, July ...
... Demo Mode To use , press c to select Home and press T. For normal TV usage, please select [Normal (Off)]. To restart the on-screen demonstration, press Y on the remote or on -screen demonstration will automatically restart after 120 seconds of menus and messages. Initial Setup Menu Language...choose from three different languages (English, French and Spanish) for the on -screen demonstration, select Store (On). To enable the on -screen display of inactivity. Initial Setup Energy Saving Mode To use this TV for displaying in the Setup menu (- 52RV535U_EN.book Page 29 Tuesday, July ...
Owner's Manual - English
Page 31
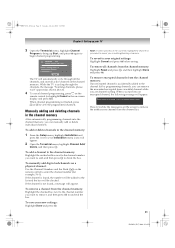
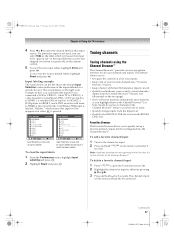
...to assist you are channel surfing. To manually add digital subchannels on a physical channel: Use the Channel Numbers and the Dash (=) on the screen to remove channel Press 1 while the message is found , a message will appear. 2 Open the Terrestrial menu, highlight Channel Add/ Delete,... or , to begin channel programming. A new set of Channels Found - 52 Scanning Analog Channels Found Channel - 55 Cancel The TV will appear. Manually adding and deleting channels in the channel memory After automatically programming channels into an encrypted channel, the following message will ...
...to assist you are channel surfing. To manually add digital subchannels on a physical channel: Use the Channel Numbers and the Dash (=) on the screen to remove channel Press 1 while the message is found , a message will appear. 2 Open the Terrestrial menu, highlight Channel Add/ Delete,... or , to begin channel programming. A new set of Channels Found - 52 Scanning Analog Channels Found Channel - 55 Cancel The TV will appear. Manually adding and deleting channels in the channel memory After automatically programming channels into an encrypted channel, the following message will ...
Owner's Manual - English
Page 32
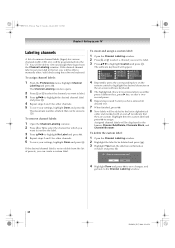
...100 Backspace 2EdAit BCHCRTaN Cbanccel2 5 JKL j k l 5 8 TUV t u v 8 00 S3endD EEXIFT dExiet f 3 6 MNOmn o 6 9 WX Y Zw x y z 9 INPUT Space 4 Repeatedly press the corresponding key on -screen software keyboard. 5 The highlighted character is not provided in the list, you can create a custom label. No Yes 4 Highlight Done and press T to save your... No Label and press T. 4 Repeat steps 2 and 3 for various channels (ABC, CBS, etc.) will be programmed into the TV. To remove channel labels: 1 Open the Channel Labeling window. 2 Press < or , to select the channel for which you want...
...100 Backspace 2EdAit BCHCRTaN Cbanccel2 5 JKL j k l 5 8 TUV t u v 8 00 S3endD EEXIFT dExiet f 3 6 MNOmn o 6 9 WX Y Zw x y z 9 INPUT Space 4 Repeatedly press the corresponding key on -screen software keyboard. 5 The highlighted character is not provided in the list, you can create a custom label. No Yes 4 Highlight Done and press T to save your... No Label and press T. 4 Repeat steps 2 and 3 for various channels (ABC, CBS, etc.) will be programmed into the TV. To remove channel labels: 1 Open the Channel Labeling window. 2 Press < or , to select the channel for which you want...

Owner's Manual - English
Page 33
...the HDMI 1 Audio menu setting. To return to the Terrestrial menu: Highlight Done and press T. A new set to check. page 16). If not, the TV will appear. 2 Open the Terrestrial menu, highlight Signal Meter, and press T. 3 Press BbC c to select the digital channel whose signal you want to ...channel. Note: Because the PC and HDMI 1 inputs share the same set to "No," the HDMI 1 Audio setting changes to a virtual TV channel number. To close the screen and return to normal viewing: Press O. 33 RV535U (E/F) Web 213:276 52RV535U_EN.book Page 33 Tuesday, July 22, 2008 5:25 PM ...
...the HDMI 1 Audio menu setting. To return to the Terrestrial menu: Highlight Done and press T. A new set to check. page 16). If not, the TV will appear. 2 Open the Terrestrial menu, highlight Signal Meter, and press T. 3 Press BbC c to select the digital channel whose signal you want to ...channel. Note: Because the PC and HDMI 1 inputs share the same set to "No," the HDMI 1 Audio setting changes to a virtual TV channel number. To close the screen and return to normal viewing: Press O. 33 RV535U (E/F) Web 213:276 52RV535U_EN.book Page 33 Tuesday, July 22, 2008 5:25 PM ...

Owner's Manual - English
Page 34
...Version and view the related information. Reset Factory Defaults To reset all settings and channels to complete the reset process. The TV will turn off , unplug the TV power cord and then plug it in again to their factory default values: 1 From the Setup menu, highlight Installation and... the system status To view the system status: 1 From the Setup menu, highlight Installation and press T. After the TV turns off automatically after a few seconds. To close the screen and return to show the correct time zone information (- To cancel the reset: Highlight No and press T. 34 RV535U...
...Version and view the related information. Reset Factory Defaults To reset all settings and channels to complete the reset process. The TV will turn off , unplug the TV power cord and then plug it in again to their factory default values: 1 From the Setup menu, highlight Installation and... the system status To view the system status: 1 From the Setup menu, highlight Installation and press T. After the TV turns off automatically after a few seconds. To close the screen and return to show the correct time zone information (- To cancel the reset: Highlight No and press T. 34 RV535U...
Owner's Manual - English
Page 36
...window using +, some REGZA LINK devices may automatically turn on. • When selecting input sources using B b, you will appear randomly on the screen if no signal is received in the top right corner of labels: • - - (default label) • Audio Receiver • ... 9 PC 0 - 9 / INPUT / ENTER to Select Navigate Note: • You can also be "hidden" (- or c) Repeatedly press + on the remote control or TV control panel. 2 And then either: a) Press 0-9; If a REGZA LINK device with HDMI switching capability (e.g. "Labeling the video input sources" at right). • "No Video...
...window using +, some REGZA LINK devices may automatically turn on. • When selecting input sources using B b, you will appear randomly on the screen if no signal is received in the top right corner of labels: • - - (default label) • Audio Receiver • ... 9 PC 0 - 9 / INPUT / ENTER to Select Navigate Note: • You can also be "hidden" (- or c) Repeatedly press + on the remote control or TV control panel. 2 And then either: a) Press 0-9; If a REGZA LINK device with HDMI switching capability (e.g. "Labeling the video input sources" at right). • "No Video...
Owner's Manual - English
Page 37
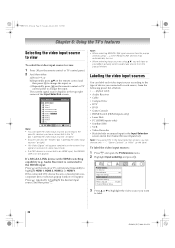
...Page 37 Tuesday, July 22, 2008 5:25 PM Chapter 6: Using the TV's features 4 Press C or c to the beginning of the Favorites list on the left shows the default Input Selection screen (with tuner to tune). • Quickly change inputs from the Inputs List... 2 3 ColorStream HD1 4 ColorStream HD2 5 HDMI 1 6 HDMI 2 7 HDMI 3 8 HDMI 4 9 PC ANT/CABLE 0 - 9 / INPUT / ENTER to Select Navigate Input Selection screen with no inputs labeled. Tuning channels Tuning channels using the Channel Browser™ The Channel Browser™ provides an easy navigation interface for 3 seconds. Input...
...Page 37 Tuesday, July 22, 2008 5:25 PM Chapter 6: Using the TV's features 4 Press C or c to the beginning of the Favorites list on the left shows the default Input Selection screen (with tuner to tune). • Quickly change inputs from the Inputs List... 2 3 ColorStream HD1 4 ColorStream HD2 5 HDMI 1 6 HDMI 2 7 HDMI 3 8 HDMI 4 9 PC ANT/CABLE 0 - 9 / INPUT / ENTER to Select Navigate Input Selection screen with no inputs labeled. Tuning channels Tuning channels using the Channel Browser™ The Channel Browser™ provides an easy navigation interface for 3 seconds. Input...
Owner's Manual - English
Page 40
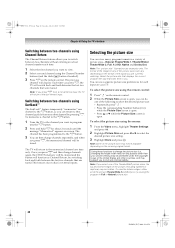
... many program formats in a variety of the following to that channel quickly from a non-antenna input, the TV will vary depending on the remote control. 2 While the Picture Size screen is open . To select the picture size using SurfLock™ The SurfLock™ feature temporarily "memorizes" one... time you . To select the picture size using the Channel Number buttons (and the dash (=) button if needed). 3 Press R on -screen. The TV will switch back and forth between the last two channels that were tuned. Note: Some of the signal you to select the desired picture size...
... many program formats in a variety of the following to that channel quickly from a non-antenna input, the TV will vary depending on the remote control. 2 While the Picture Size screen is open . To select the picture size using SurfLock™ The SurfLock™ feature temporarily "memorizes" one... time you . To select the picture size using the Channel Number buttons (and the dash (=) button if needed). 3 Press R on -screen. The TV will switch back and forth between the last two channels that were tuned. Note: Some of the signal you to select the desired picture size...
Owner's Manual - English
Page 41
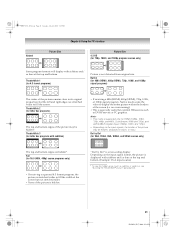
..., 1080i, and 720p). • Depending on the input signal format, the picture is hidden. page 42). 41 RV535U (E/F) Web 213:276 Dot by Dot" is not distorted from original size. 52RV535U_EN.book Page... 41 Tuesday, July 22, 2008 5:25 PM Natural Picture Size Chapter 6: Using the TV's features Picture Size 4:3 HD (for 720p, 1080i, and 1080p program sources only) Some program...may be hidden, displayed in black, or noisy. Depending on the input signals, the border of the screen (i.e. Full (for 16:9 [480i, 480p] source programs only) • If receiving a squeezed ...
..., 1080i, and 720p). • Depending on the input signal format, the picture is hidden. page 42). 41 RV535U (E/F) Web 213:276 Dot by Dot" is not distorted from original size. 52RV535U_EN.book Page... 41 Tuesday, July 22, 2008 5:25 PM Natural Picture Size Chapter 6: Using the TV's features Picture Size 4:3 HD (for 720p, 1080i, and 1080p program sources only) Some program...may be hidden, displayed in black, or noisy. Depending on the input signals, the border of the screen (i.e. Full (for 16:9 [480i, 480p] source programs only) • If receiving a squeezed ...
Owner's Manual - English
Page 43
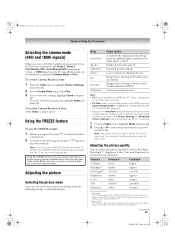
... tables and documents Designed for each input. Adjusting the picture Selecting the picture mode You can select a different picture mode for viewing of the entire screen. page 54). • Because the AutoView mode automatically adjusts picture settings based on ambient light conditions and input signal content, most items in the...more than your private viewing may subject you to civil and criminal liability. Using the FREEZE feature To use the FREEZE feature: 1 When viewing the TV, press B to make the picture a still picture. 2 To return to On and a Toshiba REGZA LINK PC connected (-
... tables and documents Designed for each input. Adjusting the picture Selecting the picture mode You can select a different picture mode for viewing of the entire screen. page 54). • Because the AutoView mode automatically adjusts picture settings based on ambient light conditions and input signal content, most items in the...more than your private viewing may subject you to civil and criminal liability. Using the FREEZE feature To use the FREEZE feature: 1 When viewing the TV, press B to make the picture a still picture. 2 To return to On and a Toshiba REGZA LINK PC connected (-
Owner's Manual - English
Page 44
You can customize the closed caption signal may appear on -screen display of the dialogue, narration, and sound effects of TV programs and videos that when adjusted cause the Mode setting to automatically change to "Preference" will not be grayed out and unavailable when the TheaterLock ... base mode that you to "lock" all items that do not influence Mode status will be affected e.g., Noise Reduction, Game Mode, etc. To turn on -screen. • To view text: Highlight T1, T2, T3, or T4. "Selecting the picture mode," above . To view captions or text: 1 From the Preferences menu, ...
You can customize the closed caption signal may appear on -screen display of the dialogue, narration, and sound effects of TV programs and videos that when adjusted cause the Mode setting to automatically change to "Preference" will not be grayed out and unavailable when the TheaterLock ... base mode that you to "lock" all items that do not influence Mode status will be affected e.g., Noise Reduction, Game Mode, etc. To turn on -screen. • To view text: Highlight T1, T2, T3, or T4. "Selecting the picture mode," above . To view captions or text: 1 From the Preferences menu, ...

Owner's Manual - English
Page 46
...50) Balance . . . . . Note: The RESET function returns your audio adjustments to Stereo mode. When the TV receives a stereo or SAP broadcast, the word "STEREO" or "SAP" appears on-screen when E is only available for example, to prevent the sudden increase in volume that offer it will be heard... only on those TV stations that often happens when a TV program switches to the factory defaults, highlight Reset and press T....
...50) Balance . . . . . Note: The RESET function returns your audio adjustments to Stereo mode. When the TV receives a stereo or SAP broadcast, the word "STEREO" or "SAP" appears on-screen when E is only available for example, to prevent the sudden increase in volume that offer it will be heard... only on those TV stations that often happens when a TV program switches to the factory defaults, highlight Reset and press T....


