
Owners Manual
Page 2
... is particularly hot, move the display to a cooler location, and wait for the display to service or repair the unit. Never use the power cord polarized plug with the apparatus. NO USER-SERVICEABLE PARTS INSIDE. REFER SERVICING TO QUALIFIED SERVICE PERSONNEL. Use a soft dry cloth to the unit, read carefully and observe the following instructions. If the room where the display is installed is a serious risk of this...
... is particularly hot, move the display to a cooler location, and wait for the display to service or repair the unit. Never use the power cord polarized plug with the apparatus. NO USER-SERVICEABLE PARTS INSIDE. REFER SERVICING TO QUALIFIED SERVICE PERSONNEL. Use a soft dry cloth to the unit, read carefully and observe the following instructions. If the room where the display is installed is a serious risk of this...
Owners Manual
Page 3
... many colors and color gradations (i.e. photographic or photo-realistic images). • Create image content with a computer input source. • Display a moving image whenever possible. • Change the position of accident, unplug the unit and have luminous spots. Caution The plasma display panel is not a sign of the power cable (supplied). In case of the menu display from your computer's screen saver function during use a trained, authorized TOSHIBA dealer. 7. Avoid installing this...
... many colors and color gradations (i.e. photographic or photo-realistic images). • Create image content with a computer input source. • Display a moving image whenever possible. • Change the position of accident, unplug the unit and have luminous spots. Caution The plasma display panel is not a sign of the power cable (supplied). In case of the menu display from your computer's screen saver function during use a trained, authorized TOSHIBA dealer. 7. Avoid installing this...
Owners Manual
Page 4
... to the 42HP82 Plasma Display 6 The features you'll enjoy include 6 Contents of the Package 6 Options 6 Part Names and Function 7 Front View 7 Rear View / Terminal Board 8 Remote Controller 9 Battery Installation and Replacement 10 Using the wired remote control mode 11 Operating Range 11 Handling the remote controller 11 Installation 12 Connecting Your PC 13 Connections with Equipment that has a Digital Interface ..... 13 Connecting Your VCR 13 Connecting Your DVD Player 13 External Speaker Connections 14 Pin Assignments and Signal Levels...
... to the 42HP82 Plasma Display 6 The features you'll enjoy include 6 Contents of the Package 6 Options 6 Part Names and Function 7 Front View 7 Rear View / Terminal Board 8 Remote Controller 9 Battery Installation and Replacement 10 Using the wired remote control mode 11 Operating Range 11 Handling the remote controller 11 Installation 12 Connecting Your PC 13 Connections with Equipment that has a Digital Interface ..... 13 Connecting Your VCR 13 Connecting Your DVD Player 13 External Speaker Connections 14 Pin Assignments and Signal Levels...

Owners Manual
Page 6
... be connected easily and displayed as brilliantly as intended on -screen control system that a host of cutting-edge visual technology and sophisticated design. Introduction Introduction to the 42HP82 Plasma Display TOSHIBA's 42HP82 Plasma Display is employed. • RGB input (3*), Video input (3*), DVD/HD input (2*), Audio input (3), External Control input (1) • Color Filter control system provides user selectable onscreen color temperature settings • New Drive Technology • Component video input terminal for the 5BNC terminal. However, at a mere 3.5 inches/ 89...
... be connected easily and displayed as brilliantly as intended on -screen control system that a host of cutting-edge visual technology and sophisticated design. Introduction Introduction to the 42HP82 Plasma Display TOSHIBA's 42HP82 Plasma Display is employed. • RGB input (3*), Video input (3*), DVD/HD input (2*), Audio input (3), External Control input (1) • Color Filter control system provides user selectable onscreen color temperature settings • New Drive Technology • Component video input terminal for the 5BNC terminal. However, at a mere 3.5 inches/ 89...

Owners Manual
Page 7
... 7 6 5 4 POWER / STANDBY POWER / STANDBY 32 1 q Power Turns the display's power on the setting of "BNC SELECT". and RIGHT/+ Enlarges or reduces the image. e POWER/STANDBY indicator When the power is in the standby mode ... The available inputs depend on and off. Lights red. Functions as the CURSOR buttons in the On-Screen Display (OSD) mode. y VOLUME DOWN and UP Adjusts the volume. Functions as the CURSOR (v/ w) buttons in the On-Screen Display (OSD) mode. w Remote sensor window Receives the signals from the remote controller...
... 7 6 5 4 POWER / STANDBY POWER / STANDBY 32 1 q Power Turns the display's power on the setting of "BNC SELECT". and RIGHT/+ Enlarges or reduces the image. e POWER/STANDBY indicator When the power is in the standby mode ... The available inputs depend on and off. Lights red. Functions as the CURSOR buttons in the On-Screen Display (OSD) mode. y VOLUME DOWN and UP Adjusts the volume. Functions as the CURSOR (v/ w) buttons in the On-Screen Display (OSD) mode. w Remote sensor window Receives the signals from the remote controller...

Owners Manual
Page 8
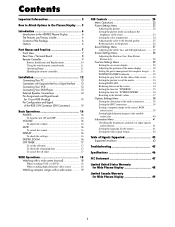
... (DVI 29pin) Inputs a digital RGB signal (TMDS). Set which video image to allot them to on the set "ON", the buttons on the menu screen. Rear View/ Terminal Board AC IN RIGHT LEFT SPEAKERS MUST HAVE MORE THAN 7WATT RATING IMPEDANCE 6 OHM RGB 3 (Digital RGB) AUDIO 3 RGB2 / DVD2 / HD2 AUDIO 2 DVD1/HD1 AUDIO 1 VIDEO 1 VIDEO 2 L ( MONO ) R Y CB / PB CR / PR L ( MONO ) R RGB 1 R / CR / PR G/Y / VIDEO 3 B / CB / PB HD VD L ( MONO ) R CONTROL LOCK ON /OFF REMOTE CONTROL EXTERNAL CONTROL...
... (DVI 29pin) Inputs a digital RGB signal (TMDS). Set which video image to allot them to on the set "ON", the buttons on the menu screen. Rear View/ Terminal Board AC IN RIGHT LEFT SPEAKERS MUST HAVE MORE THAN 7WATT RATING IMPEDANCE 6 OHM RGB 3 (Digital RGB) AUDIO 3 RGB2 / DVD2 / HD2 AUDIO 2 DVD1/HD1 AUDIO 1 VIDEO 1 VIDEO 2 L ( MONO ) R Y CB / PB CR / PR L ( MONO ) R RGB 1 R / CR / PR G/Y / VIDEO 3 B / CB / PB HD VD L ( MONO ) R CONTROL LOCK ON /OFF REMOTE CONTROL EXTERNAL CONTROL...

Owners Manual
Page 11
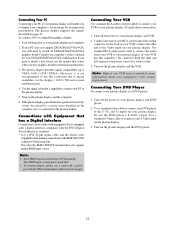
... strong artificial light, or if there is connected, the mode automatically switches to the remote controller's remote jack and the "REMOTE CONTROL" terminal on the display. 11 from the REMOTE CONTROL terminal on the display. RGB 3 (Digital RGB) AUDIO 3 RGB2 / DVD2 / HD2 AUDIO 2 DVD1/HD1 AUDIO 1 VIDEO 1 VIDEO 2 L ( MONO ) R Y CB / PB CR / PR L ( MONO ) R RGB 1 R / CR / PR G/Y / VIDEO 3 B / CB / PB HD VD L ( MONO ) R CONTROL LOCK ON / OFF REMOTE CONTROL EXTERNAL CONTROL R CONTROL LOCK ON / OFF REMOTE CONTROL EXTERNAL CONTROL Remote Control Cable To Remote Jack PROCEED...
... strong artificial light, or if there is connected, the mode automatically switches to the remote controller's remote jack and the "REMOTE CONTROL" terminal on the display. 11 from the REMOTE CONTROL terminal on the display. RGB 3 (Digital RGB) AUDIO 3 RGB2 / DVD2 / HD2 AUDIO 2 DVD1/HD1 AUDIO 1 VIDEO 1 VIDEO 2 L ( MONO ) R Y CB / PB CR / PR L ( MONO ) R RGB 1 R / CR / PR G/Y / VIDEO 3 B / CB / PB HD VD L ( MONO ) R CONTROL LOCK ON / OFF REMOTE CONTROL EXTERNAL CONTROL R CONTROL LOCK ON / OFF REMOTE CONTROL EXTERNAL CONTROL Remote Control Cable To Remote Jack PROCEED...
Owners Manual
Page 13
... the plasma display and the computer. 6. To connect a PC or compatible graphics adapter: 1. Input TMDS signals conforming to your plasma display. Be careful to keep the right and left channel connections correct for installation instructions. 3. Connecting Your VCR Use common RCA cables (not provided) to connect your VCR to DVI standards. Turn off the power to your plasma display and DVD player. 2. Turn on page 43. Consult your computer's owner's manual for more information about your equipment's video output...
... the plasma display and the computer. 6. To connect a PC or compatible graphics adapter: 1. Input TMDS signals conforming to your plasma display. Be careful to keep the right and left channel connections correct for installation instructions. 3. Connecting Your VCR Use common RCA cables (not provided) to connect your VCR to DVI standards. Turn off the power to your plasma display and DVD player. 2. Turn on page 43. Consult your computer's owner's manual for more information about your equipment's video output...

Owners Manual
Page 16
... the POINTER button to restore. Plug the power cord into an active AC power outlet. 2. The display's POWER/STANDBY indicator will light up (green) when the unit is set (only when turning off . MUTE To cancel the sound: Press the MUTE button on the remote controller or the unit) to decrease to display the pointer. ( ) To change the picture position: Select the position with the remote controller). The screen changes each time the DISPLAY button is...
... the POINTER button to restore. Plug the power cord into an active AC power outlet. 2. The display's POWER/STANDBY indicator will light up (green) when the unit is set (only when turning off . MUTE To cancel the sound: Press the MUTE button on the remote controller or the unit) to decrease to display the pointer. ( ) To change the picture position: Select the position with the remote controller). The screen changes each time the DISPLAY button is...

Owners Manual
Page 21
...3 Sets the picture to the factory default values. Default Center Center Center Reset Yes Yes Yes Sub menu V-POSITION H-POSITION V-HEIGHT H-WIDTH AUTO PICTURE FINE PICTURE PICTURE ADJ. Adjusts for striped patterns on the computer image. Min*1 Adjusts for flickering on -screen display is distorted. In 4:3 size, sets the luminance of the display. *2 Resets all the settings (PICTURE, SOUND, SCREEN, FUNCTION, - currently being inputted. Reset - SCREEN WIPER: OFF. *3 AUDIO1: VIDEO1; Adjusts the sharpness. Adjusts the color temperature and white balance. Sets...
...3 Sets the picture to the factory default values. Default Center Center Center Reset Yes Yes Yes Sub menu V-POSITION H-POSITION V-HEIGHT H-WIDTH AUTO PICTURE FINE PICTURE PICTURE ADJ. Adjusts for striped patterns on the computer image. Min*1 Adjusts for flickering on -screen display is distorted. In 4:3 size, sets the luminance of the display. *2 Resets all the settings (PICTURE, SOUND, SCREEN, FUNCTION, - currently being inputted. Reset - SCREEN WIPER: OFF. *3 AUDIO1: VIDEO1; Adjusts the sharpness. Adjusts the color temperature and white balance. Sets...

Owners Manual
Page 22
... . Adjusts picture detail of VIDEO display. COLOR Changes the color density. Use the v and w buttons to select "PICTURE," then press the PROCEED button. Changes the picture's sharpness. Adjust for natural colored skin, background, etc. Ⅵ Adjusting the computer image Only the contrast and brightness can be adjusted when a computer signal is completed ... The "PICTURE" screen appears. 2. EXIT RETURN 3. Changes the picture's contrast. Once the adjustment is connected. Ⅵ Restoring the factory default settings Select "RESET" under the "PICTURE MODE" settings...
... . Adjusts picture detail of VIDEO display. COLOR Changes the color density. Use the v and w buttons to select "PICTURE," then press the PROCEED button. Changes the picture's sharpness. Adjust for natural colored skin, background, etc. Ⅵ Adjusting the computer image Only the contrast and brightness can be adjusted when a computer signal is completed ... The "PICTURE" screen appears. 2. EXIT RETURN 3. Changes the picture's contrast. Once the adjustment is connected. Ⅵ Restoring the factory default settings Select "RESET" under the "PICTURE MODE" settings...

Owners Manual
Page 31
... computer and selector tuner are not properly connected, the system is set to the off . Ⅵ Power management function and POWER/ STANDBY indicator The POWER/STANDBY indicator indicates the status of the power management function. Press the EXIT button to return to the factory defaults. 31 POWER MGT GRAY LEVEL CINEMA MODE RGB3 ADJ. : 1 : ON : 3 : ON : 1 LONG LIFE RESET SEL. Use the v and w buttons to select "FUNCTION...
... computer and selector tuner are not properly connected, the system is set to the off . Ⅵ Power management function and POWER/ STANDBY indicator The POWER/STANDBY indicator indicates the status of the power management function. Press the EXIT button to return to the factory defaults. 31 POWER MGT GRAY LEVEL CINEMA MODE RGB3 ADJ. : 1 : ON : 3 : ON : 1 LONG LIFE RESET SEL. Use the v and w buttons to select "FUNCTION...

Owners Manual
Page 35
... "ON." WT The entire screen turns white. Press the PROCEED button. EXIT RETURN 5. 5. To close the main menu, press the EXIT button twice. LOCK The brightness level is displayed alternately between positive image and negative image. ON The picture is set to the factory defaults. • Only the PLE and ORBITER can set . Ⅵ Restoring the factory default settings Select "RESET" from the left end of the "WORKING TIME": → ON or...
... "ON." WT The entire screen turns white. Press the PROCEED button. EXIT RETURN 5. 5. To close the main menu, press the EXIT button twice. LOCK The brightness level is displayed alternately between positive image and negative image. ON The picture is set to the factory defaults. • Only the PLE and ORBITER can set . Ⅵ Restoring the factory default settings Select "RESET" from the left end of the "WORKING TIME": → ON or...

Owners Manual
Page 36
... of time the "INVERSE/WT" mode lasts. Use the v and w buttons to select "SCREEN WIPER," then use the ᮤ and ᮣ buttons to the main menu. ADJ. When the WORKING TIME is set for up to 0M. WAITING TIME Set the length of time until the "INVERSE/WT" mode starts. • The "WORKING TIME" and "WAITING TIME" can be displayed. Press the PROCEED button. EXIT RETURN 5. Adjust the time and speed using the...
... of time the "INVERSE/WT" mode lasts. Use the v and w buttons to select "SCREEN WIPER," then use the ᮤ and ᮣ buttons to the main menu. ADJ. When the WORKING TIME is set for up to 0M. WAITING TIME Set the length of time until the "INVERSE/WT" mode starts. • The "WORKING TIME" and "WAITING TIME" can be displayed. Press the PROCEED button. EXIT RETURN 5. Adjust the time and speed using the...

Owners Manual
Page 37
... the WORKING TIME is set for the "SCREEN WIPER". RESET RETURN RESET PROCEED OK EXIT RETURN RESET SETTING NOW When the "SETTING NOW" screen disappears, the screen will be restored to the previous "RESET" mode, then all the picture adjustments, audio settings, to display the MAIN MENU on the screen, then... 1. To close the main menu, press the EXIT button once more . Set the hours of the "WORKING TIME" to 0H and the minutes to the default...
... the WORKING TIME is set for the "SCREEN WIPER". RESET RETURN RESET PROCEED OK EXIT RETURN RESET SETTING NOW When the "SETTING NOW" screen disappears, the screen will be restored to the previous "RESET" mode, then all the picture adjustments, audio settings, to display the MAIN MENU on the screen, then... 1. To close the main menu, press the EXIT button once more . Set the hours of the "WORKING TIME" to 0H and the minutes to the default...
Owners Manual
Page 40
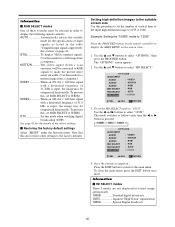
... displayed in the table "Computer input signals supported by this mode when watching digital broadcasting (480P). Information Ⅵ RGB SELECT modes One of these 6 modes must be compressed horizontally. ADJ. Press the EXIT button to return to display the MAIN MENU on the remote controller to the main menu. STILL To display VESA standard signals. (Use this , set the number of vertical lines of 31.0 kHz is input, the image may be compressed horizontally. The video signal...
... displayed in the table "Computer input signals supported by this mode when watching digital broadcasting (480P). Information Ⅵ RGB SELECT modes One of these 6 modes must be compressed horizontally. ADJ. Press the EXIT button to return to display the MAIN MENU on the remote controller to the main menu. STILL To display VESA standard signals. (Use this , set the number of vertical lines of 31.0 kHz is input, the image may be compressed horizontally. The video signal...
Owners Manual
Page 45
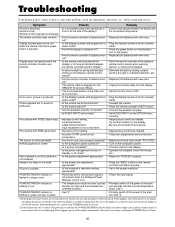
... your TOSHIBA dealer for service. *2 If the display turns off . do not function. Nothing appears on screen. • Is the computer's power turned on? • Turn on and then the POWER/STANDBY indicator blinks, the power supply circuit, plasma display panel, or one or more fans have been damaged. The remote controller does not work. • Are the remote controller's batteries worn • Replace both batteries with RGB signal input. • Improper control setting. • Adjust picture controls as needed...
... your TOSHIBA dealer for service. *2 If the display turns off . do not function. Nothing appears on screen. • Is the computer's power turned on? • Turn on and then the POWER/STANDBY indicator blinks, the power supply circuit, plasma display panel, or one or more fans have been damaged. The remote controller does not work. • Are the remote controller's batteries worn • Replace both batteries with RGB signal input. • Improper control setting. • Adjust picture controls as needed...
Owners Manual
Page 46
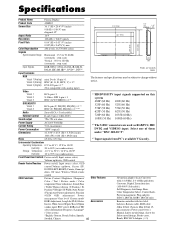
..., Screen Wiper)/ Reset)/Option (Audio input/ BNC select/ RGBselect/ HD select), Information (Frequency / Language* / Color system) *English, German, French, Italian, Spanish, Swedish, Chinese 46 3D motion adaptive Scan Converter with 2-2 (50Hz), 2-3 (60Hz) pull down , Off timer, Wireless/ Wired remote control Picture (Contrast / Brightness / Sharpness/ Other Features Color / Tint / Picture mode / Color temperature/ Noise reductions), Sound (Bass / Treble/ Balance),Screen (V-Position / H- Specifications Product Name Plasma Display Product Code Screen Size Aspect Ratio 42HP82 36...
..., Screen Wiper)/ Reset)/Option (Audio input/ BNC select/ RGBselect/ HD select), Information (Frequency / Language* / Color system) *English, German, French, Italian, Spanish, Swedish, Chinese 46 3D motion adaptive Scan Converter with 2-2 (50Hz), 2-3 (60Hz) pull down , Off timer, Wireless/ Wired remote control Picture (Contrast / Brightness / Sharpness/ Other Features Color / Tint / Picture mode / Color temperature/ Noise reductions), Sound (Bass / Treble/ Balance),Screen (V-Position / H- Specifications Product Name Plasma Display Product Code Screen Size Aspect Ratio 42HP82 36...
Owners Manual
Page 48
... materials or workmanship as a gift, purchased this plasma display and its parts against or the set will come to your home when warranty service is authorized Owner's Manual and Product Registration Card to change, modify, or extend the terms of customer controls, and installation are effective only if the THEREFORE, THE ABOVE LIMITATIONS OR plasma display is required. FORTH ABOVE. Failure to return the...
... materials or workmanship as a gift, purchased this plasma display and its parts against or the set will come to your home when warranty service is authorized Owner's Manual and Product Registration Card to change, modify, or extend the terms of customer controls, and installation are effective only if the THEREFORE, THE ABOVE LIMITATIONS OR plasma display is required. FORTH ABOVE. Failure to return the...
Owners Manual
Page 49
... on Parts and Labor* TCL warrants this plasma display and its parts against defects in this manual and checking the "Troubleshooting" section, you find that service is authorized to change, modify, or extend the terms of these warranties. (5) Warranties extend only to defects in materials or workmanship as lightning or fluctuations in electric power), improper installation, improper maintenance, or use in...
... on Parts and Labor* TCL warrants this plasma display and its parts against defects in this manual and checking the "Troubleshooting" section, you find that service is authorized to change, modify, or extend the terms of these warranties. (5) Warranties extend only to defects in materials or workmanship as lightning or fluctuations in electric power), improper installation, improper maintenance, or use in...

