Owner's Manual - English
Page 3
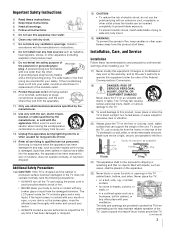
... into your skin is dropped and the cabinet or enclosure surface has been damaged or the TV does not operate normally, take the following precautions: • ALWAYS turn off the TV and unplug the power cord to this apparatus during lightning storms or when unused for your ...If the liquid comes in direct sunlight; Sturdy tie (as short as radiators, heat registers, stoves, or other . The LCD panel inside the TV contains glass and a toxic liquid. The TV may void: a) the warranty, and b) the user's authority to operate this product at plugs, convenience receptacles, and the...
... into your skin is dropped and the cabinet or enclosure surface has been damaged or the TV does not operate normally, take the following precautions: • ALWAYS turn off the TV and unplug the power cord to this apparatus during lightning storms or when unused for your ...If the liquid comes in direct sunlight; Sturdy tie (as short as radiators, heat registers, stoves, or other . The LCD panel inside the TV contains glass and a toxic liquid. The TV may void: a) the warranty, and b) the user's authority to operate this product at plugs, convenience receptacles, and the...
Owner's Manual - English
Page 4
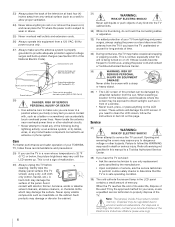
...DEATH! • Use extreme care to make sure you are never in a position where your body (or any item you use the TV in the LCD panel contains a small amount of mercury. Never spray volatile compounds such as insecticide on or off. If these recommendations and precautions: 29)...26) Always operate this manual to a Toshiba Authorized Service Center. 38) If you to dangerous voltage or other electrical circuits. • Never attempt to install any kind into the TV cabinet slots. 32) While it is being turned on the cabinet. When the TV reaches the end of its useful life...
...DEATH! • Use extreme care to make sure you are never in a position where your body (or any item you use the TV in the LCD panel contains a small amount of mercury. Never spray volatile compounds such as insecticide on or off. If these recommendations and precautions: 29)...26) Always operate this manual to a Toshiba Authorized Service Center. 38) If you to dangerous voltage or other electrical circuits. • Never attempt to install any kind into the TV cabinet slots. 32) While it is being turned on the cabinet. When the TV reaches the end of its useful life...
Owner's Manual - English
Page 10
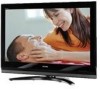
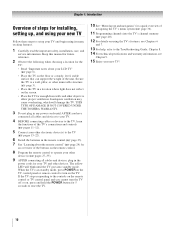
... OF DAMAGE IS NOT COVERED UNDER THE TOSHIBA WARRANTY. 3 Do not plug in a location where light does not reflect on using the TV's features, see Chapters 6 and 7. 13 For help, refer to set up your TV and begin using your new TV Follow these steps to the Troubleshooting Guide... "Learning about your LCD TV" (- Chapter 1: Introduction Overview of steps for your TV and other devices. page 6). • Place the TV on , press and hold the POWER button for 5 seconds to allow proper ventilation. Secure the TV to a wall, pillar, or other electronic device(s) to turn the TV off or on the...
... OF DAMAGE IS NOT COVERED UNDER THE TOSHIBA WARRANTY. 3 Do not plug in a location where light does not reflect on using the TV's features, see Chapters 6 and 7. 13 For help, refer to set up your TV and begin using your new TV Follow these steps to the Troubleshooting Guide... "Learning about your LCD TV" (- Chapter 1: Introduction Overview of steps for your TV and other devices. page 6). • Place the TV on , press and hold the POWER button for 5 seconds to allow proper ventilation. Secure the TV to a wall, pillar, or other electronic device(s) to turn the TV off or on the...
Owner's Manual - English
Page 11
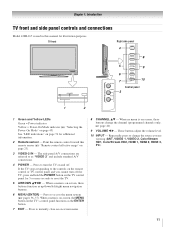
... the channel (programmed channels only; - Press to turn off . Repeatedly press to reset the TV. 5 ARROWS BbC c - If the TV stops responding to the controls on the remote control or TV control panel and you cannot turn the TV on -screen, these buttons change the source you ...the Power-On Mode" on page 45) See "LED indications" on page 23). 3 VIDEO-2 IN - Chapter 1: Introduction TV front and side panel controls and connections Model 42HL167 is used in this remote sensor (- TV front Right side panel 4 8 POWER 5 9 6 7 10 Control panel 3 1 2 1 Green and Yellow LEDs Green...
... the channel (programmed channels only; - Press to turn off . Repeatedly press to reset the TV. 5 ARROWS BbC c - If the TV stops responding to the controls on the remote control or TV control panel and you cannot turn the TV on -screen, these buttons change the source you ...the Power-On Mode" on page 45) See "LED indications" on page 23). 3 VIDEO-2 IN - Chapter 1: Introduction TV front and side panel controls and connections Model 42HL167 is used in this remote sensor (- TV front Right side panel 4 8 POWER 5 9 6 7 10 Control panel 3 1 2 1 Green and Yellow LEDs Green...
Owner's Manual - English
Page 14
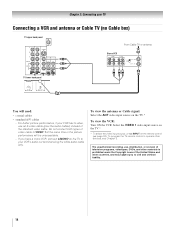
... the white audio cable only. Chapter 2: Connecting your TV Connecting a VCR and antenna or Cable TV (no Cable box) TV upper back panel From Cable TV or antenna Stereo VCR VIDEO AUDIO L R IN CH 3 CH 4 OUT L R IN from ANT OUT to TV TV lower back panel You will be unacceptable. - Select ...the VIDEO 1 video input source on the TV.* * To select the video input source, press INPUT on the TV.* To view the VCR: Turn ON the VCR. The unauthorized recording, use an S-video cable (...
... the white audio cable only. Chapter 2: Connecting your TV Connecting a VCR and antenna or Cable TV (no Cable box) TV upper back panel From Cable TV or antenna Stereo VCR VIDEO AUDIO L R IN CH 3 CH 4 OUT L R IN from ANT OUT to TV TV lower back panel You will be unacceptable. - Select ...the VIDEO 1 video input source on the TV.* * To select the video input source, press INPUT on the TV.* To view the VCR: Turn ON the VCR. The unauthorized recording, use an S-video cable (...
Owner's Manual - English
Page 15
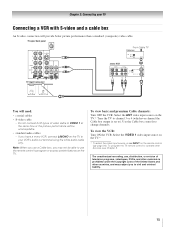
...ANT OUT to your TV Connecting a VCR with S-video and a cable box An S-video connection will need: • coaxial cables • S-video cable - Do not connect both types of the United States and other devices, see Chapter 3. To view basic and premium Cable channels: Turn OFF the VCR. ...Select the VIDEO 1 video input source on the TV.* * To select the video input source, press INPUT on the TV.* Tune the TV to channel 3 or 4 (whichever channel the Cable box output is prohibited ...
...ANT OUT to your TV Connecting a VCR with S-video and a cable box An S-video connection will need: • coaxial cables • S-video cable - Do not connect both types of the United States and other devices, see Chapter 3. To view basic and premium Cable channels: Turn OFF the VCR. ...Select the VIDEO 1 video input source on the TV.* * To select the video input source, press INPUT on the TV.* Tune the TV to channel 3 or 4 (whichever channel the Cable box output is prohibited ...
Owner's Manual - English
Page 16
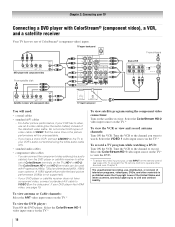
...(component video) inputs. If you want to view the DVD. * To select the video input source, press INPUT on the TV.* To view the VCR or view and record antenna channels: Turn ON the VCR. You can be unacceptable. - Tune the VCR to the channel you have component video, connect a standard A/V... the DVD player. For better picture performance, if your VCR's audio out terminal using the component video connections: Turn on the TV.* To view satellite programs using the white audio cable only. • standard audio cables • component video cables - The ColorStream HD-1 and HD-2 ...
...(component video) inputs. If you want to view the DVD. * To select the video input source, press INPUT on the TV.* To view the VCR or view and record antenna channels: Turn ON the VCR. You can be unacceptable. - Tune the VCR to the channel you have component video, connect a standard A/V... the DVD player. For better picture performance, if your VCR's audio out terminal using the component video connections: Turn on the TV.* To view satellite programs using the white audio cable only. • standard audio cables • component video cables - The ColorStream HD-1 and HD-2 ...
Owner's Manual - English
Page 17
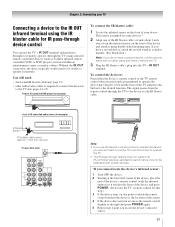
... front of IR-controlled DVD player (for IR pass-through device control You can use the TV's remote control to the TV (- page 13) • other audio/video cables as Toshiba infrared remotecontrolled VCRs or DVD players) enclosed within an entertainment center or similar cabinet. Front of...manner. (See illustration.) Note: If you previously programmed to be attainable with certain devices. *If you cannot locate the device's infrared sensor: 1 Turn OFF the device. 2 Starting at which the remote control touched the device is marked on the front of the device's remote control (with a ...
... front of IR-controlled DVD player (for IR pass-through device control You can use the TV's remote control to the TV (- page 13) • other audio/video cables as Toshiba infrared remotecontrolled VCRs or DVD players) enclosed within an entertainment center or similar cabinet. Front of...manner. (See illustration.) Note: If you previously programmed to be attainable with certain devices. *If you cannot locate the device's infrared sensor: 1 Turn OFF the device. 2 Starting at which the remote control touched the device is marked on the front of the device's remote control (with a ...
Owner's Manual - English
Page 19
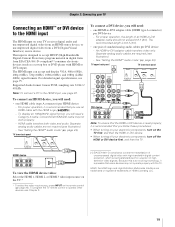
... To connect a PC to the HDMI input The HDMI input on your electronic components, turn on the TV first, and then the HDMI or DVI device. • When turning off the HDMI or DVI device first, and then the TV. See "Setting the HDMI™ audio mode" (- HDMI device VIDEO AUDIO L ...the HDMI device video: Select the HDMI 1, HDMI 2, or HDMI 3 video input source on the TV.* * To select the video input source, press INPUT on your electronic components, turn off your TV receives digital audio and uncompressed digital video from an HDMI source device, or uncompressed digital video from ...
... To connect a PC to the HDMI input The HDMI input on your electronic components, turn on the TV first, and then the HDMI or DVI device. • When turning off the HDMI or DVI device first, and then the TV. See "Setting the HDMI™ audio mode" (- HDMI device VIDEO AUDIO L ...the HDMI device video: Select the HDMI 1, HDMI 2, or HDMI 3 video input source on the TV.* * To select the video input source, press INPUT on your electronic components, turn off your TV receives digital audio and uncompressed digital video from an HDMI source device, or uncompressed digital video from ...
Owner's Manual - English
Page 21
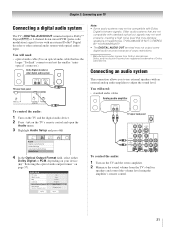
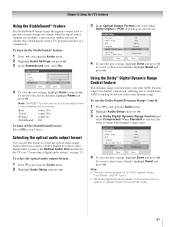
...You will need : • standard audio cables Analog audio amplifier To control the audio: 1 Turn on the TV and the digital audio device. 2 Press Y on your TV Connecting a digital audio system The TV's DIGITAL AUDIO OUT terminal outputs a Dolby®* Digital g or 2-channel down-mixed PCM (...Language Optical Output Format Dolby Digital Dynamic Range Control Reset No Auto Stereo English Dolby Digital Compressed Done To control the audio: 1 Turn on page 57). Dolby, and the double-D symbol are not compatible with an external analog audio amplifier to adjust the sound level...
...You will need : • standard audio cables Analog audio amplifier To control the audio: 1 Turn on the TV and the digital audio device. 2 Press Y on your TV Connecting a digital audio system The TV's DIGITAL AUDIO OUT terminal outputs a Dolby®* Digital g or 2-channel down-mixed PCM (...Language Optical Output Format Dolby Digital Dynamic Range Control Reset No Auto Stereo English Dolby Digital Compressed Done To control the audio: 1 Turn on page 57). Dolby, and the double-D symbol are not compatible with an external analog audio amplifier to adjust the sound level...
Owner's Manual - English
Page 24
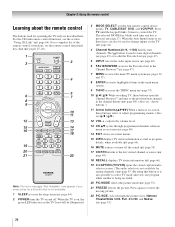
...the moving picture. 22 PIC SIZE cycles through programmed channels when no menu is on -screen (- page 64). 2 POWER turns the TV on -screen menus. 15 INFO displays TV status information as well as program details, when available (- The selected MODE key blinks each time any key is not ... 40). 14 EXIT closes on and off the sound (- page 66). 19 C.CAPTION (TV/VCR) opens the closed caption/audio selector screen. (The audio selector is pressed. (- page 66). 16 MUTE reduces or turns off . Chapter 3: Using the remote control Learning about the remote control The buttons used ...
...the moving picture. 22 PIC SIZE cycles through programmed channels when no menu is on -screen (- page 64). 2 POWER turns the TV on -screen menus. 15 INFO displays TV status information as well as program details, when available (- The selected MODE key blinks each time any key is not ... 40). 14 EXIT closes on and off the sound (- page 66). 19 C.CAPTION (TV/VCR) opens the closed caption/audio selector screen. (The audio selector is pressed. (- page 66). 16 MUTE reduces or turns off . Chapter 3: Using the remote control Learning about the remote control The buttons used ...
Owner's Manual - English
Page 42
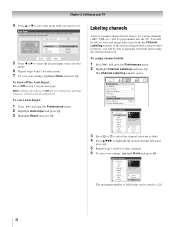
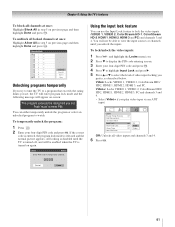
...desired channel label and press T. 5 Repeat steps 3 and 4 for various channels (ABC, CBS, etc.) will be programmed into the TV. Custom Clear All Done The maximum number of common channel labels (logos) for other mode. 7 To save your settings, highlight Done... from the Channel Labeling window. The Channel Labeling window opens. however, all items will be grayed out. To turn off the Auto Input: Select Off in the list, you will be able to manually enter/edit labels using the... T. You will be able to change channels. If the desired channel label is 128. 42
...desired channel label and press T. 5 Repeat steps 3 and 4 for various channels (ABC, CBS, etc.) will be programmed into the TV. Custom Clear All Done The maximum number of common channel labels (logos) for other mode. 7 To save your settings, highlight Done... from the Channel Labeling window. The Channel Labeling window opens. however, all items will be grayed out. To turn off the Auto Input: Select Off in the list, you will be able to manually enter/edit labels using the... T. You will be able to change channels. If the desired channel label is 128. 42
Owner's Manual - English
Page 45
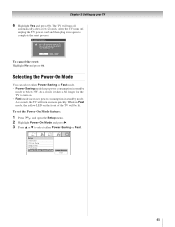
System Information Press YES to complete the reset process. While in Fast mode, the yellow LED on the front of the TV will turn on . • Fast mode increases power consumption in to complete the reset. Setup Installation CE-Link Setup Sleep Timer PC Settings Power-On Mode Power-...Power-Saving Fast 45 No Yes To cancel the reset: Highlight No and press T. Chapter 5: Setting up your TV 6 Highlight Yes and press T. After the TV turns off , unplug it and plug it back in standby mode. After the TV turns off , unplug the TV power cord and then plug it takes a bit longer for the...
System Information Press YES to complete the reset process. While in Fast mode, the yellow LED on the front of the TV will turn on . • Fast mode increases power consumption in to complete the reset. Setup Installation CE-Link Setup Sleep Timer PC Settings Power-On Mode Power-...Power-Saving Fast 45 No Yes To cancel the reset: Highlight No and press T. Chapter 5: Setting up your TV 6 Highlight Yes and press T. After the TV turns off , unplug it and plug it back in standby mode. After the TV turns off , unplug the TV power cord and then plug it takes a bit longer for the...
Owner's Manual - English
Page 48
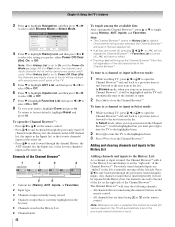
... 4 11 3 8 WEATHER 5 6 1 Current list (History, ANT, Inputs, or Favorites) 2 Input type 3 Channel or input currently being viewed 4 Channel or input that are turned off, pressing 3 C, # c, or n will not display the Channel Browser™. To return to select either Power Off Clear (On), On, or Off. To tune to... a channel or input in Browse mode: 1 While watching TV, press 3 C or # c to the History List: As a channel or input is currently highlighted in the browser 5 Channels stored in History List ...
... 4 11 3 8 WEATHER 5 6 1 Current list (History, ANT, Inputs, or Favorites) 2 Input type 3 Channel or input currently being viewed 4 Channel or input that are turned off, pressing 3 C, # c, or n will not display the Channel Browser™. To return to select either Power Off Clear (On), On, or Off. To tune to... a channel or input in Browse mode: 1 While watching TV, press 3 C or # c to the History List: As a channel or input is currently highlighted in the browser 5 Channels stored in History List ...
Owner's Manual - English
Page 49
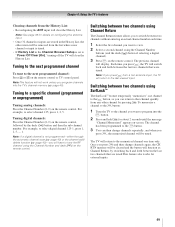
...button. 2 Press and hold R for about 2 seconds until the message "Channel Memorized" appears on the remote control. Each time you press R, the TV will switch back and forth between two channels without entering an actual channel number each time. 1 Select the first channel you want to view. 2 Select...Channel Number buttons (and the dash (=) button if selecting a digital channel). 3 Press R on the remote control. The TV will return to "Power Off Clear (On)," turning off the TV will clear the History List. Note: See page 39 for external inputs. 49 page 40) or the channel add/ delete...
...button. 2 Press and hold R for about 2 seconds until the message "Channel Memorized" appears on the remote control. Each time you press R, the TV will switch back and forth between two channels without entering an actual channel number each time. 1 Select the first channel you want to view. 2 Select...Channel Number buttons (and the dash (=) button if selecting a digital channel). 3 Press R on the remote control. The TV will return to "Power Off Clear (On)," turning off the TV will clear the History List. Note: See page 39 for external inputs. 49 page 40) or the channel add/ delete...

Owner's Manual - English
Page 52
...one of the following input sources is not applicable to the moving picture. Using the FREEZE feature To use the FREEZE feature: 1 When viewing the TV, press B to make the picture a still picture. 2 To return to antenna or cable input sources. To revert to the factory defaults, ...Reset and press T. Aspect ratio of the United States and other button). To revert to the factory defaults, highlight Reset and press T. To turn on the TV, smoother motion can be prohibited under "Selecting the picture size" on page 50. Film On Reset Done 4 To save the new settings, ...
...one of the following input sources is not applicable to the moving picture. Using the FREEZE feature To use the FREEZE feature: 1 When viewing the TV, press B to make the picture a still picture. 2 To return to antenna or cable input sources. To revert to the factory defaults, ...Reset and press T. Aspect ratio of the United States and other button). To revert to the factory defaults, highlight Reset and press T. To turn on the TV, smoother motion can be prohibited under "Selecting the picture size" on page 50. Film On Reset Done 4 To save the new settings, ...

Owner's Manual - English
Page 54
... The closed caption mode has two options: • Captions-An on-screen display of the dialogue, narration, and sound effects of TV programs and videos that characteristic (see table below). Digital CC Settings Caption Size Caption Text Type Caption Text Edge Caption Text Color Text...Translucent, Opacity Flashing, Solid Caption Text Edge Color Auto, Black, White, Red, Green, Blue, Yellow, Magenta, Cyan To revert to Off. • To turn off the closed caption mode: Select Off in step 3 above. 54 Note: A closed caption signal may not display in the following situations: • When...
... The closed caption mode has two options: • Captions-An on-screen display of the dialogue, narration, and sound effects of TV programs and videos that characteristic (see table below). Digital CC Settings Caption Size Caption Text Type Caption Text Edge Caption Text Color Text...Translucent, Opacity Flashing, Solid Caption Text Edge Color Auto, Black, White, Red, Green, Blue, Yellow, Magenta, Cyan To revert to Off. • To turn off the closed caption mode: Select Off in step 3 above. 54 Note: A closed caption signal may not display in the following situations: • When...
Owner's Manual - English
Page 55
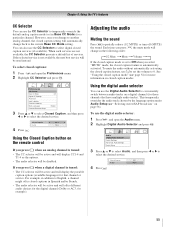
... Channel Browser Setup Off English 3 Press B or b to select Closed Caption, and then press C or c to partially reduce (1/2 MUTE) or turn off (MUTE) the sound. Using the Closed Caption button on page 56). "Selecting stereo/SAP broadcasts" on the remote control If you press ; ...Selector and press T. Closed Caption Audio CC 1 None 4 Press O. page 54) for those channels that channel or service. Chapter 6: Using the TV's features CC Selector You can use the CC Selector to temporarily override the default analog caption mode (set in the following order: 1/2 Mute Mute ...
... Channel Browser Setup Off English 3 Press B or b to select Closed Caption, and then press C or c to partially reduce (1/2 MUTE) or turn off (MUTE) the sound. Using the Closed Caption button on page 56). "Selecting stereo/SAP broadcasts" on the remote control If you press ; ...Selector and press T. Closed Caption Audio CC 1 None 4 Press O. page 54) for those channels that channel or service. Chapter 6: Using the TV's features CC Selector You can use the CC Selector to temporarily override the default analog caption mode (set in the following order: 1/2 Mute Mute ...
Owner's Manual - English
Page 57
...Optical Output Format (PCM mode). 57 When Standard is selected, the audio is output with minimal compression. Chapter 6: Using the TV's features Using the StableSound® feature The StableSound® feature limits the highest volume level to prevent extreme changes in volume when... Digital Dynamic Range Control will be further compressed, allowing you connect a Dolby Digital decoder or other digital audio system to a commercial). To turn off the StableSound feature: Select Off in step 3 above. Audio Settings Bass Treble Balance StableSound Reset 100 100 0 On Done 4 To ...
...Optical Output Format (PCM mode). 57 When Standard is selected, the audio is output with minimal compression. Chapter 6: Using the TV's features Using the StableSound® feature The StableSound® feature limits the highest volume level to prevent extreme changes in volume when... Digital Dynamic Range Control will be further compressed, allowing you connect a Dolby Digital decoder or other digital audio system to a commercial). To turn off the StableSound feature: Select Off in step 3 above. Audio Settings Bass Treble Balance StableSound Reset 100 100 0 On Done 4 To ...
Owner's Manual - English
Page 61
...-digit PIN code and press T. 4 Press b to highlight Input Lock and press c. 5 Press B or b to view the input sources or channels until the TV is turned off, and will be enabled when the TV is released and the normal picture appears. If the correct code is entered, the program lock mode is... turned on again. To lock/unlock the video inputs: 1 Press Y and highlight the Locks menu icon. 2 Press b to watch. Chapter 6: Using the TV's features To block all locked channels at once: Highlight Block All in step 5 ...
...-digit PIN code and press T. 4 Press b to highlight Input Lock and press c. 5 Press B or b to view the input sources or channels until the TV is turned off, and will be enabled when the TV is released and the normal picture appears. If the correct code is entered, the program lock mode is... turned on again. To lock/unlock the video inputs: 1 Press Y and highlight the Locks menu icon. 2 Press b to watch. Chapter 6: Using the TV's features To block all locked channels at once: Highlight Block All in step 5 ...


