Owner's Manual - English
Page 1
... High Definition LCD Television 42HL167 47HL167 52HL167 HIGH-DEFINITION TELEVISION For an overview of your TV. For details, please contact your TV antenna installer, cable provider, or satellite provider. © 2007 TOSHIBA CORPORATION All Rights Reserved Owner's Record The model number and serial number are on the back of steps for setting up your Toshiba dealer about...
... High Definition LCD Television 42HL167 47HL167 52HL167 HIGH-DEFINITION TELEVISION For an overview of your TV. For details, please contact your TV antenna installer, cable provider, or satellite provider. © 2007 TOSHIBA CORPORATION All Rights Reserved Owner's Record The model number and serial number are on the back of steps for setting up your Toshiba dealer about...
Owner's Manual - English
Page 7
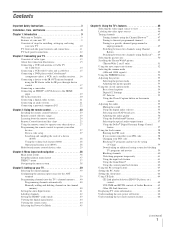
... 3 Chapter 1: Introduction 9 Welcome to Toshiba 9 Features of your new TV 9 Overview of steps for installing, setting up, and using your new TV 10 TV front and side panel controls and connections 11 TV back panel connections 12 Chapter 2: Connecting your TV 13 Overview of cable types 13 About ...the ANT terminal 39 Programming channels into the TV's channel memory . . . . 40 Programming channels automatically 40 Manually adding and deleting channels in the channel memory 40 Setting the Auto Input feature 41 Labeling channels 42 Setting the HDMI™ audio mode 43 Viewing the...
... 3 Chapter 1: Introduction 9 Welcome to Toshiba 9 Features of your new TV 9 Overview of steps for installing, setting up, and using your new TV 10 TV front and side panel controls and connections 11 TV back panel connections 12 Chapter 2: Connecting your TV 13 Overview of cable types 13 About ...the ANT terminal 39 Programming channels into the TV's channel memory . . . . 40 Programming channels automatically 40 Manually adding and deleting channels in the channel memory 40 Setting the Auto Input feature 41 Labeling channels 42 Setting the HDMI™ audio mode 43 Viewing the...
Owner's Manual - English
Page 8
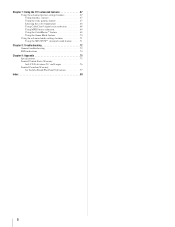
Chapter 7: Using the TV's advanced features 67 Using the advanced picture settings features 67 Using dynamic contrast 67 Using the static gamma feature 67 Selecting the color temperature 68 Using CableClear® digital noise reduction 68 ...Using MPEG noise reduction 69 Using the ColorMaster™ feature 69 Using the Game Mode feature 70 Using the advanced audio settings features 71 Using the SRS WOW™ surround sound feature 71 Chapter 8: Troubleshooting 72 General troubleshooting 72 LED indications 74 Chapter 9: Appendix 75 Specifications...
Chapter 7: Using the TV's advanced features 67 Using the advanced picture settings features 67 Using dynamic contrast 67 Using the static gamma feature 67 Selecting the color temperature 68 Using CableClear® digital noise reduction 68 ...Using MPEG noise reduction 69 Using the ColorMaster™ feature 69 Using the Game Mode feature 70 Using the advanced audio settings features 71 Using the SRS WOW™ surround sound feature 71 Chapter 8: Troubleshooting 72 General troubleshooting 72 LED indications 74 Chapter 9: Appendix 75 Specifications...

Owner's Manual - English
Page 9
...). • Two sets of a set -top box (in most innovative LCD TVs on the screen along with Dolby® Digital optical output format (- page 57). • CableClear® digital picture noise reduction (- ABC, HBO, etc.) on the market. page 42). • IR OUT infrared terminal using the IR blaster cable for this Toshiba LCD TV, one of the...
...). • Two sets of a set -top box (in most innovative LCD TVs on the screen along with Dolby® Digital optical output format (- page 57). • CableClear® digital picture noise reduction (- ABC, HBO, etc.) on the market. page 42). • IR OUT infrared terminal using the IR blaster cable for this Toshiba LCD TV, one of the...
Owner's Manual - English
Page 10
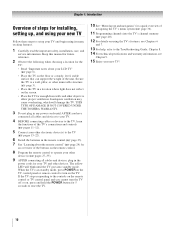
... THIS TYPE OF DAMAGE IS NOT COVERED UNDER THE TOSHIBA WARRANTY. 3 Do not plug in the remote control (- pages 13-22). 6 Install the batteries in any power cords until the TV goes into the TV's channel memory (- pages 27-35). 9 AFTER ...TV, learn the functions of the TV's connections and controls (- Keep this manual for future reference. 2 Observe the following when choosing a location for the TV: • Read "Important notes about the remote control" (- Chapter 1: Introduction Overview of steps for installing, setting up, and using your new TV Follow these steps to set up your LCD TV...
... THIS TYPE OF DAMAGE IS NOT COVERED UNDER THE TOSHIBA WARRANTY. 3 Do not plug in the remote control (- pages 13-22). 6 Install the batteries in any power cords until the TV goes into the TV's channel memory (- pages 27-35). 9 AFTER ...TV, learn the functions of the TV's connections and controls (- Keep this manual for future reference. 2 Observe the following when choosing a location for the TV: • Read "Important notes about the remote control" (- Chapter 1: Introduction Overview of steps for installing, setting up, and using your new TV Follow these steps to set up your LCD TV...
Owner's Manual - English
Page 12
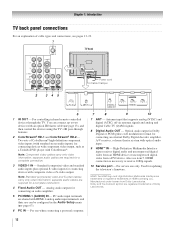
...only video information; Analog audio outputs for updating the television's firmware. Also see pages 13-22. 1 TV back 2 345 Power cord Cable Clamper 6 1 IR OUT - Two sets of ColorStream® high-definition component video inputs (with standard stereo audio inputs) for connecting devices with... component video output, such as a Toshiba DVD player with HDMI-1 analog audio input terminals, and their use...
...only video information; Analog audio outputs for updating the television's firmware. Also see pages 13-22. 1 TV back 2 345 Power cord Cable Clamper 6 1 IR OUT - Two sets of ColorStream® high-definition component video inputs (with standard stereo audio inputs) for connecting devices with... component video output, such as a Toshiba DVD player with HDMI-1 analog audio input terminals, and their use...
Owner's Manual - English
Page 13
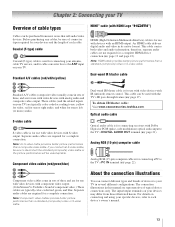
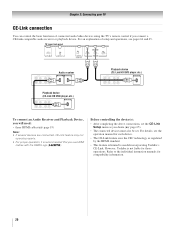
...video devices with Dolby Digital or PCM (pulse-code modulation) optical audio input to the TV's DIGITAL AUDIO OUT terminal (- To obtain IR blaster cable: Visit www.ceaccessories.toshiba.com. page 22). About the connection illustrations You can be used for connecting receivers ...with IR (infrared) remote control. The connection illustrations in sets of three, and are not required for a complete connection. The input/output terminals on your TV. Standard A/V ...
...video devices with Dolby Digital or PCM (pulse-code modulation) optical audio input to the TV's DIGITAL AUDIO OUT terminal (- To obtain IR blaster cable: Visit www.ceaccessories.toshiba.com. page 22). About the connection illustrations You can be used for connecting receivers ...with IR (infrared) remote control. The connection illustrations in sets of three, and are not required for a complete connection. The input/output terminals on your TV. Standard A/V ...
Owner's Manual - English
Page 15
... will be able to use , distribution, or revision of television programs, videotapes, DVDs, and other materials is set to operate other countries, and may not be unacceptable. • standard audio cables - To program the TV remote control to ). Do not connect both types of the United States and other devices, see Chapter...
... will be able to use , distribution, or revision of television programs, videotapes, DVDs, and other materials is set to operate other countries, and may not be unacceptable. • standard audio cables - To program the TV remote control to ). Do not connect both types of the United States and other devices, see Chapter...
Owner's Manual - English
Page 16
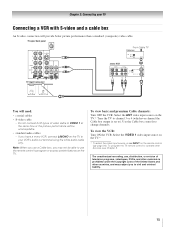
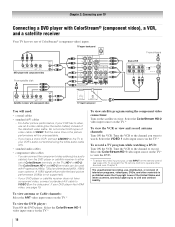
...1 video input source on the satellite receiver. The unauthorized recording, use an S-video cable (plus audio cables) from ANT OUT to either set of the standard video cable. Do not connect both types of ColorStream® (component video) inputs. If your VCR's audio out terminal ...channel you have component video, connect a standard A/V cable to watch. Chapter 2: Connecting your TV Connecting a DVD player with ColorStream® (component video), a VCR, and a satellite receiver Your TV has two sets of video cable to VIDEO 1 at the same time or the picture performance will be ...
...1 video input source on the satellite receiver. The unauthorized recording, use an S-video cable (plus audio cables) from ANT OUT to either set of the standard video cable. Do not connect both types of ColorStream® (component video) inputs. If your VCR's audio out terminal ...channel you have component video, connect a standard A/V cable to watch. Chapter 2: Connecting your TV Connecting a DVD player with ColorStream® (component video), a VCR, and a satellite receiver Your TV has two sets of video cable to VIDEO 1 at the same time or the picture performance will be ...
Owner's Manual - English
Page 19
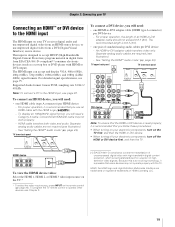
...device. To connect an HDMI device, you follow these procedures: • When turning on your electronic components, turn off your TV receives digital audio and uncompressed digital video from an HDMI source device, or uncompressed digital video from EIA/CEA-861-D-compliant[1] consumer ...audio cables are trademarks or registered trademarks of highdefinition video signals. For detailed signal specifications, see page 22. See "Setting the HDMI™ audio mode" (- TV upper back panel TV lower back panel DVI device VIDEO AUDIO L R IN IN DVI / HDCP OUT OUT L R Note: To ...
...device. To connect an HDMI device, you follow these procedures: • When turning on your electronic components, turn off your TV receives digital audio and uncompressed digital video from an HDMI source device, or uncompressed digital video from EIA/CEA-861-D-compliant[1] consumer ...audio cables are trademarks or registered trademarks of highdefinition video signals. For detailed signal specifications, see page 22. See "Setting the HDMI™ audio mode" (- TV upper back panel TV lower back panel DVI device VIDEO AUDIO L R IN IN DVI / HDCP OUT OUT L R Note: To ...
Owner's Manual - English
Page 20
...Audio Receiver and Playback Device, you use HDMI cables with the HDMI Logo ( ). page 65). • The connected devices must also be set the CE-Link Setup menu as regulated by the HDMI standard. • This feature is not liable for compatibility information. 20 page 19) ... • three HDMI cables (- Refer to models incorporating Toshiba's CE-Link. For an explanation of connected audio/video devices using the TV's remote control if you desire (- For details, see pages 64 and 65. However, Toshiba is limited to the individual instruction manuals for those operations....
...Audio Receiver and Playback Device, you use HDMI cables with the HDMI Logo ( ). page 65). • The connected devices must also be set the CE-Link Setup menu as regulated by the HDMI standard. • This feature is not liable for compatibility information. 20 page 19) ... • three HDMI cables (- Refer to models incorporating Toshiba's CE-Link. For an explanation of connected audio/video devices using the TV's remote control if you desire (- For details, see pages 64 and 65. However, Toshiba is limited to the individual instruction manuals for those operations....
Owner's Manual - English
Page 21
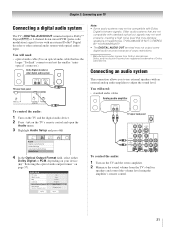
...audio cables Analog audio amplifier To control the audio: 1 Turn on the TV and the digital audio device. 2 Press Y on page 57). LINE IN LR TV upper back panel Audio Digital Audio Selector Audio Settings Advanced Audio Settings Audio Setup 4 In the Optical Output Format field, select either Dolby ...Digital or PCM, depending on the TV and the stereo amplifier. 2 Minimize the sound volume from...
...audio cables Analog audio amplifier To control the audio: 1 Turn on the TV and the digital audio device. 2 Press Y on page 57). LINE IN LR TV upper back panel Audio Digital Audio Selector Audio Settings Advanced Audio Settings Audio Setup 4 In the Optical Output Format field, select either Dolby ...Digital or PCM, depending on the TV and the stereo amplifier. 2 Minimize the sound volume from...
Owner's Manual - English
Page 22
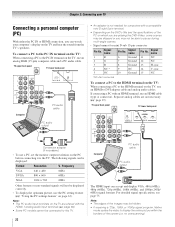
...a PC to the HDMI terminal on the TV: When connecting a PC to the HDMI terminal on the TV, use a PC, set the monitor output resolution on the TV, use an analog RGB (15-pin) computer cable and a PC audio cable. TV upper back panel TV lower back panel PC audio output Conversion adapter ...before connecting it to pause during multi-angle scenes. • Signal names for computers with an HDMI terminal, use the PC setting feature (- "Using the PC settings feature" on the TV: When connecting a PC to DVI adapter cable and analog audio cables. no overscanning). To connect a PC to the PC...
...a PC to the HDMI terminal on the TV: When connecting a PC to the HDMI terminal on the TV, use a PC, set the monitor output resolution on the TV, use an analog RGB (15-pin) computer cable and a PC audio cable. TV upper back panel TV lower back panel PC audio output Conversion adapter ...before connecting it to pause during multi-angle scenes. • Signal names for computers with an HDMI terminal, use the PC setting feature (- "Using the PC settings feature" on the TV: When connecting a PC to DVI adapter cable and analog audio cables. no overscanning). To connect a PC to the PC...
Owner's Manual - English
Page 24
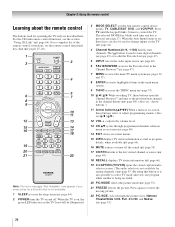
... selected MODE key blinks each time any key is on, the green LED indicator on and off the sound (- When the Auto Input feature is set, these buttons select or adjust programming menus. (Also see "Arrow buttons.") 11 Arrow buttons (BbC c) When a menu is also possible to change inputs on ...-screen, these keys can also be illuminated. 3 MODE SELECT sets the four remote control device modes: TV, CABLE/SAT, DVD, and VCR/PVR. page 47). 5 INPUT selects the video input source (- page 55). 17 CH RTN returns to control...
... selected MODE key blinks each time any key is on, the green LED indicator on and off the sound (- When the Auto Input feature is set, these buttons select or adjust programming menus. (Also see "Arrow buttons.") 11 Arrow buttons (BbC c) When a menu is also possible to change inputs on ...-screen, these keys can also be illuminated. 3 MODE SELECT sets the four remote control device modes: TV, CABLE/SAT, DVD, and VCR/PVR. page 47). 5 INPUT selects the video input source (- page 55). 17 CH RTN returns to control...
Owner's Manual - English
Page 25
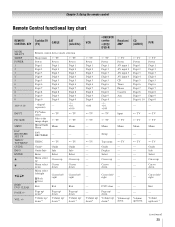
... 3: Using the remote control Remote Control functional key chart REMOTE CONTROL KEY Toshiba TV (TV) CABLE SAT (satellite) MODE SELECT SLEEP POWER 1 2 3 4 5 6 7 8 9 0 100/-/+10 INPUT PIC SIZE MENU FAV BROWSER/ SET UP THINC/ TOP MENU GUIDE INFO ENTER B b C3 #c EXIT/ DVD CLEAR PAGE +/- s TV --------- --- --- s TV Power Digit 1 Digit 2 Digit 3 Digit 4 Digit 5 Digit 6 Digit 7 Digit 8 Digit 9 Digit...
... 3: Using the remote control Remote Control functional key chart REMOTE CONTROL KEY Toshiba TV (TV) CABLE SAT (satellite) MODE SELECT SLEEP POWER 1 2 3 4 5 6 7 8 9 0 100/-/+10 INPUT PIC SIZE MENU FAV BROWSER/ SET UP THINC/ TOP MENU GUIDE INFO ENTER B b C3 #c EXIT/ DVD CLEAR PAGE +/- s TV --------- --- --- s TV Power Digit 1 Digit 2 Digit 3 Digit 4 Digit 5 Digit 6 Digit 7 Digit 8 Digit 9 Digit...
Owner's Manual - English
Page 26
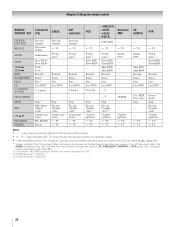
... control the CE-Link devices (- When the volume is picked for DVD-R, no function is unlocked, all the devices will affect the TV, even though the remote control is set on TV, CABLE/SAT, VCR/PVR, or DVD mode. See "Using the volume lock feature" (- Stop* REC Menu* (Single click) Channel up ... • DVD/ DVD-R Receiver/ AMP DVD RTN --- Chapter 3: Using the remote control REMOTE CONTROL KEY Toshiba TV (TV) CABLE CH RTN/ DVD RTN RECALL MUTE SLOW SKIP z SKIP Z REW PAUSE/STEP PLAY FF C.CAPTION TV/VCR DISC/AM/FM STOP REC CH B b PIC MODE FREEZE Previous channel On-screen display Sound mute...
... control the CE-Link devices (- When the volume is picked for DVD-R, no function is unlocked, all the devices will affect the TV, even though the remote control is set on TV, CABLE/SAT, VCR/PVR, or DVD mode. See "Using the volume lock feature" (- Stop* REC Menu* (Single click) Channel up ... • DVD/ DVD-R Receiver/ AMP DVD RTN --- Chapter 3: Using the remote control REMOTE CONTROL KEY Toshiba TV (TV) CABLE CH RTN/ DVD RTN RECALL MUTE SLOW SKIP z SKIP Z REW PAUSE/STEP PLAY FF C.CAPTION TV/VCR DISC/AM/FM STOP REC CH B b PIC MODE FREEZE Previous channel On-screen display Sound mute...
Owner's Manual - English
Page 27
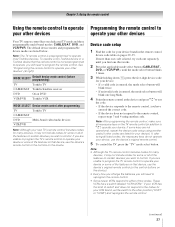
... programming) TV Toshiba TV CABLE/SAT Toshiba Satellite receiver DVD Orion DVD VCR/PVR Toshiba VCR MODE SELECT Device mode control after trying all necessary keys on the TV remote control (in addition to either of switch and does not respond to the codes for your VCR brand, set the switch...are not operational, repeat the device code setup using another code (if other devices Your TV remote control has one long blink. 4 Point the remote control at right). If, after programming TV Toshiba TV CABLE/SAT DVD Multi-brand video/audio devices VCR/PVR Note: Although your new...
... programming) TV Toshiba TV CABLE/SAT Toshiba Satellite receiver DVD Orion DVD VCR/PVR Toshiba VCR MODE SELECT Device mode control after trying all necessary keys on the TV remote control (in addition to either of switch and does not respond to the codes for your VCR brand, set the switch...are not operational, repeat the device code setup using another code (if other devices Your TV remote control has one long blink. 4 Point the remote control at right). If, after programming TV Toshiba TV CABLE/SAT DVD Multi-brand video/audio devices VCR/PVR Note: Although your new...
Owner's Manual - English
Page 28
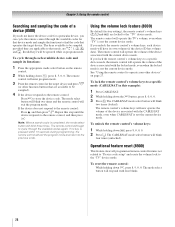
Chapter 3: Using the remote control Searching and sampling the code of a device (8500) If you do not know the device code for a particular device, you can cycle the remote control through the available codes for that device mode and sample the functions to find the code that mode, are applicable to be sampled, provided they are p, 1, z, The keys available to that operates the target device.
Chapter 3: Using the remote control Searching and sampling the code of a device (8500) If you do not know the device code for a particular device, you can cycle the remote control through the available codes for that device mode and sample the functions to find the code that mode, are applicable to be sampled, provided they are p, 1, z, The keys available to that operates the target device.
Owner's Manual - English
Page 36
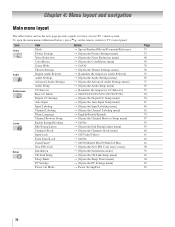
...TV control panel. Icon Video Audio Preferences Locks Setup Item Mode Picture Settings Noise Reduction ColorMaster Game Mode Theater Settings Digital Audio Selector Audio Settings Advanced Audio Settings Audio Setup CC Selector Base CC Mode Digital CC Settings... PC Settings Power-On Mode Option S Sports/Standard/Movie/Document/Preference S [Opens the Picture Settings menu]... [Opens the Theater Settings menu] S [Launches the temporary Audio Selector] S [Opens the Audio Settings menu] S [Opens the Advanced Audio Settings menu] S [Opens...S [Opens the PC Settings menu] S Power-Saving/Fast Page 53 53 68...
...TV control panel. Icon Video Audio Preferences Locks Setup Item Mode Picture Settings Noise Reduction ColorMaster Game Mode Theater Settings Digital Audio Selector Audio Settings Advanced Audio Settings Audio Setup CC Selector Base CC Mode Digital CC Settings... PC Settings Power-On Mode Option S Sports/Standard/Movie/Document/Preference S [Opens the Picture Settings menu]... [Opens the Theater Settings menu] S [Launches the temporary Audio Selector] S [Opens the Audio Settings menu] S [Opens the Advanced Audio Settings menu] S [Opens...S [Opens the PC Settings menu] S Power-Saving/Fast Page 53 53 68...
Owner's Manual - English
Page 38
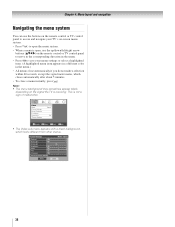
...Color 50 Tint 0 Sharpness 50 Advanced Picture Settings Reset Mode: Sports On Done 38 Chapter 4: Menu layout and navigation Navigating the menu system You can use the buttons on the remote control or TV control panel to access and navigate your TV's on-screen menu system. • ...Note: • The menu background may sometimes appear black, depending on the remote control or TV control panel to move in the corresponding direction in the menu. • Press T to save your menu settings or select a highlighted item. (A highlighted menu item appears in a different color in the ...
...Color 50 Tint 0 Sharpness 50 Advanced Picture Settings Reset Mode: Sports On Done 38 Chapter 4: Menu layout and navigation Navigating the menu system You can use the buttons on the remote control or TV control panel to access and navigate your TV's on-screen menu system. • ...Note: • The menu background may sometimes appear black, depending on the remote control or TV control panel to move in the corresponding direction in the menu. • Press T to save your menu settings or select a highlighted item. (A highlighted menu item appears in a different color in the ...


