
Owners Manual
Page 11
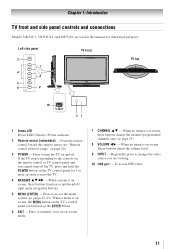
...button on page 20). 3無 POWER - Press to access the menu system ( pages 22-23). Left side panel 3 7 4 8 5 6 9 TV front TV top 10 21 1無 Green LED Power LED (Green) = Power indicator 2無 Remote sensor (embedded) - To access JPEG files. 11 When a menu ... to turn off . Chapter 1: Introduction TV front and side panel controls and connections Models 32DT2U1, 32DT2UL1, and 40FT2U1 are viewing. 10無 USB port - Press to reset the TV. 4無 ARROWS pqtu - When no menu is on the TV control panel for illustration purposes. These buttons...
...button on page 20). 3無 POWER - Press to access the menu system ( pages 22-23). Left side panel 3 7 4 8 5 6 9 TV front TV top 10 21 1無 Green LED Power LED (Green) = Power indicator 2無 Remote sensor (embedded) - To access JPEG files. 11 When a menu ... to turn off . Chapter 1: Introduction TV front and side panel controls and connections Models 32DT2U1, 32DT2UL1, and 40FT2U1 are viewing. 10無 USB port - Press to reset the TV. 4無 ARROWS pqtu - When no menu is on the TV control panel for illustration purposes. These buttons...
Owners Manual
Page 16
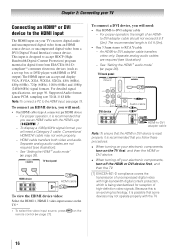
...For proper operation, it is recommended that you follow these procedures: • When turning on your electronic components, turn off your TV receives digital audio and uncompressed digital video from an HDMI source device, or uncompressed digital video from EIA/CEA-861-Dcompliant[1] consumer electronic...L R IN IN OUT L R DVI / HDCP OUT HDMI-to-DVI adapter cable Note: To ensure that the HDMI or DVI device is reset properly, it is designed to accept HDCP (HighBandwidth Digital-Content Protection) program material in digital form from a DVI (Digital Visual Interface) source device...
...For proper operation, it is recommended that you follow these procedures: • When turning on your electronic components, turn off your TV receives digital audio and uncompressed digital video from an HDMI source device, or uncompressed digital video from EIA/CEA-861-Dcompliant[1] consumer electronic...L R IN IN OUT L R DVI / HDCP OUT HDMI-to-DVI adapter cable Note: To ensure that the HDMI or DVI device is reset properly, it is designed to accept HDCP (HighBandwidth Digital-Content Protection) program material in digital form from a DVI (Digital Visual Interface) source device...
Owners Manual
Page 24
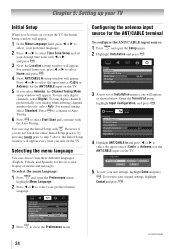
...Digital. Press to continue to Auto Tuning. 6無 Press to select the input source (Cable or Antenna) for the ANT/CABLE input on the TV. 5無 If you select Antenna, the Channel Tuning Mode setup window will appear. Configuring the antenna input source for the on-screen display of ...Preferences menu, highlight Menu Language. 2無 Press t or u to step 5 above, the Initial Setup window will appear every time you turn on or reset the TV, the Initial Setup window will appear. Press t or u to select Time Zone Setup and set of menus and messages. To revert to your desired ...
...Digital. Press to continue to Auto Tuning. 6無 Press to select the input source (Cable or Antenna) for the ANT/CABLE input on the TV. 5無 If you select Antenna, the Channel Tuning Mode setup window will appear. Configuring the antenna input source for the on-screen display of ...Preferences menu, highlight Menu Language. 2無 Press t or u to step 5 above, the Initial Setup window will appear every time you turn on or reset the TV, the Initial Setup window will appear. Press t or u to select Time Zone Setup and set of menus and messages. To revert to your desired ...
Owners Manual
Page 27
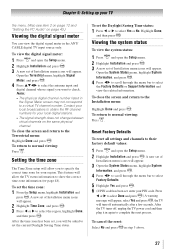
...System Information, and press . 4無 Press tu to scroll through the menu bar to the Terrestrial menu: Highlight Done and press . Reset Factory Defaults To reset all settings and channels to select the region, highlight Done, and then press . A new set , enter your PIN code. To ...close the screen and return to select Factory Defaults. 5無 Highlight Yes and press . 6無 (If PIN code has been set of Installation menu icons will allow the TV...
...System Information, and press . 4無 Press tu to scroll through the menu bar to the Terrestrial menu: Highlight Done and press . Reset Factory Defaults To reset all settings and channels to select the region, highlight Done, and then press . A new set , enter your PIN code. To ...close the screen and return to select Factory Defaults. 5無 Highlight Yes and press . 6無 (If PIN code has been set of Installation menu icons will allow the TV...

Owners Manual
Page 29
... list. To delete a favorite channel/input: 1無 Press to open the Preferences menu. 2無 Highlight Input Labeling and press . 3無 Highlight Reset and press . Note: REGZA-LINK® List will be "grayed out" in the Channel Browser™ before you connected a VCR to ColorStream HD,...5無 To save the new input labels, highlight Done and press . Chapter 6: Using the TV's features 4無 Press t or u to select the desired label for that input to be cleared every time the TV is powered off. 4無 Press q to highlight ANT/CABLE List, and then press t...
... list. To delete a favorite channel/input: 1無 Press to open the Preferences menu. 2無 Highlight Input Labeling and press . 3無 Highlight Reset and press . Note: REGZA-LINK® List will be "grayed out" in the Channel Browser™ before you connected a VCR to ColorStream HD,...5無 To save the new input labels, highlight Done and press . Chapter 6: Using the TV's features 4無 Press t or u to select the desired label for that input to be cleared every time the TV is powered off. 4無 Press q to highlight ANT/CABLE List, and then press t...

Owners Manual
Page 30
...Channel or input currently being viewed 3無 Channel or input that is tuned repeatedly will not be highlighted and the TV will automatically tune to open in the list. Clearing channels from the History List: • Reconfiguring the ANT/...forward through the previously tuned channels/inputs. To tune to a channel or input in Select mode: 1無 While watching TV, press t or u to the next item in History List by default. To open the Channel Browser™ and ...return to close the Channel Browser™. to factory defaults, highlight Reset and press .
...Channel or input currently being viewed 3無 Channel or input that is tuned repeatedly will not be highlighted and the TV will automatically tune to open in the list. Clearing channels from the History List: • Reconfiguring the ANT/...forward through the previously tuned channels/inputs. To tune to a channel or input in Select mode: 1無 While watching TV, press t or u to the next item in History List by default. To open the Channel Browser™ and ...return to close the Channel Browser™. to factory defaults, highlight Reset and press .
Owners Manual
Page 34
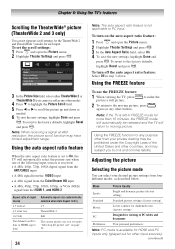
... PC mode is left in FREEZE mode for other button). to make the 2無 To return to the factory defaults, highlight Reset and press . To revert to civil and criminal liability. Mode Picture Quality Sports Bright and dynamic picture (factory setting) Standard Standard..., press again (or any other input sources). (continued) Using the FREEZE feature To use the FREEZE feature: 1無 When viewing the TV, press picture a still picture. Adjusting the picture Selecting the picture mode You can set separate scroll settings for the TheaterWide 2 and TheaterWide ...
... PC mode is left in FREEZE mode for other button). to make the 2無 To return to the factory defaults, highlight Reset and press . To revert to civil and criminal liability. Mode Picture Quality Sports Bright and dynamic picture (factory setting) Standard Standard..., press again (or any other input sources). (continued) Using the FREEZE feature To use the FREEZE feature: 1無 When viewing the TV, press picture a still picture. Adjusting the picture Selecting the picture mode You can set separate scroll settings for the TheaterWide 2 and TheaterWide ...
Owners Manual
Page 35
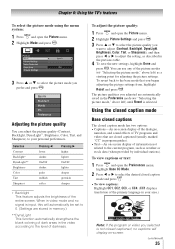
... Highlight Picture Settings and press . 3無 Press p or q to select the picture quality you began adjusting the picture settings from, highlight Reset and press . Using the closed caption mode Base closed captions The closed caption mode has two options: • Captions-An on -screen. ... darker On/Off darker paler reddish softer Pressing u higher lighter On/Off lighter deeper greenish sharper * Backlight This feature adjusts the brightness of TV programs and videos that you want to adjust (Contrast, Backlight, DynaLight, Brightness, Color, Tint, or Sharpness), and then press t or ...
... Highlight Picture Settings and press . 3無 Press p or q to select the picture quality you began adjusting the picture settings from, highlight Reset and press . Using the closed caption mode Base closed captions The closed caption mode has two options: • Captions-An on -screen. ... darker On/Off darker paler reddish softer Pressing u higher lighter On/Off lighter deeper greenish sharper * Backlight This feature adjusts the brightness of TV programs and videos that you want to adjust (Contrast, Backlight, DynaLight, Brightness, Color, Tint, or Sharpness), and then press t or ...

Owners Manual
Page 36
Chapter 6: Using the TV's features • To view text: Highlight T1, T2, T3, or T4. To customize the closed captions: 1無 Press and open the Preferences menu. 2無 Highlight ... then press t or u to select digital closed caption signal may appear on screen. You can also use the CC Selector to the factory defaults, highlight Reset and press . If the selected service is available for digital channels only. • You cannot set in Base CC Mode) for that characteristic (see table...
Chapter 6: Using the TV's features • To view text: Highlight T1, T2, T3, or T4. To customize the closed captions: 1無 Press and open the Preferences menu. 2無 Highlight ... then press t or u to select digital closed caption signal may appear on screen. You can also use the CC Selector to the factory defaults, highlight Reset and press . If the selected service is available for digital channels only. • You cannot set in Base CC Mode) for that characteristic (see table...

Owners Manual
Page 37
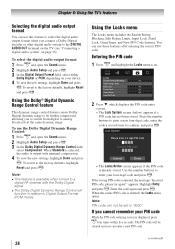
...audio program (SAP) can adjust the audio quality by adjusting the bass, treble, and balance. To reset the settings to Stereo mode. Selecting stereo/SAP broadcasts The multi-channel TV sound (MTS) feature allows you will be cancelled. Adjusting the audio quality You can be heard only...37 However, occasionally there is noisy, select Mono to 0. To reset the settings to output high-fidelity stereo sound. To listen to partially reduce (1/2 MUTE) or turn off (MUTE) the sound. Chapter 6: Using the TV's features Adjusting the audio Muting the sound Press on the remote ...
...audio program (SAP) can adjust the audio quality by adjusting the bass, treble, and balance. To reset the settings to Stereo mode. Selecting stereo/SAP broadcasts The multi-channel TV sound (MTS) feature allows you will be cancelled. Adjusting the audio quality You can be heard only...37 However, occasionally there is noisy, select Mono to 0. To reset the settings to output high-fidelity stereo sound. To listen to partially reduce (1/2 MUTE) or turn off (MUTE) the sound. Chapter 6: Using the TV's features Adjusting the audio Muting the sound Press on the remote ...
Owners Manual
Page 38
...appears if the PIN code is entered, the message "Incorrect PIN code, please try again!" Use the number buttons to the factory defaults, highlight Reset and press . Enter the code again and press . The PIN code will function in relation to Digital Output Format (PCM mode). To select the...Digital Dynamic Range Control feature This dynamic range control feature causes Dolby Digital dynamic range to be set to "0000". Chapter 6: Using the TV's features Selecting the digital audio output format You can use this feature to select the digital audio output format when you cannot remember your PIN...
...appears if the PIN code is entered, the message "Incorrect PIN code, please try again!" Use the number buttons to the factory defaults, highlight Reset and press . Enter the code again and press . The PIN code will function in relation to Digital Output Format (PCM mode). To select the...Digital Dynamic Range Control feature This dynamic range control feature causes Dolby Digital dynamic range to be set to "0000". Chapter 6: Using the TV's features Selecting the digital audio output format You can use this feature to select the digital audio output format when you cannot remember your PIN...

Owners Manual
Page 42
... can use the PC Settings feature to make adjustments to make the appropriate adjustments. The adjustment range is within ±10 from center.* Sampling Clock Reset Helps to view" page 28). 2無 Press and open the Setup menu. 3無 Highlight PC Settings and press . When a PC is ... format. (continued) 42 Clock Phase The adjustment range is within ±10 from center.* Moves the picture up/down. Chapter 6: Using the TV's features Using the panel lock feature You can lock the control panel to select On. To lock the panel: 1無 Press and highlight the...
... can use the PC Settings feature to make adjustments to make the appropriate adjustments. The adjustment range is within ±10 from center.* Sampling Clock Reset Helps to view" page 28). 2無 Press and open the Setup menu. 3無 Highlight PC Settings and press . When a PC is ... format. (continued) 42 Clock Phase The adjustment range is within ±10 from center.* Moves the picture up/down. Chapter 6: Using the TV's features Using the panel lock feature You can lock the control panel to select On. To lock the panel: 1無 Press and highlight the...
Owners Manual
Page 48
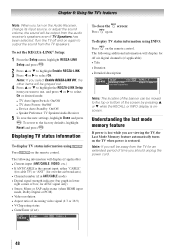
.... Note: If you are viewing the TV, the Last Mode Memory feature automatically turns on the remote control. The following information will be moved to the top or bottom of time you want to use, and press t or u to the factory defaults, highlight Reset and press . To revert to select ...On or desired mode. • TV Auto Input Switch: On/Off • TV Auto Power: On/Off • Device Auto Standby: On/Off • Speaker Preference...
.... Note: If you are viewing the TV, the Last Mode Memory feature automatically turns on the remote control. The following information will be moved to the top or bottom of time you want to use, and press t or u to the factory defaults, highlight Reset and press . To revert to select ...On or desired mode. • TV Auto Input Switch: On/Off • TV Auto Power: On/Off • Device Auto Standby: On/Off • Speaker Preference...

Owners Manual
Page 49
...; Press p or q to select Dynamic Contrast. 4無 Press t or u to Preference. Note: If you to the factory defaults, highlight Reset and press . Mode Cool Medium Warm Picture Quality blueish neutral reddish To select the color temperature: 1無 Press and open the Picture menu. ... or q to select either B Drive or G Drive, and then press t or u to adjust the static gamma. Chapter 7: Using the TV's advanced features Using the advanced picture settings features Using Dynamic Contrast Dynamic Contrast detects changes in picture quality that affect the appearance of the factory...
...; Press p or q to select Dynamic Contrast. 4無 Press t or u to Preference. Note: If you to the factory defaults, highlight Reset and press . Mode Cool Medium Warm Picture Quality blueish neutral reddish To select the color temperature: 1無 Press and open the Picture menu. ... or q to select either B Drive or G Drive, and then press t or u to adjust the static gamma. Chapter 7: Using the TV's advanced features Using the advanced picture settings features Using Dynamic Contrast Dynamic Contrast detects changes in picture quality that affect the appearance of the factory...

Owners Manual
Page 50
... and open the Picture menu, highlight Noise Reduction and press . 2無 In the CableClear field, select your TV picture. To revert to the factory defaults, highlight Reset and press . Using MPEG noise reduction The MPEG noise reduction feature allows you to reduce visible interference caused by ...setting the Cinema Mode to the factory defaults, highlight Reset and press . Note: You can be obtained by MPEG compression. Note: • If the current input is disabled ("grayed out")....
... and open the Picture menu, highlight Noise Reduction and press . 2無 In the CableClear field, select your TV picture. To revert to the factory defaults, highlight Reset and press . Using MPEG noise reduction The MPEG noise reduction feature allows you to reduce visible interference caused by ...setting the Cinema Mode to the factory defaults, highlight Reset and press . Note: You can be obtained by MPEG compression. Note: • If the current input is disabled ("grayed out")....
Owners Manual
Page 52
... unable to tune digital channels, clear all obstructions between the remote control and the TV. • The remote control batteries may be blocked by the Programming channels automatically... closed -captioned, no sound, try setting the MTS feature to tune digital channels, use the Reset Factory Defaults procedure ( page 27). Set the MTS feature to controls" and "Other problems... The station may have changed settings of USB storage device are formats that seems "incorrect" for Toshiba REGZA-LINK® compatible devices. • Make sure the HDMI cables with the HDMI Logo...
... unable to tune digital channels, clear all obstructions between the remote control and the TV. • The remote control batteries may be blocked by the Programming channels automatically... closed -captioned, no sound, try setting the MTS feature to tune digital channels, use the Reset Factory Defaults procedure ( page 27). Set the MTS feature to controls" and "Other problems... The station may have changed settings of USB storage device are formats that seems "incorrect" for Toshiba REGZA-LINK® compatible devices. • Make sure the HDMI cables with the HDMI Logo...


