Brochure
Page 2
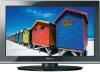
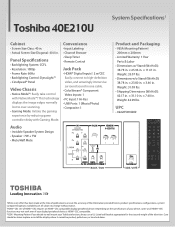
.... Convenience • Input Labeling • Channel Browser • Sleep Timer • Remote Control Jack Pack • HDMI® Digital Inputs2: 2 w/CEC Easily connect to wall mount your Toshiba television, always use a UL Listed wall bracket appropriate for the size and weight of ...be pushed, pulled over -scanning. • Gaming Mode: Initiate the gaming experience by reducing game controller delay with Native Mode™! Toshiba 40E210U System Specifications1 Cabinet • Screen Size Class: 40 in. • Actual Screen Size Diagonal: 40.0 in . UPC • 022265004289...
.... Convenience • Input Labeling • Channel Browser • Sleep Timer • Remote Control Jack Pack • HDMI® Digital Inputs2: 2 w/CEC Easily connect to wall mount your Toshiba television, always use a UL Listed wall bracket appropriate for the size and weight of ...be pushed, pulled over -scanning. • Gaming Mode: Initiate the gaming experience by reducing game controller delay with Native Mode™! Toshiba 40E210U System Specifications1 Cabinet • Screen Size Class: 40 in. • Actual Screen Size Diagonal: 40.0 in . UPC • 022265004289...
User Manual
Page 8
... REGZA-LINK® connection 17 Connecting a digital audio system 18 Connecting a personal computer (PC 18 Chapter 3: Using the remote control 20 Installing the remote control batteries 20 Remote control effective range 20 Learning about the remote control 21 Chapter 4: Menu layout and navigation 22 Main menu layout 22 Setup/Installation menu layout 23 Navigating... 55 Specifications 55 Acceptable signal formats for PC IN and HDMI terminals 56 Limited United States Warranty for LCD Televisions 57 Limited Canadian Warranty for Toshiba Brand Flat Panel Televisions 58
... REGZA-LINK® connection 17 Connecting a digital audio system 18 Connecting a personal computer (PC 18 Chapter 3: Using the remote control 20 Installing the remote control batteries 20 Remote control effective range 20 Learning about the remote control 21 Chapter 4: Menu layout and navigation 22 Main menu layout 22 Setup/Installation menu layout 23 Navigating... 55 Specifications 55 Acceptable signal formats for PC IN and HDMI terminals 56 Limited United States Warranty for LCD Televisions 57 Limited Canadian Warranty for Toshiba Brand Flat Panel Televisions 58
User Manual
Page 9
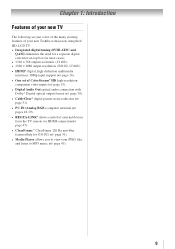
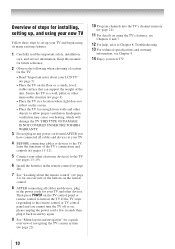
Chapter 1: Introduction Features of your new TV The following are just a few of the many exciting features of your new Toshiba widescreen, integrated HD, LCD TV: • Integrated digital tuning (8VSB ATSC and QAM) eliminates the need for a separate digital converter set-top box (... 51). • PC IN (Analog RGB) computer terminal ( pages 18-19). • REGZA-LINK® allows control of external devices from the TV remote via HDMI connection( page 47). • ClearFrame™ ClearFrame 120 Hz anti-blur feature(Only for G310U) ( page 51). • Media Player allows...
Chapter 1: Introduction Features of your new TV The following are just a few of the many exciting features of your new Toshiba widescreen, integrated HD, LCD TV: • Integrated digital tuning (8VSB ATSC and QAM) eliminates the need for a separate digital converter set-top box (... 51). • PC IN (Analog RGB) computer terminal ( pages 18-19). • REGZA-LINK® allows control of external devices from the TV remote via HDMI connection( page 47). • ClearFrame™ ClearFrame 120 Hz anti-blur feature(Only for G310U) ( page 51). • Media Player allows...
User Manual
Page 10
THIS TYPE OF DAMAGE IS NOT COVERED UNDER THE TOSHIBA WARRANTY. 3 Do not plug in any power cords until AFTER you cannot turn on the remote control. 8 AFTER connecting all cables and devices to your TV. 4 BEFORE connecting cables or devices to the TV, learn the functions of... damage the TV. Keep this manual for future reference. 2 Observe the following when choosing a location for the TV: • Read "Important notes about the remote control" ( page 21) for a quick overview of the unit. If the TV stops responding to a wall, pillar, or other immovable structure (...
THIS TYPE OF DAMAGE IS NOT COVERED UNDER THE TOSHIBA WARRANTY. 3 Do not plug in any power cords until AFTER you cannot turn on the remote control. 8 AFTER connecting all cables and devices to your TV. 4 BEFORE connecting cables or devices to the TV, learn the functions of... damage the TV. Keep this manual for future reference. 2 Observe the following when choosing a location for the TV: • Read "Important notes about the remote control" ( page 21) for a quick overview of the unit. If the TV stops responding to a wall, pillar, or other immovable structure (...
User Manual
Page 11
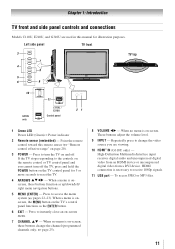
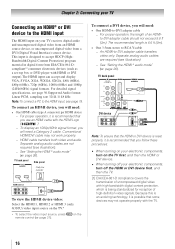
...8 5 6 9 TV top 10 G310U only 11 C110U / E210U Control panel 21 1無 Green LED Power LED (Green) = Power indicator 2無 Remote sensor (embedded) - When a menu is on -screen menu. 7無 CHANNEL pq - High-Definition Multimedia Interface input receives digital audio and uncompressed digital video... the volume level. 9無 INPUT - Point the remote control toward this manual for 5 or more seconds to the controls on the remote control or TV control panel and you are used in this remote sensor ( "Remote control effective range" on page 20). 3無 POWER...
...8 5 6 9 TV top 10 G310U only 11 C110U / E210U Control panel 21 1無 Green LED Power LED (Green) = Power indicator 2無 Remote sensor (embedded) - When a menu is on -screen menu. 7無 CHANNEL pq - High-Definition Multimedia Interface input receives digital audio and uncompressed digital video... the volume level. 9無 INPUT - Point the remote control toward this manual for 5 or more seconds to the controls on the remote control or TV control panel and you are used in this remote sensor ( "Remote control effective range" on page 20). 3無 POWER...
User Manual
Page 14
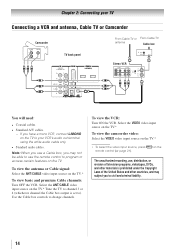
... programs, videotapes, DVDs, and other materials is set to program or access certain features on the TV.* ** To select the video input source, press remote control ( page 21). Select the ANT/CABLE video input source on the TV.* To view basic and premium Cable channels: Turn OFF the VCR.... Note: When you use , distribution, or revision of the United States and other countries, and may subject you may not be able to use the remote control to ). on the TV to your TV Connecting a VCR and antenna, Cable TV or Camcorder Camcorder AUDIO OUT L R VIDEO TV back panel 1 From...
... programs, videotapes, DVDs, and other materials is set to program or access certain features on the TV.* ** To select the video input source, press remote control ( page 21). Select the ANT/CABLE video input source on the TV.* To view basic and premium Cable channels: Turn OFF the VCR.... Note: When you use , distribution, or revision of the United States and other countries, and may subject you may not be able to use the remote control to ). on the TV to your TV Connecting a VCR and antenna, Cable TV or Camcorder Camcorder AUDIO OUT L R VIDEO TV back panel 1 From...
User Manual
Page 15
... channel you to civil and criminal liability. 15 Tune the VCR to the channel to view the DVD. ** To select the video input source, press remote control ( page 21). To view antenna or Cable channels: Select the ANT/CABLE video input source on the TV.* To view the VCR or...
... channel you to civil and criminal liability. 15 Tune the VCR to the channel to view the DVD. ** To select the video input source, press remote control ( page 21). To view antenna or Cable channels: Select the ANT/CABLE video input source on the TV.* To view the VCR or...
User Manual
Page 16
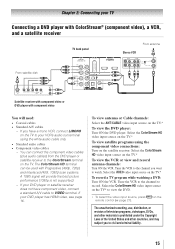
..., SXGA, 480i (60Hz), 480p (60Hz), 720p (60Hz), 1080i (60Hz) and 1080p (24Hz/60Hz) signal formats. on the TV.* ** To select the video input source, press remote control ( page 21). The recommended length is designed to -DVI adapter cable −− For proper operation, the length of high-definition video signals...
..., SXGA, 480i (60Hz), 480p (60Hz), 720p (60Hz), 1080i (60Hz) and 1080p (24Hz/60Hz) signal formats. on the TV.* ** To select the video input source, press remote control ( page 21). The recommended length is designed to -DVI adapter cable −− For proper operation, the length of high-definition video signals...
User Manual
Page 17
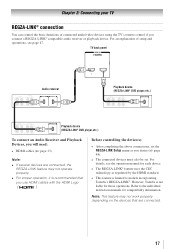
... page 47. Before controlling the device(s): • After completing the above connections, set . However, Toshiba is limited to the individual instruction manuals for those operations. For an explanation of connected audio/video devices using the TV's remote control if you desire ( page 48). • The connected devices must also be set...; The REGZA-LINK® feature uses the CEC technology as you connect a REGZA-LINK® compatible audio receiver or playback device. Refer to models incorporating Toshiba's REGZA-LINK®.
... page 47. Before controlling the device(s): • After completing the above connections, set . However, Toshiba is limited to the individual instruction manuals for those operations. For an explanation of connected audio/video devices using the TV's remote control if you desire ( page 48). • The connected devices must also be set...; The REGZA-LINK® feature uses the CEC technology as you connect a REGZA-LINK® compatible audio receiver or playback device. Refer to models incorporating Toshiba's REGZA-LINK®.
User Manual
Page 18
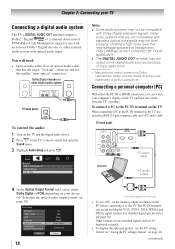
... digital audio system TV back panel To control the audio: 1無 Turn on the TV and the digital audio device. 2無 Press on the TV's remote control and open the Sound menu. 3無 Highlight Audio Setup and press .
... digital audio system TV back panel To control the audio: 1無 Turn on the TV and the digital audio device. 2無 Press on the TV's remote control and open the Sound menu. 3無 Highlight Audio Setup and press .

User Manual
Page 20
..., always replace both batteries with the environment in mind. Always dispose of batteries in accordance with applicable laws and regulations. •• If the remote control does not operate correctly, or if the operating range becomes reduced, replace batteries with new ones. •• When necessary to use AAA size... batteries. •• Dispose of batteries in the remote control until the tab snaps. Never mix battery types or new and used for an extended period of the...
..., always replace both batteries with the environment in mind. Always dispose of batteries in accordance with applicable laws and regulations. •• If the remote control does not operate correctly, or if the operating range becomes reduced, replace batteries with new ones. •• When necessary to use AAA size... batteries. •• Dispose of batteries in the remote control until the tab snaps. Never mix battery types or new and used for an extended period of the...
User Manual
Page 21
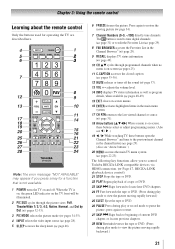
...). (Also see "Arrow buttons.") 20無 MENU accesses the main TV menu system ( pages 22-23). Chapter 3: Using the remote control Learning about the remote control Only the buttons used to tune digital channels ( page 31) or to the last viewed channel or source ( page 31... allow you press a key for operating the TV are described here. Note: The error message "NOT AVAILABLE" may appear if you to control Toshiba REGZA-LINK compatible devices via HDMI connection. ( Page 47, REGZA-LINK playback device control) 21無 STOP Stops the tape or DVD....
...). (Also see "Arrow buttons.") 20無 MENU accesses the main TV menu system ( pages 22-23). Chapter 3: Using the remote control Learning about the remote control Only the buttons used to tune digital channels ( page 31) or to the last viewed channel or source ( page 31... allow you press a key for operating the TV are described here. Note: The error message "NOT AVAILABLE" may appear if you to control Toshiba REGZA-LINK compatible devices via HDMI connection. ( Page 47, REGZA-LINK playback device control) 21無 STOP Stops the tape or DVD....
User Manual
Page 22
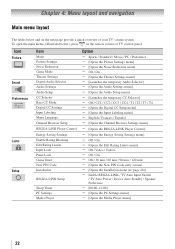
To open the main menus (illustrated below and on the remote control or TV control panel. Icon Picture Sound Preferences Locks Setup Item Mode Picture Settings Noise Reduction Game Mode Theater Settings Digital Audio Selector Audio ...
To open the main menus (illustrated below and on the remote control or TV control panel. Icon Picture Sound Preferences Locks Setup Item Mode Picture Settings Noise Reduction Game Mode Theater Settings Digital Audio Selector Audio ...
User Manual
Page 23
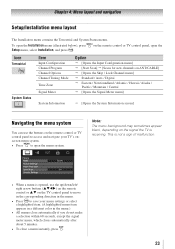
..., press . 23 Note: The menu background may sometimes appear black, depending on the signal the TV is opened, use the buttons on the remote control or TV control panel, open the Installation menu (illustrated below), press Setup menu, select Installation, and press . This is not a sign... of malfunction. • When a menu is receiving. on the remote control or TV control panel to open the menu system. Chapter 4: Menu layout and navigation Setup/Installation menu layout The Installation menu contains the Terrestrial...
..., press . 23 Note: The menu background may sometimes appear black, depending on the signal the TV is opened, use the buttons on the remote control or TV control panel, open the Installation menu (illustrated below), press Setup menu, select Installation, and press . This is not a sign... of malfunction. • When a menu is receiving. on the remote control or TV control panel to open the menu system. Chapter 4: Menu layout and navigation Setup/Installation menu layout The Installation menu contains the Terrestrial...
User Manual
Page 25
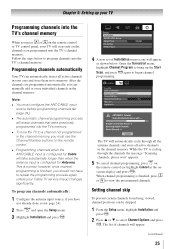
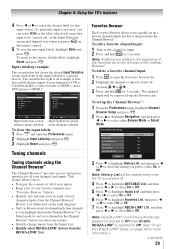
...the TV is finished, press or to begin channel programming. Note: •• You must use the Channel Number buttons on the remote control. •• Programming channels when the ANT/CABLE input is configured for Cable will appear. (continued) 25 Chapter 5: Setting up... automatically cycle through the channels the message "Scanning channels, please wait" appears. 5無 To cancel channel programming, press on the remote control (or highlight Cancel in its memory. however, once channel programming is normal; Setting channel skip To prevent certain channels from being...
...the TV is finished, press or to begin channel programming. Note: •• You must use the Channel Number buttons on the remote control. •• Programming channels when the ANT/CABLE input is configured for Cable will appear. (continued) 25 Chapter 5: Setting up... automatically cycle through the channels the message "Scanning channels, please wait" appears. 5無 To cancel channel programming, press on the remote control (or highlight Cancel in its memory. however, once channel programming is normal; Setting channel skip To prevent certain channels from being...
User Manual
Page 26
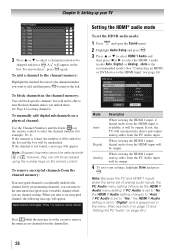
... Numbers and the Dash ( ) on page 43.) 26 A will not be able to "Digital" and is on the remote control. To block channels in the box.To remove the , press again. Press 1 on remote to remove channel Press while the message is grayed out in the menu. (Also see item 2 on page... 12 and "Setting the PC Audio" on the remote control to be output. Digital When viewing the HDMI 1 input, digital audio from the channel list. If PC Audio is set to "Yes," the HDMI...
... Numbers and the Dash ( ) on page 43.) 26 A will not be able to "Digital" and is on the remote control. To block channels in the box.To remove the , press again. Press 1 on remote to remove channel Press while the message is grayed out in the menu. (Also see item 2 on page... 12 and "Setting the PC Audio" on the remote control to be output. Digital When viewing the HDMI 1 input, digital audio from the channel list. If PC Audio is set to "Yes," the HDMI...
User Manual
Page 28
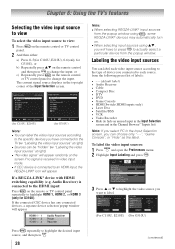
...Selection screen, you can label the video input sources according to change the input. Audio Receiver) is connected to the HDMI input: Press on the remote or TV control panel repeatedly to highlight HDMI 1, HDMI 2, or HDMI 3 (only for G310U), or b) Repeatedly press on ...appear. or c) Repeatedly press on . ••When selecting input sources using , some REGZA-LINK® devices may automatically turn on the remote control or TV control panel to label. If a REGZA-LINK® device with HDMI switching capability (e.g. The current signal source displays in the ...
...Selection screen, you can label the video input sources according to change the input. Audio Receiver) is connected to the HDMI input: Press on the remote or TV control panel repeatedly to highlight HDMI 1, HDMI 2, or HDMI 3 (only for G310U), or b) Repeatedly press on ...appear. or c) Repeatedly press on . ••When selecting input sources using , some REGZA-LINK® devices may automatically turn on the remote control or TV control panel to label. If a REGZA-LINK® device with HDMI switching capability (e.g. The current signal source displays in the ...
User Manual
Page 29
... for 3 seconds. Note: REGZA-LINK® List will cause that input to be automatically grayed out and set the REGZA-LINK® Setup" on the remote control. 5無 To save the new input labels, highlight Done and press . To revert to the factory default labels, highlight Reset and press . Note: Additions...
... for 3 seconds. Note: REGZA-LINK® List will cause that input to be automatically grayed out and set the REGZA-LINK® Setup" on the remote control. 5無 To save the new input labels, highlight Done and press . To revert to the factory default labels, highlight Reset and press . Note: Additions...
User Manual
Page 30
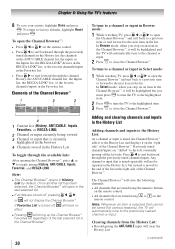
...input is tuned, the Channel Browser™ adds it to the History List and displays it on the remote control. Previously tuned channels/inputs are tuned using the numeric buttons on the remote control. • All channels that are "shifted" to the previously viewed channel or input. The ... moving off the left side. Note: Whenever an item is selected that are tuned using or on the "right side" of the list on the remote control. • Press to surf backward through the previously tuned channels/inputs. To open the Channel Browser™: • Press ...
...input is tuned, the Channel Browser™ adds it to the History List and displays it on the remote control. Previously tuned channels/inputs are tuned using the numeric buttons on the remote control. • All channels that are "shifted" to the previously viewed channel or input. The ... moving off the left side. Note: Whenever an item is selected that are tuned using or on the "right side" of the list on the remote control. • Press to surf backward through the previously tuned channels/inputs. To open the Channel Browser™: • Press ...
User Manual
Page 31
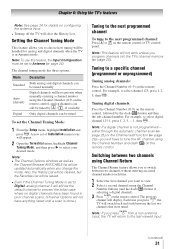
...Tuning Mode, and then press to a specific channel (programmed or unprogrammed) Tuning analog channels: Press the Channel Number (0-9) on the remote control or TV control panel. Tuning to select your desired mode. either through the automatic channel scan ( page 25) or the Channel add... If you program channels into the TV's channel memory ( page 25). Tuning digital channels: Press the Channel Number (0-9) on the remote control, analog channels can be tuned To set to Digital, analog channel 3 will still be tuned normally Digital channels will return to the ...
...Tuning Mode, and then press to a specific channel (programmed or unprogrammed) Tuning analog channels: Press the Channel Number (0-9) on the remote control or TV control panel. Tuning to select your desired mode. either through the automatic channel scan ( page 25) or the Channel add... If you program channels into the TV's channel memory ( page 25). Tuning digital channels: Press the Channel Number (0-9) on the remote control, analog channels can be tuned To set to Digital, analog channel 3 will still be tuned normally Digital channels will return to the ...


