
Printable Spec Sheet
Page 2
...for the size and weight of Video Electronics Standards Association. Product design and specifications subject to wall mount your Toshiba television, always use a UL Listed wall bracket appropriate for the applicable device. 4If you decide to change or modifi...PACK: HDMITM v1.3 Digital Inputs ColorStream® Component Video Inputs Front A/V / Rear A/V / Rear S-Video High Res PC Input (S-XGA, 15 Pin, D-sub) Analog Audio Out Dolby® Digital Optical Out 3 2 1 / 1 /1 1 Variable • REMOTE CONTROL: Type 4 Item Universal3 PRODUCT & PACKAGING: VESA® Mounting Pattern4...
...for the size and weight of Video Electronics Standards Association. Product design and specifications subject to wall mount your Toshiba television, always use a UL Listed wall bracket appropriate for the applicable device. 4If you decide to change or modifi...PACK: HDMITM v1.3 Digital Inputs ColorStream® Component Video Inputs Front A/V / Rear A/V / Rear S-Video High Res PC Input (S-XGA, 15 Pin, D-sub) Analog Audio Out Dolby® Digital Optical Out 3 2 1 / 1 /1 1 Variable • REMOTE CONTROL: Type 4 Item Universal3 PRODUCT & PACKAGING: VESA® Mounting Pattern4...
Owners Manual
Page 8
...28 Navigating the menu system 28 Chapter 5: Setting up your TV 29 Setting the Energy Saving Mode 29 Selecting the menu language 29 TOSHIBA Logo LED 29 Configuring the antenna input source for the ANT/CABLE terminal 29 Programming channels into the TV's channel memory..... 30 ... feature 53 Using CableClear® digital noise reduction 54 Using MPEG noise reduction 54 Using the Game Mode feature 54 Using the advanced audio settings features 55 Using the QSound® sound feature 55 Chapter 8: Troubleshooting 56 General troubleshooting 56 Chapter 9: Appendix 58 Specifications 58 ...
...28 Navigating the menu system 28 Chapter 5: Setting up your TV 29 Setting the Energy Saving Mode 29 Selecting the menu language 29 TOSHIBA Logo LED 29 Configuring the antenna input source for the ANT/CABLE terminal 29 Programming channels into the TV's channel memory..... 30 ... feature 53 Using CableClear® digital noise reduction 54 Using MPEG noise reduction 54 Using the Game Mode feature 54 Using the advanced audio settings features 55 Using the QSound® sound feature 55 Chapter 8: Troubleshooting 56 General troubleshooting 56 Chapter 9: Appendix 58 Specifications 58 ...

Owners Manual
Page 9
Chapter 1: Introduction Features of your new TV The following are just a few of the many exciting features of your new Toshiba widescreen, integrated HD, LCD TV: • Integrated digital tuning (8VSB ATSC and QAM) eliminates the need for a separate ...LINK allows control of ColorStream® HD high-resolution component video inputs ( page 15). • QSound® audio technologies ( page 55). • Digital Audio Out optical audio connection with the station numbers, so you always know what you to accurately perform synchronization automatically. • Two sets...
Chapter 1: Introduction Features of your new TV The following are just a few of the many exciting features of your new Toshiba widescreen, integrated HD, LCD TV: • Integrated digital tuning (8VSB ATSC and QAM) eliminates the need for a separate ...LINK allows control of ColorStream® HD high-resolution component video inputs ( page 15). • QSound® audio technologies ( page 55). • Digital Audio Out optical audio connection with the station numbers, so you always know what you to accurately perform synchronization automatically. • Two sets...
Owners Manual
Page 12
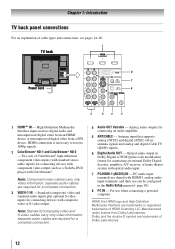
... or S-video output. Two sets of cable types and connections, see pages 14-20. Standard (composite) video and standard audio inputs plus optional S-video inputs for connecting devices with component video output, such as a Toshiba DVD player with ColorStream®. Optical audio output in the Audio Setup menu ( page 50). 8無 PC IN -
... or S-video output. Two sets of cable types and connections, see pages 14-20. Standard (composite) video and standard audio inputs plus optional S-video inputs for connecting devices with component video output, such as a Toshiba DVD player with ColorStream®. Optical audio output in the Audio Setup menu ( page 50). 8無 PC IN -
Owners Manual
Page 13
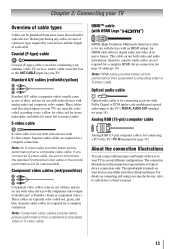
...Coaxial (F-type) cable is for a complete connection. These cables (and the related inputs on your devices may differ from most stores that sell audio/ video devices. Component video cables (red/green/blue) Component video cables come in sets of three, and are for use : yellow for ... come in sets of three and are typically colorcoded according to use with video devices with analog audio and composite video output. Analog RGB (15-pin) computer cable S-video cable is Toshiba's brand of component video.) These cables are required for a complete HDMI device connection ( ...
...Coaxial (F-type) cable is for a complete connection. These cables (and the related inputs on your devices may differ from most stores that sell audio/ video devices. Component video cables (red/green/blue) Component video cables come in sets of three, and are for use : yellow for ... come in sets of three and are typically colorcoded according to use with video devices with analog audio and composite video output. Analog RGB (15-pin) computer cable S-video cable is Toshiba's brand of component video.) These cables are required for a complete HDMI device connection ( ...
Owners Manual
Page 14
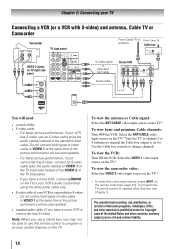
... cable −− For better picture performance, if your TV Connecting a VCR (or a VCR with S-video) and antenna, Cable TV or Camcorder Camcorder AUDIO OUT L R VIDEO TV back panel VIDEO 2 inputs on TV right side panel From Cable TV or From Cable TV antenna Cable box IN CH 3 CH... picture performance will be unacceptable. −− For better picture performance, if your camcorder has S-video, connect an S-video cable (plus the audio cables) instead of the United States and other countries, and may not be able to use the remote control to program or access certain features...
... cable −− For better picture performance, if your TV Connecting a VCR (or a VCR with S-video) and antenna, Cable TV or Camcorder Camcorder AUDIO OUT L R VIDEO TV back panel VIDEO 2 inputs on TV right side panel From Cable TV or From Cable TV antenna Cable box IN CH 3 CH... picture performance will be unacceptable. −− For better picture performance, if your camcorder has S-video, connect an S-video cable (plus the audio cables) instead of the United States and other countries, and may not be able to use the remote control to program or access certain features...
Owners Manual
Page 15
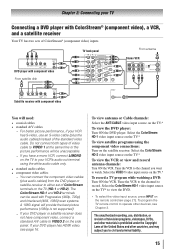
... HDMI video, see Chapter 3. Tune the VCR to the channel you to operate other countries, and may subject you want to your VCR's audio out terminal using the component video connections: Turn on the remote control ( page 21). Select the ColorStream HD-1 video input source on ....* To view the DVD player: Turn ON the DVD player. The ColorStream HD-1 and HD-2 terminals can connect the component video cables (plus the audio cables) instead of ColorStream® (component video) inputs. Do not connect both types of ColorStream terminals on the TV (HD-1 or HD-2). To...
... HDMI video, see Chapter 3. Tune the VCR to the channel you to operate other countries, and may subject you want to your VCR's audio out terminal using the component video connections: Turn on the remote control ( page 21). Select the ColorStream HD-1 video input source on ....* To view the DVD player: Turn ON the DVD player. The ColorStream HD-1 and HD-2 terminals can connect the component video cables (plus the audio cables) instead of ColorStream® (component video) inputs. Do not connect both types of ColorStream terminals on the TV (HD-1 or HD-2). To...
Owners Manual
Page 16
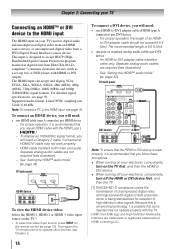
... possible that you follow these procedures: •• When turning on your electronic components, turn off your TV receives digital audio and uncompressed digital video from an HDMI source device, or uncompressed digital video from EIA/CEA-861-D- The recommended length is ... (Digital Visual Interface) source device. HDMI, the HDMI logo and High-Definition Multimedia Interface are trademarks or registered trademarks of standard analog audio cables per HDMI device −− For proper operation, it is designed to operate other devices, see Chapter 3. 16 To connect ...
... possible that you follow these procedures: •• When turning on your electronic components, turn off your TV receives digital audio and uncompressed digital video from an HDMI source device, or uncompressed digital video from EIA/CEA-861-D- The recommended length is ... (Digital Visual Interface) source device. HDMI, the HDMI logo and High-Definition Multimedia Interface are trademarks or registered trademarks of standard analog audio cables per HDMI device −− For proper operation, it is designed to operate other devices, see Chapter 3. 16 To connect ...

Owners Manual
Page 17
For details, see pages 51. However, Toshiba is recommended that are connected, REGZA-LINK feature may not operate properly. • For proper operation, it is not liable for those operations. TV back panel Audio receiver Playback device (REGZA-LINK HD DVD player,etc.) Playback...Logo ( ). Before controlling the device(s): • After completing the above connections, set . Refer to models incorporating Toshiba's REGZA-LINK. For an explanation of connected audio/video devices using the TV's remote control if you desire ( page 51). • The connected devices ...
For details, see pages 51. However, Toshiba is recommended that are connected, REGZA-LINK feature may not operate properly. • For proper operation, it is not liable for those operations. TV back panel Audio receiver Playback device (REGZA-LINK HD DVD player,etc.) Playback...Logo ( ). Before controlling the device(s): • After completing the above connections, set . Refer to models incorporating Toshiba's REGZA-LINK. For an explanation of connected audio/video devices using the TV's remote control if you desire ( page 51). • The connected devices ...
Owners Manual
Page 18
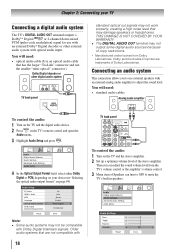
... Press on the TV's remote control and open the Audio menu. 3無 Highlight Audio Setup and press . Older audio systems that may not be compatible with Dolby Digital bitstream signals. Audio Digital Audio Selector Audio Settings Advanced Audio Settings Audio Setup 4無 In the Optical Output Format field, select...2-channel down-mixed PCM (pulse-code modulation) signal for use external speakers with an external analog audio amplifier to adjust the sound level. Connecting an audio system This connection allows you can adjust the sound volume level from the TV's volume control or...
... Press on the TV's remote control and open the Audio menu. 3無 Highlight Audio Setup and press . Older audio systems that may not be compatible with Dolby Digital bitstream signals. Audio Digital Audio Selector Audio Settings Advanced Audio Settings Audio Setup 4無 In the Optical Output Format field, select...2-channel down-mixed PCM (pulse-code modulation) signal for use external speakers with an external analog audio amplifier to adjust the sound level. Connecting an audio system This connection allows you can adjust the sound volume level from the TV's volume control or...
Owners Manual
Page 19
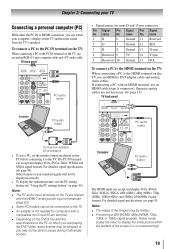
... SCL To connect a PC to the HDMI terminal on the TV: When connecting a PC to DVI adapter cable and analog audio cables. TV back panel Computer PC audio output PC audio cable Conversion adapter (if necessary) • To use the PC setting feature ( "Using the PC settings feature" on...49). no overscanning). 19 Chapter 2: Connecting your computer's display on the TV and hear the sound from the TV's speakers. TV back panel PC audio cable • Signal names for computers with an HDMI terminal, use an HDMI cable (type A connector). The PC IN terminal can accept and ...
... SCL To connect a PC to the HDMI terminal on the TV: When connecting a PC to DVI adapter cable and analog audio cables. TV back panel Computer PC audio output PC audio cable Conversion adapter (if necessary) • To use the PC setting feature ( "Using the PC settings feature" on...49). no overscanning). 19 Chapter 2: Connecting your computer's display on the TV and hear the sound from the TV's speakers. TV back panel PC audio cable • Signal names for computers with an HDMI terminal, use an HDMI cable (type A connector). The PC IN terminal can accept and ...
Owners Manual
Page 24
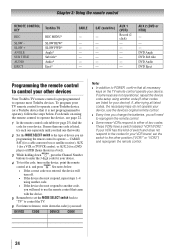
... to operate), follow the steps below . • If the correct code was entered, the device will need to operate a non-Toshiba device (or a Toshiba device that all listed codes, the necessary keys do not operate your device). See notes below . If, after trying all necessary keys... CODE Note: •• In addition to POWER, confirm that it , and press . SLOW + ANGLE SUB TITLE AUDIO EJECT Toshiba TV REC MENU* SLOW REW* SLOW FWD* Angle* Sub title* Audio* Eject* CABLE --- Chapter 3: Using the remote control REMOTE CONTROL KEY REC SLOW - These VCRs have a switch labeled ...
... to operate), follow the steps below . • If the correct code was entered, the device will need to operate a non-Toshiba device (or a Toshiba device that all listed codes, the necessary keys do not operate your device). See notes below . If, after trying all necessary keys... CODE Note: •• In addition to POWER, confirm that it , and press . SLOW + ANGLE SUB TITLE AUDIO EJECT Toshiba TV REC MENU* SLOW REW* SLOW FWD* Angle* Sub title* Audio* Eject* CABLE --- Chapter 3: Using the remote control REMOTE CONTROL KEY REC SLOW - These VCRs have a switch labeled ...
Owners Manual
Page 27
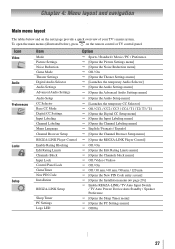
... Locks Setup Item Mode Picture Settings Noise Reduction Game Mode Theater Settings Digital Audio Selector Audio Settings Advanced Audio Settings Audio Setup CC Selector Base CC Mode Digital CC Settings Input Labeling Channel Labeling Menu Language Channel ...Noise Reduction menu] Off / On [Opens the Theater Settings menu] [Launches the temporary Audio Selector] [Opens the Audio Settings menu] [Opens the Advanced Audio Settings menu] [Opens the Audio Setup menu] [Launches the temporary CC Selector] Off / CC1 / CC2 / CC3 / CC4...
... Locks Setup Item Mode Picture Settings Noise Reduction Game Mode Theater Settings Digital Audio Selector Audio Settings Advanced Audio Settings Audio Setup CC Selector Base CC Mode Digital CC Settings Input Labeling Channel Labeling Menu Language Channel ...Noise Reduction menu] Off / On [Opens the Theater Settings menu] [Launches the temporary Audio Selector] [Opens the Audio Settings menu] [Opens the Advanced Audio Settings menu] [Opens the Audio Setup menu] [Launches the temporary CC Selector] Off / CC1 / CC2 / CC3 / CC4...

Owners Manual
Page 32
...5 until you want to label. 3無 Press pqu to assign. Analog When viewing the HDMI 1 input, analog audio from the PC Audio input will automatically detect and output analog audio from the HDMI input is the recommended mode.) See "Connecting an HDMI or DVI device to the HDMI input" ...highlight Done and press . Highlight the new custom label and press to highlight Custom and press . Digital When viewing the HDMI 1 input, digital audio from the deletion confirmation window and press . 4無 Highlight Done and press to save your TV To create and assign a custom label: 1&#...
...5 until you want to label. 3無 Press pqu to assign. Analog When viewing the HDMI 1 input, analog audio from the PC Audio input will automatically detect and output analog audio from the HDMI input is the recommended mode.) See "Connecting an HDMI or DVI device to the HDMI input" ...highlight Done and press . Highlight the new custom label and press to highlight Custom and press . Digital When viewing the HDMI 1 input, digital audio from the deletion confirmation window and press . 4無 Highlight Done and press to save your TV To create and assign a custom label: 1&#...

Owners Manual
Page 34
...to highlight HDMI 1, HDMI 2, or HDMI 3. The current signal source displays in the top right corner of labels: • - - (default label) • Audio Receiver • Cable • Compact Disc • DTV • DVD • Game Console • HDMI Switch (HDMI inputs only) • Laser Disc ... input source, and then press . Press repeatedly to actually select a particular device from the following preset list of the Input Selection screen. Audio Receiver) is connected to the HDMI input: Press on the remote control or TV control panel. 2無 And then either: a) Press ...
...to highlight HDMI 1, HDMI 2, or HDMI 3. The current signal source displays in the top right corner of labels: • - - (default label) • Audio Receiver • Cable • Compact Disc • DTV • DVD • Game Console • HDMI Switch (HDMI inputs only) • Laser Disc ... input source, and then press . Press repeatedly to actually select a particular device from the following preset list of the Input Selection screen. Audio Receiver) is connected to the HDMI input: Press on the remote control or TV control panel. 2無 And then either: a) Press ...
Owners Manual
Page 43
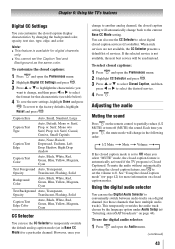
...61483; page 42) for more information on a digital channel (for that have multiple audio tracks). Using the digital audio selector You can use the Digital Audio Selector to conveniently switch between audio tracks on closed caption modes. When such services are not available, the CC Selector presents..., Solid Caption Text Edge Color Auto, Black, White, Red, Green, Blue, Yellow, Magenta, Cyan CC Selector You can also use the digital audio selector: 1無 Press and open the Preferences menu. 2無 Highlight CC Selector and press . 3無 Press or to...
...61483; page 42) for more information on a digital channel (for that have multiple audio tracks). Using the digital audio selector You can use the Digital Audio Selector to conveniently switch between audio tracks on closed caption modes. When such services are not available, the CC Selector presents..., Solid Caption Text Edge Color Auto, Black, White, Red, Green, Blue, Yellow, Magenta, Cyan CC Selector You can also use the digital audio selector: 1無 Press and open the Preferences menu. 2無 Highlight CC Selector and press . 3無 Press or to...

Owners Manual
Page 44
...the current program on the screen but hear the other audio information (when provided by adjusting the bass, treble, and balance. Audio Digital Audio Selector Audio Settings Advanced Audio Settings Audio Setup 3無 Press or to select Audio, and then press or to the... sound being broadcast (stereo or monaural). ••If the stereo sound is not broadcasting a second audio program, the station's normal audio will see "Connecting a digital audio system" on the item selected). 5無 To save the new settings, highlight Done and press . ...
...the current program on the screen but hear the other audio information (when provided by adjusting the bass, treble, and balance. Audio Digital Audio Selector Audio Settings Advanced Audio Settings Audio Setup 3無 Press or to select Audio, and then press or to the... sound being broadcast (stereo or monaural). ••If the stereo sound is not broadcasting a second audio program, the station's normal audio will see "Connecting a digital audio system" on the item selected). 5無 To save the new settings, highlight Done and press . ...

Owners Manual
Page 45
... the ATSC dynamic range to be further compressed, allowing you can use the Dolby Digital Dynamic Range Control: 1無 Press and open the Audio menu. 2無 Highlight Audio Setup and press . 3無 In the Dolby Digital Dynamic Range Control field, select Compressed. When Standard is selected, the... audio is displayed, press four times within five seconds. Using the Locks menu The Locks menu includes the Enable Rating Blocking, Edit Rating Limits, Channels...
... the ATSC dynamic range to be further compressed, allowing you can use the Dolby Digital Dynamic Range Control: 1無 Press and open the Audio menu. 2無 Highlight Audio Setup and press . 3無 In the Dolby Digital Dynamic Range Control field, select Compressed. When Standard is selected, the... audio is displayed, press four times within five seconds. Using the Locks menu The Locks menu includes the Enable Rating Blocking, Edit Rating Limits, Channels...

Owners Manual
Page 50
... reduce noise and minimize periodic vertical stripes on the sleep timer. If PC Audio is set to "Yes," the HDMI 1 Audio setting is set to "Digital" and is within ±10 from center.* Highlight this item then press to control Toshiba REGZA-LINK compatible devices from your TV's remote control, or using the...
... reduce noise and minimize periodic vertical stripes on the sleep timer. If PC Audio is set to "Yes," the HDMI 1 Audio setting is set to "Digital" and is within ±10 from center.* Highlight this item then press to control Toshiba REGZA-LINK compatible devices from your TV's remote control, or using the...
Owners Manual
Page 51
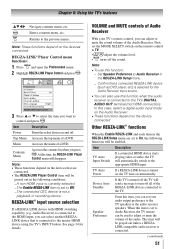
...functions depend on the remote control to the previous menu. Item Description TV Auto Input Switch If a connected HDMI device starts playing video or audio, the TV will send a message to turn off the TV will automatically switch to the TV. Device Auto Standby If the TV is ... you press . Chapter 6: Using the TV's features pqtu Navigate contents menu, etc. At this item, you can be grayed out unless a REGZALINK compatible audio receiver is set to On, the following conditions: −−A non-HDMI input is currently selected. −−The Enable REGZA-LINK item is not...
...functions depend on the remote control to the previous menu. Item Description TV Auto Input Switch If a connected HDMI device starts playing video or audio, the TV will send a message to turn off the TV will automatically switch to the TV. Device Auto Standby If the TV is ... you press . Chapter 6: Using the TV's features pqtu Navigate contents menu, etc. At this item, you can be grayed out unless a REGZALINK compatible audio receiver is set to On, the following conditions: −−A non-HDMI input is currently selected. −−The Enable REGZA-LINK item is not...


