Owner's Manual - English
Page 6
...Dolby Laboratories. • HDMI, the HDMI logo and High-Definition Multimedia Interface are designed to the following two conditions: (1) this device may not cause harmful interference, and (2) this TV. FCC Declaration of Conformity Compliance Statement (Part 15): The Toshiba 32RV530U, 37RV530U, 42RV530U, ... involve shooting a "gun" type of malfunction, and is not responsible for help. Trademark Information • Manufactured under your LCD TV The following measures: • Reorient or relocate the receiving antenna. • Increase the separation between the equipment and the ...
...Dolby Laboratories. • HDMI, the HDMI logo and High-Definition Multimedia Interface are designed to the following two conditions: (1) this device may not cause harmful interference, and (2) this TV. FCC Declaration of Conformity Compliance Statement (Part 15): The Toshiba 32RV530U, 37RV530U, 42RV530U, ... involve shooting a "gun" type of malfunction, and is not responsible for help. Trademark Information • Manufactured under your LCD TV The following measures: • Reorient or relocate the receiving antenna. • Increase the separation between the equipment and the ...
Owner's Manual - English
Page 7
... for the ANT/CABLE terminal 29 Programming channels into the TV's channel memory . . . . 30 Programming channels automatically 30 Manually adding and deleting channels in the channel memory 30 Labeling channels 31 Setting the HDMI™ audio mode 32 Viewing the digital signal meter 33 Setting the time zone... 33 Viewing the system status 34 Selecting the Power-On Mode 34 Chapter 6: Using the TV's features 35 Selecting the video input source to ...
... for the ANT/CABLE terminal 29 Programming channels into the TV's channel memory . . . . 30 Programming channels automatically 30 Manually adding and deleting channels in the channel memory 30 Labeling channels 31 Setting the HDMI™ audio mode 32 Viewing the digital signal meter 33 Setting the time zone... 33 Viewing the system status 34 Selecting the Power-On Mode 34 Chapter 6: Using the TV's features 35 Selecting the video input source to ...
Owner's Manual - English
Page 8
Chapter 7: Using the TV's advanced features 55 Using the advanced picture settings features 55 Using dynamic contrast 55 Using the static gamma feature 55 Selecting the color temperature 56 ... surround sound features 58 Chapter 8: Troubleshooting 59 General troubleshooting 59 LED indications 61 Chapter 9: Appendix 62 Specifications 62 Acceptable signal formats for PC IN and HDMI terminals 63 Limited United States Warranty for LCD Televisions 26" and Larger 64 Limited Canadian Warranty for Toshiba Brand Flat Panel Televisions 65 Index 68 8
Chapter 7: Using the TV's advanced features 55 Using the advanced picture settings features 55 Using dynamic contrast 55 Using the static gamma feature 55 Selecting the color temperature 56 ... surround sound features 58 Chapter 8: Troubleshooting 59 General troubleshooting 59 LED indications 61 Chapter 9: Appendix 62 Specifications 62 Acceptable signal formats for PC IN and HDMI terminals 63 Limited United States Warranty for LCD Televisions 26" and Larger 64 Limited Canadian Warranty for Toshiba Brand Flat Panel Televisions 65 Index 68 8

Owner's Manual - English
Page 9
...up, and using your new TV Follow these steps to the TV, learn the functions of your new Toshiba widescreen, integrated HD, LCD TV: • Integrated digital tuning (8VSB ATSC and QAM) eliminates the need for a separate digital converter set up your TV and begin using its many ... 2-5) 2 Do not plug in most cases). • 1080p output resolution. • Four HDMI™ digital, high-definition multimedia interfaces with 1080p input support (- Chapter 1: Introduction Features of your new TV The following are just a few of the many exciting features. 1 Observe the following when choosing...
...up, and using your new TV Follow these steps to the TV, learn the functions of your new Toshiba widescreen, integrated HD, LCD TV: • Integrated digital tuning (8VSB ATSC and QAM) eliminates the need for a separate digital converter set up your TV and begin using its many ... 2-5) 2 Do not plug in most cases). • 1080p output resolution. • Four HDMI™ digital, high-definition multimedia interfaces with 1080p input support (- Chapter 1: Introduction Features of your new TV The following are just a few of the many exciting features. 1 Observe the following when choosing...

Owner's Manual - English
Page 10
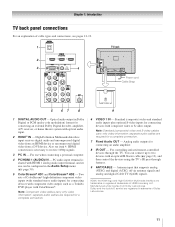
... is on -screen, these buttons function as "VIDEO 2" and include standard A/V connections. 4 POWER - TV front Right side panel 4 8 5 9 6 7 10 3 11 1 2 1 Remote sensor - The side panel A/V connections are viewing (ANT/CABLE, VIDEO 1, VIDEO 2, ColorStream HD1, ColorStream HD2, HDMI 1, HDMI 2, HDMI 3, HDMI 4, PC). 11 HDMI™ IN - Effective range: 16.4 ft (5m) 2 Green and Yellow LEDs Green = Power...
... is on -screen, these buttons function as "VIDEO 2" and include standard A/V connections. 4 POWER - TV front Right side panel 4 8 5 9 6 7 10 3 11 1 2 1 Remote sensor - The side panel A/V connections are viewing (ANT/CABLE, VIDEO 1, VIDEO 2, ColorStream HD1, ColorStream HD2, HDMI 1, HDMI 2, HDMI 3, HDMI 4, PC). 11 HDMI™ IN - Effective range: 16.4 ft (5m) 2 Green and Yellow LEDs Green = Power...
Owner's Manual - English
Page 11
...1 IN - Dolby and the double-D symbol are required for connecting devices with component video output, such as a Toshiba DVD player with composite video or S-video output. Also see pages 12-19. 1 TV back 2 3 4 Power cord Cable Strap 5 67 8 9 1 DIGITAL AUDIO OUT - page 50). 5 ...inputs for connecting an external Dolby Digital decoder, amplifier, A/V receiver, or home theater system with HDMI 1 analog audio input terminal, and its use when connecting a personal computer. 4 PC/HDMI 1 (AUDIO) IN - Note: Standard (composite) video and S-video cables carry only video information...
...1 IN - Dolby and the double-D symbol are required for connecting devices with component video output, such as a Toshiba DVD player with composite video or S-video output. Also see pages 12-19. 1 TV back 2 3 4 Power cord Cable Strap 5 67 8 9 1 DIGITAL AUDIO OUT - page 50). 5 ...inputs for connecting an external Dolby Digital decoder, amplifier, A/V receiver, or home theater system with HDMI 1 analog audio input terminal, and its use when connecting a personal computer. 4 PC/HDMI 1 (AUDIO) IN - Note: Standard (composite) video and S-video cables carry only video information...
Owner's Manual - English
Page 12
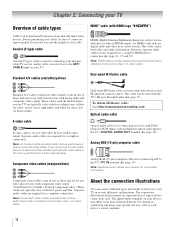
...connection. Separate audio cables are required for connecting receivers with an HDMI output. To obtain IR blaster cable: Visit http://ceaccessories.toshiba.com/ Optical audio cable Optical audio cable is for connecting your antenna, cable TV service, and/or cable converter box to the ANT/ CABLE...be sure of three and are typically color-coded according to the TV's DIGITAL AUDIO OUT terminal (- Note: HDMI cable provides better picture performance than a standard (composite) video or S-video cable. An HDMI cable delivers digital audio and video in sets of connector types ...
...connection. Separate audio cables are required for connecting receivers with an HDMI output. To obtain IR blaster cable: Visit http://ceaccessories.toshiba.com/ Optical audio cable Optical audio cable is for connecting your antenna, cable TV service, and/or cable converter box to the ANT/ CABLE...be sure of three and are typically color-coded according to the TV's DIGITAL AUDIO OUT terminal (- Note: HDMI cable provides better picture performance than a standard (composite) video or S-video cable. An HDMI cable delivers digital audio and video in sets of connector types ...
Owner's Manual - English
Page 14
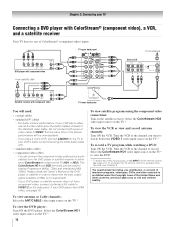
...cables • component video cables - Select the VIDEO 1 video input source on the TV.* To view the VCR or view and record antenna channels: Turn ON the VCR. For better picture performance, if your DVD player has HDMI video, see Chapter 3. page 21). If you have component video, connect a standard ...A/V cable to view the DVD. * To select the video input source, press INPUT on the TV.* To view the DVD player: Turn ON the DVD player....
...cables • component video cables - Select the VIDEO 1 video input source on the TV.* To view the VCR or view and record antenna channels: Turn ON the VCR. For better picture performance, if your DVD player has HDMI video, see Chapter 3. page 21). If you have component video, connect a standard ...A/V cable to view the DVD. * To select the video input source, press INPUT on the TV.* To view the DVD player: Turn ON the DVD player....

Owner's Manual - English
Page 16
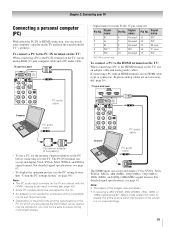
.... page 21). Supported Audio format: Linear PCM, sampling rate 32/44.1/ 48 kHz Note: To connect a PC to -DVI adapter cable transfers video only. Separate analog audio cables are required (see illustration). - To connect an HDMI device, you use an HDMI cable with the TV. For proper operation, it is recommended that some devices...
.... page 21). Supported Audio format: Linear PCM, sampling rate 32/44.1/ 48 kHz Note: To connect a PC to -DVI adapter cable transfers video only. Separate analog audio cables are required (see illustration). - To connect an HDMI device, you use an HDMI cable with the TV. For proper operation, it is recommended that some devices...
Owner's Manual - English
Page 17
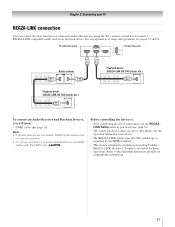
...connected devices must also be set the REGZALINK Setup menu as regulated by the HDMI standard. • This feature is limited to the individual instruction manuals for those operations. Refer to models incorporating Toshiba's REGZA-LINK. page 16) Note: • If several devices are ...For details, see pages 51 and 52. However, Toshiba is not liable for compatibility information. 17 For an explanation of connected audio/video devices using the TV's remote control if you desire (- Chapter 2: Connecting your TV REGZA-LINK connection You can control the basic functions...
...connected devices must also be set the REGZALINK Setup menu as regulated by the HDMI standard. • This feature is limited to the individual instruction manuals for those operations. Refer to models incorporating Toshiba's REGZA-LINK. page 16) Note: • If several devices are ...For details, see pages 51 and 52. However, Toshiba is not liable for compatibility information. 17 For an explanation of connected audio/video devices using the TV's remote control if you desire (- Chapter 2: Connecting your TV REGZA-LINK connection You can control the basic functions...

Owner's Manual - English
Page 18
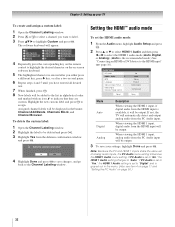
... the Optical Output Format field, select either Dolby Digital or PCM, depending on the TV and the stereo amplifier. 2 Minimize the sound volume from Dolby Laboratories. Audio Setup PC Audio HDMI 1 Audio MTS Language Optical Output Format Dolby Digital Dynamic Range Control Reset No Auto... Stereo English Dolby Digital Compressed Done To control the audio: 1 Turn on your TV Connecting a digital audio system The TV's DIGITAL AUDIO OUT terminal outputs a ...
... the Optical Output Format field, select either Dolby Digital or PCM, depending on the TV and the stereo amplifier. 2 Minimize the sound volume from Dolby Laboratories. Audio Setup PC Audio HDMI 1 Audio MTS Language Optical Output Format Dolby Digital Dynamic Range Control Reset No Auto... Stereo English Dolby Digital Compressed Done To control the audio: 1 Turn on your TV Connecting a digital audio system The TV's DIGITAL AUDIO OUT terminal outputs a ...
Owner's Manual - English
Page 19
...Signal name 11 NC 12 NC 13 H-sync 14 V-sync 15 NC *NC=Not connected To connect a PC to the HDMI terminal on the TV: When connecting a PC to the PC IN terminal on the TV, use an analog RGB (15-pin) computer cable and a PC audio cable. Separate analog cables are playing the... you are not necessary (- To connect a PC to the PC IN terminal on the TV: When connecting a PC to the HDMI terminal on the TV, use a PC, set the monitor output resolution on the TV and hear the sound from the TV's speakers. For detailed signal specifications, see page 63. • To display the optimum...
...Signal name 11 NC 12 NC 13 H-sync 14 V-sync 15 NC *NC=Not connected To connect a PC to the HDMI terminal on the TV: When connecting a PC to the PC IN terminal on the TV, use an analog RGB (15-pin) computer cable and a PC audio cable. Separate analog cables are playing the... you are not necessary (- To connect a PC to the PC IN terminal on the TV: When connecting a PC to the HDMI terminal on the TV, use a PC, set the monitor output resolution on the TV and hear the sound from the TV's speakers. For detailed signal specifications, see page 63. • To display the optimum...
Owner's Manual - English
Page 27
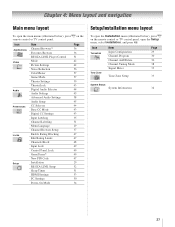
... Setup Enable Rating Blocking Edit Rating Limits Channels Block Input Lock Control Panel Lock GameTimer® New PIN Code Installation REGZA-LINK Setup Sleep Timer HDMI Settings PC Settings Power-On Mode Page 36 36 51 42 42 56 57 57 39 43 44 45 58 45 44 43 43 35... 49 47 29 52 51 53 50 34 Setup/Installation menu layout To open the Installation menu (illustrated below), press Y on the remote control or TV control panel, open the main menus (illustrated below), press Y on the remote control or...
... Setup Enable Rating Blocking Edit Rating Limits Channels Block Input Lock Control Panel Lock GameTimer® New PIN Code Installation REGZA-LINK Setup Sleep Timer HDMI Settings PC Settings Power-On Mode Page 36 36 51 42 42 56 57 57 39 43 44 45 58 45 44 43 43 35... 49 47 29 52 51 53 50 34 Setup/Installation menu layout To open the Installation menu (illustrated below), press Y on the remote control or TV control panel, open the main menus (illustrated below), press Y on the remote control or...

Owner's Manual - English
Page 29
... the menu language You can choose from three different languages (English, French and Spanish) for the on the TV. Preferences CC Selector Base CC Mode Digital CC Settings Input Labeling Channel Labeling Menu Language Channel Browser Setup Off English English Français Espa&#... of Installation menu icons will appear, as shown below.) Open the Terrestrial menu, highlight Input Configuration, and press T. Setup Installation REGZA-LINK Setup Sleep Timer HDMI Settings PC Settings Power-On Mode Power-Saving 3 (A new set of menus and messages.
... the menu language You can choose from three different languages (English, French and Spanish) for the on the TV. Preferences CC Selector Base CC Mode Digital CC Settings Input Labeling Channel Labeling Menu Language Channel Browser Setup Off English English Français Espa&#... of Installation menu icons will appear, as shown below.) Open the Terrestrial menu, highlight Input Configuration, and press T. Setup Installation REGZA-LINK Setup Sleep Timer HDMI Settings PC Settings Power-On Mode Power-Saving 3 (A new set of menus and messages.
Owner's Manual - English
Page 32
...key on the remote control to highlight the desired character on the on page 50.) 32 The software keyboard will be output. Digital When viewing the HDMI 1 input, digital audio from the HDMI input will automatically detect and output analog audio from the deletion confirmation window and press ... new custom label and press T to the Channel Labeling window. Delete the selected custom label? No Yes 4 Highlight Done and press T to save your TV To create and assign a custom label: 1 Open the Channel Labeling window. 2 Press < or , to select a channel you have entered all desired ...
...key on the remote control to highlight the desired character on the on page 50.) 32 The software keyboard will be output. Digital When viewing the HDMI 1 input, digital audio from the HDMI input will automatically detect and output analog audio from the deletion confirmation window and press ... new custom label and press T to the Channel Labeling window. Delete the selected custom label? No Yes 4 Highlight Done and press T to save your TV To create and assign a custom label: 1 Open the Channel Labeling window. 2 Press < or , to select a channel you have entered all desired ...
Owner's Manual - English
Page 35
... in video input mode. • If a CEC device is connected to the HDMI input: Press + on the remote or TV control panel repeatedly to the TV (- Preferences CC Selector Base CC Mode Digital CC Settings Input Labeling Channel Labeling Menu... control or TV control panel. 2 And then either: a) Press 0-9; Input Selection 0 ANT/CABLE 1 Video 1 2 Video 2 3 ColorStream HD1 4 ColorStream HD2 5 HDMI 1 REGZA-LINK 6 HDMI 2 7 HDMI 3 8 HDMI 4 9 PC ANT/CABLE 0 - 9 / INPUT to an HDMI input, the REGZALINK icon will have connected to highlight HDMI 1, HDMI 2, HDMI 3, or HDMI 4. Audio Receiver...
... in video input mode. • If a CEC device is connected to the HDMI input: Press + on the remote or TV control panel repeatedly to the TV (- Preferences CC Selector Base CC Mode Digital CC Settings Input Labeling Channel Labeling Menu... control or TV control panel. 2 And then either: a) Press 0-9; Input Selection 0 ANT/CABLE 1 Video 1 2 Video 2 3 ColorStream HD1 4 ColorStream HD2 5 HDMI 1 REGZA-LINK 6 HDMI 2 7 HDMI 3 8 HDMI 4 9 PC ANT/CABLE 0 - 9 / INPUT to an HDMI input, the REGZALINK icon will have connected to highlight HDMI 1, HDMI 2, HDMI 3, or HDMI 4. Audio Receiver...

Owner's Manual - English
Page 36
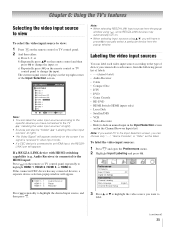
...for all of your inputs. • Keep a list of your favorite channels (see "Favorites Browser," below). • Keep a history of the last 32 channels or inputs viewed. • Quickly surf and tune your channels and inputs. Input labeling example: The screen below right is pressed. Note: Additions ...Input Selection screen with none of how you could label the inputs if you connected a VCR to VIDEO 1, Cable TV to VIDEO 2, a video recorder to ColorStream HD1, a DTV settop box to HDMI 1, a satellite/DSS set up a favorite channels/inputs list that is not used, you can select Hide as a...
...for all of your inputs. • Keep a list of your favorite channels (see "Favorites Browser," below). • Keep a history of the last 32 channels or inputs viewed. • Quickly surf and tune your channels and inputs. Input labeling example: The screen below right is pressed. Note: Additions ...Input Selection screen with none of how you could label the inputs if you connected a VCR to VIDEO 1, Cable TV to VIDEO 2, a video recorder to ColorStream HD1, a DTV settop box to HDMI 1, a satellite/DSS set up a favorite channels/inputs list that is not used, you can select Hide as a...
Owner's Manual - English
Page 40
... only) • If receiving a squeezed 4:3 format program, the picture is hidden. page 41). 40 Natural Picture Size Chapter 6: Using the TV's features Picture Size 4:3 HD (for 720p, 1080i, and 1080p program sources only) Some program formats will display with sidebars and/or bars at...its original proportion, but not stretched taller. • None of the picture may be hidden, displayed in black, or noisy. TheaterWide 2 (for 480i (HDMI), 480p (HDMI), 720p, 1080i, and 1080p signal programs) The center of the picture may be hidden*. Native (for letter box programs) A B C D E ...
... only) • If receiving a squeezed 4:3 format program, the picture is hidden. page 41). 40 Natural Picture Size Chapter 6: Using the TV's features Picture Size 4:3 HD (for 720p, 1080i, and 1080p program sources only) Some program formats will display with sidebars and/or bars at...its original proportion, but not stretched taller. • None of the picture may be hidden, displayed in black, or noisy. TheaterWide 2 (for 480i (HDMI), 480p (HDMI), 720p, 1080i, and 1080p signal programs) The center of the picture may be hidden*. Native (for letter box programs) A B C D E ...
Owner's Manual - English
Page 41
...). 4 Press b to highlight the Picture Scroll field. 5 Press C or c to scroll the picture up and down as needed, from the HDMI 1/2/3/4 input Aspect ratio of Automatic aspect size (automatically signal source selected when Auto Aspect is not applicable to +20. 6 To save the new ... (with sidebars) 4:3 letter box TheaterWide 2 16:9 full Full Not defined (no ID-1 data or HDMI aspect data) The current picture size you cannot scroll in step 2 above. 41 Chapter 6: Using the TV's features Scrolling the TheaterWide® picture (TheaterWide 2 and 3 only) You can set separate scroll settings...
...). 4 Press b to highlight the Picture Scroll field. 5 Press C or c to scroll the picture up and down as needed, from the HDMI 1/2/3/4 input Aspect ratio of Automatic aspect size (automatically signal source selected when Auto Aspect is not applicable to +20. 6 To save the new ... (with sidebars) 4:3 letter box TheaterWide 2 16:9 full Full Not defined (no ID-1 data or HDMI aspect data) The current picture size you cannot scroll in step 2 above. 41 Chapter 6: Using the TV's features Scrolling the TheaterWide® picture (TheaterWide 2 and 3 only) You can set separate scroll settings...
Owner's Manual - English
Page 42
... States and other countries, and may be set the Cinema Mode to the moving picture. Note: If the TV is left in video mode and no signal is available for HDMI and PC inputs only (grayed out for more than your desired picture settings from a DVD player connected to... the Video 1, Video 2, ColorStream HD1, ColorStream HD2 (component video), or HDMI inputs on the TV, smoother motion can be released and the TV will automatically be obtained by setting the Cinema Mode to Film. Note: The picture mode you to your personal preferences...
... States and other countries, and may be set the Cinema Mode to the moving picture. Note: If the TV is left in video mode and no signal is available for HDMI and PC inputs only (grayed out for more than your desired picture settings from a DVD player connected to... the Video 1, Video 2, ColorStream HD1, ColorStream HD2 (component video), or HDMI inputs on the TV, smoother motion can be released and the TV will automatically be obtained by setting the Cinema Mode to Film. Note: The picture mode you to your personal preferences...


