Owners Manual
Page 4
...in item 29 on this product can accidentally touch overhead power lines. Gently wipe the display panel surface (the monitor screen) using a dry, soft cloth only (cotton, flannel, etc.). If these recommendations...or any item you need to clean the LCD screen, follow these sounds become frequent or continuous, unplug the power cord and contact a Toshiba Authorized Service Center. 34) WARNING: RISK ... routine safety checks to determine that the monitor is 32 ºF (0 ºC) or below, the picture brightness may vary until the LCD warms up static charges (see Section 810 of the...
...in item 29 on this product can accidentally touch overhead power lines. Gently wipe the display panel surface (the monitor screen) using a dry, soft cloth only (cotton, flannel, etc.). If these recommendations...or any item you need to clean the LCD screen, follow these sounds become frequent or continuous, unplug the power cord and contact a Toshiba Authorized Service Center. 34) WARNING: RISK ... routine safety checks to determine that the monitor is 32 ºF (0 ºC) or below, the picture brightness may vary until the LCD warms up static charges (see Section 810 of the...
Owners Manual
Page 5
...time. 2) The LCD panel contained in this manual are designed to provide reasonable protection against harmful interference in accordance with the instructions, may not work with Part 15 of the FCC rules. FCC Compliance Statement (Part 15): The Toshiba 26HLC56, 32HLC56, and 37HLC56 LCD Color Monitors comply...approved by one of the most innovative LCD monitors on the market. Operation is subject to the following two conditions: (1) this device may appear on the screen if a fixed, non-moving image is displayed for help. therefore, Toshiba is not responsible for perceived issues ...
...time. 2) The LCD panel contained in this manual are designed to provide reasonable protection against harmful interference in accordance with the instructions, may not work with Part 15 of the FCC rules. FCC Compliance Statement (Part 15): The Toshiba 26HLC56, 32HLC56, and 37HLC56 LCD Color Monitors comply...approved by one of the most innovative LCD monitors on the market. Operation is subject to the following two conditions: (1) this device may appear on the screen if a fixed, non-moving image is displayed for help. therefore, Toshiba is not responsible for perceived issues ...
Owners Manual
Page 6
... setting up, and using your new monitor 7 Front and side panel controls and connections 8 Back panel connections 9 Chapter 2: Connecting your Monitor 10 Overview of cable types... 28 Using the blue screen function 28 Selecting the gray level for 4:3 mode side panels 28 Selecting the cinema mode... the color temperature 31 Using the closed caption mode 32 Closed Caption Reception Adjustment 32 Adjusting the audio 33 Muting the sound 33 Adjusting the... sleep timer 38 Setting the On timer 39 Displaying the monitor's settings on-screen using RECALL 39 Understanding the last mode memory...
... setting up, and using your new monitor 7 Front and side panel controls and connections 8 Back panel connections 9 Chapter 2: Connecting your Monitor 10 Overview of cable types... 28 Using the blue screen function 28 Selecting the gray level for 4:3 mode side panels 28 Selecting the cinema mode... the color temperature 31 Using the closed caption mode 32 Closed Caption Reception Adjustment 32 Adjusting the audio 33 Muting the sound 33 Adjusting the... sleep timer 38 Setting the On timer 39 Displaying the monitor's settings on-screen using RECALL 39 Understanding the last mode memory...
Owners Manual
Page 7
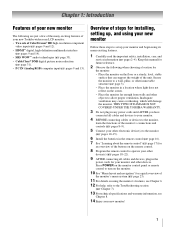
... (- page 3). • Place the monitor in a location where light does not reflect on the screen. • Place the monitor far enough from walls and other objects to a wall, pillar, or...installing, setting up your monitor and begin using its many exciting features of your new Toshiba widescreen LCD monitor: • Two sets of ColorStream® HD high-resolution component video inputs (-...pages 9 and 14). • SRS WOW™ audio technologies (- Press POWER on the monitor control panel or remote control to turn on the monitor. 10 See "Menu layout and navigation" for your monitor...
... (- page 3). • Place the monitor in a location where light does not reflect on the screen. • Place the monitor far enough from walls and other objects to a wall, pillar, or...installing, setting up your monitor and begin using its many exciting features of your new Toshiba widescreen LCD monitor: • Two sets of ColorStream® HD high-resolution component video inputs (-...pages 9 and 14). • SRS WOW™ audio technologies (- Press POWER on the monitor control panel or remote control to turn on the monitor. 10 See "Menu layout and navigation" for your monitor...
Owners Manual
Page 8
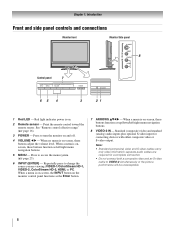
Red light indicates power is on the monitor control panel functions as the Enter button. 7 ARROWS BbC c - When a menu is on-screen, these buttons function as left /right menu navigation buttons. 8 VIDEO-2 IN - When a menu is on-screen, the INPUT button on . 2 Remote sensor - Note: •...; Standard (composite) video and S-video cables carry only video information; page 16). 3 POWER - Press to turn the monitor on -screen, these buttons function as up/down/left /right menu navigation buttons. 5 MENU - Point the remote control toward the remote sensor. When no menu...
Red light indicates power is on the monitor control panel functions as the Enter button. 7 ARROWS BbC c - When a menu is on-screen, these buttons function as left /right menu navigation buttons. 8 VIDEO-2 IN - When a menu is on-screen, the INPUT button on . 2 Remote sensor - Note: •...; Standard (composite) video and S-video cables carry only video information; page 16). 3 POWER - Press to turn the monitor on -screen, these buttons function as up/down/left /right menu navigation buttons. 5 MENU - Point the remote control toward the remote sensor. When no menu...
Owners Manual
Page 15
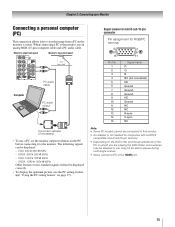
...: 800 5 600 @ 60Hz - The following signals can be displayed correctly. • To display the optimum picture, use the PC setting feature (- "Using the PC setting feature" on page 37). Monitor's upper back panel Monitor's lower back panel Computer PC audio cable PC audio output Conversion adapter (if necessary)... audio cable. SXGA: 1280 5 1024 @ 60Hz Other formats or non-standard signals will not be displayed: - Chapter 2: Connecting your Monitor Connecting a personal computer (PC) This connection allows you may be skipped or you to view the image from a PC on the monitor's screen.
...: 800 5 600 @ 60Hz - The following signals can be displayed correctly. • To display the optimum picture, use the PC setting feature (- "Using the PC setting feature" on page 37). Monitor's upper back panel Monitor's lower back panel Computer PC audio cable PC audio output Conversion adapter (if necessary)... audio cable. SXGA: 1280 5 1024 @ 60Hz Other formats or non-standard signals will not be displayed: - Chapter 2: Connecting your Monitor Connecting a personal computer (PC) This connection allows you may be skipped or you to view the image from a PC on the monitor's screen.
Owners Manual
Page 17
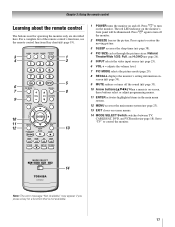
...the video input source (- adjusts the volume level. 7 PIC MODE selects the picture mode (page 29). 8 RECALL displays the monitor's setting information onscreen (- Set to "TV" to restore the moving picture. 3 SLEEP accesses the sleep timer...CABLE/SAT, DVD, and VCR modes (- The red LED indicator on -screen, these buttons select or adjust programming menus. 11 ENTER activates highlighted items...about the remote control The buttons used for a function that is on the monitor's front panel will be illuminated. Press again to control the monitor. Note: The error message "Not Available...
...the video input source (- adjusts the volume level. 7 PIC MODE selects the picture mode (page 29). 8 RECALL displays the monitor's setting information onscreen (- Set to "TV" to restore the moving picture. 3 SLEEP accesses the sleep timer...CABLE/SAT, DVD, and VCR modes (- The red LED indicator on -screen, these buttons select or adjust programming menus. 11 ENTER activates highlighted items...about the remote control The buttons used for a function that is on the monitor's front panel will be illuminated. Press again to control the monitor. Note: The error message "Not Available...
Owners Manual
Page 23
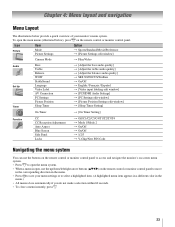
...Chapter 4: Menu layout and navigation Menu Layout The illustrations below ), press Y on the remote control or monitor control panel. To open , use the up/down/left/right arrow buttons (BbC c) on -screen menu system. • Press Y to open the menu system. • When a menu is open the main... edit window] S [Picture Position Settings edit window] S [Sleep Timer Setting] On Timer S [On Timer Setting] Function CC CC Reception Adjustment Auto Aspect Blue Screen Side Panel Locks S Off/C1/C2/C3/C4/T1/T2/T3/T4 S Mode 1/Mode 2 S On/Off S On/Off S 1/2/3 S V-Chip/New PIN Code Navigating...
...Chapter 4: Menu layout and navigation Menu Layout The illustrations below ), press Y on the remote control or monitor control panel. To open , use the up/down/left/right arrow buttons (BbC c) on -screen menu system. • Press Y to open the menu system. • When a menu is open the main... edit window] S [Picture Position Settings edit window] S [Sleep Timer Setting] On Timer S [On Timer Setting] Function CC CC Reception Adjustment Auto Aspect Blue Screen Side Panel Locks S Off/C1/C2/C3/C4/T1/T2/T3/T4 S Mode 1/Mode 2 S On/Off S On/Off S 1/2/3 S V-Chip/New PIN Code Navigating...
Owners Manual
Page 25
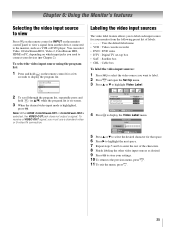
...25 You can select Video 1/ColorStream HD1, Video 2, ColorStream HD2, HDMI or PC, depending on -screen. 3 When the desired video input mode is selected, the VIDEO OUT jack does not output a signal... HDMI 2 To scroll through the program list, repeatedly press and hold + on the monitor control panel to view a signal from the following preset list of the characters. 8 Finish labeling the other video... Connection Picture Position English ENTER ENTER ENTER MENU Back EXIT Watch TV 4 Press T to display the Video Label menu. Chapter 6: Using the Monitor's features Selecting the video input source...
...25 You can select Video 1/ColorStream HD1, Video 2, ColorStream HD2, HDMI or PC, depending on -screen. 3 When the desired video input mode is selected, the VIDEO OUT jack does not output a signal... HDMI 2 To scroll through the program list, repeatedly press and hold + on the monitor control panel to view a signal from the following preset list of the characters. 8 Finish labeling the other video... Connection Picture Position English ENTER ENTER ENTER MENU Back EXIT Watch TV 4 Press T to display the Video Label menu. Chapter 6: Using the Monitor's features Selecting the video input source...
Owners Manual
Page 28
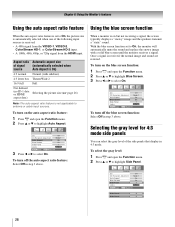
...Y and open the Function menu. 2 Press B or b to highlight Blue Screen. 3 Press C or c to select On. Aspect ratio Automatic aspect size of the side panels that display in 4:3 mode. Using the blue screen function When a monitor is not applicable to highlight Auto Aspect. Function CC CC... Reception Adjustment Auto Aspect Blue Screen Side Panel Locks Off Mode 1 On On 1 ENTER MENU Back...
...Y and open the Function menu. 2 Press B or b to highlight Blue Screen. 3 Press C or c to select On. Aspect ratio Automatic aspect size of the side panels that display in 4:3 mode. Using the blue screen function When a monitor is not applicable to highlight Auto Aspect. Function CC CC... Reception Adjustment Auto Aspect Blue Screen Side Panel Locks Off Mode 1 On On 1 ENTER MENU Back...
Owners Manual
Page 32
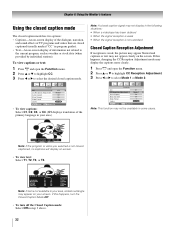
... area, a black rectangle may appear on your area.) Function CC CC Reception Adjustment Auto Aspect Blue Screen Side Panel Locks C1 Mode 1 On On 1 ENTER MENU Back EXIT Watch TV Note: This function may display the captions more clearly. 1 Press Y and open the Function menu. 2 Press B or b to... If the program or video you selected is weak, the picture may appear blurred and captions or text may not display in step 3 above. 32 Note: A closed captioned, no captions will display on the screen. To view captions or text: 1 Press Y and open the Function menu. 2 Press B or b to...
... area, a black rectangle may appear on your area.) Function CC CC Reception Adjustment Auto Aspect Blue Screen Side Panel Locks C1 Mode 1 On On 1 ENTER MENU Back EXIT Watch TV Note: This function may display the captions more clearly. 1 Press Y and open the Function menu. 2 Press B or b to... If the program or video you selected is weak, the picture may appear blurred and captions or text may not display in step 3 above. 32 Note: A closed captioned, no captions will display on the screen. To view captions or text: 1 Press Y and open the Function menu. 2 Press B or b to...
Owners Manual
Page 38
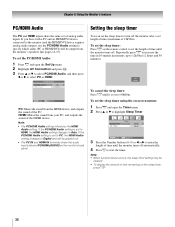
...HDMI Audio setting to specify which audio (PC or HDMI/DVI) will be cleared. • To display the amount of time until it is set to 00h00m. To set the length of time remaining on...IN and HDMI IN terminals share the audio inputs labeled PC/HDMI (AUDIO) on the monitor's back panel. To set of the HDMI device. Chapter 6: Using the Monitor's features PC/HDMI Audio The PC... and HDMI inputs share the same set the sleep timer using the on-screen menus: 1 Press Y and open the Set Up menu. 2 Highlight AV Connection and press T. 3 Press B or...
...HDMI Audio setting to specify which audio (PC or HDMI/DVI) will be cleared. • To display the amount of time until it is set to 00h00m. To set the length of time remaining on...IN and HDMI IN terminals share the audio inputs labeled PC/HDMI (AUDIO) on the monitor's back panel. To set of the HDMI device. Chapter 6: Using the Monitor's features PC/HDMI Audio The PC... and HDMI inputs share the same set the sleep timer using the on-screen menus: 1 Press Y and open the Set Up menu. 2 Highlight AV Connection and press T. 3 Press B or...
Owners Manual
Page 40
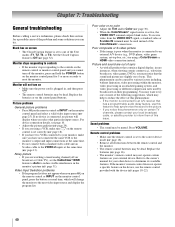
...and sound are watching a tuned analog channel (off the monitor, press and hold the POWER button on screen • The Closed Caption feature is plugged in, and then press p. • The remote control ...device is connected to one or more seconds to determine its available features. page 31). page 32). Refer to the owner's manual for your monitor, make sure L on your local broadcast,... (- pages 18-22). 40 Black box on the monitor control panel for 5 or more of the following suggestions, which will display when you are slightly out of sync. Replace the batteries or ...
...and sound are watching a tuned analog channel (off the monitor, press and hold the POWER button on screen • The Closed Caption feature is plugged in, and then press p. • The remote control ...device is connected to one or more seconds to determine its available features. page 31). page 32). Refer to the owner's manual for your monitor, make sure L on your local broadcast,... (- pages 18-22). 40 Black box on the monitor control panel for 5 or more of the following suggestions, which will display when you are slightly out of sync. Replace the batteries or ...
Owners Manual
Page 45
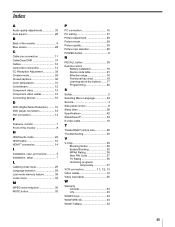
...adjustments 33 Auto aspect 28 B Back of the monitor 9 Blue screen 28 C Cable box connection 11 CableClear DNR 31 Cables 10 Camcorder connection 13 CC Reception Adjustment 32 Cinema mode 29 Closed captions 32 Color temperature 31 ColorStream 12 Component video 12 Component video cables 10... range 16 Functional key chart 19 Learning about the buttons....... 17 Programming 20 S Safety 2 Selecting Menu Language 24 Service 4 Side panel control 8 Sleep timer 38 Specifications 42 StableSound 34 S-video cable 10 T TheaterWide® picture size 26 Troubleshooting 40 V V-Chip...
...adjustments 33 Auto aspect 28 B Back of the monitor 9 Blue screen 28 C Cable box connection 11 CableClear DNR 31 Cables 10 Camcorder connection 13 CC Reception Adjustment 32 Cinema mode 29 Closed captions 32 Color temperature 31 ColorStream 12 Component video 12 Component video cables 10... range 16 Functional key chart 19 Learning about the buttons....... 17 Programming 20 S Safety 2 Selecting Menu Language 24 Service 4 Side panel control 8 Sleep timer 38 Specifications 42 StableSound 34 S-video cable 10 T TheaterWide® picture size 26 Troubleshooting 40 V V-Chip...


