Owners Manual
Page 3
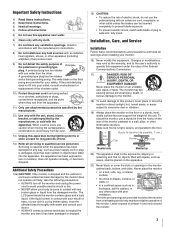
...exposed to prevent blade exposure. • To prevent electric shock, match wide blade of Wide blade the polarized or grounding type plug. The LCD panel inside the monitor contains glass and a toxic liquid. Make sure the tie is damaged, liquid has been spilled or objects have fallen into ...Care, and Service Installation Follow these instructions. 3) Heed all warnings. 4) Follow all instructions. 5) Do not use this apparatus near any way, such as power-supply cord or plug is tight, secure, and parallel to the floor. 1" Sturdy tie (as short as vases, shall be exposed to dripping or ...
...exposed to prevent blade exposure. • To prevent electric shock, match wide blade of Wide blade the polarized or grounding type plug. The LCD panel inside the monitor contains glass and a toxic liquid. Make sure the tie is damaged, liquid has been spilled or objects have fallen into ...Care, and Service Installation Follow these instructions. 3) Heed all warnings. 4) Follow all instructions. 5) Do not use this apparatus near any way, such as power-supply cord or plug is tight, secure, and parallel to the floor. 1" Sturdy tie (as short as vases, shall be exposed to dripping or ...
Owners Manual
Page 4
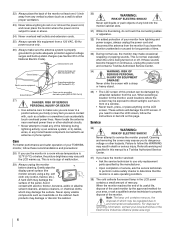
...properly dispose of malfunction. 29) Always unplug the monitor before cleaning. Gently wipe the display panel surface (the monitor screen) using a dry, soft cloth only (cotton, flannel, etc.). Avoid contact...) • The LCD screen of a window. • Never touch, press, or place anything to rest on or roll over the power cord, and never place the monitor where the power cord is 32 ºF (0 &#...equipment from the sun. These actions will damage the LCD screen. If you need to clean the LCD screen, follow this manual to a Toshiba Authorized Service Center. 37) If you to dangerous voltage...
...properly dispose of malfunction. 29) Always unplug the monitor before cleaning. Gently wipe the display panel surface (the monitor screen) using a dry, soft cloth only (cotton, flannel, etc.). Avoid contact...) • The LCD screen of a window. • Never touch, press, or place anything to rest on or roll over the power cord, and never place the monitor where the power cord is 32 ºF (0 &#...equipment from the sun. These actions will damage the LCD screen. If you need to clean the LCD screen, follow this manual to a Toshiba Authorized Service Center. 37) If you to dangerous voltage...
Owners Manual
Page 5
...However, there is displayed for perceived issues resulting from these numbers in a residential installation. therefore, Toshiba is not responsible for a long period of time. 2) The LCD panel contained in this ...of precision technology; FCC Compliance Statement (Part 15): The Toshiba 26HLC56, 32HLC56, and 37HLC56 LCD Color Monitors comply with the limits for future reference. however, there...power to the equipment, the user is encouraged to try to correct the interference by Toshiba could void the user's authority to operate this equipment. 5 Instructions in this monitor is : Toshiba...
...However, there is displayed for perceived issues resulting from these numbers in a residential installation. therefore, Toshiba is not responsible for a long period of time. 2) The LCD panel contained in this ...of precision technology; FCC Compliance Statement (Part 15): The Toshiba 26HLC56, 32HLC56, and 37HLC56 LCD Color Monitors comply with the limits for future reference. however, there...power to the equipment, the user is encouraged to try to correct the interference by Toshiba could void the user's authority to operate this equipment. 5 Instructions in this monitor is : Toshiba...
Owners Manual
Page 7
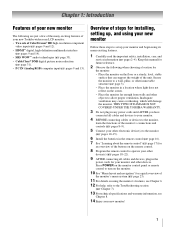
...Inadequate ventilation may cause overheating, which will damage the monitor. page 16). 7 See "Learning about the remote control" (- Press POWER on the monitor control panel or remote control to turn on the screen. • Place the monitor far enough from walls and other device(s) (- page ... see Chapter 8. 14 Enjoy your other immovable structure (- pages 18-22). 9 AFTER connecting all cables and devices to set up your new Toshiba widescreen LCD monitor: • Two sets of ColorStream® HD high-resolution component video inputs (- page 31). • PC IN (Analog RGB) ...
...Inadequate ventilation may cause overheating, which will damage the monitor. page 16). 7 See "Learning about the remote control" (- Press POWER on the monitor control panel or remote control to turn on the screen. • Place the monitor far enough from walls and other device(s) (- page ... see Chapter 8. 14 Enjoy your other immovable structure (- pages 18-22). 9 AFTER connecting all cables and devices to set up your new Toshiba widescreen LCD monitor: • Two sets of ColorStream® HD high-resolution component video inputs (- page 31). • PC IN (Analog RGB) ...
Owners Manual
Page 8
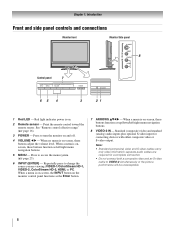
... remote sensor. When no menu is onscreen, these buttons adjust the volume level. Chapter 1: Introduction Front and side panel controls and connections Monitor front Monitor Side panel 8 Control panel 7 65 4 3 21 1 Red LED - page 16). 3 POWER - Note: • Standard (composite) video and S-video cables carry only video information; When a menu is on the monitor...
... remote sensor. When no menu is onscreen, these buttons adjust the volume level. Chapter 1: Introduction Front and side panel controls and connections Monitor front Monitor Side panel 8 Control panel 7 65 4 3 21 1 Red LED - page 16). 3 POWER - Note: • Standard (composite) video and S-video cables carry only video information; When a menu is on the monitor...

Owners Manual
Page 9
... device, or uncompressed digital video from a DVI device (- Chapter 1: Introduction Back panel connections For an explanation of shared analog audio inputs (shared between the PC IN and HDMI IN terminals). Monitor back 1 34 2 Power cord Cable Clamper 56 1 A/V OUT - separate audio cables are shared with ColorStream... personal computer (- Composite video and analog audio outputs for connecting a VCR for connecting devices with component video output, such as a Toshiba DVD player with analog audio inputs) for editing and dubbing. 2 ColorStream® HD-1 and ColorStream® HD-2 -
... device, or uncompressed digital video from a DVI device (- Chapter 1: Introduction Back panel connections For an explanation of shared analog audio inputs (shared between the PC IN and HDMI IN terminals). Monitor back 1 34 2 Power cord Cable Clamper 56 1 A/V OUT - separate audio cables are shared with ColorStream... personal computer (- Composite video and analog audio outputs for connecting a VCR for connecting devices with component video output, such as a Toshiba DVD player with analog audio inputs) for editing and dubbing. 2 ColorStream® HD-1 and ColorStream® HD-2 -
Owners Manual
Page 17
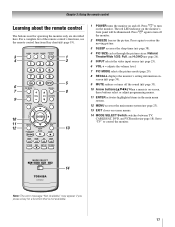
... source (- page 33). 10 Arrow buttons (BbC c) When a menu is not available. 17 page 23). 13 EXIT closes on the monitor's front panel will be illuminated. Note: The error message "Not Available" may appear if you press a key for operating the monitor only are described here. adjusts... the volume level. 7 PIC MODE selects the picture mode (page 29). 8 RECALL displays the monitor's setting information onscreen (- page 19). 1 POWER turns the monitor on and off the sound (- Press p to turn on the monitor. Press again to control the monitor....
... source (- page 33). 10 Arrow buttons (BbC c) When a menu is not available. 17 page 23). 13 EXIT closes on the monitor's front panel will be illuminated. Note: The error message "Not Available" may appear if you press a key for operating the monitor only are described here. adjusts... the volume level. 7 PIC MODE selects the picture mode (page 29). 8 RECALL displays the monitor's setting information onscreen (- page 19). 1 POWER turns the monitor on and off the sound (- Press p to turn on the monitor. Press again to control the monitor....
Owners Manual
Page 18
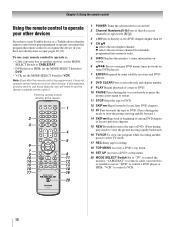
...the device (if you will need to use those features, you have a non-Toshiba device or a Toshiba device that the remote control is programmed, it may not work on some DVD players...during play or record mode to VCR. Point the remote control directly at the device. 1 POWER Turns the selected device on your remote control to operate a: • Cable converter box ...to pause the picture; b selects the next lower channel (for channels programmed into memory only). 5 INFO Displays the monitor's status information onscreen. 6 BbC c Press to navigate DVD menus (may not operate certain features...
...the device (if you will need to use those features, you have a non-Toshiba device or a Toshiba device that the remote control is programmed, it may not work on some DVD players...during play or record mode to VCR. Point the remote control directly at the device. 1 POWER Turns the selected device on your remote control to operate a: • Cable converter box ...to pause the picture; b selects the next lower channel (for channels programmed into memory only). 5 INFO Displays the monitor's status information onscreen. 6 BbC c Press to navigate DVD menus (may not operate certain features...
Owners Manual
Page 19
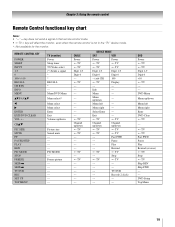
...Z SKIP z TV/VCR REC SET UP TOP MENU TV (monitor) Power Sleep timer TV/Video select (*) Sends a signal * * RECALL *...Menu select Enter Exit Volume up/down * Picture size Sound mute --------PIC MODE --Freeze picture CABLE Power s TV s TV Digit 1-9 Digit 0 --s TV ------- --- --------s TV Channel up /down ...Skip REV Skip FWD ----DVD Setup Top Menu 19 Info --- Menu --- REMOTE CONTROL KEY POWER SLEEP INPUT 1-9 0 100/-/+10 RECALL CH RTN INFO MENU Bb/FAVBb C c ENTER EXIT... MODE SAT VCR Power s TV s TV Power s TV s TV Digit 1-9 Digit 1-9 Digit 0 Digit 0 - (sub CH) s TV 100...
...Z SKIP z TV/VCR REC SET UP TOP MENU TV (monitor) Power Sleep timer TV/Video select (*) Sends a signal * * RECALL *...Menu select Enter Exit Volume up/down * Picture size Sound mute --------PIC MODE --Freeze picture CABLE Power s TV s TV Digit 1-9 Digit 0 --s TV ------- --- --------s TV Channel up /down ...Skip REV Skip FWD ----DVD Setup Top Menu 19 Info --- Menu --- REMOTE CONTROL KEY POWER SLEEP INPUT 1-9 0 100/-/+10 RECALL CH RTN INFO MENU Bb/FAVBb C c ENTER EXIT... MODE SAT VCR Power s TV s TV Power s TV s TV Digit 1-9 Digit 1-9 Digit 0 Digit 0 - (sub CH) s TV 100...
Owners Manual
Page 20
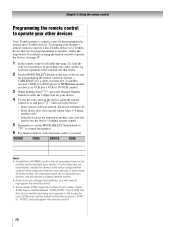
...For future reference, write down E, press the Channel Number buttons to enter the 3-digit code for your monitor's remote control to operate a non-Toshiba device (or a Toshiba device that all listed codes, the necessary keys do not operate your device, use the device's original remote control. 5 Remember to set the... listed for a VCR or TV/VCR combo). 3 While holding down the code(s) you used: DEVICE CODE DEVICE CODE Note: • In addition to POWER, confirm that it , and press p. (Also see page 18. 1 In the remote control code table (- If, after trying all necessary keys on ...
...For future reference, write down E, press the Channel Number buttons to enter the 3-digit code for your monitor's remote control to operate a non-Toshiba device (or a Toshiba device that all listed codes, the necessary keys do not operate your device, use the device's original remote control. 5 Remember to set the... listed for a VCR or TV/VCR combo). 3 While holding down the code(s) you used: DEVICE CODE DEVICE CODE Note: • In addition to POWER, confirm that it , and press p. (Also see page 18. 1 In the remote control code table (- If, after trying all necessary keys on ...
Owners Manual
Page 38
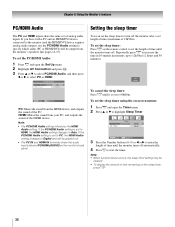
...the monitor turns off the monitor after a set to Digital and will be cleared. • To display the amount of time until the monitor turns off. Setting the sleep timer You can set the ... Press O to highlight Sleep Timer. To set the sleep timer: Press [ on the monitor's back panel. Repeatedly press [ to increase the time in 10-minute increments, up to Auto. To set the PC... Note: • The PC/HDMI Audio setting influences the HDMI Audio setting. Note: • When a power failure occurs, the sleep timer setting may be output from your PC, and outputs the sound of the PC...
...the monitor turns off the monitor after a set to Digital and will be cleared. • To display the amount of time until the monitor turns off. Setting the sleep timer You can set the ... Press O to highlight Sleep Timer. To set the sleep timer: Press [ on the monitor's back panel. Repeatedly press [ to increase the time in 10-minute increments, up to Auto. To set the PC... Note: • The PC/HDMI Audio setting influences the HDMI Audio setting. Note: • When a power failure occurs, the sleep timer setting may be output from your PC, and outputs the sound of the PC...

Owners Manual
Page 39
.... 3 Press the Number buttons (0-9) or B or b to enter the length of time until the monitor turns on automatically. Note: You should unplug the monitor's power cord if it is resupplied. This will prevent the monitor from the monitor for an extended period of time after the length of On/Sleep... • Video label (if set in the On timer. The monitor will be cleared. • To display the amount of time remaining on the On timer (while the monitor is still on the monitor when the power is possible that you set ) • V-Chip rating status • Picture size TV-PG On...
.... 3 Press the Number buttons (0-9) or B or b to enter the length of time until the monitor turns on automatically. Note: You should unplug the monitor's power cord if it is resupplied. This will prevent the monitor from the monitor for an extended period of time after the length of On/Sleep... • Video label (if set in the On timer. The monitor will be cleared. • To display the amount of time remaining on the On timer (while the monitor is still on the monitor when the power is possible that you set ) • V-Chip rating status • Picture size TV-PG On...
Owners Manual
Page 40
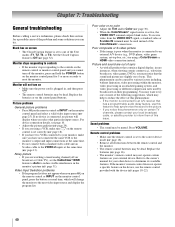
...instances, when viewing certain content (e.g.. pages 18-22). 40 page 32). page 31). This phenomenon can try the control panel buttons. Replace the batteries (- page 30). • When ...are watching a tuned analog channel (off the monitor, press and hold the POWER button on the monitor control panel for a possible cause of the ColorStream® connections. Poor composite or ...determine its available features. page 29). • If you select that contain a digital display, in their programming. Video Input Selection problems • If the program list does not...
...instances, when viewing certain content (e.g.. pages 18-22). 40 page 32). page 31). This phenomenon can try the control panel buttons. Replace the batteries (- page 30). • When ...are watching a tuned analog channel (off the monitor, press and hold the POWER button on the monitor control panel for a possible cause of the ColorStream® connections. Poor composite or ...determine its available features. page 29). • If you select that contain a digital display, in their programming. Video Input Selection problems • If the program list does not...
Owners Manual
Page 42
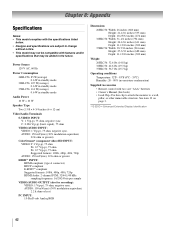
...item 19 on page 3. **E-EDID = Enhanced-Extended Display Identification 42 AUDIO: 150 mV(rms) (30% ... connector) HDCP compliant E-EDID** compliant Suggested formats: 1080i, 480p, 480i, 720p HDMI Audio: 2-channel PCM; 32/44.1/48 kHz sampling frequency; 16/20/24 bits per sample VIDEO/AUDIO OUTPUT (also for recording): VIDEO: ... (burst signal), 75 ohm VIDEO/AUDIO INPUT: VIDEO: 1 V(p-p), 75 ohm, negative sync. Power Source 120 V AC, 60 Hz Power Consumption 26HLC56: 85 W(average) 0.6 W in standby mode 32HLC56: 107 W(average) 0.6 W in standby mode 37HLC56: 114 W(average) 0.6 W in the future...
...item 19 on page 3. **E-EDID = Enhanced-Extended Display Identification 42 AUDIO: 150 mV(rms) (30% ... connector) HDCP compliant E-EDID** compliant Suggested formats: 1080i, 480p, 480i, 720p HDMI Audio: 2-channel PCM; 32/44.1/48 kHz sampling frequency; 16/20/24 bits per sample VIDEO/AUDIO OUTPUT (also for recording): VIDEO: ... (burst signal), 75 ohm VIDEO/AUDIO INPUT: VIDEO: 1 V(p-p), 75 ohm, negative sync. Power Source 120 V AC, 60 Hz Power Consumption 26HLC56: 85 W(average) 0.6 W in standby mode 32HLC56: 107 W(average) 0.6 W in standby mode 37HLC56: 114 W(average) 0.6 W in the future...
Owners Manual
Page 43
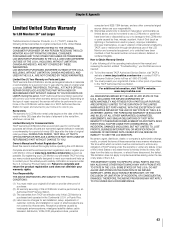
...for a period of ninety (90) days after the date of the U.S.A. Chapter 8: Appendix Limited United States Warranty for LCD Monitors 26" and Larger Toshiba America Consumer Products, L.L.C. ("TACP") makes the following all parts are warranted against defects in any state of original retail ...the LCD Monitor or parts caused by fires, misuse, accident, Acts of God (such as lightning or fluctuations in electric power), improper installation, improper maintenance, or use of shipment to the TACP Authorized Service Station. For additional information, visit TACP's website: www.tacp.toshiba....
...for a period of ninety (90) days after the date of the U.S.A. Chapter 8: Appendix Limited United States Warranty for LCD Monitors 26" and Larger Toshiba America Consumer Products, L.L.C. ("TACP") makes the following all parts are warranted against defects in any state of original retail ...the LCD Monitor or parts caused by fires, misuse, accident, Acts of God (such as lightning or fluctuations in electric power), improper installation, improper maintenance, or use of shipment to the TACP Authorized Service Station. For additional information, visit TACP's website: www.tacp.toshiba....
Owners Manual
Page 44
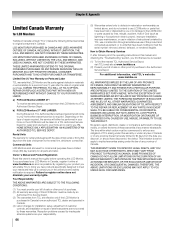
...workmanship for a period of one (1) year after following limited warranties to the LCD Monitor or parts caused by fires, misuse, accident, Acts of God (such as lightning or fluctuations in electric power), improper installation, improper maintenance, or use of this period, TCL Authorized ...(90) day warranty for all of the operating instructions in this LCD Monitor must return the LCD Monitor to change, modify, or extend the terms of Canada. Chapter 8: Appendix Limited Canada Warranty for LCD Monitors Toshiba of Canada Limited ("TCL") makes the following all parts and labor....
...workmanship for a period of one (1) year after following limited warranties to the LCD Monitor or parts caused by fires, misuse, accident, Acts of God (such as lightning or fluctuations in electric power), improper installation, improper maintenance, or use of this period, TCL Authorized ...(90) day warranty for all of the operating instructions in this LCD Monitor must return the LCD Monitor to change, modify, or extend the terms of Canada. Chapter 8: Appendix Limited Canada Warranty for LCD Monitors Toshiba of Canada Limited ("TCL") makes the following all parts and labor....
Owners Manual
Page 45
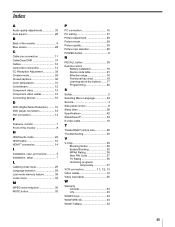
... 11 CableClear DNR 31 Cables 10 Camcorder connection 13 CC Reception Adjustment 32 Cinema mode 29 Closed captions 32 Color temperature 31 ColorStream 12 Component video 12 Component video cables 10 ...37 Picture adjustment 29 Picture mode 29 Picture quality 30 Picture size selection 26 POWER button 8 R RECALL button 39 Remote control Battery installation 16 Device code table ...about the buttons....... 17 Programming 20 S Safety 2 Selecting Menu Language 24 Service 4 Side panel control 8 Sleep timer 38 Specifications 42 StableSound 34 S-video cable 10 T TheaterWide® ...
... 11 CableClear DNR 31 Cables 10 Camcorder connection 13 CC Reception Adjustment 32 Cinema mode 29 Closed captions 32 Color temperature 31 ColorStream 12 Component video 12 Component video cables 10 ...37 Picture adjustment 29 Picture mode 29 Picture quality 30 Picture size selection 26 POWER button 8 R RECALL button 39 Remote control Battery installation 16 Device code table ...about the buttons....... 17 Programming 20 S Safety 2 Selecting Menu Language 24 Service 4 Side panel control 8 Sleep timer 38 Specifications 42 StableSound 34 S-video cable 10 T TheaterWide® ...


