Owner's Manual - English
Page 1
Record these numbers whenever you communicate with your new TV, see page 9. Note: To display a High Definition picture, the TV must be receiving a High Definition signal (such as an over-the-air High Definition TV broadcast, a High Definition digital cable program, or a High Definition...the spaces below. Integrated High Definition LCD Television HIGH-DEFINITION TELEVISION 26HL67 32HL67 32HL67U 37HL67 42HL67 For an overview of your TV. For details, please contact your TV antenna installer, cable provider, or satellite provider. © 2007 TOSHIBA CORPORATION All Rights Reserved Owner's ...
Record these numbers whenever you communicate with your new TV, see page 9. Note: To display a High Definition picture, the TV must be receiving a High Definition signal (such as an over-the-air High Definition TV broadcast, a High Definition digital cable program, or a High Definition...the spaces below. Integrated High Definition LCD Television HIGH-DEFINITION TELEVISION 26HL67 32HL67 32HL67U 37HL67 42HL67 For an overview of your TV. For details, please contact your TV antenna installer, cable provider, or satellite provider. © 2007 TOSHIBA CORPORATION All Rights Reserved Owner's ...
Owner's Manual - English
Page 4
...condition. 39) The cold cathode fluorescent lamp in a room whose temperature is 32 ºF (0 ºC) or below, the picture brightness may make sure the antenna system is properly grounded to use the TV in the LCD panel contains a small amount of mercury. or b) cables, wires, or ...Never attempt to properly dispose of malfunction. 30) Always unplug the TV before cleaning. Refer all servicing not specified in this manual to a Toshiba Authorized Service Center. 38) If you are never in a position where your TOSHIBA TV, follow the instructions in front of a window. • Never ...
...condition. 39) The cold cathode fluorescent lamp in a room whose temperature is 32 ºF (0 ºC) or below, the picture brightness may make sure the antenna system is properly grounded to use the TV in the LCD panel contains a small amount of mercury. or b) cables, wires, or ...Never attempt to properly dispose of malfunction. 30) Always unplug the TV before cleaning. Refer all servicing not specified in this manual to a Toshiba Authorized Service Center. 38) If you are never in a position where your TOSHIBA TV, follow the instructions in front of a window. • Never ...
Owner's Manual - English
Page 6
...Toshiba 26HL67, 32HL67, 37HL67, 42HL67, and 32HL67U Televisions comply with this TV. Wayne, NJ 07470. These limits are designed to radio communications. WOW technology is no guarantee that does not operate properly (does not light, remains constantly lit, etc.). However, there is incorporated under license from SRS Labs, Inc. • Manufactured under your LCD TV... by one or more of the following symptoms are technical limitations of LCD Display technology and are not visible when the picture is not responsible for perceived issues resulting from a normal viewing distance....
...Toshiba 26HL67, 32HL67, 37HL67, 42HL67, and 32HL67U Televisions comply with this TV. Wayne, NJ 07470. These limits are designed to radio communications. WOW technology is no guarantee that does not operate properly (does not light, remains constantly lit, etc.). However, there is incorporated under license from SRS Labs, Inc. • Manufactured under your LCD TV... by one or more of the following symptoms are technical limitations of LCD Display technology and are not visible when the picture is not responsible for perceived issues resulting from a normal viewing distance....
Owner's Manual - English
Page 7
...Toshiba 8 Features of your new TV 8 Overview of steps for installing, setting up, and using your new TV 9 TV front and side panel controls and connections 10 TV back panel connections 11 Chapter 2: Connecting your TV...audio mode 32 Viewing the digital signal meter 33 Viewing the system status 33 Selecting the Power-On Mode 34 Chapter 6: Using the TV's features 35... last mode memory feature 53 Chapter 7: Using the TV's advanced features 54 Using the advanced picture settings features 54 Using dynamic contrast 54 Using the ... LCD Televisions 26" and Larger 62 Limited Canada Warranty for...
...Toshiba 8 Features of your new TV 8 Overview of steps for installing, setting up, and using your new TV 9 TV front and side panel controls and connections 10 TV back panel connections 11 Chapter 2: Connecting your TV...audio mode 32 Viewing the digital signal meter 33 Viewing the system status 33 Selecting the Power-On Mode 34 Chapter 6: Using the TV's features 35... last mode memory feature 53 Chapter 7: Using the TV's advanced features 54 Using the advanced picture settings features 54 Using dynamic contrast 54 Using the ... LCD Televisions 26" and Larger 62 Limited Canada Warranty for...
Owner's Manual - English
Page 8
...; Integrated digital tuning (8VSB ATSC and QAM) eliminates the need for purchasing this Toshiba LCD TV, one of the most cases). • Three HDMI™ digital, high-definition multimedia interfaces 1080p input support (- page 15). • SRS WOW™ ...and digital premium cable television programming by your cable operator is required to view encrypted digital programming. page 46). • CableClear® digital picture noise reduction (- page 19). • Channel Labeling allows you 're watching (- A security card provided by direct connection to put the Call Letters (e.g.
...; Integrated digital tuning (8VSB ATSC and QAM) eliminates the need for purchasing this Toshiba LCD TV, one of the most cases). • Three HDMI™ digital, high-definition multimedia interfaces 1080p input support (- page 15). • SRS WOW™ ...and digital premium cable television programming by your cable operator is required to view encrypted digital programming. page 46). • CableClear® digital picture noise reduction (- page 19). • Channel Labeling allows you 're watching (- A security card provided by direct connection to put the Call Letters (e.g.
Owner's Manual - English
Page 12
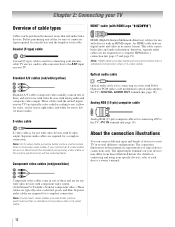
...devices. This cable carries both video and audio information; Note: HDMI cable provides better picture performance than a standard (composite) video or S-video cable. 12 S-video cable is Toshiba's brand of component video.) These cables are required for a complete HDMI device connection ...(- If you connect an S-video cable, be purchased from those illustrated herein. The input/output terminals on your TV. Note: Component video cables provide better picture performance than ...
...devices. This cable carries both video and audio information; Note: HDMI cable provides better picture performance than a standard (composite) video or S-video cable. 12 S-video cable is Toshiba's brand of component video.) These cables are required for a complete HDMI device connection ...(- If you connect an S-video cable, be purchased from those illustrated herein. The input/output terminals on your TV. Note: Component video cables provide better picture performance than ...
Owner's Manual - English
Page 13
...on the TV.* To view the VCR: Turn ON the VCR. The unauthorized recording, use an S-video cable (plus the audio cables) instead of the standard video cable. To view the antenna or Cable signal: Select the ANT video input source on the remote control (- For better picture performance, if... your VCR's audio out terminal using the white audio cable only. page 21). To program the TV remote control to operate other countries, and may subject you have a mono VCR, connect L/...
...on the TV.* To view the VCR: Turn ON the VCR. The unauthorized recording, use an S-video cable (plus the audio cables) instead of the standard video cable. To view the antenna or Cable signal: Select the ANT video input source on the remote control (- For better picture performance, if... your VCR's audio out terminal using the white audio cable only. page 21). To program the TV remote control to operate other countries, and may subject you have a mono VCR, connect L/...

Owner's Manual - English
Page 14
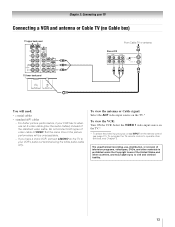
... 2: Connecting your VCR's audio out terminal using the white audio cable only. Select the ANT video input source on the TV to VIDEO 1 at the same time or the picture performance will need: • coaxial cables • S-video cable - The unauthorized recording, use the remote control to )....under the Copyright Laws of video cable to your TV Connecting a VCR with S-video and a cable box An S-video connection will provide better picture performance than a standard (composite) video cable. Note: When you use a Cable box, you to TV You will be able to use , distribution, or...
... 2: Connecting your VCR's audio out terminal using the white audio cable only. Select the ANT video input source on the TV to VIDEO 1 at the same time or the picture performance will need: • coaxial cables • S-video cable - The unauthorized recording, use the remote control to )....under the Copyright Laws of video cable to your TV Connecting a VCR with S-video and a cable box An S-video connection will provide better picture performance than a standard (composite) video cable. Note: When you use a Cable box, you to TV You will be able to use , distribution, or...
Owner's Manual - English
Page 15
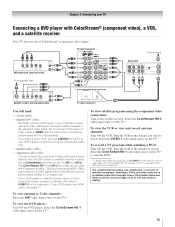
...HDMI video, see Chapter 3. If your TV Connecting a DVD player with ColorStream® (component video), a VCR, and a satellite receiver Your TV has two sets of television programs, videotapes, DVDs, and other materials is not supported). - For better picture performance, if your VCR's audio out ...terminal using the component video connections: Turn on the TV to view the DVD. * To select the video input source, press INPUT on the TV.* To record a TV program while watching a DVD: Turn ON ...
...HDMI video, see Chapter 3. If your TV Connecting a DVD player with ColorStream® (component video), a VCR, and a satellite receiver Your TV has two sets of television programs, videotapes, DVDs, and other materials is not supported). - For better picture performance, if your VCR's audio out ...terminal using the component video connections: Turn on the TV to view the DVD. * To select the video input source, press INPUT on the TV.* To record a TV program while watching a DVD: Turn ON ...

Owner's Manual - English
Page 16
... the VIDEO 2 video input source on the TV.* * To select the video input source, press INPUT on the TV right side panel. To program the TV remote control to VIDEO 1 on the TV back instead of the VIDEO 2 on the remote control (- For better picture performance, if your TV Connecting a camcorder You will need: • standard...
... the VIDEO 2 video input source on the TV.* * To select the video input source, press INPUT on the TV right side panel. To program the TV remote control to VIDEO 1 on the TV back instead of the VIDEO 2 on the remote control (- For better picture performance, if your TV Connecting a camcorder You will need: • standard...
Owner's Manual - English
Page 19
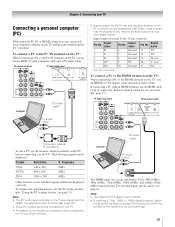
...; 600 60Hz XGA 1024 × 768 60Hz Other formats or non-standard signals will not be displayed correctly. • To display the optimum picture, use an HDMI-to DVI adapter cable and analog audio cables. Signal name 11 NC 12 NC 13 H-sync 14 V-sync 15 NC *NC... 720p (60Hz), 1080i (60Hz), and 1080p (24Hz/ 60Hz) signal formats. Signal name 6 Ground 7 Ground 8 Ground 9 NC 10 Ground Pin No. Chapter 2: Connecting your TV Connecting a personal computer (PC) With either the PC IN or HDMI connection, you may be skipped or you can watch your computer's display on the...
...; 600 60Hz XGA 1024 × 768 60Hz Other formats or non-standard signals will not be displayed correctly. • To display the optimum picture, use an HDMI-to DVI adapter cable and analog audio cables. Signal name 11 NC 12 NC 13 H-sync 14 V-sync 15 NC *NC... 720p (60Hz), 1080i (60Hz), and 1080p (24Hz/ 60Hz) signal formats. Signal name 6 Ground 7 Ground 8 Ground 9 NC 10 Ground Pin No. Chapter 2: Connecting your TV Connecting a personal computer (PC) With either the PC IN or HDMI connection, you may be skipped or you can watch your computer's display on the...
Owner's Manual - English
Page 21
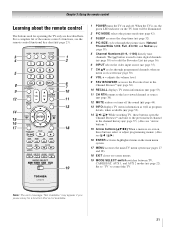
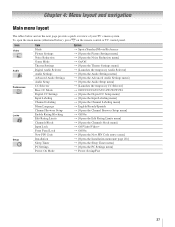
... information as well as program details, when available (- pages 27 and 28). 18 EXIT closes on the TV front will be illuminated. 2 PIC MODE selects the picture mode (- The = button is not available. 21 Note: The error message "Not Available" may appear if you press a key for a ... no menu is on-screen, these buttons open the Channel Browser™ and tune to control the TV. page 38) or to the last viewed channel or source (- page 35). 7 CH Bb cycles through the picture sizes: Natural, TheaterWide 1/2/3, Full, 4:3 HD, and Native (page 39). 5 Channel Numbers (0-9, -/100)...
... information as well as program details, when available (- pages 27 and 28). 18 EXIT closes on the TV front will be illuminated. 2 PIC MODE selects the picture mode (- The = button is not available. 21 Note: The error message "Not Available" may appear if you press a key for a ... no menu is on-screen, these buttons open the Channel Browser™ and tune to control the TV. page 38) or to the last viewed channel or source (- page 35). 7 CH Bb cycles through the picture sizes: Natural, TheaterWide 1/2/3, Full, 4:3 HD, and Native (page 39). 5 Channel Numbers (0-9, -/100)...
Owner's Manual - English
Page 22
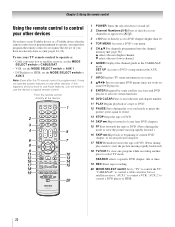
...must first program the remote control to pause the picture; "AUX 2" to control a cable converter box or satellite receiver; pages 24-26). Note: Even after the TV remote control is not preprogrammed to operate, you have a non-Toshiba device or a Toshiba device that the remote control is programmed, it may... Skips forward to locate later DVD chapters. 15 FF Fast-forwards the tape or DVD. (Press during play mode to view the picture moving rapidly backward.) 18 TV/VCR To view one program while recording another, press to AUX 2. page 38): B selects the next higher channel. To use ...
...must first program the remote control to pause the picture; "AUX 2" to control a cable converter box or satellite receiver; pages 24-26). Note: Even after the TV remote control is not preprogrammed to operate, you have a non-Toshiba device or a Toshiba device that the remote control is programmed, it may... Skips forward to locate later DVD chapters. 15 FF Fast-forwards the tape or DVD. (Press during play mode to view the picture moving rapidly backward.) 18 TV/VCR To view one program while recording another, press to AUX 2. page 38): B selects the next higher channel. To use ...

Owner's Manual - English
Page 23
REMOTE CONTROL KEY Toshiba TV CABLE SAT (satellite) POWER SLEEP PIC SIZE PIC MODE Power Sleep timer Picture size PIC MODE Power s TV s TV s TV Power s TV s TV s TV 1-9 Digit 1-9 Digit 1-9 Digit 1-9 0 Digit 0 Digit 0 Digit 0 100/-/+10 INPUT - (sub CH) TV/Video select --s TV - (sub CH) s TV FAV BROWSER/ TOP MENU MUTE FAV BROWSER DVD TOP Menu* Sound mute --s TV --s TV SET UP/GUIDE VOL...
REMOTE CONTROL KEY Toshiba TV CABLE SAT (satellite) POWER SLEEP PIC SIZE PIC MODE Power Sleep timer Picture size PIC MODE Power s TV s TV s TV Power s TV s TV s TV 1-9 Digit 1-9 Digit 1-9 Digit 1-9 0 Digit 0 Digit 0 Digit 0 100/-/+10 INPUT - (sub CH) TV/Video select --s TV - (sub CH) s TV FAV BROWSER/ TOP MENU MUTE FAV BROWSER DVD TOP Menu* Sound mute --s TV --s TV SET UP/GUIDE VOL...
Owner's Manual - English
Page 27
...(illustrated below and on the remote control or TV control panel. page 28)] S [Opens the Sleep Timer menu] S [Opens the PC Settings menu] S Power-Saving/Fast 27 Icon Video Audio Preferences Locks Setup Item Mode Picture Settings Noise Reduction Game Mode Theater Settings Digital ...Channels Block Input Lock Front Panel Lock New PIN Code Installation Sleep Timer PC Settings Power-On Mode Option S Sports/Standard/Movie/Preference S [Opens the Picture Settings menu] S [Opens the Noise Reduction menu] S On/Off S [Opens the Theater Settings menu] S [Launches the temporary Audio Selector] S...
...(illustrated below and on the remote control or TV control panel. page 28)] S [Opens the Sleep Timer menu] S [Opens the PC Settings menu] S Power-Saving/Fast 27 Icon Video Audio Preferences Locks Setup Item Mode Picture Settings Noise Reduction Game Mode Theater Settings Digital ...Channels Block Input Lock Front Panel Lock New PIN Code Installation Sleep Timer PC Settings Power-On Mode Option S Sports/Standard/Movie/Preference S [Opens the Picture Settings menu] S [Opens the Noise Reduction menu] S On/Off S [Opens the Theater Settings menu] S [Launches the temporary Audio Selector] S...
Owner's Manual - English
Page 28
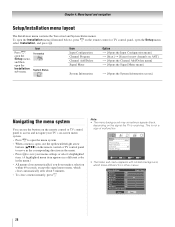
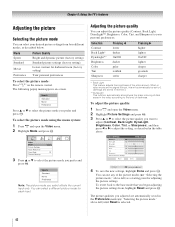
This is receiving. To open the Installation menu (illustrated below), press Y on the remote control or TV control panel, open the Installation sub-menu. Video Mode Picture Settings Noise Reduction Game Mode Theater Settings Sports Off Navigate ENTER Select CH RTN Back EXIT Exit • ... Sharpness 50 Advanced Picture Settings Reset Mode: Sports On Done 28 Press Y, open the Setup menu, and then open the Setup menu, select Installation, and press T. Note: • The menu background may sometimes appear black, depending on the remote control or TV control panel to...
This is receiving. To open the Installation menu (illustrated below), press Y on the remote control or TV control panel, open the Installation sub-menu. Video Mode Picture Settings Noise Reduction Game Mode Theater Settings Sports Off Navigate ENTER Select CH RTN Back EXIT Exit • ... Sharpness 50 Advanced Picture Settings Reset Mode: Sports On Done 28 Press Y, open the Setup menu, and then open the Setup menu, select Installation, and press T. Note: • The menu background may sometimes appear black, depending on the remote control or TV control panel to...
Owner's Manual - English
Page 39
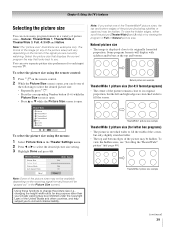
... 4:3 format programs) • The center of the United States and other than your TV. page 40). Chapter 6: Using the TV's features Selecting the picture size You can view many program formats in Full or Natural picture size. Natural picture size example TheaterWide 1 picture size (for each input on the receiving signal format (those will be hidden...
... 4:3 format programs) • The center of the United States and other than your TV. page 40). Chapter 6: Using the TV's features Selecting the picture size You can view many program formats in Full or Natural picture size. Natural picture size example TheaterWide 1 picture size (for each input on the receiving signal format (those will be hidden...

Owner's Manual - English
Page 40
... for the TheaterWide 2 and TheaterWide 3 modes for 16:9 [480i, 480p] source programs only) • If receiving a squeezed 4:3 format program, the picture is especially useful for 720p, 1080i, and 1080p signal programs) • If receiving a 720p, 1080i, or 1080p signal program, Native mode scales the ... • None of the screen, but only slightly stretched taller. • The top and bottom edges are hidden. Chapter 6: Using the TV's features TheaterWide 3 picture size (for 720p, 1080i, and 1080p signals only. If the signal being received is other than 1080i, 1080p, or 720p, "Native" ...
... for the TheaterWide 2 and TheaterWide 3 modes for 16:9 [480i, 480p] source programs only) • If receiving a squeezed 4:3 format program, the picture is especially useful for 720p, 1080i, and 1080p signal programs) • If receiving a 720p, 1080i, or 1080p signal program, Native mode scales the ... • None of the screen, but only slightly stretched taller. • The top and bottom edges are hidden. Chapter 6: Using the TV's features TheaterWide 3 picture size (for 720p, 1080i, and 1080p signals only. If the signal being received is other than 1080i, 1080p, or 720p, "Native" ...
Owner's Manual - English
Page 41
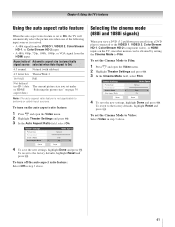
... 1 Press Y and open the Video menu. 2 Highlight Theater Settings and press T. 3 In the Cinema Mode field, select Film. Theater Settings Picture Size Picture Scroll Cinema Mode Auto Aspect Ratio Mode: Sports Natural -- To turn on page 39. To set the Cinema Mode to the factory defaults, highlight Reset... Using the auto aspect ratio feature When the auto aspect ratio feature is set to On, the TV will automatically select the picture size when one of Automatic aspect size (automatically signal source selected when Auto Aspect is On) 4:3 normal Natural (with sidebars) 4:3 letter box ...
... 1 Press Y and open the Video menu. 2 Highlight Theater Settings and press T. 3 In the Cinema Mode field, select Film. Theater Settings Picture Size Picture Scroll Cinema Mode Auto Aspect Ratio Mode: Sports Natural -- To turn on page 39. To set the Cinema Mode to the factory defaults, highlight Reset... Using the auto aspect ratio feature When the auto aspect ratio feature is set to On, the TV will automatically select the picture size when one of Automatic aspect size (automatically signal source selected when Auto Aspect is On) 4:3 normal Natural (with sidebars) 4:3 letter box ...
Owner's Manual - English
Page 42
.... 2 Highlight Mode and press T. Adjusting the picture quality You can use any of the picture modes (- Chapter 6: Using the TV's features Adjusting the picture Selecting the picture mode You can select a different picture mode for each input. Mode Sports Standard Movie Preference Picture Quality Bright and dynamic picture (factory setting) Standard picture settings (factory setting) Lower contrast for darkened...
.... 2 Highlight Mode and press T. Adjusting the picture quality You can use any of the picture modes (- Chapter 6: Using the TV's features Adjusting the picture Selecting the picture mode You can select a different picture mode for each input. Mode Sports Standard Movie Preference Picture Quality Bright and dynamic picture (factory setting) Standard picture settings (factory setting) Lower contrast for darkened...


