Owner's Manual - English
Page 3
...when unused for long periods of the obsolete outlet. 10) Protect the power cord from tip-over. 13) Unplug this equipment. The LCD panel inside the TV contains glass and a toxic liquid. If the liquid comes in direct sunlight; Changes or modifications may fall, causing serious personal injury, death...-supply cord or plug is dropped and the cabinet or enclosure surface has been damaged or the TV does not operate normally, take the following precautions: • ALWAYS turn off the TV and unplug the power cord to rain or moisture, does not operate normally, or has been dropped...
...when unused for long periods of the obsolete outlet. 10) Protect the power cord from tip-over. 13) Unplug this equipment. The LCD panel inside the TV contains glass and a toxic liquid. If the liquid comes in direct sunlight; Changes or modifications may fall, causing serious personal injury, death...-supply cord or plug is dropped and the cabinet or enclosure surface has been damaged or the TV does not operate normally, take the following precautions: • ALWAYS turn off the TV and unplug the power cord to rain or moisture, does not operate normally, or has been dropped...
Owner's Manual - English
Page 4
...this page. If these recommendations and precautions: 29) If you are never in a room whose temperature is being turned on the cabinet. A hard cloth may result in the LCD panel contains a small amount of mercury. Never spray volatile compounds such as a wall) to allow proper ventilation.... or phone system. This is normal, especially when the unit is 32 ºF (0 ºC) or below, the picture brightness may be exposed to a Toshiba Authorized Service Center. 38) If you leave the TV unattended or unused for your local authorities or the Electronics Industries Alliance ...
...this page. If these recommendations and precautions: 29) If you are never in a room whose temperature is being turned on the cabinet. A hard cloth may result in the LCD panel contains a small amount of mercury. Never spray volatile compounds such as a wall) to allow proper ventilation.... or phone system. This is normal, especially when the unit is 32 ºF (0 ºC) or below, the picture brightness may be exposed to a Toshiba Authorized Service Center. 38) If you leave the TV unattended or unused for your local authorities or the Electronics Industries Alliance ...
Owner's Manual - English
Page 9
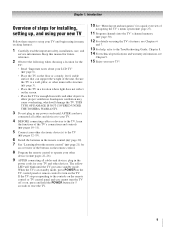
...TV (- THIS TYPE OF DAMAGE IS NOT COVERED UNDER THE TOSHIBA WARRANTY. 3 Do not plug in any power cords until the TV goes into the TV's channel memory (- page 30). 12 For details on the screen. • Place the TV... until AFTER you cannot turn on the remote control. 8 Program the remote control to the TV, learn the functions of the TV's connections and controls (- When the TV is in a location ... overview of the unit. page 20). 7 See "Learning about your TV and other device(s) (- page 21) for your LCD TV" (- page 27). 11 Program channels into standby mode. pages 22-...
...TV (- THIS TYPE OF DAMAGE IS NOT COVERED UNDER THE TOSHIBA WARRANTY. 3 Do not plug in any power cords until the TV goes into the TV's channel memory (- page 30). 12 For details on the screen. • Place the TV... until AFTER you cannot turn on the remote control. 8 Program the remote control to the TV, learn the functions of the TV's connections and controls (- When the TV is in a location ... overview of the unit. page 20). 7 See "Learning about your TV and other device(s) (- page 21) for your LCD TV" (- page 27). 11 Program channels into standby mode. pages 22-...

Owner's Manual - English
Page 10
...illustration purposes. "Selecting the Power-On Mode" on page 34) See "LED indications" on the remote control or TV control panel and you are referred to turn off . The side panel A/V connections are viewing (ANT, VIDEO 1, VIDEO 2, ColorStream HD1, ColorStream HD2, HDMI ...- When a menu is on-screen, these buttons change the source you cannot turn the TV on -screen, these buttons function as the ENTER button. 7 EXIT - page 30). 9 VOLUME C c - These buttons adjust the volume level. 10 INPUT - TV top TV front POWER Right side panel 4 8 5 9 6 7 10 Control panel ...
...illustration purposes. "Selecting the Power-On Mode" on page 34) See "LED indications" on the remote control or TV control panel and you are referred to turn off . The side panel A/V connections are viewing (ANT, VIDEO 1, VIDEO 2, ColorStream HD1, ColorStream HD2, HDMI ...- When a menu is on-screen, these buttons change the source you cannot turn the TV on -screen, these buttons function as the ENTER button. 7 EXIT - page 30). 9 VOLUME C c - These buttons adjust the volume level. 10 INPUT - TV top TV front POWER Right side panel 4 8 5 9 6 7 10 Control panel ...
Owner's Manual - English
Page 13
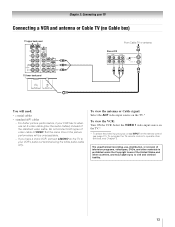
...: Select the ANT video input source on the remote control (- Select the VIDEO 1 video input source on the TV.* * To select the video input source, press INPUT on the TV.* To view the VCR: Turn ON the VCR. Do not connect both types of the United States and other countries, and may subject... you have a mono VCR, connect L/MONO on the TV to your VCR has S-video, use , distribution, or revision of television...
...: Select the ANT video input source on the remote control (- Select the VIDEO 1 video input source on the TV.* * To select the video input source, press INPUT on the TV.* To view the VCR: Turn ON the VCR. Do not connect both types of the United States and other countries, and may subject... you have a mono VCR, connect L/MONO on the TV to your VCR has S-video, use , distribution, or revision of television...

Owner's Manual - English
Page 14
... select the video input source, press INPUT on the TV. page 21). To program the TV remote control to operate other materials is set to). To view basic and premium Cable channels: Turn OFF the VCR. Use the Cable box controls to program or access certain features on the remote control... (- If you to TV You will provide better picture performance than a standard (composite) video cable. Do ...
... select the video input source, press INPUT on the TV. page 21). To program the TV remote control to operate other materials is set to). To view basic and premium Cable channels: Turn OFF the VCR. Use the Cable box controls to program or access certain features on the remote control... (- If you to TV You will provide better picture performance than a standard (composite) video cable. Do ...
Owner's Manual - English
Page 15
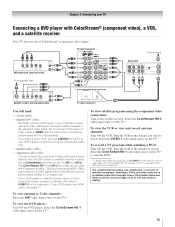
...). - Select the ColorStream HD-1 video input source on the remote control (- Select the ColorStream HD-2 video input source on the TV.* To view the DVD player: Turn ON the DVD player. Tune the VCR to the channel to view the DVD. * To select the video input source, press .... - Chapter 2: Connecting your DVD player has HDMI video, see Chapter 3. If your VCR's audio out terminal using the component video connections: Turn on the TV* to record. The ColorStream HD-1 and HD-2 terminals can connect the component video cables (plus the audio cables) instead of the United States ...
...). - Select the ColorStream HD-1 video input source on the remote control (- Select the ColorStream HD-2 video input source on the TV.* To view the DVD player: Turn ON the DVD player. Tune the VCR to the channel to view the DVD. * To select the video input source, press .... - Chapter 2: Connecting your DVD player has HDMI video, see Chapter 3. If your VCR's audio out terminal using the component video connections: Turn on the TV* to record. The ColorStream HD-1 and HD-2 terminals can connect the component video cables (plus the audio cables) instead of the United States ...

Owner's Manual - English
Page 17
... to the HDMI input The HDMI input on your electronic components, turn on the TV first, and then the HDMI or DVI device. • When turning off the HDMI or DVI device first, and then the TV. Supported Audio format: Linear PCM, sampling rate 32/44.1/ 48 kHz Note: To connect a PC to -DVI... adapter cable transfers video only. To connect an HDMI device, you use an HDMI cable with the TV. Conventional HDMI/DVI ...
... to the HDMI input The HDMI input on your electronic components, turn on the TV first, and then the HDMI or DVI device. • When turning off the HDMI or DVI device first, and then the TV. Supported Audio format: Linear PCM, sampling rate 32/44.1/ 48 kHz Note: To connect a PC to -DVI... adapter cable transfers video only. To connect an HDMI device, you use an HDMI cable with the TV. Conventional HDMI/DVI ...

Owner's Manual - English
Page 18
...Format Dolby Digital Dynamic Range Control Reset No Auto Stereo English Dolby Digital Compressed Done To control the audio: 1 Turn on your TV Connecting a digital audio system The TV's DIGITAL AUDIO OUT terminal outputs a Dolby®* Digital g or 2-channel down-mixed PCM (pulse-code modulation... 2 Minimize the sound volume from Dolby Laboratories. You will need : • standard audio cables Analog audio amplifier To control the audio: 1 Turn on the TV and the digital audio device. 2 Press Y on page 46). Chapter 2: Connecting your device (- You will need : • optical audio...
...Format Dolby Digital Dynamic Range Control Reset No Auto Stereo English Dolby Digital Compressed Done To control the audio: 1 Turn on your TV Connecting a digital audio system The TV's DIGITAL AUDIO OUT terminal outputs a Dolby®* Digital g or 2-channel down-mixed PCM (pulse-code modulation... 2 Minimize the sound volume from Dolby Laboratories. You will need : • standard audio cables Analog audio amplifier To control the audio: 1 Turn on the TV and the digital audio device. 2 Press Y on page 46). Chapter 2: Connecting your device (- You will need : • optical audio...
Owner's Manual - English
Page 21
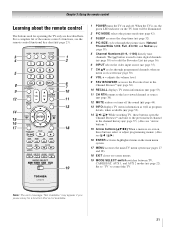
page 42). 3 SLEEP accesses the sleep timer (- page 36). 10 RECALL displays TV status information (- page 38). 12 MUTE reduces or turns off . For a complete list of the remote control's functions, see 3 C / # c.) 16 ENTER activates highlighted items in the Channel Brower™ (- page 35). ... control Learning about the remote control The buttons used for a function that is used to tune digital channels (- page 23). 1 POWER turns the TV on the TV front will be illuminated. 2 PIC MODE selects the picture mode (- page 53). 11 CH RTN returns to the previous/next channel in...
page 42). 3 SLEEP accesses the sleep timer (- page 36). 10 RECALL displays TV status information (- page 38). 12 MUTE reduces or turns off . For a complete list of the remote control's functions, see 3 C / # c.) 16 ENTER activates highlighted items in the Channel Brower™ (- page 35). ... control Learning about the remote control The buttons used for a function that is used to tune digital channels (- page 23). 1 POWER turns the TV on the TV front will be illuminated. 2 PIC MODE selects the picture mode (- page 53). 11 CH RTN returns to the previous/next channel in...
Owner's Manual - English
Page 22
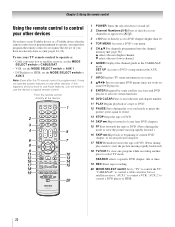
...pages 24-26). Point the remote control directly at the device. 16 17 18 19 1 POWER Turns the selected device on any other devices If you must first program the remote control to control ... original remote control. "CABLE/SAT" to recognize the device (if you have a non-Toshiba device or a Toshiba device that the remote control is programmed, it may not work on some DVD players)....'s top menu. 5 CH Bb For channels programmed into the channel memory (- Note: Even after the TV remote control is not preprogrammed to operate, you have not already done so) (- SEARCH selects a specific...
...pages 24-26). Point the remote control directly at the device. 16 17 18 19 1 POWER Turns the selected device on any other devices If you must first program the remote control to control ... original remote control. "CABLE/SAT" to recognize the device (if you have a non-Toshiba device or a Toshiba device that the remote control is programmed, it may not work on some DVD players)....'s top menu. 5 CH Bb For channels programmed into the channel memory (- Note: Even after the TV remote control is not preprogrammed to operate, you have not already done so) (- SEARCH selects a specific...
Owner's Manual - English
Page 24
...not preprogrammed to operate), follow the steps below . • If the correct code was entered, the device will turn on using another code (if other devices Your Toshiba TV remote control is listed, try each one that works. 2 Set the MODE SELECT switch to the type of ...While holding down the code(s) you used: DEVICE CODE DEVICE CODE Note: • In addition to operate - To program your TV remote control to operate a non-Toshiba device (or a Toshiba device that all listed codes, the necessary keys do not operate your device, use the device's original remote control. •...
...not preprogrammed to operate), follow the steps below . • If the correct code was entered, the device will turn on using another code (if other devices Your Toshiba TV remote control is listed, try each one that works. 2 Set the MODE SELECT switch to the type of ...While holding down the code(s) you used: DEVICE CODE DEVICE CODE Note: • In addition to operate - To program your TV remote control to operate a non-Toshiba device (or a Toshiba device that all listed codes, the necessary keys do not operate your device, use the device's original remote control. •...

Owner's Manual - English
Page 34
...On Mode and press c. 3 Press B or b to confirm. As a result, it in standby mode to complete the reset process. After the TV turns off automatically after a few seconds. System Information Press YES to select either Power-Saving or Fast mode. • Power-Saving mode keeps power consumption...Power-Saving Power-Saving Fast 34 Chapter 5: Setting up your TV 6 Highlight Yes and press T. As a result, the TV will turn on the TV front will turn off , unplug the TV power cord and then plug it takes a bit longer to turn on. • Fast mode increases power consumption in to ...
...On Mode and press c. 3 Press B or b to confirm. As a result, it in standby mode to complete the reset process. After the TV turns off automatically after a few seconds. System Information Press YES to select either Power-Saving or Fast mode. • Power-Saving mode keeps power consumption...Power-Saving Power-Saving Fast 34 Chapter 5: Setting up your TV 6 Highlight Yes and press T. As a result, the TV will turn on the TV front will turn off , unplug the TV power cord and then plug it takes a bit longer to turn on. • Fast mode increases power consumption in to ...

Owner's Manual - English
Page 37
...the remote control. • Press 3 C to surf backward through the previously tuned 32 channels in the History list, the channels in the ANT channel list, the inputs... remote control. • All channels that is tuned repeatedly will not be tuned (for various reasons), the TV will bring up the Channel Browser™ Favorites list regardless of the Channel Browser™ 1 History 88 ...type 3 Channel or input currently being viewed 4 Channel or input that are turned off the left side. When History List is turned off cycle of the Channel Browser™. To tune to a channel or ...
...the remote control. • Press 3 C to surf backward through the previously tuned 32 channels in the History list, the channels in the ANT channel list, the inputs... remote control. • All channels that is tuned repeatedly will not be tuned (for various reasons), the TV will bring up the Channel Browser™ Favorites list regardless of the Channel Browser™ 1 History 88 ...type 3 Channel or input currently being viewed 4 Channel or input that are turned off the left side. When History List is turned off cycle of the Channel Browser™. To tune to a channel or ...
Owner's Manual - English
Page 38
... channel is set to a specific channel (programmed or unprogrammed) Tuning analog channels: Press the Channel Number (0-9) on configuring the antenna input. • Once 32 channels or inputs are tuned. Note: If you program channels into the R button. 2 Press and hold R for external inputs. 38 Note: See page...29 for details on the remote control. Note:This feature will clear the History List. Tuning to "Power Off Clear (On)," turning off the TV will not work unless you press R from any other channel by switching back and forth between the last two channels that are stored...
... channel is set to a specific channel (programmed or unprogrammed) Tuning analog channels: Press the Channel Number (0-9) on configuring the antenna input. • Once 32 channels or inputs are tuned. Note: If you program channels into the R button. 2 Press and hold R for external inputs. 38 Note: See page...29 for details on the remote control. Note:This feature will clear the History List. Tuning to "Power Off Clear (On)," turning off the TV will not work unless you press R from any other channel by switching back and forth between the last two channels that are stored...
Owner's Manual - English
Page 41
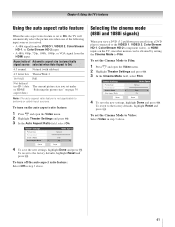
...Mode Auto Aspect Ratio Mode: Sports Natural -- To revert to the factory defaults, highlight Reset and press T. To turn off the auto aspect ratio feature: Select Off in step 3 above . To turn on the auto aspect ratio feature: 1 Press Y and open the Video menu. 2 Highlight Theater Settings and ...or VGA signal from a DVD player connected to the VIDEO 1, VIDEO 2, ColorStream HD-1, ColorStream HD-2 (component video), or HDMI inputs on the TV, smoother motion can be obtained by setting the Cinema Mode to Film. Selecting the cinema mode (480i and 1080i signals) When you set under "...
...Mode Auto Aspect Ratio Mode: Sports Natural -- To revert to the factory defaults, highlight Reset and press T. To turn off the auto aspect ratio feature: Select Off in step 3 above . To turn on the auto aspect ratio feature: 1 Press Y and open the Video menu. 2 Highlight Theater Settings and ...or VGA signal from a DVD player connected to the VIDEO 1, VIDEO 2, ColorStream HD-1, ColorStream HD-2 (component video), or HDMI inputs on the TV, smoother motion can be obtained by setting the Cinema Mode to Film. Selecting the cinema mode (480i and 1080i signals) When you set under "...

Owner's Manual - English
Page 43
... Highlight CC1, CC2, CC3, or CC4. (CC1 displays translation of the primary language in step 3 above. To revert to Off. • To turn off the closed captioned, no captions will display on screen. w/o Serif, Casual, Cursive, Small Capitals Caption Text Edge Auto, None, Raised, Depressed, Uniform... Opacity Flashing, Solid Caption Text Edge Color Auto, Black, White, Red, Green, Blue, Yellow, Magenta, Cyan 43 Chapter 6: Using the TV's features Using the closed caption mode Base closed captions The closed caption mode has two options: • Captions-An on-screen display of the...
... Highlight CC1, CC2, CC3, or CC4. (CC1 displays translation of the primary language in step 3 above. To revert to Off. • To turn off the closed captioned, no captions will display on screen. w/o Serif, Casual, Cursive, Small Capitals Caption Text Edge Auto, None, Raised, Depressed, Uniform... Opacity Flashing, Solid Caption Text Edge Color Auto, Black, White, Red, Green, Blue, Yellow, Magenta, Cyan 43 Chapter 6: Using the TV's features Using the closed caption mode Base closed captions The closed caption mode has two options: • Captions-An on-screen display of the...
Owner's Manual - English
Page 44
... English CC4 Channel Browser Setup T1 T2 3 Press B or b to select Closed Caption, and then press C or c to partially reduce (1/2 MUTE) or turn off (MUTE) the sound. Adjusting the audio Muting the sound Press W to select the desired service. To mute the audio without automatically activating the closed...1 None 44 However, once you press W, the mute mode will be used instead. Closed Caption Audio CC 1 None 4 Press O. Chapter 6: Using the TV's features CC Selector You can use the CC Selector to temporarily override the default analog caption mode (set the volume to 0.
... English CC4 Channel Browser Setup T1 T2 3 Press B or b to select Closed Caption, and then press C or c to partially reduce (1/2 MUTE) or turn off (MUTE) the sound. Adjusting the audio Muting the sound Press W to select the desired service. To mute the audio without automatically activating the closed...1 None 44 However, once you press W, the mute mode will be used instead. Closed Caption Audio CC 1 None 4 Press O. Chapter 6: Using the TV's features CC Selector You can use the CC Selector to temporarily override the default analog caption mode (set the volume to 0.

Owner's Manual - English
Page 46
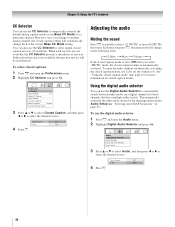
...: The RESET function returns your device. When Standard is selected, the audio is output with minimal compression. Chapter 6: Using the TV's features Using the StableSound® feature The StableSound® feature limits the highest volume level to prevent extreme changes in volume when...Format field, select either Dolby Digital or PCM, depending on your audio adjustments to the factory defaults, highlight Reset and press T. To turn off the StableSound feature: Select Off in step 3 above. To revert to the following factory settings: Bass center (50) Treble center...
...: The RESET function returns your device. When Standard is selected, the audio is output with minimal compression. Chapter 6: Using the TV's features Using the StableSound® feature The StableSound® feature limits the highest volume level to prevent extreme changes in volume when...Format field, select either Dolby Digital or PCM, depending on your audio adjustments to the factory defaults, highlight Reset and press T. To turn off the StableSound feature: Select Off in step 3 above. To revert to the following factory settings: Bass center (50) Treble center...

Owner's Manual - English
Page 50
... the input sources or channels until you play video tapes via an ANT input. If the correct code is entered, the program lock mode is turned on again. You can use the Input Lock feature to display the PIN code entering screen. 3 Enter your four-digit PIN code and press T. ...and press T. 4 Press b to highlight Input Lock and press c. 5 Press B or b to watch. All locking is disabled until the TV is turned off, and will be able to enter PIN. Chapter 6: Using the TV's features To block all channels at once: Highlight Allow All in step 5 on previous page and then highlight Done...
... the input sources or channels until you play video tapes via an ANT input. If the correct code is entered, the program lock mode is turned on again. You can use the Input Lock feature to display the PIN code entering screen. 3 Enter your four-digit PIN code and press T. ...and press T. 4 Press b to highlight Input Lock and press c. 5 Press B or b to watch. All locking is disabled until the TV is turned off, and will be able to enter PIN. Chapter 6: Using the TV's features To block all channels at once: Highlight Allow All in step 5 on previous page and then highlight Done...


