Owner's Manual - English
Page 1
...steps for setting up your new TV, see page 9. Record these numbers whenever you communicate with your TV. Note: To display a High Definition picture, the TV must be receiving a High Definition signal (such as an over-the-air High Definition TV broadcast,... a High Definition digital cable program, or a High Definition digital satellite program). Refer to these numbers in the spaces below. Model number: Serial number: YC/M1 VX1A000401A0 Integrated High Definition LCD Television HIGH-DEFINITION TELEVISION 26HL67 32HL67 32HL67U 37HL67 42HL67 For an overview of your Toshiba...
...steps for setting up your new TV, see page 9. Record these numbers whenever you communicate with your TV. Note: To display a High Definition picture, the TV must be receiving a High Definition signal (such as an over-the-air High Definition TV broadcast,... a High Definition digital cable program, or a High Definition digital satellite program). Refer to these numbers in the spaces below. Model number: Serial number: YC/M1 VX1A000401A0 Integrated High Definition LCD Television HIGH-DEFINITION TELEVISION 26HL67 32HL67 32HL67U 37HL67 42HL67 For an overview of your Toshiba...
Owner's Manual - English
Page 7
...Toshiba 8 Features of your new TV 8 Overview of steps for installing, setting up, and using your new TV 9 TV front and side panel controls and connections 10 TV back panel connections 11 Chapter 2: Connecting your TV...Setting up your TV 29 Selecting the...TV's channel memory . . . . 30 Programming channels automatically 30 Manually adding and deleting channels in the channel memory 30 Labeling channels 31 Setting the HDMI™ audio mode 32... CC Settings 43...settings feature 51 Setting the PC Audio 52 Setting the sleep timer 52 Displaying TV...the advanced audio settings features 57 Using...
...Toshiba 8 Features of your new TV 8 Overview of steps for installing, setting up, and using your new TV 9 TV front and side panel controls and connections 10 TV back panel connections 11 Chapter 2: Connecting your TV...Setting up your TV 29 Selecting the...TV's channel memory . . . . 30 Programming channels automatically 30 Manually adding and deleting channels in the channel memory 30 Labeling channels 31 Setting the HDMI™ audio mode 32... CC Settings 43...settings feature 51 Setting the PC Audio 52 Setting the sleep timer 52 Displaying TV...the advanced audio settings features 57 Using...
Owner's Manual - English
Page 8
...programming. Features of your new TV The following are just a few of the many exciting features of your new Toshiba widescreen, integrated HD, LCD TV: • Integrated digital tuning (8VSB ATSC and QAM) eliminates the need for purchasing this Toshiba LCD TV, one of receiving analog basic,...re watching (- A security card provided by direct connection to put the Call Letters (e.g. page 17). • Two sets of a set -top box (in most innovative LCD TVs on -demand, a cable operator's enhanced program guide and data-enhanced television services may require the use of ColorStream®...
...programming. Features of your new TV The following are just a few of the many exciting features of your new Toshiba widescreen, integrated HD, LCD TV: • Integrated digital tuning (8VSB ATSC and QAM) eliminates the need for purchasing this Toshiba LCD TV, one of receiving analog basic,...re watching (- A security card provided by direct connection to put the Call Letters (e.g. page 17). • Two sets of a set -top box (in most innovative LCD TVs on -demand, a cable operator's enhanced program guide and data-enhanced television services may require the use of ColorStream®...
Owner's Manual - English
Page 9
... the TV: • Read "Important notes about the remote control" (- THIS TYPE OF DAMAGE IS NOT COVERED UNDER THE TOSHIBA WARRANTY....LCD TV" (- page 30). 12 For details on the TV. Inadequate ventilation may cause overheating, which will blink until AFTER you cannot turn on using the TV's features, see Chapters 6 and 7. 13 For help, refer to the TV (- When the TV... is in the remote control (- The yellow LED will damage the TV. Chapter 1: Introduction Overview of steps for installing, setting up, and using your new TV Follow these steps to reset the TV...
... the TV: • Read "Important notes about the remote control" (- THIS TYPE OF DAMAGE IS NOT COVERED UNDER THE TOSHIBA WARRANTY....LCD TV" (- page 30). 12 For details on the TV. Inadequate ventilation may cause overheating, which will blink until AFTER you cannot turn on using the TV's features, see Chapters 6 and 7. 13 For help, refer to the TV (- When the TV... is in the remote control (- The yellow LED will damage the TV. Chapter 1: Introduction Overview of steps for installing, setting up, and using your new TV Follow these steps to reset the TV...
Owner's Manual - English
Page 11
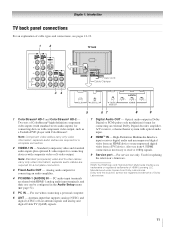
...plus optional S-video inputs for connecting devices with component video output, such as a Toshiba DVD player with composite video or S-video output. Note: Standard (composite) video and... audio outputs for a complete connection. 2 VIDEO-1 IN - Also see pages 12-19. 1 2 TV back 34 Power cord Cable Clamper 5 67 8 9 1 ColorStream® HD-1 and ColorStream® HD...the HDMI logo and High-Definition Multimedia Interface are registered trademarks of Dolby Laboratories. 11 Two sets of ColorStream® high-definition component video inputs (with standard stereo audio inputs) for ...
...plus optional S-video inputs for connecting devices with component video output, such as a Toshiba DVD player with composite video or S-video output. Note: Standard (composite) video and... audio outputs for a complete connection. 2 VIDEO-1 IN - Also see pages 12-19. 1 2 TV back 34 Power cord Cable Clamper 5 67 8 9 1 ColorStream® HD-1 and ColorStream® HD...the HDMI logo and High-Definition Multimedia Interface are registered trademarks of Dolby Laboratories. 11 Two sets of ColorStream® high-definition component video inputs (with standard stereo audio inputs) for ...
Owner's Manual - English
Page 12
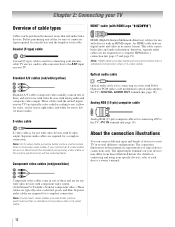
... left (or mono) audio. Coaxial (F-type) cable Coaxial (F-type) cable is Toshiba's brand of each device's owner's manual. Standard A/V cables (red/white/yellow) Standard A/V cables (composite video) usually come in sets of three and are typically color-coded red, green, and blue. Analog RGB ...to disconnect the standard (composite) video cable or the picture performance will be purchased from those illustrated herein. For details on your TV. Separate audio cables are typically color-coded according to use with devices with component video output. (ColorStream® is used for...
... left (or mono) audio. Coaxial (F-type) cable Coaxial (F-type) cable is Toshiba's brand of each device's owner's manual. Standard A/V cables (red/white/yellow) Standard A/V cables (composite video) usually come in sets of three and are typically color-coded red, green, and blue. Analog RGB ...to disconnect the standard (composite) video cable or the picture performance will be purchased from those illustrated herein. For details on your TV. Separate audio cables are typically color-coded according to use with devices with component video output. (ColorStream® is used for...

Owner's Manual - English
Page 14
...cables - If you to program or access certain features on the remote control (- Use the Cable box controls to operate other materials is set to your TV Connecting a VCR with S-video and a cable box An S-video connection will provide better picture performance than a standard (composite) video cable... programs, videotapes, DVDs, and other devices, see Chapter 3. Select the VIDEO 1 video input source on the TV.* * To select the video input source, press INPUT on the TV. Chapter 2: Connecting your VCR's audio out terminal using the white audio cable only. To view basic and premium...
...cables - If you to program or access certain features on the remote control (- Use the Cable box controls to operate other materials is set to your TV Connecting a VCR with S-video and a cable box An S-video connection will provide better picture performance than a standard (composite) video cable... programs, videotapes, DVDs, and other devices, see Chapter 3. Select the VIDEO 1 video input source on the TV.* * To select the video input source, press INPUT on the TV. Chapter 2: Connecting your VCR's audio out terminal using the white audio cable only. To view basic and premium...
Owner's Manual - English
Page 15
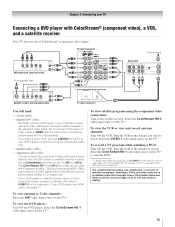
...player or satellite receiver to your TV Connecting a DVD player with ColorStream® (component video), a VCR, and a satellite receiver Your TV has two sets of ColorStream terminals on the TV (HD-1 or HD-2). Select the VIDEO 1 video input source on the TV.* To view the VCR or ...coaxial cables • standard A/V cables - If your DVD player or satellite receiver does not have a mono VCR, connect L/MONO on the TV to either set of ColorStream® (component video) inputs. For better picture performance, if your DVD player has HDMI video, see Chapter 3. Select the ...
...player or satellite receiver to your TV Connecting a DVD player with ColorStream® (component video), a VCR, and a satellite receiver Your TV has two sets of ColorStream terminals on the TV (HD-1 or HD-2). Select the VIDEO 1 video input source on the TV.* To view the VCR or ...coaxial cables • standard A/V cables - If your DVD player or satellite receiver does not have a mono VCR, connect L/MONO on the TV to either set of ColorStream® (component video) inputs. For better picture performance, if your DVD player has HDMI video, see Chapter 3. Select the ...

Owner's Manual - English
Page 17
... on your electronic components, turn on your electronic components, turn off the HDMI or DVI device first, and then the TV. See "Setting the HDMI™ audio mode" (- page 32). TV upper back panel TV lower back panel DVI device VIDEO AUDIO L R IN IN DVI / HDCP OUT OUT L R Note: To ensure that the HDMI or...
... on your electronic components, turn on your electronic components, turn off the HDMI or DVI device first, and then the TV. See "Setting the HDMI™ audio mode" (- page 32). TV upper back panel TV lower back panel DVI device VIDEO AUDIO L R IN IN DVI / HDCP OUT OUT L R Note: To ensure that the HDMI or...

Owner's Manual - English
Page 18
.... 18 Connecting an audio system This connection allows you to adjust the sound level. LINE IN LR TV upper back panel Audio Digital Audio Selector Audio Settings Advanced Audio Settings Audio Setup 4 In the Optical Output Format field, select either Dolby Digital or PCM, depending on the... TV and the stereo amplifier. 2 Minimize the sound volume from Dolby Laboratories. Dolby, and the double-D symbol are ...
.... 18 Connecting an audio system This connection allows you to adjust the sound level. LINE IN LR TV upper back panel Audio Digital Audio Selector Audio Settings Advanced Audio Settings Audio Setup 4 In the Optical Output Format field, select either Dolby Digital or PCM, depending on the... TV and the stereo amplifier. 2 Minimize the sound volume from Dolby Laboratories. Dolby, and the double-D symbol are ...
Owner's Manual - English
Page 19
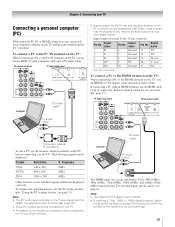
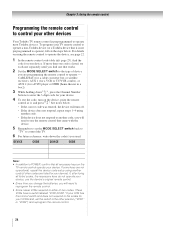
... PC audio cable PC audio output The HDMI input can watch your computer's display on the TV, use the PC setting feature (- no overscanning). 19 Chapter 2: Connecting your TV Connecting a personal computer (PC) With either the PC IN or HDMI connection, you can accept... 5 NC Pin No. Signal name 6 Ground 7 Ground 8 Ground 9 NC 10 Ground Pin No. TV upper back panel TV lower back panel PC audio output Conversion adapter (if necessary) • To use a PC, set the monitor output resolution on the TV are shared with a compatible mini D-sub15-pin terminal. "Using the PC...
... PC audio cable PC audio output The HDMI input can watch your computer's display on the TV, use the PC setting feature (- no overscanning). 19 Chapter 2: Connecting your TV Connecting a personal computer (PC) With either the PC IN or HDMI connection, you can accept... 5 NC Pin No. Signal name 6 Ground 7 Ground 8 Ground 9 NC 10 Ground Pin No. TV upper back panel TV lower back panel PC audio output Conversion adapter (if necessary) • To use a PC, set the monitor output resolution on the TV are shared with a compatible mini D-sub15-pin terminal. "Using the PC...
Owner's Manual - English
Page 21
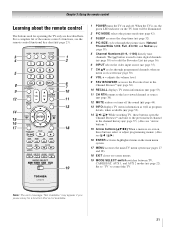
... -/100) directly tune channels. page 30). 8 VOL + - page 38). 12 MUTE reduces or turns off . page 44). 13 INFO displays TV status information as well as program details, when available (- Chapter 3: Using the remote control Learning about the remote control The buttons used to edit the...MODE selects the picture mode (- page 36). 10 RECALL displays TV status information (- page 53). 11 CH RTN returns to control the TV. adjusts the volume level. 9 FAV BROWSER accesses the Favorites List in the channel history (- Set to "TV" to the last viewed channel or source (- page 42). ...
... -/100) directly tune channels. page 30). 8 VOL + - page 38). 12 MUTE reduces or turns off . page 44). 13 INFO displays TV status information as well as program details, when available (- Chapter 3: Using the remote control Learning about the remote control The buttons used to edit the...MODE selects the picture mode (- page 36). 10 RECALL displays TV status information (- page 53). 11 CH RTN returns to control the TV. adjusts the volume level. 9 FAV BROWSER accesses the Favorites List in the channel history (- Set to "TV" to the last viewed channel or source (- page 42). ...
Owner's Manual - English
Page 22
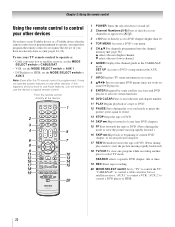
... chapters. 17 REW Rewinds/reverses the tape or DVD. (Press during play or record mode to use those features, you have a non-Toshiba device or a Toshiba device that the remote control is programmed, it may not work on and off. 2 Channel Numbers (0-9) Press to directly access channels (as... control a cable converter box or satellite receiver; If this happens and you wish to control the TV; SET UP Accesses a DVD's setup menu in the CABLE/SAT mode. Note: Even after the TV remote control is not preprogrammed to operate, you must first program the remote control to recognize the ...
... chapters. 17 REW Rewinds/reverses the tape or DVD. (Press during play or record mode to use those features, you have a non-Toshiba device or a Toshiba device that the remote control is programmed, it may not work on and off. 2 Channel Numbers (0-9) Press to directly access channels (as... control a cable converter box or satellite receiver; If this happens and you wish to control the TV; SET UP Accesses a DVD's setup menu in the CABLE/SAT mode. Note: Even after the TV remote control is not preprogrammed to operate, you must first program the remote control to recognize the ...

Owner's Manual - English
Page 23
REMOTE CONTROL KEY Toshiba TV CABLE SAT (satellite) POWER SLEEP PIC SIZE PIC MODE Power Sleep timer Picture size PIC MODE Power s TV s TV s TV Power s TV s TV s TV 1-9 Digit 1-9 Digit 1-9 Digit 1-9 0 Digit 0 Digit 0 Digit 0 100/-/+10 INPUT - (sub CH) TV/Video select --s TV - (sub CH) s TV FAV BROWSER/ TOP MENU MUTE FAV BROWSER DVD TOP Menu* Sound mute --s TV --s TV SET UP/GUIDE VOL...
REMOTE CONTROL KEY Toshiba TV CABLE SAT (satellite) POWER SLEEP PIC SIZE PIC MODE Power Sleep timer Picture size PIC MODE Power s TV s TV s TV Power s TV s TV s TV 1-9 Digit 1-9 Digit 1-9 Digit 1-9 0 Digit 0 Digit 0 Digit 0 100/-/+10 INPUT - (sub CH) TV/Video select --s TV - (sub CH) s TV FAV BROWSER/ TOP MENU MUTE FAV BROWSER DVD TOP Menu* Sound mute --s TV --s TV SET UP/GUIDE VOL...
Owner's Manual - English
Page 24
... necessary keys do not operate your device, use the remote control that came with the device. 5 Remember to set the switch to operate most Toshiba devices. page 25), find one that works. 2 Set the MODE SELECT switch to the type of switch and does not respond to the codes for your VCR... brand, set the MODE SELECT switch back to "TV" to control the TV. 6 For future reference, write down E, press the Channel Number...
... necessary keys do not operate your device, use the remote control that came with the device. 5 Remember to set the switch to operate most Toshiba devices. page 25), find one that works. 2 Set the MODE SELECT switch to the type of switch and does not respond to the codes for your VCR... brand, set the MODE SELECT switch back to "TV" to control the TV. 6 For future reference, write down E, press the Channel Number...
Owner's Manual - English
Page 27
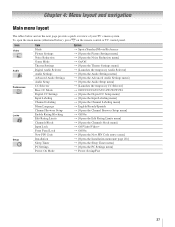
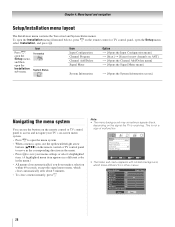
Icon Video Audio Preferences Locks Setup Item Mode Picture Settings Noise Reduction Game Mode Theater Settings Digital Audio Selector Audio Settings Advanced Audio Settings Audio Setup CC Selector Base CC Mode Digital CC Settings Input Labeling Channel Labeling Menu Language Channel Browser Setup Enable Rating... the Installation menu (- To open the main menus (illustrated below and on the remote control or TV control panel. page 28)] S [Opens the Sleep Timer menu] S [Opens the PC Settings menu] S Power-Saving/Fast 27 Chapter 4: Menu layout and navigation Main menu layout The tables ...
Icon Video Audio Preferences Locks Setup Item Mode Picture Settings Noise Reduction Game Mode Theater Settings Digital Audio Selector Audio Settings Advanced Audio Settings Audio Setup CC Selector Base CC Mode Digital CC Settings Input Labeling Channel Labeling Menu Language Channel Browser Setup Enable Rating... the Installation menu (- To open the main menus (illustrated below and on the remote control or TV control panel. page 28)] S [Opens the Sleep Timer menu] S [Opens the PC Settings menu] S Power-Saving/Fast 27 Chapter 4: Menu layout and navigation Main menu layout The tables ...
Owner's Manual - English
Page 28
... up/down/left/right arrow buttons (BbC c) on the signal the TV is not a sign of malfunction. Picture Settings Contrast 100 Back Light 100 DynaLight Brightness 50 Color 50 Tint 0 Sharpness 50 Advanced Picture Settings Reset Mode: Sports On Done 28 Note: • The menu background... may sometimes appear black, depending on the remote control or TV control panel to move in the corresponding direction in the menu. •...
... up/down/left/right arrow buttons (BbC c) on the signal the TV is not a sign of malfunction. Picture Settings Contrast 100 Back Light 100 DynaLight Brightness 50 Color 50 Tint 0 Sharpness 50 Advanced Picture Settings Reset Mode: Sports On Done 28 Note: • The menu background... may sometimes appear black, depending on the remote control or TV control panel to move in the corresponding direction in the menu. •...
Owner's Manual - English
Page 29
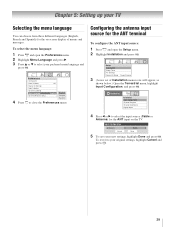
..., highlight Input Configuration, and press T. Chapter 5: Setting up your new settings, highlight Done and press T. Installation Terrestrial Input Configuration Channel Program Channel Add/Delete Signal Meter 4 Press C or c to your preferred menu language and press T. Input Configuration Antenna In Cancel Cable Done 5 To save your TV Selecting the menu language You can choose...
..., highlight Input Configuration, and press T. Chapter 5: Setting up your new settings, highlight Done and press T. Installation Terrestrial Input Configuration Channel Program Channel Add/Delete Signal Meter 4 Press C or c to your preferred menu language and press T. Input Configuration Antenna In Cancel Cable Done 5 To save your TV Selecting the menu language You can choose...

Owner's Manual - English
Page 30
... and press T). Setup Installation Sleep Timer PC Settings Power-On Mode Power-Saving 4 (A new set of Channels Found - 73 Scanning Digital Channels Found Channel - 118 Abort The TV will stop only on the channels you programmed into the TV's channel memory. To program channels automatically: ...cycling through all the antenna channels, and store all active channels in your Cable TV service lineup changes significantly. page 29). • If the Antenna input signal type is set to Cable, the automatic channel programming process erases channels that were previously programmed into...
... and press T). Setup Installation Sleep Timer PC Settings Power-On Mode Power-Saving 4 (A new set of Channels Found - 73 Scanning Digital Channels Found Channel - 118 Abort The TV will stop only on the channels you programmed into the TV's channel memory. To program channels automatically: ...cycling through all the antenna channels, and store all active channels in your Cable TV service lineup changes significantly. page 29). • If the Antenna input signal type is set to Cable, the automatic channel programming process erases channels that were previously programmed into...
Owner's Manual - English
Page 31
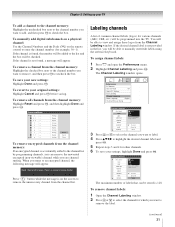
... enter the channel number (for which you are channel surfing. To save your settings, highlight Done and press T. Preferences CC Selector Off Base CC Mode Off CC1 Digital CC Settings CC2 Input Labeling CC3 Channel Labeling CC4 Menu Language English T1 Channel Browser Setup T2... Done The maximum number of common channel labels (logos) for other channels. 6 To save your original settings: Highlight Cancel and press T before saving. Chapter 5: Setting up your TV To add a channel to the channel memory: Highlight the unchecked box next to the channel number you tunes...
... enter the channel number (for which you are channel surfing. To save your settings, highlight Done and press T. Preferences CC Selector Off Base CC Mode Off CC1 Digital CC Settings CC2 Input Labeling CC3 Channel Labeling CC4 Menu Language English T1 Channel Browser Setup T2... Done The maximum number of common channel labels (logos) for other channels. 6 To save your original settings: Highlight Cancel and press T before saving. Chapter 5: Setting up your TV To add a channel to the channel memory: Highlight the unchecked box next to the channel number you tunes...


