
Owners Manual
Page 8
...174; (component video), a VCR, and a satellite receiver ... 15 Connecting an HDMI® or DVI device to the HDMI input 16 REGZA-LINK® connection 17 Connecting a digital audio system 18 Connecting a personal computer (PC 18 Chapter 3: Using the... Chapter 5: Setting up your TV 24 Initial Setup 24 Selecting the menu language 24 Configuring the antenna input source for the ANT/CABLE terminal 24 Programming channels into the TV's channel memory .... 25 Programming channels...States Warranty for LCD Televisions....... 55 Limited Canadian Warranty for Toshiba Brand Flat Panel Televisions 56
...174; (component video), a VCR, and a satellite receiver ... 15 Connecting an HDMI® or DVI device to the HDMI input 16 REGZA-LINK® connection 17 Connecting a digital audio system 18 Connecting a personal computer (PC 18 Chapter 3: Using the... Chapter 5: Setting up your TV 24 Initial Setup 24 Selecting the menu language 24 Configuring the antenna input source for the ANT/CABLE terminal 24 Programming channels into the TV's channel memory .... 25 Programming channels...States Warranty for LCD Televisions....... 55 Limited Canadian Warranty for Toshiba Brand Flat Panel Televisions 56

Owners Manual
Page 9
...of external devices from the TV remote via HDMI connection ( page 46). • Media Player allows you to view your new Toshiba widescreen, integrated HD, LCD TV: • Integrated digital tuning (8VSB ATSC and QAM) eliminates the need for a separate digital converter... set-top box (in most cases). • 1366 x 768 output resolution (32DT2U1 / 32DT2UL1). 1920 x 1080 output resoluation (40FT2U1). • HDMI® digital, high-definition multimedia interfaces 1080p input support ( page 16). • One set of your JPEG files ( page 43). ...
...of external devices from the TV remote via HDMI connection ( page 46). • Media Player allows you to view your new Toshiba widescreen, integrated HD, LCD TV: • Integrated digital tuning (8VSB ATSC and QAM) eliminates the need for a separate digital converter... set-top box (in most cases). • 1366 x 768 output resolution (32DT2U1 / 32DT2UL1). 1920 x 1080 output resoluation (40FT2U1). • HDMI® digital, high-definition multimedia interfaces 1080p input support ( page 16). • One set of your JPEG files ( page 43). ...
Owners Manual
Page 11
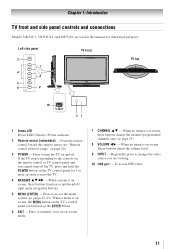
.... 7無 CHANNEL pq - Repeatedly press to change the channel (programmed channels only; page 25). 8無 VOLUME tu - These buttons adjust the volume level. 9無 INPUT - Press to instantly close an on -screen, these buttons function as the ENTER button. 6無 EXIT - To access JPEG files. 11 Press to reset the.... 4無 ARROWS pqtu - When no menu is onscreen, the MENU button on and off. Chapter 1: Introduction TV front and side panel controls and connections Models 32DT2U1, 32DT2UL1, and 40FT2U1 are viewing. 10無 USB port -
.... 7無 CHANNEL pq - Repeatedly press to change the channel (programmed channels only; page 25). 8無 VOLUME tu - These buttons adjust the volume level. 9無 INPUT - Press to instantly close an on -screen, these buttons function as the ENTER button. 6無 EXIT - To access JPEG files. 11 Press to reset the.... 4無 ARROWS pqtu - When no menu is onscreen, the MENU button on and off. Chapter 1: Introduction TV front and side panel controls and connections Models 32DT2U1, 32DT2UL1, and 40FT2U1 are viewing. 10無 USB port -
Owners Manual
Page 12
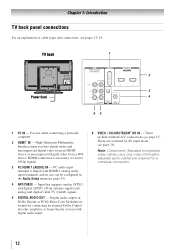
... connecting an external Dolby Digital decoder, amplifier, or home theater system with HDMI 1 analog audio input terminals, and its use when connecting a personal computer. 2無 HDMI® IN - PC audio input terminal is necessary to receive 1080p signals. 3無 PC/HDMI 1 (AUDIO) IN - High...audio output in Dolby Digital or PCM (Pulse-Code Modulation) format for a complete connection. 12 separate audio cables are switched by AV input mode ( page 26). Chapter 1: Introduction TV back panel connections For an explanation of cable types and connections, see pages 13-19...
... connecting an external Dolby Digital decoder, amplifier, or home theater system with HDMI 1 analog audio input terminals, and its use when connecting a personal computer. 2無 HDMI® IN - PC audio input terminal is necessary to receive 1080p signals. 3無 PC/HDMI 1 (AUDIO) IN - High...audio output in Dolby Digital or PCM (Pulse-Code Modulation) format for a complete connection. 12 separate audio cables are switched by AV input mode ( page 26). Chapter 1: Introduction TV back panel connections For an explanation of cable types and connections, see pages 13-19...

Owners Manual
Page 13
...) video. 13 Note: Separate audio cables are for use with video devices with Dolby Digital or PCM (pulse-code modulation) digital audio input to the TV's DIGITAL AUDIO OUT terminal ( page 18). Standard A/V cables (red/white/yellow) Standard A/V cables (composite video)... ( page 16 and page 19). This cable carries both video and audio information; HDMI (High-Definition Multimedia Interface) cable is Toshiba's brand of component video.) These cables are representative of each device's owner's manual. Coaxial cable (F-type) (F-type) Coaxial cable is...
...) video. 13 Note: Separate audio cables are for use with video devices with Dolby Digital or PCM (pulse-code modulation) digital audio input to the TV's DIGITAL AUDIO OUT terminal ( page 18). Standard A/V cables (red/white/yellow) Standard A/V cables (composite video)... ( page 16 and page 19). This cable carries both video and audio information; HDMI (High-Definition Multimedia Interface) cable is Toshiba's brand of component video.) These cables are representative of each device's owner's manual. Coaxial cable (F-type) (F-type) Coaxial cable is...
Owners Manual
Page 14
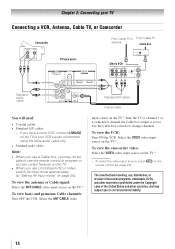
... out terminal using the white audio cable only. • Standard audio cables. To view the antenna or Cable signal: Select the ANT/CABLE video input source on the TV to your TV Connecting a VCR, Antenna, Cable TV, or Camcorder Camcorder AUDIO OUT L R VIDEO TV back panel From ... box controls to program or access certain features on the TV. • When you use ColorStream HD or Video, switch AV input mode appropriately ("Setting AV Input mode" on the The unauthorized recording, use, distribution, or revision of television programs, videotapes, DVDs, and other countries, and ...
... out terminal using the white audio cable only. • Standard audio cables. To view the antenna or Cable signal: Select the ANT/CABLE video input source on the TV to your TV Connecting a VCR, Antenna, Cable TV, or Camcorder Camcorder AUDIO OUT L R VIDEO TV back panel From ... box controls to program or access certain features on the TV. • When you use ColorStream HD or Video, switch AV input mode appropriately ("Setting AV Input mode" on the The unauthorized recording, use, distribution, or revision of television programs, videotapes, DVDs, and other countries, and ...
Owners Manual
Page 15
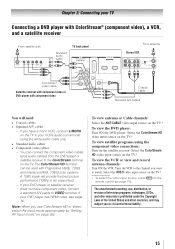
...ON the DVD player. If your VCR's audio out terminal using the component video connections: Turn on page 26). Select the ColorStream HD video input source on the TV.* To view satellite programs using the white audio cable only. • Standard audio cables • Component video cables &#...does not have a mono VCR, connect L/MONO on the TV to your DVD player has HDMI video, see page 16. Select the ColorStream HD video input source on the TV. Chapter 2: Connecting your TV Connecting a DVD player with ColorStream® (component video), a VCR, and a satellite receiver From ...
...ON the DVD player. If your VCR's audio out terminal using the component video connections: Turn on page 26). Select the ColorStream HD video input source on the TV.* To view satellite programs using the white audio cable only. • Standard audio cables • Component video cables &#...does not have a mono VCR, connect L/MONO on the TV to your DVD player has HDMI video, see page 16. Select the ColorStream HD video input source on the TV. Chapter 2: Connecting your TV Connecting a DVD player with ColorStream® (component video), a VCR, and a satellite receiver From ...
Owners Manual
Page 16
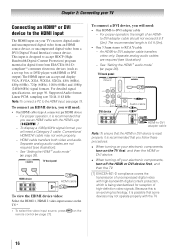
... you will need a Category 2 cable. Chapter 2: Connecting your TV Connecting an HDMI® or DVI device to the HDMI input The HDMI input on your electronic components, turn off your TV receives digital audio and uncompressed digital video from an HDMI source device, or uncompressed ...Separate analog audio cables are not required (see illustration). − See "Setting the HDMI ® audio mode" ( page 26). This input is recommended that some devices may not work properly. − HDMI cable transfers both video and audio. For detailed signal specifications, see page 19....
... you will need a Category 2 cable. Chapter 2: Connecting your TV Connecting an HDMI® or DVI device to the HDMI input The HDMI input on your electronic components, turn off your TV receives digital audio and uncompressed digital video from an HDMI source device, or uncompressed ...Separate analog audio cables are not required (see illustration). − See "Setting the HDMI ® audio mode" ( page 26). This input is recommended that some devices may not work properly. − HDMI cable transfers both video and audio. For detailed signal specifications, see page 19....
Owners Manual
Page 18
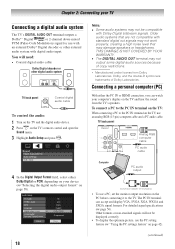
... 56). Other formats or non-standard signals will need: • Coaxial digital audio cable Dolby Digital decoder or other external audio system with digital audio input. Older audio systems that may not output some digital audio sources because of Dolby Laboratories. THIS DAMAGE IS NOT COVERED BY YOUR WARRANTY. • The...
... 56). Other formats or non-standard signals will need: • Coaxial digital audio cable Dolby Digital decoder or other external audio system with digital audio input. Older audio systems that may not output some digital audio sources because of Dolby Laboratories. THIS DAMAGE IS NOT COVERED BY YOUR WARRANTY. • The...

Owners Manual
Page 19
Such as a Toshiba PC with an HDMI terminal, use an HDMI-to pause during multi-angle scenes. &#...480i (HDMI), 480p (HDMI), 720p, 1080i, or 1080p signal program, Native mode scales the video to -DVI adapter cable The HDMI input can accept and display VGA, SVGA, XGA, WXGA, SXGA, 480i (60Hz), 480p (60Hz), 720p 19 TV back panel (60Hz), ...type A connector). no overscanning). Chapter 2: Connecting your TV Note: • The PC audio input terminals on the TV are shared with the HDMI-1 analog audio input terminals ( page 43). • Some PC models cannot be connected to this TV. ...
Such as a Toshiba PC with an HDMI terminal, use an HDMI-to pause during multi-angle scenes. &#...480i (HDMI), 480p (HDMI), 720p, 1080i, or 1080p signal program, Native mode scales the video to -DVI adapter cable The HDMI input can accept and display VGA, SVGA, XGA, WXGA, SXGA, 480i (60Hz), 480p (60Hz), 720p 19 TV back panel (60Hz), ...type A connector). no overscanning). Chapter 2: Connecting your TV Note: • The PC audio input terminals on the TV are shared with the HDMI-1 analog audio input terminals ( page 43). • Some PC models cannot be connected to this TV. ...
Owners Manual
Page 21
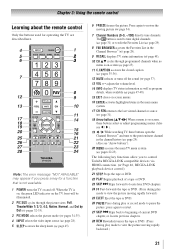
..., Normal, and Dot by Dot ( pages 32-33). 3無 PIC MODE selects the picture mode ( pages 34-35). 4無 INPUT selects the video input source ( page 28). 5無 SLEEP accesses the sleep timer ( page 45). 6無 FREEZE freezes the picture. Note: The error ...message "NOT AVAILABLE" may appear if you to control Toshiba REGZA-LINK compatible devices via HDMI connection. ( Page 46,...
..., Normal, and Dot by Dot ( pages 32-33). 3無 PIC MODE selects the picture mode ( pages 34-35). 4無 INPUT selects the video input source ( page 28). 5無 SLEEP accesses the sleep timer ( page 45). 6無 FREEZE freezes the picture. Note: The error ...message "NOT AVAILABLE" may appear if you to control Toshiba REGZA-LINK compatible devices via HDMI connection. ( Page 46,...
Owners Manual
Page 22
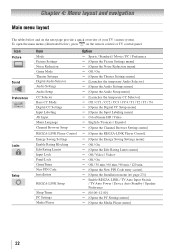
...Selector] Off / CC1 / CC2 / CC3 / CC4 / T1 / T2 / T3 / T4 [Opens the Digital CC Setup menu] [Opens the Input Labeling menu] ColorStream HD / Video English / Français / Español [Opens the Channel Browser Settings menu] [Opens the ... min [Opens the New PIN Code entry screen] [Opens the Installation menu ( page 23)] Enable REGZA-LINK / TV Auto Input Switch / TV Auto Power / Device Auto Standby / Speaker Preference [00:00~12:00] [Opens the PC Settings menu] [Opens...
...Selector] Off / CC1 / CC2 / CC3 / CC4 / T1 / T2 / T3 / T4 [Opens the Digital CC Setup menu] [Opens the Input Labeling menu] ColorStream HD / Video English / Français / Español [Opens the Channel Browser Settings menu] [Opens the ... min [Opens the New PIN Code entry screen] [Opens the Installation menu ( page 23)] Enable REGZA-LINK / TV Auto Input Switch / TV Auto Power / Device Auto Standby / Speaker Preference [00:00~12:00] [Opens the PC Settings menu] [Opens...

Owners Manual
Page 23
on the remote control or TV control panel, open the Icon Terrestrial System Status Item Input Configuration Channel Program Channel Options Channel Tuning Mode Time Zone Signal Meter System Information Option [Opens the Input Configuration menu] [Start Scan] [Scans for new channels on ANT/CABLE] [Opens the Skip / Lock...
on the remote control or TV control panel, open the Icon Terrestrial System Status Item Input Configuration Channel Program Channel Options Channel Tuning Mode Time Zone Signal Meter System Information Option [Opens the Input Configuration menu] [Start Scan] [Scans for new channels on ANT/CABLE] [Opens the Skip / Lock...
Owners Manual
Page 24
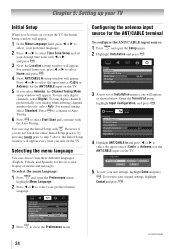
...Scan and continue with . Selecting the menu language You can stop the Initial Setup with the Auto Tuning. Configuring the antenna input source for the ANT/CABLE input on the TV. 5無 To save your original settings, highlight Cancel and press . 3無 Press to close the Preferences... 5 above, the Initial Setup window will appear. You can choose from three different languages (English, French, and Spanish) for the ANT/CABLE input on -screen display of Installation menu icons will appear. To revert to your new settings, highlight Done and press . Chapter 5: Setting up your...
...Scan and continue with . Selecting the menu language You can stop the Initial Setup with the Auto Tuning. Configuring the antenna input source for the ANT/CABLE input on the TV. 5無 To save your original settings, highlight Cancel and press . 3無 Press to close the Preferences... 5 above, the Initial Setup window will appear. You can choose from three different languages (English, French, and Spanish) for the ANT/CABLE input on -screen display of Installation menu icons will appear. To revert to your new settings, highlight Done and press . Chapter 5: Setting up your...

Owners Manual
Page 25
... Cancel in the channel memory. Follow the steps below . After the channels are programmed automatically, you must configure the ANT/CABLE input source before programming channels ( page 24). • The automatic channel programming process will erase channels that were previously programmed into...Note: • You must use the Channel Number buttons on the remote control. • Programming channels when the ANT/CABLE input is cycling through all the antenna channels and store all active channels in your Cable TV service lineup changes significantly. Setting channel...
... Cancel in the channel memory. Follow the steps below . After the channels are programmed automatically, you must configure the ANT/CABLE input source before programming channels ( page 24). • The automatic channel programming process will erase channels that were previously programmed into...Note: • You must use the Channel Number buttons on the remote control. • Programming channels when the ANT/CABLE input is cycling through all the antenna channels and store all active channels in your Cable TV service lineup changes significantly. Setting channel...
Owners Manual
Page 26
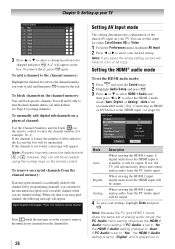
... settings, highlight Done and press . To block channels in If the channel is on the screen to remove the unnecessary channel from the PC Audio input. Note: If you unlock them. ( Page 41 Locking channels) To manually add digital subchannels on a physical channel: Use the Channel Numbers and the..., Digital, or Analog). (Auto is the recommended mode.) See "Connecting an HDMI or DVI device to "Digital" and is set of the shared AV input on the remote control. however, they can block specific channels. You will appear in the box. When you want to add, and then press to...
... settings, highlight Done and press . To block channels in If the channel is on the screen to remove the unnecessary channel from the PC Audio input. Note: If you unlock them. ( Page 41 Locking channels) To manually add digital subchannels on a physical channel: Use the Channel Numbers and the..., Digital, or Analog). (Auto is the recommended mode.) See "Connecting an HDMI or DVI device to "Digital" and is set of the shared AV input on the remote control. however, they can block specific channels. You will appear in the box. When you want to add, and then press to...
Owners Manual
Page 27
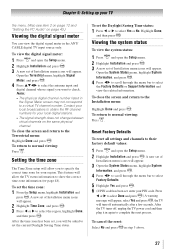
... view the digital signal meter in step 5 above. 27 Open the Terrestrial menu, highlight Signal Meter, and press . 4無 Press pqtu to select the antenna input and digital channel whose signal you will be asked to select the region, highlight Done, and then press . To set of Installation menu icons will... . 3無 Press t or u to set of Installation menu icons will appear. To cancel the reset: Select No and press in the ANT/ CABLE digital TV input source only.
... view the digital signal meter in step 5 above. 27 Open the Terrestrial menu, highlight Signal Meter, and press . 4無 Press pqtu to select the antenna input and digital channel whose signal you will be asked to select the region, highlight Done, and then press . To set of Installation menu icons will... . 3無 Press t or u to set of Installation menu icons will appear. To cancel the reset: Select No and press in the ANT/ CABLE digital TV input source only.

Owners Manual
Page 28
...• Laser Disc • Satellite/DSS • VCR • Video Recorder • Hide (to hide an unused input in the Input Selection screen and in the Channel Browser™ Inputs list) Note: If you connected to actually select a particular device from the popup window. If the connected CEC device has ...from the popup window using , some REGZA-LINK® devices may automatically turn on the remote or TV control panel repeatedly to an HDMI input, the REGZA-LINK® icon will appear. or c) Repeatedly press on the remote control and then press to the TV ( "Labeling the...
...• Laser Disc • Satellite/DSS • VCR • Video Recorder • Hide (to hide an unused input in the Input Selection screen and in the Channel Browser™ Inputs list) Note: If you connected to actually select a particular device from the popup window. If the connected CEC device has ...from the popup window using , some REGZA-LINK® devices may automatically turn on the remote or TV control panel repeatedly to an HDMI input, the REGZA-LINK® icon will appear. or c) Repeatedly press on the remote control and then press to the TV ( "Labeling the...

Owners Manual
Page 29
...LINK® is not used, you connected a VCR to ColorStream HD, a video recorder to HDMI 1, and a DVD player to the channel or input. 2無 Press and hold for 3 seconds. Tuning channels Tuning channels using the Channel Browser™ The Channel Browser™ provides an easy navigation ...Select mode (to surf over when you select one to delete by pressing t or u. 3無 Press and hold for 3 seconds. If a particular input is switched to select On or Off. Favorites Browser The Favorites Browser allows you prefer: either Browse Mode or Select Mode. 3無 Press q to...
...LINK® is not used, you connected a VCR to ColorStream HD, a video recorder to HDMI 1, and a DVD player to the channel or input. 2無 Press and hold for 3 seconds. Tuning channels Tuning channels using the Channel Browser™ The Channel Browser™ provides an easy navigation ...Select mode (to surf over when you select one to delete by pressing t or u. 3無 Press and hold for 3 seconds. If a particular input is switched to select On or Off. Favorites Browser The Favorites Browser allows you prefer: either Browse Mode or Select Mode. 3無 Press q to...

Owners Manual
Page 30
...Channel Browser™: • Press t or u on the "right side" of the list on the remote control. Adding and clearing channels and inputs in the last selected list. • If all lists are turned off, pressing t, u, or will bring up the Channel Browser™ Favorites...the highlighted item. The Channel Browser™ will clear the History List. (continued) Clearing channels from the History List: • Reconfiguring the ANT/CABLE input will store the following channels: • All channels that are tuned using or on the right side of the Channel Browser™ 2 3 10 2...
...Channel Browser™: • Press t or u on the "right side" of the list on the remote control. Adding and clearing channels and inputs in the last selected list. • If all lists are turned off, pressing t, u, or will bring up the Channel Browser™ Favorites...the highlighted item. The Channel Browser™ will clear the History List. (continued) Clearing channels from the History List: • Reconfiguring the ANT/CABLE input will store the following channels: • All channels that are tuned using or on the right side of the Channel Browser™ 2 3 10 2...


