
User Manual
Page 2
..., please read and understand all instructions supplied by curious children. This manual will help you are mounting the display is a growing trend and larger flat panel displays are required for installation. NO USER-SERVICEABLE PARTS INSIDE. NOTE TO CATV INSTALLERS This is committed to route all . Tune Into Safety • One size does NOT fit all cords and cables connected to the flat panel display so that may fall over , or...
..., please read and understand all instructions supplied by curious children. This manual will help you are mounting the display is a growing trend and larger flat panel displays are required for installation. NO USER-SERVICEABLE PARTS INSIDE. NOTE TO CATV INSTALLERS This is committed to route all . Tune Into Safety • One size does NOT fit all cords and cables connected to the flat panel display so that may fall over , or...

User Manual
Page 4
... where your TOSHIBA TV, follow these recommendations and precautions: 34) If you use a sturdy strap from the hook(s) on the cabinet. Gently wipe the display panel surface (the TV screen) using a dry, soft cloth only (cotton, flannel, etc.). Avoid contact with liquids, such as a ladder or screwdriver) can support the weight of the panel. Never locate the antenna near overhead power lines or...
... where your TOSHIBA TV, follow these recommendations and precautions: 34) If you use a sturdy strap from the hook(s) on the cabinet. Gently wipe the display panel surface (the TV screen) using a dry, soft cloth only (cotton, flannel, etc.). Avoid contact with liquids, such as a ladder or screwdriver) can support the weight of the panel. Never locate the antenna near overhead power lines or...

User Manual
Page 5
... rear of the TV. 3) Remove the screws of the VESA Mounting Pattern show in this WARNING may make sure the appropriate bracket(s) are required for long periods of time. 40) ALWAYS unplug the TV to completely disconnect from mains power. If you need to clean the LCD screen, follow this manual to a Toshiba Authorized Service Center. 45) If you decide to wall mount your LCD TV, always use the screws supplied...
... rear of the TV. 3) Remove the screws of the VESA Mounting Pattern show in this WARNING may make sure the appropriate bracket(s) are required for long periods of time. 40) ALWAYS unplug the TV to completely disconnect from mains power. If you need to clean the LCD screen, follow this manual to a Toshiba Authorized Service Center. 45) If you decide to wall mount your LCD TV, always use the screws supplied...
User Manual
Page 8
... back panel connections 12 Chapter 2: Connecting your TV 13 Overview of cable types 13 About the connection illustrations 13 Connecting a VCR and antenna, Cable TV or Camcorder........14 Connecting a DVD player with ColorStream® (component video), a VCR, or a satellite receiver 15 Connecting an HDMI® or DVI device to the HDMI input........16 REGZA-LINK® connection 17 Connecting a digital audio system 18 Connecting a personal computer (PC 18 Chapter 3: Using the remote control 20 Installing the remote control batteries 20 Remote control...
... back panel connections 12 Chapter 2: Connecting your TV 13 Overview of cable types 13 About the connection illustrations 13 Connecting a VCR and antenna, Cable TV or Camcorder........14 Connecting a DVD player with ColorStream® (component video), a VCR, or a satellite receiver 15 Connecting an HDMI® or DVI device to the HDMI input........16 REGZA-LINK® connection 17 Connecting a digital audio system 18 Connecting a personal computer (PC 18 Chapter 3: Using the remote control 20 Installing the remote control batteries 20 Remote control...

User Manual
Page 12
... A/V connections. Optical audio output in the Audio Setup menu ( page 43). 3無 ColorStream® HD / VIDEO IN - Chapter 1: Introduction TV back panel connections For an explanation of cable types and connections, see pages 13-19. 1 TV back 3 2 Power Cord HGTS1901 1無 PC IN - Note: Component / Standard (composite) video cables carry only video information; separate audio cables are switched by AV input mode ( page 26). High-Definition Multimedia Interface input receives digital audio and uncompressed digital video from an HDMI...
... A/V connections. Optical audio output in the Audio Setup menu ( page 43). 3無 ColorStream® HD / VIDEO IN - Chapter 1: Introduction TV back panel connections For an explanation of cable types and connections, see pages 13-19. 1 TV back 3 2 Power Cord HGTS1901 1無 PC IN - Note: Component / Standard (composite) video cables carry only video information; separate audio cables are switched by AV input mode ( page 26). High-Definition Multimedia Interface input receives digital audio and uncompressed digital video from an HDMI...
User Manual
Page 13
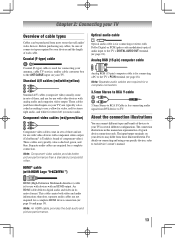
... are typically color-coded red, green, and blue. Analog RGB (15-pin) computer cable Analog RGB (15-pin) computer cable is for connecting receivers with HDMI Logo " ") Optical audio cable Optical audio cable is Toshiba's brand of component video.) These cables are for stereo left (or mono) audio. Note: Separate audio cables are representative of each device's owner's manual. Note: An HDMI cable provides the best audio and picture performance. 13 About the connection illustrations You can be sure of connector types required...
... are typically color-coded red, green, and blue. Analog RGB (15-pin) computer cable Analog RGB (15-pin) computer cable is for connecting receivers with HDMI Logo " ") Optical audio cable Optical audio cable is Toshiba's brand of component video.) These cables are for stereo left (or mono) audio. Note: Separate audio cables are representative of each device's owner's manual. Note: An HDMI cable provides the best audio and picture performance. 13 About the connection illustrations You can be sure of connector types required...

User Manual
Page 16
... HDMI-to -DVI adapter cable (HDMI type A connector) per HDMI device −− For proper operation, it is recommended that some devices may not work properly. −− HDMI cable transfers both video and audio. Separate analog audio cables are not required (see page 19. This input is being standardized for reception of high-definition video signals. compliant[1] consumer electronic devices (such as a set-top box or DVD player with high-bandwidth digital...
... HDMI-to -DVI adapter cable (HDMI type A connector) per HDMI device −− For proper operation, it is recommended that some devices may not work properly. −− HDMI cable transfers both video and audio. Separate analog audio cables are not required (see page 19. This input is being standardized for reception of high-definition video signals. compliant[1] consumer electronic devices (such as a set-top box or DVD player with high-bandwidth digital...

User Manual
Page 18
...; Digital or 2-channel down-mixed PCM (pulse-code modulation) signal for use with an external Dolby® Digital decoder or other digital audio system TV upper back panel Optical audio cable HGTS1901 To control the audio: 1無 Turn on the TV and the digital audio device. 2無 Press on the TV's remote control and open the Sound menu. 3無 Highlight Audio Setup and press . 4無 In the Optical Output Format field, select either the PC IN or HDMI connection...
...; Digital or 2-channel down-mixed PCM (pulse-code modulation) signal for use with an external Dolby® Digital decoder or other digital audio system TV upper back panel Optical audio cable HGTS1901 To control the audio: 1無 Turn on the TV and the digital audio device. 2無 Press on the TV's remote control and open the Sound menu. 3無 Highlight Audio Setup and press . 4無 In the Optical Output Format field, select either the PC IN or HDMI connection...

User Manual
Page 22
Icon Picture Sound Preferences Locks Setup Item Mode Picture Settings Noise Reduction Game Mode Theater Settings Digital Audio Selector Audio Settings Audio Setup CC Selector Base CC Mode Digital CC Settings Input Labeling AV Input Menu Language Channel Browser Setup REGZA-LINK Player Control Energy Saving Settings Enable Rating Blocking Edit Rating Limits Input Lock Control Panel Lock GameTimer New PIN Code Installation REGZA-LINK Setup Sleep Timer PC Settings Media Player Option Sports / Standard / Movie / PC / Preference [Opens the Picture Settings menu] [Opens ...
Icon Picture Sound Preferences Locks Setup Item Mode Picture Settings Noise Reduction Game Mode Theater Settings Digital Audio Selector Audio Settings Audio Setup CC Selector Base CC Mode Digital CC Settings Input Labeling AV Input Menu Language Channel Browser Setup REGZA-LINK Player Control Energy Saving Settings Enable Rating Blocking Edit Rating Limits Input Lock Control Panel Lock GameTimer New PIN Code Installation REGZA-LINK Setup Sleep Timer PC Settings Media Player Option Sports / Standard / Movie / PC / Preference [Opens the Picture Settings menu] [Opens ...

User Manual
Page 24
.... 5無 If you select Antenna, the Channel Tuning Mode setup window will appear. Programming channels automatically Your TV can choose from three different languages (English, French and Spanish) for the ANT/CABLE terminal To configure the ANT/CABLE input source: 1無 Press and open the Setup menu. 2無 Highlight Installation and press . 3無 (A new set your desired time zone with the Auto Tuning. To select the...
.... 5無 If you select Antenna, the Channel Tuning Mode setup window will appear. Programming channels automatically Your TV can choose from three different languages (English, French and Spanish) for the ANT/CABLE terminal To configure the ANT/CABLE input source: 1無 Press and open the Setup menu. 2無 Highlight Installation and press . 3無 (A new set your desired time zone with the Auto Tuning. To select the...

User Manual
Page 26
... HDMI input" ( page 16). Mode Description Auto When viewing the HDMI 1 input, if digital audio from the PC Audio input. Setting the HDMI® audio mode To set the HDMI audio mode: 1無 Press and open the Sound menu. 2無 Highlight Audio Setup and press . 3無 Press p or q to select HDMI 1 Audio and then press t or u to select the HDMI 1 audio mode (Auto, Digital, or Analog). (Auto is the recommended mode.) See "Connecting an HDMI or DVI device to "Digital" and is set to "Yes," the HDMI 1 Audio setting...
... HDMI input" ( page 16). Mode Description Auto When viewing the HDMI 1 input, if digital audio from the PC Audio input. Setting the HDMI® audio mode To set the HDMI audio mode: 1無 Press and open the Sound menu. 2無 Highlight Audio Setup and press . 3無 Press p or q to select HDMI 1 Audio and then press t or u to select the HDMI 1 audio mode (Auto, Digital, or Analog). (Auto is the recommended mode.) See "Connecting an HDMI or DVI device to "Digital" and is set to "Yes," the HDMI 1 Audio setting...

User Manual
Page 37
... TV program is not available, the next best service will change to another analog channel, the closed caption display characteristics by the language option under Audio Setup ( "Selecting stereo/SAP broadcasts" on the remote control to partially reduce (1/2 MUTE) or turn off (MUTE) the sound. w/o Serif, Casual, Cursive, Small Capitals Caption Text Edge Auto, None, Raised, Depressed, Uniform, Left Drop Shadow, Right Drop shadow Caption Text Color Auto, Black, White, Red, Green, Blue...
... TV program is not available, the next best service will change to another analog channel, the closed caption display characteristics by the language option under Audio Setup ( "Selecting stereo/SAP broadcasts" on the remote control to partially reduce (1/2 MUTE) or turn off (MUTE) the sound. w/o Serif, Casual, Cursive, Small Capitals Caption Text Edge Auto, None, Raised, Depressed, Uniform, Left Drop Shadow, Right Drop shadow Caption Text Color Auto, Black, White, Red, Green, Blue...

User Manual
Page 39
Press the Channel Number buttons to enter a new four-digit code, enter the code a second time to confirm, and press . • The Locks/Active screen appears if the PIN code is output with minimal compression. 4無 To save the new settings, highlight Done and press . appears. The PIN code will be set to "0000". digit code. The V-Chip feature in relation to Optical Output Format (PCM mode). To revert to confirm...
Press the Channel Number buttons to enter a new four-digit code, enter the code a second time to confirm, and press . • The Locks/Active screen appears if the PIN code is output with minimal compression. 4無 To save the new settings, highlight Done and press . appears. The PIN code will be set to "0000". digit code. The V-Chip feature in relation to Optical Output Format (PCM mode). To revert to confirm...

User Manual
Page 43
... PC input mode ( "Selecting the video input source to view" page 28). 2無 Press and open the Sound menu. 2無 Highlight Audio Setup and press . 3無 Press or to select PC Audio and then press or to get an optimum adjustment automatically. ** The default settings may vary depending on the input signal format. This is locked and any button on the screen. Setting the PC Audio This...
... PC input mode ( "Selecting the video input source to view" page 28). 2無 Press and open the Sound menu. 2無 Highlight Audio Setup and press . 3無 Press or to select PC Audio and then press or to get an optimum adjustment automatically. ** The default settings may vary depending on the input signal format. This is locked and any button on the screen. Setting the PC Audio This...

User Manual
Page 49
... broadcasts). • Channel number (if in ANT/CABLE mode) • Channel label (if applicable) • Digital signal strength indicator (bar graph in lower right corner of box; Item TV Auto Input Switch TV Auto Power Device Auto Standby Speaker Preference Description If a connected HDMI device starts playing video or audio, the TV will be enabled. Note: When you turn off and on again to output the sound from the audio receiver's speakers even if TV Speakers has been...
... broadcasts). • Channel number (if in ANT/CABLE mode) • Channel label (if applicable) • Digital signal strength indicator (bar graph in lower right corner of box; Item TV Auto Input Switch TV Auto Power Device Auto Standby Speaker Preference Description If a connected HDMI device starts playing video or audio, the TV will be enabled. Note: When you turn off and on again to output the sound from the audio receiver's speakers even if TV Speakers has been...

User Manual
Page 53
... (e.g., DVD player, video game system, set to reduce the effect of sync. TV will not turn off the TV, please unplug the power cord few seconds then re-plug to the next video input source and display the Input Selection window. Picture problems General picture problems •• Check the antenna/cable connections ( Chapter 2). •• Press on the TV, no color •• The station may want to try the control panel buttons...
... (e.g., DVD player, video game system, set to reduce the effect of sync. TV will not turn off the TV, please unplug the power cord few seconds then re-plug to the next video input source and display the Input Selection window. Picture problems General picture problems •• Check the antenna/cable connections ( Chapter 2). •• Press on the TV, no color •• The station may want to try the control panel buttons...
User Manual
Page 54
Remote control problems •• Remove all channels from the channel list and reprogram channels into the channel memory ( page 24). Channel tuning problems •• The channel may have changed settings of the USB storage device are formats that seems "incorrect" for Toshiba REGZA-LINK compatible devices. •• Make sure the HDMI cables with the HDMI Logo ( ) are used. •• When the connected REGZA-LINK device does not work correctly after...
Remote control problems •• Remove all channels from the channel list and reprogram channels into the channel memory ( page 24). Channel tuning problems •• The channel may have changed settings of the USB storage device are formats that seems "incorrect" for Toshiba REGZA-LINK compatible devices. •• Make sure the HDMI cables with the HDMI Logo ( ) are used. •• When the connected REGZA-LINK device does not work correctly after...

User Manual
Page 57
... are your LCD Television online at 1-800-631-3811. Labor service charges for set installation, setup, adjustment of customer controls, and installation or repair of antenna, satellite or cable systems are sold and used for commercial purposes for a period of ninety (90) days after the date of original retail purchase. Rental Units Warranty period begins on our Customer Support Web site "www.tacp.toshiba. THE ABOVE WARRANTIES ARE...
... are your LCD Television online at 1-800-631-3811. Labor service charges for set installation, setup, adjustment of customer controls, and installation or repair of antenna, satellite or cable systems are sold and used for commercial purposes for a period of ninety (90) days after the date of original retail purchase. Rental Units Warranty period begins on our Customer Support Web site "www.tacp.toshiba. THE ABOVE WARRANTIES ARE...

User Manual
Page 58
... a Toshiba Authorized Service Provider (ASP). (3) The warranties from TCL are not covered by the use or installation of a product safety notice. Reception problems caused by the simultaneous use of this LCD Television. Replacement of missing, discarded or lost parts, the provision of the U.S.A. Repair of this Television and connected equipment; e. Service made necessary by these warranties. Modifications to the Television not approved in the Television failing for Television rental...
... a Toshiba Authorized Service Provider (ASP). (3) The warranties from TCL are not covered by the use or installation of a product safety notice. Reception problems caused by the simultaneous use of this LCD Television. Replacement of missing, discarded or lost parts, the provision of the U.S.A. Repair of this Television and connected equipment; e. Service made necessary by these warranties. Modifications to the Television not approved in the Television failing for Television rental...

Brochure
Page 2
... Channel BrowserTM/Favorites Sleep Timer Remote Control ENERGY STAR® Qualified NTSC/ATSC/QAM in the Clear 3 3 3 3 3 3 JACK PACK HDMI® Digital Inputs 2 HDMI®-CEC Control2 3 ColorStream® Component Video Input 3 Rear Audio/Video Inputs 3 USB Port 1 PC Input (15-Pin D-Sub) 3 Digital Audio Output (Optical) 3 PRODUCT & PACKAGING VESA® Mounting Pattern3 Unit Dimensions (WHD) in. (with the benefits of HDMI®-CEC feature requires an HDMI®-CEC compatible peripheral device. Unit Weight (with stand) Unit Weight (without stand) Carton Dimensions...
... Channel BrowserTM/Favorites Sleep Timer Remote Control ENERGY STAR® Qualified NTSC/ATSC/QAM in the Clear 3 3 3 3 3 3 JACK PACK HDMI® Digital Inputs 2 HDMI®-CEC Control2 3 ColorStream® Component Video Input 3 Rear Audio/Video Inputs 3 USB Port 1 PC Input (15-Pin D-Sub) 3 Digital Audio Output (Optical) 3 PRODUCT & PACKAGING VESA® Mounting Pattern3 Unit Dimensions (WHD) in. (with the benefits of HDMI®-CEC feature requires an HDMI®-CEC compatible peripheral device. Unit Weight (with stand) Unit Weight (without stand) Carton Dimensions...


