
Owners Manual
Page 7
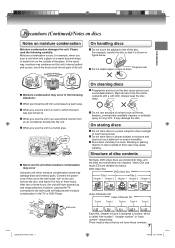
... and dust on discs outside of the disc. Do not store discs in figure below. DVD video disc DVD video disc Title 1 Title 2 Chapter 1 Chapter 2 Chapter 1 Chapter 2 Chapter 3 Video CD/Audio CD Video CD/Audio CD Track 1 Track 2 Track 3 Track 4 Track 5 Each title, chapter or track is shown ...Moisture condensation may occur in a humid area. ■ Never use any moisture. Wipe the disc from a cold area to discs. Video CDs and Audio CDs are sub-divided into a glass on a warm day and drops of water form on the outside of the unit to direct sunlight...
... and dust on discs outside of the disc. Do not store discs in figure below. DVD video disc DVD video disc Title 1 Title 2 Chapter 1 Chapter 2 Chapter 1 Chapter 2 Chapter 3 Video CD/Audio CD Video CD/Audio CD Track 1 Track 2 Track 3 Track 4 Track 5 Each title, chapter or track is shown ...Moisture condensation may occur in a humid area. ■ Never use any moisture. Wipe the disc from a cold area to discs. Video CDs and Audio CDs are sub-divided into a glass on a warm day and drops of water form on the outside of the unit to direct sunlight...
Owners Manual
Page 8
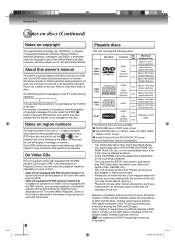
...Please do not insert any difficulty playing a DVD and/or CD disc on the DVD player contained in this TV, please contact Toshiba Customer Service. The following discs are produced in the same way as this may still be played back depending on the recording conditions. &#...Some of the functions described in any other color system (PAL, SECAM, etc.). • This unit can play an 8cm disc. Disc Mark DVD video discs Contents Audio + Video (moving pictures) Disc Maximum Size playback time Approx. 4 hours (single sided disc) 12 cm Approx. 8 hours (double sided disc) Approx. 80...
...Please do not insert any difficulty playing a DVD and/or CD disc on the DVD player contained in this TV, please contact Toshiba Customer Service. The following discs are produced in the same way as this may still be played back depending on the recording conditions. &#...Some of the functions described in any other color system (PAL, SECAM, etc.). • This unit can play an 8cm disc. Disc Mark DVD video discs Contents Audio + Video (moving pictures) Disc Maximum Size playback time Approx. 4 hours (single sided disc) 12 cm Approx. 8 hours (double sided disc) Approx. 80...
Owners Manual
Page 9
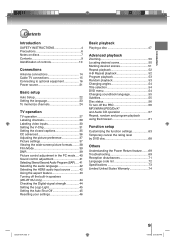
...source 21 Basic setup Auto Setup 22 Setting the language 23 To memorize channels 24 TV operation TV operation 27 Labeling channels 29 Labeling video inputs 30 Setting the V-Chip 31 Setting the closed captions 35 CC advanced 36 Adjusting the picture preference 37 Picture settings 37 Viewing the...DVD menu 54 Changing soundtrack language 55 Subtitles 55 Disc status 56 To turn off the PBC 56 MP3/WMA/JPEG/DivX® and Audio CD operation 57 Repeat, random and program playback using file browser 61 Function setup Customizing the function settings 63 Temporary cancel the ...
...source 21 Basic setup Auto Setup 22 Setting the language 23 To memorize channels 24 TV operation TV operation 27 Labeling channels 29 Labeling video inputs 30 Setting the V-Chip 31 Setting the closed captions 35 CC advanced 36 Adjusting the picture preference 37 Picture settings 37 Viewing the...DVD menu 54 Changing soundtrack language 55 Subtitles 55 Disc status 56 To turn off the PBC 56 MP3/WMA/JPEG/DivX® and Audio CD operation 57 Repeat, random and program playback using file browser 61 Function setup Customizing the function settings 63 Temporary cancel the ...

Owners Manual
Page 11
... INPUT COVER (19LV610U/ 19LV611U only) AC INPUT 21 HEAD PHONE jack 28 COLORSTREAM HD/AUDIO IN jacks 17 S-VIDEO/VIDEO/AUDIO IN jacks 16 17 Antenna jack 14 15 COAXIAL DIGITAL AUDIO OUT jack 18 19 HDMI IN jack 19 PC AUDIO IN jack 19 20 Illustration of 19LV610U/ PC MONITOR IN jack 20 19LV611U/22LV610U... 18 19 52G0101A.indb 11 AC INPUT 21 Antenna jack 14 15 HDMI 1 IN jack 19 COLORSTREAM HD IN jacks 17 HDMI 2 IN jack 19 VIDEO IN jacks 16 17 HDMI 1/PC AUDIO IN jack 19 20 AUDIO IN (L/R) jacks 16 17 S-VIDEO IN jack 17 Illustration of 26LV610U 11 1/5/09 3:02:04 PM
... INPUT COVER (19LV610U/ 19LV611U only) AC INPUT 21 HEAD PHONE jack 28 COLORSTREAM HD/AUDIO IN jacks 17 S-VIDEO/VIDEO/AUDIO IN jacks 16 17 Antenna jack 14 15 COAXIAL DIGITAL AUDIO OUT jack 18 19 HDMI IN jack 19 PC AUDIO IN jack 19 20 Illustration of 19LV610U/ PC MONITOR IN jack 20 19LV611U/22LV610U... 18 19 52G0101A.indb 11 AC INPUT 21 Antenna jack 14 15 HDMI 1 IN jack 19 COLORSTREAM HD IN jacks 17 HDMI 2 IN jack 19 VIDEO IN jacks 16 17 HDMI 1/PC AUDIO IN jack 19 20 AUDIO IN (L/R) jacks 16 17 S-VIDEO IN jack 17 Illustration of 26LV610U 11 1/5/09 3:02:04 PM

Owners Manual
Page 12
... button 16 POWER button 22 SLEEP button 28 JUMP button 50 Direct channel selection button ( ) 27 AUDIO SELECT button 55 VOL +/- To operate a menu, follow the instructions in this manual describe the function on many DVD video discs. Introduction Identification of controls (Continued) Remote control The instructions in "DVD menu." 54 12...
... button 16 POWER button 22 SLEEP button 28 JUMP button 50 Direct channel selection button ( ) 27 AUDIO SELECT button 55 VOL +/- To operate a menu, follow the instructions in this manual describe the function on many DVD video discs. Introduction Identification of controls (Continued) Remote control The instructions in "DVD menu." 54 12...
Owners Manual
Page 16
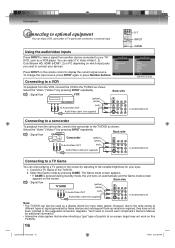
...Manual for your eyes. 1. Back side : Signal flow Camcorder (yellow) (white) To Audio/Video OUT (red) Audio/Video cable (not supplied) To AUDIO/VIDEO IN Connecting to a TV Game You can select TV, Video (Video1, 2), ColorStream HD, HDMI (HDMI1, 2) or PC depending on which input jacks you ...adjusting to connect your TV/ DVD, such as shown. Back side : Signal flow (yellow) (white) To Audio/Video OUT (red) Audio/Video cable (not supplied) To AUDIO/VIDEO IN Note: • The TV/DVD can enjoy VCR, camcorder or TV game with connection to external input. 0-7 ...
...Manual for your eyes. 1. Back side : Signal flow Camcorder (yellow) (white) To Audio/Video OUT (red) Audio/Video cable (not supplied) To AUDIO/VIDEO IN Connecting to a TV Game You can select TV, Video (Video1, 2), ColorStream HD, HDMI (HDMI1, 2) or PC depending on which input jacks you ...adjusting to connect your TV/ DVD, such as shown. Back side : Signal flow (yellow) (white) To Audio/Video OUT (red) Audio/Video cable (not supplied) To AUDIO/VIDEO IN Note: • The TV/DVD can enjoy VCR, camcorder or TV game with connection to external input. 0-7 ...
Owners Manual
Page 17
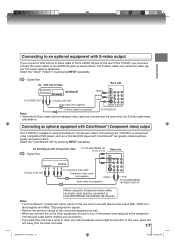
... 3:02:53 PM Connecting your TV/DVD to the AUDIO IN jacks as a Toshiba DVD player with S-Video (playback) (white) Back side To S-VIDEO OUT To Audio (L/R) OUT (red) Audio cable (not supplied) S-Video cable (not supplied) To AUDIO (L/R) IN To S-VIDEO IN Note: • When the S-Video cable and the standard video cable are for use with ColorStream® (Component...
... 3:02:53 PM Connecting your TV/DVD to the AUDIO IN jacks as a Toshiba DVD player with S-Video (playback) (white) Back side To S-VIDEO OUT To Audio (L/R) OUT (red) Audio cable (not supplied) S-Video cable (not supplied) To AUDIO (L/R) IN To S-VIDEO IN Note: • When the S-Video cable and the standard video cable are for use with ColorStream® (Component...
Owners Manual
Page 18
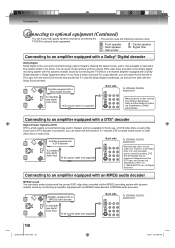
...64257;t of DTS, Inc. © 1996-2008 DTS, Inc. Dolby and the double-D symbol are trademarks of 5.1 channel DTS encoded sound tracks on DVD video discs or audio CDs. If you have a Dolby Surround Pro Logic decoder, you can enjoy motion picture and live concert DVD... theaters and now available for home use, on DVD video discs or audio CDs. Connecting to reproduce this dynamic realistic sound by connecting an amplifier equipped with an MPEG2 audio decoder Back side To COAXIAL DIGITAL AUDIO OUT To COAXIAL type digital audio input 75 Ω coaxial cable (not supplied) 18...
...64257;t of DTS, Inc. © 1996-2008 DTS, Inc. Dolby and the double-D symbol are trademarks of 5.1 channel DTS encoded sound tracks on DVD video discs or audio CDs. If you have a Dolby Surround Pro Logic decoder, you can enjoy motion picture and live concert DVD... theaters and now available for home use, on DVD video discs or audio CDs. Connecting to reproduce this dynamic realistic sound by connecting an amplifier equipped with an MPEG2 audio decoder Back side To COAXIAL DIGITAL AUDIO OUT To COAXIAL type digital audio input 75 Ω coaxial cable (not supplied) 18...
Owners Manual
Page 19
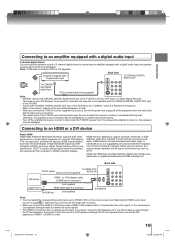
...the capability to support standard, enhanced, or highdefinition video plus standard to a moderate listening level. Note: PCM audio is incompatible with the COAXIAL DIGITAL AUDIO OUT jack of the TV/DVD. • Connect the COAXIAL DIGITAL AUDIO OUT jack of the TV/DVD to the "COAXIAL" ...HDMI or a DVI device About HDMI HDMI (High Definition Multimedia Interface) supports both video and audio on page 42 ). Connections Connecting to an amplifier equipped with a digital audio input 2 channel digital stereo You can enjoy the dynamic sound of several cables and connectors), ...
...the capability to support standard, enhanced, or highdefinition video plus standard to a moderate listening level. Note: PCM audio is incompatible with the COAXIAL DIGITAL AUDIO OUT jack of the TV/DVD. • Connect the COAXIAL DIGITAL AUDIO OUT jack of the TV/DVD to the "COAXIAL" ...HDMI or a DVI device About HDMI HDMI (High Definition Multimedia Interface) supports both video and audio on page 42 ). Connections Connecting to an amplifier equipped with a digital audio input 2 channel digital stereo You can enjoy the dynamic sound of several cables and connectors), ...
Owners Manual
Page 20
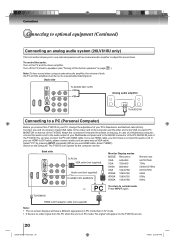
... to connect the audio cord. To control the audio: Turn on the computer. Back side To AUDIO OUT (L/R) Analog audio amplifier To AUDIO IN Connecting to a PC (Personal Computer) Before you don't have a different appearance in PC mode than in TV mode. • If there is no video signal from the PC when ... your Multimedia computer and to the VGA connector PC MONITOR on the plug. Connect one end of a (male to male) VGA cable to the video card of the computer and the other end to the AUDIO connector of the PC AUDIO IN jack of the TV/DVD. You can operate as VGA cable.
... to connect the audio cord. To control the audio: Turn on the computer. Back side To AUDIO OUT (L/R) Analog audio amplifier To AUDIO IN Connecting to a PC (Personal Computer) Before you don't have a different appearance in PC mode than in TV mode. • If there is no video signal from the PC when ... your Multimedia computer and to the VGA connector PC MONITOR on the plug. Connect one end of a (male to male) VGA cable to the video card of the computer and the other end to the AUDIO connector of the PC AUDIO IN jack of the TV/DVD. You can operate as VGA cable.
Owners Manual
Page 23
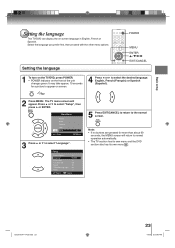
It may take approx. 10 seconds for more than about 60 seconds, the MENU screen will appear. Setup Closed Caption Language Video Label Auto Shut Off Aspect TOSHIBA Logo Light Reset >> English >> Off On On >> : Select : Adjust 5 Press EXIT/CANCEL to return to select "Language". Basic ...setup Setting the language This TV/DVD can display the on the front of the unit changes green. Main Menu Picture Audio Channel Lock Setup ...
It may take approx. 10 seconds for more than about 60 seconds, the MENU screen will appear. Setup Closed Caption Language Video Label Auto Shut Off Aspect TOSHIBA Logo Light Reset >> English >> Off On On >> : Select : Adjust 5 Press EXIT/CANCEL to return to select "Language". Basic ...setup Setting the language This TV/DVD can display the on the front of the unit changes green. Main Menu Picture Audio Channel Lock Setup ...

Owners Manual
Page 30
Main Menu Picture Audio Channel Lock Setup : Select ENTER:Set 2 Press ▲ or ▼ to select "Setup", then press ▶ or ENTER. Video 2 - HDMI 1 - HDMI - HDMI 2 - : Select : Adjust (26LV610U only) 1/5/09 3:04:00 PM Setup Closed Caption Language Video Label Auto Shut Off Aspect TOSHIBA Logo Light Reset : Select >> English >> Off On On >> ENTER:Set...
Main Menu Picture Audio Channel Lock Setup : Select ENTER:Set 2 Press ▲ or ▼ to select "Setup", then press ▶ or ENTER. Video 2 - HDMI 1 - HDMI - HDMI 2 - : Select : Adjust (26LV610U only) 1/5/09 3:04:00 PM Setup Closed Caption Language Video Label Auto Shut Off Aspect TOSHIBA Logo Light Reset : Select >> English >> Off On On >> ENTER:Set...
Owners Manual
Page 35
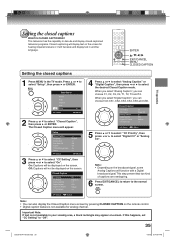
...broadcast signal. When you select "Analog Caption", you can choose C1, C2, C3, C4, T1, T2, T3 and T4. Setup Closed Caption Language Video Label Auto Shut Off Aspect TOSHIBA Logo Light Reset : Select >> English >> Off On On >> ENTER:Set 3 Press ▲ or ▼ to select "CC Setting", then ... the remote control. • Digital caption feature is not available in your viewing area, a black rectangle may appear on the screen. Main Menu Picture Audio Channel Lock Setup : Select ENTER:Set 2 Press ▲ or ▼ to select "Digital CC" or "Analog CC". Closed Caption CC Setting CC...
...broadcast signal. When you select "Analog Caption", you can choose C1, C2, C3, C4, T1, T2, T3 and T4. Setup Closed Caption Language Video Label Auto Shut Off Aspect TOSHIBA Logo Light Reset : Select >> English >> Off On On >> ENTER:Set 3 Press ▲ or ▼ to select "CC Setting", then ... the remote control. • Digital caption feature is not available in your viewing area, a black rectangle may appear on the screen. Main Menu Picture Audio Channel Lock Setup : Select ENTER:Set 2 Press ▲ or ▼ to select "Digital CC" or "Analog CC". Closed Caption CC Setting CC...

Owners Manual
Page 36
...Select ENTER:Set 5 Press ▲ or ▼ to select the desired item, then press ◀ or ▶ to the normal screen. Main Menu Picture Audio Channel Lock Setup : Select ENTER:Set 2 Press ▲ or ▼ to select "Setup", then press ▶ or ENTER. Press ▲ or ▼...; to select "Closed Caption", then press ▶ or ENTER. Setup Closed Caption Language Video Label Auto Shut Off Aspect TOSHIBA Logo Light Reset : Select >> English >> Off On On >> ENTER:Set 3 Press ▲ or ▼ to select "Digital CC Preset...
...Select ENTER:Set 5 Press ▲ or ▼ to select the desired item, then press ◀ or ▶ to the normal screen. Main Menu Picture Audio Channel Lock Setup : Select ENTER:Set 2 Press ▲ or ▼ to select "Setup", then press ▶ or ENTER. Press ▲ or ▼...; to select "Closed Caption", then press ▶ or ENTER. Setup Closed Caption Language Video Label Auto Shut Off Aspect TOSHIBA Logo Light Reset : Select >> English >> Off On On >> ENTER:Set 3 Press ▲ or ▼ to select "Digital CC Preset...

Owners Manual
Page 39
...the picture. Film Mode DNR ENTER / / / EXIT/CANCEL MENU 1 Press MENU in the TV mode. The TV menu screen will appear. Main Menu Picture Audio Channel Lock Setup : Select ENTER:Set 2 Press ▲ or ▼ to select "On" or "Off". Picture Picture Setting Picture Preference Picture Size Film...• A smoother motion may be obtained by setting the Film Mode to "On" when you view a DVD from the DVD player connected with ColorStream (component video) inputs. 52G0101A P37-46.indd 39 39 1/5/09 3:04:46 PM Then press ▲ or ▼ to select "DNR". Press ▲ or ▼...
...the picture. Film Mode DNR ENTER / / / EXIT/CANCEL MENU 1 Press MENU in the TV mode. The TV menu screen will appear. Main Menu Picture Audio Channel Lock Setup : Select ENTER:Set 2 Press ▲ or ▼ to select "On" or "Off". Picture Picture Setting Picture Preference Picture Size Film...• A smoother motion may be obtained by setting the Film Mode to "On" when you view a DVD from the DVD player connected with ColorStream (component video) inputs. 52G0101A P37-46.indd 39 39 1/5/09 3:04:46 PM Then press ▲ or ▼ to select "DNR". Press ▲ or ▼...

Owners Manual
Page 43
Main Menu Picture Audio Channel Lock Setup : Select ENTER:Set 2 Press ▲ or ▼ to the normal screen. Using the aspect feature 1 ...is set mode ENTER / / / EXIT/CANCEL MENU 52G0101A P37-46.indd 43 43 1/5/09 3:04:52 PM Setup Closed Caption Language Video Label Auto Shut Off Aspect TOSHIBA Logo Light Reset >> English >> Off On On >> : Select : Adjust 3 After your desired setting, press EXIT/CANCEL to return ... will appear. TV operation Using the aspect feature When the Aspect feature is automatically selected (as described in the Video or ColorStream HD mode.
Main Menu Picture Audio Channel Lock Setup : Select ENTER:Set 2 Press ▲ or ▼ to the normal screen. Using the aspect feature 1 ...is set mode ENTER / / / EXIT/CANCEL MENU 52G0101A P37-46.indd 43 43 1/5/09 3:04:52 PM Setup Closed Caption Language Video Label Auto Shut Off Aspect TOSHIBA Logo Light Reset >> English >> Off On On >> : Select : Adjust 3 After your desired setting, press EXIT/CANCEL to return ... will appear. TV operation Using the aspect feature When the Aspect feature is automatically selected (as described in the Video or ColorStream HD mode.

Owners Manual
Page 45
Press ▲ or ▼ to the normal screen. 1 Press MENU in the TV mode. Setup Closed Caption Language Video Label Auto Shut Off Aspect TOSHIBA Logo Light Reset >> English >> Off On On >> : Select : Adjust 3 Press EXIT/CANCEL to return to select "Setup", then press ▶ or ENTER. ...will automatically shut itself off after 15 minutes. It is not operated, the TV will appear. Main Menu Picture Audio Channel Lock Setup : Select ENTER:Set 2 Press ▲ or ▼ to select "TOSHIBA Logo Light", then press ◀ or ▶ to select "Auto Shut Off". Press ◀ or ...
Press ▲ or ▼ to the normal screen. 1 Press MENU in the TV mode. Setup Closed Caption Language Video Label Auto Shut Off Aspect TOSHIBA Logo Light Reset >> English >> Off On On >> : Select : Adjust 3 Press EXIT/CANCEL to return to select "Setup", then press ▶ or ENTER. ...will automatically shut itself off after 15 minutes. It is not operated, the TV will appear. Main Menu Picture Audio Channel Lock Setup : Select ENTER:Set 2 Press ▲ or ▼ to select "TOSHIBA Logo Light", then press ◀ or ▶ to select "Auto Shut Off". Press ◀ or ...

Owners Manual
Page 46
Setup Closed Caption Language Video Label Auto Shut Off Aspect TOSHIBA Logo Light Reset : Select >> English >> Off On On >> ENTER:Set 3 Press ▶ or ENTER to return your adjustments to the following factory settings: [Picture menu] ... only) ..... (15) Picture Preference Sports Film Mode On PC Setting Hor Position center (25) Ver Position center (25) Clock center (0) Phase center (25) DNR On [Audio menu] Bass center (15) Treble center (15) Balance center (0) Surround Off 4 "Reset" will appear. Resetting your settings to the factory settings. Press ▲ or ▼...
Setup Closed Caption Language Video Label Auto Shut Off Aspect TOSHIBA Logo Light Reset : Select >> English >> Off On On >> ENTER:Set 3 Press ▶ or ENTER to return your adjustments to the following factory settings: [Picture menu] ... only) ..... (15) Picture Preference Sports Film Mode On PC Setting Hor Position center (25) Ver Position center (25) Clock center (0) Phase center (25) DNR On [Audio menu] Bass center (15) Treble center (15) Balance center (0) Surround Off 4 "Reset" will appear. Resetting your settings to the factory settings. Press ▲ or ▼...

Owners Manual
Page 48
... with the Picture Setting menu (see page 56 . • Some playback operations of DVDs may appear on the TV screen while playing a DVD video disc because the high resolution pictures on the remote control once the movie is completed. • There may damage the disc. • Use the...CD : You can use this , be a slight delay between the button is muted during playback. Doing so may be sure to the instructions supplied with Audio CDs and CD-R/RW CDs. VCD : You can use this case, check your television set a single-faced disc label downwards (ie. Basic playback Playing ...
... with the Picture Setting menu (see page 56 . • Some playback operations of DVDs may appear on the TV screen while playing a DVD video disc because the high resolution pictures on the remote control once the movie is completed. • There may damage the disc. • Use the...CD : You can use this , be a slight delay between the button is muted during playback. Doing so may be sure to the instructions supplied with Audio CDs and CD-R/RW CDs. VCD : You can use this case, check your television set a single-faced disc label downwards (ie. Basic playback Playing ...

Owners Manual
Page 56
VCD Track 3/15 00:08:32 00:51:03 TRACK NO. 56 52G0101A P50-57.indd 56 1/5/09 3:06:24 PM SUBTITLE LANGUAGE AUDIO LANGUAGE A KIND OF AUDIO Video CD DISC OPERATION ELAPSED TOTAL TIME TIME 2 Press / to clear the screen. ■ To turn on the screen. Mode Repeat Play Mode : Off : Off Program...
VCD Track 3/15 00:08:32 00:51:03 TRACK NO. 56 52G0101A P50-57.indd 56 1/5/09 3:06:24 PM SUBTITLE LANGUAGE AUDIO LANGUAGE A KIND OF AUDIO Video CD DISC OPERATION ELAPSED TOTAL TIME TIME 2 Press / to clear the screen. ■ To turn on the screen. Mode Repeat Play Mode : Off : Off Program...


