
Owners Manual
Page 6
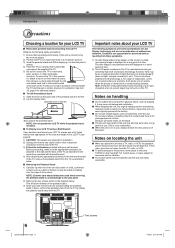
... pedestal stand NOTE: Do not operate the LCD TV while the pedestal stand is not responsible for perceived defects resulting from the TV. therefore, Toshiba is folded. ■ To Display your LCD TV using an extremely high level of precision technology; however, there may become warm after image...to the hooks located at least 4 inches between the TV and the wall or similar structure for ventilation. Such pixels are not visible when the picture is not covered under your warranty. Notes on a sturdy, level surface that involve shooting a "gun" type of joystick at the factory. &#...
... pedestal stand NOTE: Do not operate the LCD TV while the pedestal stand is not responsible for perceived defects resulting from the TV. therefore, Toshiba is folded. ■ To Display your LCD TV using an extremely high level of precision technology; however, there may become warm after image...to the hooks located at least 4 inches between the TV and the wall or similar structure for ventilation. Such pixels are not visible when the picture is not covered under your warranty. Notes on a sturdy, level surface that involve shooting a "gun" type of joystick at the factory. &#...
Owners Manual
Page 7
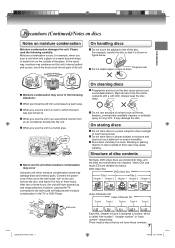
... on a warm day and drops of water form on the outside of the disc. Introduction Precautions (Continued)/Notes on discs Notes on the disc cause picture and sound deterioration. In the same way, moisture may be discs that it for example, when you move the unit from the center outwards with...
... on a warm day and drops of water form on the outside of the disc. Introduction Precautions (Continued)/Notes on discs Notes on the disc cause picture and sound deterioration. In the same way, moisture may be discs that it for example, when you move the unit from the center outwards with...
Owners Manual
Page 8
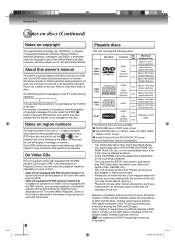
... of problems and errors that can occur during the creation of DVD and CD Software and/or the manufacture of DVD and CD discs, Toshiba cannot assure that the feature is not available for their playable area, are also available. This is a trademark of DVD Format/Logo Licensing... (double sided disc) Approx. 80 minutes (single sided disc) 8 cm Approx. 160 minutes (double sided disc) Video CDs DIGITAL VIDEO Audio + Video (moving pictures) 12 cm Approx. 74 minutes (single sided disc) 8 cm Approx. 20 minutes (single sided disc) Audio CDs Audio 12 cm Approx. 74 minutes (single sided...
... of problems and errors that can occur during the creation of DVD and CD Software and/or the manufacture of DVD and CD discs, Toshiba cannot assure that the feature is not available for their playable area, are also available. This is a trademark of DVD Format/Logo Licensing... (double sided disc) Approx. 80 minutes (single sided disc) 8 cm Approx. 160 minutes (double sided disc) Video CDs DIGITAL VIDEO Audio + Video (moving pictures) 12 cm Approx. 74 minutes (single sided disc) 8 cm Approx. 20 minutes (single sided disc) Audio CDs Audio 12 cm Approx. 74 minutes (single sided...
Owners Manual
Page 9
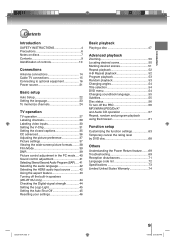
... Labeling video inputs 30 Setting the V-Chip 31 Setting the closed captions 35 CC advanced 36 Adjusting the picture preference 37 Picture settings 37 Viewing the wide-screen picture formats........ 38 Film Mode 39 DNR 39 Picture control adjustment in the PC mode .... 40 Sound control adjustment 41 Selecting Stereo/Second Audio Program (SAP...
... Labeling video inputs 30 Setting the V-Chip 31 Setting the closed captions 35 CC advanced 36 Adjusting the picture preference 37 Picture settings 37 Viewing the wide-screen picture formats........ 38 Film Mode 39 DNR 39 Picture control adjustment in the PC mode .... 40 Sound control adjustment 41 Selecting Stereo/Second Audio Program (SAP...
Owners Manual
Page 17
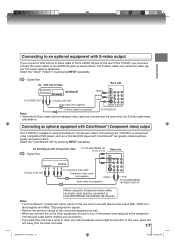
... the connected equipment as well. • When you connect the unit to other equipment, be connected to the AUDIO IN jacks as a Toshiba DVD player with ColorStream® (Component video) output Your TV/DVD is separated. The S-Video cable only carries the video signal. DVD ...HD AUDIO(L/R) IN jacks. Select the "Video" ("Video1") by pressing INPUT repeatedly. Connecting an optional equipment with ColorStream® can greatly enhance picture quality and performance. In this unit are connected at the same time, the S-video cable takes precedence. Ex. The audio signal is capable...
... the connected equipment as well. • When you connect the unit to other equipment, be connected to the AUDIO IN jacks as a Toshiba DVD player with ColorStream® (Component video) output Your TV/DVD is separated. The S-Video cable only carries the video signal. DVD ...HD AUDIO(L/R) IN jacks. Select the "Video" ("Video1") by pressing INPUT repeatedly. Connecting an optional equipment with ColorStream® can greatly enhance picture quality and performance. In this unit are connected at the same time, the S-video cable takes precedence. Ex. The audio signal is capable...
Owners Manual
Page 18
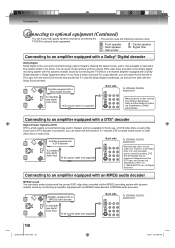
...audio decoder or MPEG2 audio processor. Connecting to an amplifier equipped with an MPEG audio decoder MPEG2 sound You can enjoy motion picture and live concert DVD video discs encoded via the MPEG2 recording system with dynamic realistic sound by connecting the TV/DVD to optional audio...full benefit of DTS, Inc. © 1996-2008 DTS, Inc. If you have a Dolby Surround Pro Logic decoder, you can enjoy motion picture and live concert DVD video discs encoded via the Dolby Digital recording system with this realistic effect in theaters and now available for home use...
...audio decoder or MPEG2 audio processor. Connecting to an amplifier equipped with an MPEG audio decoder MPEG2 sound You can enjoy motion picture and live concert DVD video discs encoded via the MPEG2 recording system with dynamic realistic sound by connecting the TV/DVD to optional audio...full benefit of DTS, Inc. © 1996-2008 DTS, Inc. If you have a Dolby Surround Pro Logic decoder, you can enjoy motion picture and live concert DVD video discs encoded via the Dolby Digital recording system with this realistic effect in theaters and now available for home use...
Owners Manual
Page 22
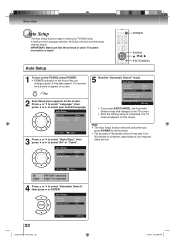
... sure that the antenna or cable TV system connection is completed, the TV channel appears on the screen. It may take approx. 10 seconds for a picture to appear on screen. 2 Auto Setup menu appears on your regional cable service. : Select : Adjust Air - It leads you the Language selection, Air/Cable selection...
... sure that the antenna or cable TV system connection is completed, the TV channel appears on the screen. It may take approx. 10 seconds for a picture to appear on screen. 2 Auto Setup menu appears on your regional cable service. : Select : Adjust Air - It leads you the Language selection, Air/Cable selection...
Owners Manual
Page 23
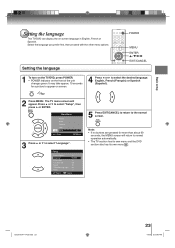
... language This TV/DVD can display the on the front of the unit changes green. Setup Closed Caption Language Video Label Auto Shut Off Aspect TOSHIBA Logo Light Reset >> English >> Off On On >> : Select : Adjust 5 Press EXIT/CANCEL to return to select "Setup", then press ▶ or ENTER....the TV/DVD, press POWER. • POWER indicator on screen language in English, French or Spanish. Note: • If no buttons are pressed for a picture to appear on screen. 4 Press ◀ or ▶ to select "Language". Select the language you prefer first, then proceed with the other ...
... language This TV/DVD can display the on the front of the unit changes green. Setup Closed Caption Language Video Label Auto Shut Off Aspect TOSHIBA Logo Light Reset >> English >> Off On On >> : Select : Adjust 5 Press EXIT/CANCEL to return to select "Setup", then press ▶ or ENTER....the TV/DVD, press POWER. • POWER indicator on screen language in English, French or Spanish. Note: • If no buttons are pressed for a picture to appear on screen. 4 Press ◀ or ▶ to select "Language". Select the language you prefer first, then proceed with the other ...

Owners Manual
Page 24
... Select ENTER:Cancel 4 The TV/DVD will begin memorizing all the channels available in the TV mode. The TV menu screen will appear. Main Menu Picture Audio Channel Lock Setup : Select ENTER:Set 2 Press ▲ or ▼ to the normal screen. 24 52G0101A P14-29.indd 24 1/5/09 3:.../Delete >> DTV Signal >> Auto Ch Memory >> Ch Label >> 3 Press ▲ or ▼ to select "Channel", then press ▶ or ENTER. Main Menu Picture Audio Channel Lock Setup : Select ENTER:Set 1 Press MENU in the Cable mode. Air - Basic setup To memorize channels This TV/DVD is in the...
... Select ENTER:Cancel 4 The TV/DVD will begin memorizing all the channels available in the TV mode. The TV menu screen will appear. Main Menu Picture Audio Channel Lock Setup : Select ENTER:Set 2 Press ▲ or ▼ to the normal screen. 24 52G0101A P14-29.indd 24 1/5/09 3:.../Delete >> DTV Signal >> Auto Ch Memory >> Ch Label >> 3 Press ▲ or ▼ to select "Channel", then press ▶ or ENTER. Main Menu Picture Audio Channel Lock Setup : Select ENTER:Set 1 Press MENU in the Cable mode. Air - Basic setup To memorize channels This TV/DVD is in the...

Owners Manual
Page 25
... Analog Delete Add Delete Add Delete : Select : Adjust 6 Repeat steps 4 - 5 for other channels you want to skip. 1 Press MENU in the TV mode. Main Menu Picture Audio Channel Lock Setup : Select ENTER:Set 2 Press ▲ or ▼ to skip.
... Analog Delete Add Delete Add Delete : Select : Adjust 6 Repeat steps 4 - 5 for other channels you want to skip. 1 Press MENU in the TV mode. Main Menu Picture Audio Channel Lock Setup : Select ENTER:Set 2 Press ▲ or ▼ to skip.

Owners Manual
Page 26
... press ▶ or ENTER. The TV menu screen will appear. Press ▲ or ▼ to select "Add/Delete", then press ▶ or ENTER. Main Menu Picture Audio Channel Lock Setup : Select ENTER:Set 3 Press ▲ or ▼ to select "Channel", then press ▶ or ENTER. Main Menu... Picture Audio Channel Lock Setup : Select ENTER:Set 2 Press ▲ or ▼ to select "Clear All", then press ▶ or ENTER. The TV menu screen will ...
... press ▶ or ENTER. The TV menu screen will appear. Press ▲ or ▼ to select "Add/Delete", then press ▶ or ENTER. Main Menu Picture Audio Channel Lock Setup : Select ENTER:Set 3 Press ▲ or ▼ to select "Channel", then press ▶ or ENTER. Main Menu... Picture Audio Channel Lock Setup : Select ENTER:Set 2 Press ▲ or ▼ to select "Clear All", then press ▶ or ENTER. The TV menu screen will ...
Owners Manual
Page 27
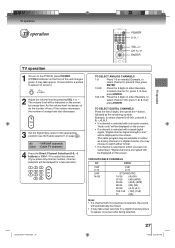
...135) 01 (5A) Note: • If a channel with a weak digital signal, "Digital channel signal strength is low" will be delayed for a few seconds for a picture to select channel 015-001, press 0, 1, 5, -, 0, 0, 1. • If a channel is selected with only audio content, "Audio only" will be displayed on ... Cable - Example, to select channel 120, press 1, 2, 0, then press ENTER. You may take approx. 10 seconds for a digital channel picture to the appropriate position (see "Air/Cable selection" on screen after being selected. 52G0101A P14-29.indd 27 27 1/5/09 3:03:07 PM ...
...135) 01 (5A) Note: • If a channel with a weak digital signal, "Digital channel signal strength is low" will be delayed for a few seconds for a picture to select channel 015-001, press 0, 1, 5, -, 0, 0, 1. • If a channel is selected with only audio content, "Audio only" will be displayed on ... Cable - Example, to select channel 120, press 1, 2, 0, then press ENTER. You may take approx. 10 seconds for a digital channel picture to the appropriate position (see "Air/Cable selection" on screen after being selected. 52G0101A P14-29.indd 27 27 1/5/09 3:03:07 PM ...
Owners Manual
Page 28
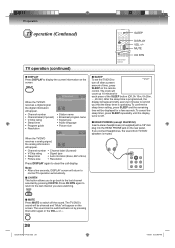
...Timer Off English Mono Full 480i • Station name • Broadcast program name • Signal type • Audio language • Picture size 14 Analog Cable Sleep Timer Off When the TV/DVD receives a analog signal, the analog information Mono Full 480i will appear on...Channel label (if preset) • V-Chip rating • Signal type • Sleep timer • Audio information (Stereo, SAP or Mono) • Picture size • Resolution Press DISPLAY again to Sleep Timer 0h 10m turn off the sound. When the TV/DVD receives a digital signal, the digital information...
...Timer Off English Mono Full 480i • Station name • Broadcast program name • Signal type • Audio language • Picture size 14 Analog Cable Sleep Timer Off When the TV/DVD receives a analog signal, the analog information Mono Full 480i will appear on...Channel label (if preset) • V-Chip rating • Signal type • Sleep timer • Audio information (Stereo, SAP or Mono) • Picture size • Resolution Press DISPLAY again to Sleep Timer 0h 10m turn off the sound. When the TV/DVD receives a digital signal, the digital information...

Owners Manual
Page 29
.../Delete >> DTV Signal >> Auto Ch Memory >> Ch Label >> : Select ENTER:Set 3 Press ◀ or ▶ to select a channel you desire appears, press ENTER. Main Menu Picture Audio Channel Lock Setup : Select ENTER:Set 2 Press ▲ or ▼ to select "Channel" menu, then press ▶ or ENTER. Repeat this step to enter...
.../Delete >> DTV Signal >> Auto Ch Memory >> Ch Label >> : Select ENTER:Set 3 Press ◀ or ▶ to select a channel you desire appears, press ENTER. Main Menu Picture Audio Channel Lock Setup : Select ENTER:Set 2 Press ▲ or ▼ to select "Channel" menu, then press ▶ or ENTER. Repeat this step to enter...

Owners Manual
Page 30
... ▶ to select "Video Label", then press ▶ or ENTER. Video 2 - HDMI 2 - : Select : Adjust (26LV610U only) 1/5/09 3:04:00 PM Main Menu Picture Audio Channel Lock Setup : Select ENTER:Set 2 Press ▲ or ▼ to select the desired label for that input source. VCR DVD DTV SAT CBL...the normal screen. 30 52G0101A P30-36.indd 30 : Select : Adjust Video Label Video 1 - Setup Closed Caption Language Video Label Auto Shut Off Aspect TOSHIBA Logo Light Reset : Select >> English >> Off On On >> ENTER:Set 3 Press ▲ or ▼ to select an input which you to ...
... ▶ to select "Video Label", then press ▶ or ENTER. Video 2 - HDMI 2 - : Select : Adjust (26LV610U only) 1/5/09 3:04:00 PM Main Menu Picture Audio Channel Lock Setup : Select ENTER:Set 2 Press ▲ or ▼ to select the desired label for that input source. VCR DVD DTV SAT CBL...the normal screen. 30 52G0101A P30-36.indd 30 : Select : Adjust Video Label Video 1 - Setup Closed Caption Language Video Label Auto Shut Off Aspect TOSHIBA Logo Light Reset : Select >> English >> Off On On >> ENTER:Set 3 Press ▲ or ▼ to select an input which you to ...

Owners Manual
Page 31
.... You may choose to exclude. This allows you may set to restrict children from viewing or hearing violent scenes or pictures that you to reset your password. 0-9 DISPLAY ENTER / / MENU To register a password To change a password 1 Press MENU ... buttons (0-9), then press ENTER. Lock Confirm Password ---- [0-9] : Select ENTER:Set Note: • The V-Chip feature is now registered. Main Menu Picture Audio Channel Lock Setup : Select ENTER:Set 2 Select and enter your password, then press ENTER. Change Password New Password Confirm Password ------- [0-9] : ...
.... You may choose to exclude. This allows you may set to restrict children from viewing or hearing violent scenes or pictures that you to reset your password. 0-9 DISPLAY ENTER / / MENU To register a password To change a password 1 Press MENU ... buttons (0-9), then press ENTER. Lock Confirm Password ---- [0-9] : Select ENTER:Set Note: • The V-Chip feature is now registered. Main Menu Picture Audio Channel Lock Setup : Select ENTER:Set 2 Select and enter your password, then press ENTER. Change Password New Password Confirm Password ------- [0-9] : ...

Owners Manual
Page 32
... years old and above : 17 years old and above Genre: ALL : All D : Dialogue L : Language S : Sex V : Violence FV : Fantasy Violence 1/5/09 3:04:04 PM Main Menu Picture Audio Channel Lock Setup : Select ENTER:Set 2 Use Number buttons (0-9) to enter your password, then press ENTER. The TV menu screen will be used, then...
... years old and above : 17 years old and above Genre: ALL : All D : Dialogue L : Language S : Sex V : Violence FV : Fantasy Violence 1/5/09 3:04:04 PM Main Menu Picture Audio Channel Lock Setup : Select ENTER:Set 2 Use Number buttons (0-9) to enter your password, then press ENTER. The TV menu screen will be used, then...
Owners Manual
Page 33
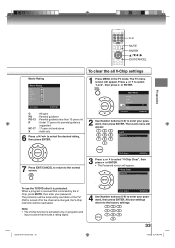
... off or the channel is blocked by the VChip, press MUTE, then enter your settings return to enter your password, then press ENTER. Main Menu Picture Audio Channel Lock Setup : Select ENTER:Set 2 Use Number buttons (0-9) to select "V-Chip Clear", then press ▶ or ENTER. • The Password screen will appear...
... off or the channel is blocked by the VChip, press MUTE, then enter your settings return to enter your password, then press ENTER. Main Menu Picture Audio Channel Lock Setup : Select ENTER:Set 2 Use Number buttons (0-9) to select "V-Chip Clear", then press ▶ or ENTER. • The Password screen will appear...
Owners Manual
Page 34
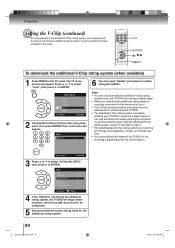
... "Lock", then press ▶ or ENTER. Note: • You can only download the additional V-Chip rating system when your password, then press ENTER. Main Menu Picture Audio Channel Lock Setup : Select ENTER:Set 2 Use Number buttons (0-9) to update rating information. Press ▲ or ▼ to be able to download an additional...
... "Lock", then press ▶ or ENTER. Note: • You can only download the additional V-Chip rating system when your password, then press ENTER. Main Menu Picture Audio Channel Lock Setup : Select ENTER:Set 2 Use Number buttons (0-9) to update rating information. Press ▲ or ▼ to be able to download an additional...
Owners Manual
Page 35
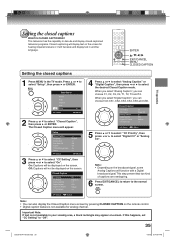
... is not available for hearing impaired viewers or it will display text on the screen. Setup Closed Caption Language Video Label Auto Shut Off Aspect TOSHIBA Logo Light Reset : Select >> English >> Off On On >> ENTER:Set 3 Press ▲ or ▼ to select "CC Setting", then press ◀ or..., CS2, CS3, CS4, CS5 and CS6. Press ▲ or ▼ to select the desired Closed Caption mode. Off: Captions will appear. Main Menu Picture Audio Channel Lock Setup : Select ENTER:Set 2 Press ▲ or ▼ to select "Digital CC" or "Analog CC". TV operation Setting the closed...
... is not available for hearing impaired viewers or it will display text on the screen. Setup Closed Caption Language Video Label Auto Shut Off Aspect TOSHIBA Logo Light Reset : Select >> English >> Off On On >> ENTER:Set 3 Press ▲ or ▼ to select "CC Setting", then press ◀ or..., CS2, CS3, CS4, CS5 and CS6. Press ▲ or ▼ to select the desired Closed Caption mode. Off: Captions will appear. Main Menu Picture Audio Channel Lock Setup : Select ENTER:Set 2 Press ▲ or ▼ to select "Digital CC" or "Analog CC". TV operation Setting the closed...


