Owners Manual
Page 1
... an overview of steps for setting up your new monitor, see page 7. © 2006 TOSHIBA CORPORATION All Rights Reserved Owner's Record The model number and serial number are on the back of your Toshiba dealer about this owner's manual. LCD Monitor 26HLC56 32HLC56 37HLC56 NOTE: THIS MONITOR DOES NOT CONTAIN A TUNER A set-top box (i.e., cable box...
... an overview of steps for setting up your new monitor, see page 7. © 2006 TOSHIBA CORPORATION All Rights Reserved Owner's Record The model number and serial number are on the back of your Toshiba dealer about this owner's manual. LCD Monitor 26HLC56 32HLC56 37HLC56 NOTE: THIS MONITOR DOES NOT CONTAIN A TUNER A set-top box (i.e., cable box...

Owners Manual
Page 2
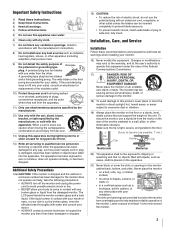
...your purchase! a Sometimes TVs are not always supported on page 3. Arlington, VA 22201 U.S.A. Before operating your LCD monitor, please read and understand the other electronic components). WARNING RISK OF ELECTRIC SHOCK DO NOT OPEN. Safety Precautions WARNING: .... a The consumer electronics industry is required to advocate children's safety and educate consumers and their families about this Toshiba Monitor. a The Consumer Electronics Association formed the Home Entertainment Support Safety Committee, comprised of TV and consumer electronics furniture manufacturers...
...your purchase! a Sometimes TVs are not always supported on page 3. Arlington, VA 22201 U.S.A. Before operating your LCD monitor, please read and understand the other electronic components). WARNING RISK OF ELECTRIC SHOCK DO NOT OPEN. Safety Precautions WARNING: .... a The consumer electronics industry is required to advocate children's safety and educate consumers and their families about this Toshiba Monitor. a The Consumer Electronics Association formed the Home Entertainment Support Safety Committee, comprised of TV and consumer electronics furniture manufacturers...
Owners Manual
Page 3
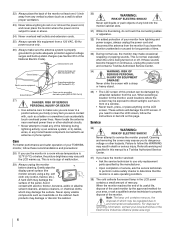
...poor ventilation. Important Safety Instructions 1) Read these instructions. 2) Keep these recommendations and precautions and heed all warnings when installing your monitor: 16) Never modify this equipment under the rules of the Federal Communications Commission. 17) DANGER: RISK OF SERIOUS PERSONAL INJURY, ...DEATH, OR EQUIPMENT DAMAGE! fully insert. hot, humid areas; Hooks Clip Clip Monitor side Monitor top 20) The apparatus shall not be inserted completely to prevent blade exposure. • To prevent electric shock, match wide...
...poor ventilation. Important Safety Instructions 1) Read these instructions. 2) Keep these recommendations and precautions and heed all warnings when installing your monitor: 16) Never modify this equipment under the rules of the Federal Communications Commission. 17) DANGER: RISK OF SERIOUS PERSONAL INJURY, ...DEATH, OR EQUIPMENT DAMAGE! fully insert. hot, humid areas; Hooks Clip Clip Monitor side Monitor top 20) The apparatus shall not be inserted completely to prevent blade exposure. • To prevent electric shock, match wide...
Owners Manual
Page 4
...popping sounds. Opening and removing the covers may expose you leave the monitor unattended or unused for the monitor, avoid locations where the screen may be damaged by the approved method for your TOSHIBA monitor, follow these sounds become frequent or continuous, unplug the power cord... and contact a Toshiba Authorized Service Center. 34) WARNING: RISK OF SERIOUS PERSONAL INJURY OR EQUIPMENT DAMAGE! When the monitor reaches the end of its useful ...
...popping sounds. Opening and removing the covers may expose you leave the monitor unattended or unused for the monitor, avoid locations where the screen may be damaged by the approved method for your TOSHIBA monitor, follow these sounds become frequent or continuous, unplug the power cord... and contact a Toshiba Authorized Service Center. 34) WARNING: RISK OF SERIOUS PERSONAL INJURY OR EQUIPMENT DAMAGE! When the monitor reaches the end of its useful ...
Owners Manual
Page 5
... following symptoms are technical limitations of LCD Display technology and are based on using an extremely high level of precision technology; Welcome to Toshiba Thank you for purchasing this Toshiba monitor, one or more of the following measures: • Reorient or relocate the receiving antenna. • Increase the separation between the... Note: This equipment has been tested and found to comply with Part 15 of the FCC rules. FCC Compliance Statement (Part 15): The Toshiba 26HLC56, 32HLC56, and 37HLC56 LCD Color Monitors comply with the limits for future reference. Wayne, NJ 07470.
... following symptoms are technical limitations of LCD Display technology and are based on using an extremely high level of precision technology; Welcome to Toshiba Thank you for purchasing this Toshiba monitor, one or more of the following measures: • Reorient or relocate the receiving antenna. • Increase the separation between the... Note: This equipment has been tested and found to comply with Part 15 of the FCC rules. FCC Compliance Statement (Part 15): The Toshiba 26HLC56, 32HLC56, and 37HLC56 LCD Color Monitors comply with the limits for future reference. Wayne, NJ 07470.

Owners Manual
Page 6
...and navigation 23 Menu Layout 23 Navigating the menu system 23 Chapter 5: Setting up your Monitor 24 Selecting the menu language 24 Setting the HDMI™ audio mode 24 Chapter 6: Using the Monitor's features 25 Selecting the video input source to view 25 Labeling the video input sources ...code 37 Using the PC setting feature 37 PC/HDMI Audio 38 Setting the sleep timer 38 Setting the On timer 39 Displaying the monitor's settings on-screen using RECALL 39 Understanding the last mode memory feature 39 Chapter 7: Troubleshooting 40 General troubleshooting 40 Chapter 8: Appendix ...
...and navigation 23 Menu Layout 23 Navigating the menu system 23 Chapter 5: Setting up your Monitor 24 Selecting the menu language 24 Setting the HDMI™ audio mode 24 Chapter 6: Using the Monitor's features 25 Selecting the video input source to view 25 Labeling the video input sources ...code 37 Using the PC setting feature 37 PC/HDMI Audio 38 Setting the sleep timer 38 Setting the On timer 39 Displaying the monitor's settings on-screen using RECALL 39 Understanding the last mode memory feature 39 Chapter 7: Troubleshooting 40 General troubleshooting 40 Chapter 8: Appendix ...
Owners Manual
Page 7
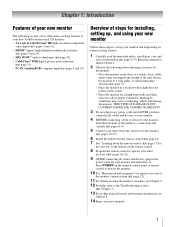
...on the floor or a sturdy, level, stable surface that can support the weight of the monitor's menu system (- pages 2-4). THIS TYPE OF DAMAGE IS NOT COVERED UNDER THE TOSHIBA WARRANTY. 3 Do not plug in any power cords until AFTER you have connected all cables and...; digital, high-definition multimedia interface (- page 17) for a quick overview of the unit. Chapter 1: Introduction Features of your new monitor The following when choosing a location for your new Toshiba widescreen LCD monitor: • Two sets of ColorStream® HD high-resolution component video inputs (-
...on the floor or a sturdy, level, stable surface that can support the weight of the monitor's menu system (- pages 2-4). THIS TYPE OF DAMAGE IS NOT COVERED UNDER THE TOSHIBA WARRANTY. 3 Do not plug in any power cords until AFTER you have connected all cables and...; digital, high-definition multimedia interface (- page 17) for a quick overview of the unit. Chapter 1: Introduction Features of your new monitor The following when choosing a location for your new Toshiba widescreen LCD monitor: • Two sets of ColorStream® HD high-resolution component video inputs (-

Owners Manual
Page 8
...INPUT (ENTER) - When a menu is on. 2 Remote sensor - When a menu is on the monitor control panel functions as the Enter button. 7 ARROWS BbC c - See "Remote control effective range" (- Press to turn the monitor on -screen, these buttons function as left /right menu navigation buttons. 8 VIDEO-2 IN - Standard (composite..., these buttons adjust the volume level. page 16). 3 POWER - Chapter 1: Introduction Front and side panel controls and connections Monitor front Monitor Side panel 8 Control panel 7 65 4 3 21 1 Red LED - When a menu is on and off. 4 VOLUME C c -
...INPUT (ENTER) - When a menu is on. 2 Remote sensor - When a menu is on the monitor control panel functions as the Enter button. 7 ARROWS BbC c - See "Remote control effective range" (- Press to turn the monitor on -screen, these buttons function as left /right menu navigation buttons. 8 VIDEO-2 IN - Standard (composite..., these buttons adjust the volume level. page 16). 3 POWER - Chapter 1: Introduction Front and side panel controls and connections Monitor front Monitor Side panel 8 Control panel 7 65 4 3 21 1 Red LED - When a menu is on and off. 4 VOLUME C c -

Owners Manual
Page 9
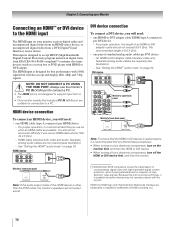
... Interface input receives digital audio and uncompressed digital video from an HDMI device, or uncompressed digital video from a DVI device (- item 3, at left; page 10). Monitor back 1 34 2 Power cord Cable Clamper 56 1 A/V OUT - Note: Component video cables carry only video information; For use can be configured in the Set Up... editing and dubbing. 2 ColorStream® HD-1 and ColorStream® HD-2 - When component video cables are required for connecting devices with component video output, such as a Toshiba DVD player with ColorStream HD-1 input terminals.
... Interface input receives digital audio and uncompressed digital video from an HDMI device, or uncompressed digital video from a DVI device (- item 3, at left; page 10). Monitor back 1 34 2 Power cord Cable Clamper 56 1 A/V OUT - Note: Component video cables carry only video information; For use can be configured in the Set Up... editing and dubbing. 2 ColorStream® HD-1 and ColorStream® HD-2 - When component video cables are required for connecting devices with component video output, such as a Toshiba DVD player with ColorStream HD-1 input terminals.

Owners Manual
Page 10
... and are for use with video devices with analog audio and composite video output. For details on your specific devices, refer to the monitor's PC IN terminal (- Note: Component video cables provide better picture performance than a standard (composite) video or S-video cable. 10 Separate...video in several different configurations. HDMI cable carries both video and audio information; Analog RGB (15-pin) computer cable S-video cable is Toshiba's brand of devices to disconnect the standard (composite) video cable or the picture performance will be unacceptable. page 15). About the ...
... and are for use with video devices with analog audio and composite video output. For details on your specific devices, refer to the monitor's PC IN terminal (- Note: Component video cables provide better picture performance than a standard (composite) video or S-video cable. 10 Separate...video in several different configurations. HDMI cable carries both video and audio information; Analog RGB (15-pin) computer cable S-video cable is Toshiba's brand of devices to disconnect the standard (composite) video cable or the picture performance will be unacceptable. page 15). About the ...

Owners Manual
Page 11
...cable box controls to your VCR's audio out terminal using the white audio cable only. If you have a mono VCR, connect L/MONO on the monitor to program or access certain features on page 18. page 25). For better picture performance, if your VCR has S-video, connect an S-video ... VCR has S-video, connect an S-video cable and standard (analog) audio cables to the VIDEO-2 inputs on the remote control (- Chapter 2: Connecting your Monitor Connecting a VCR Connecting a VCR and Cable box You will be able to use the remote control to your VCR's audio out terminal using the white...
...cable box controls to your VCR's audio out terminal using the white audio cable only. If you have a mono VCR, connect L/MONO on the monitor to program or access certain features on page 18. page 25). For better picture performance, if your VCR has S-video, connect an S-video ... VCR has S-video, connect an S-video cable and standard (analog) audio cables to the VIDEO-2 inputs on the remote control (- Chapter 2: Connecting your Monitor Connecting a VCR Connecting a VCR and Cable box You will be able to use the remote control to your VCR's audio out terminal using the white...

Owners Manual
Page 12
... can connect the component video cables (plus audio cables) from ANT CH 3 CH 4 OUT to TV AUDIO L R IN IN OUT L R Monitor's upper back panel Monitor's right side panel Y PB PR DVD player with component video AUDIO OUT L S-VIDEO COMPONENT VIDEO VIDEO R OUT OUT From satellite dish Y PB ... L Satellite S-VIDEO COMPONENT VIDEO VIDEO R IN OUT OUT Satellite receiver with ColorStream® (component video), a VCR, and a satellite receiver Your monitor has two sets of video cable to operate your VCR's audio out terminal using the component video connections: Turn on the...
... can connect the component video cables (plus audio cables) from ANT CH 3 CH 4 OUT to TV AUDIO L R IN IN OUT L R Monitor's upper back panel Monitor's right side panel Y PB PR DVD player with component video AUDIO OUT L S-VIDEO COMPONENT VIDEO VIDEO R OUT OUT From satellite dish Y PB ... L Satellite S-VIDEO COMPONENT VIDEO VIDEO R IN OUT OUT Satellite receiver with ColorStream® (component video), a VCR, and a satellite receiver Your monitor has two sets of video cable to operate your VCR's audio out terminal using the component video connections: Turn on the...

Owners Manual
Page 13
... 2 (records) IN from one VCR ("VCR1" in the illustration below) to a second VCR ("VCR2") while watching a videotape. Chapter 2: Connecting your Monitor Connecting two VCRs This connection allows you to record (dub/edit) from ANT CH 3 CH 4 OUT to TV VIDEO AUDIO L R IN OUT L ...CH 4 OUT to TV VIDEO AUDIO L R IN OUT L R Connecting a camcorder You will need : • standard A/V cables - To program the monitor's remote control to operate other devices" on the remote control (- page 25). For better picture performance, if your other devices, see "Using the remote control...
... 2 (records) IN from one VCR ("VCR1" in the illustration below) to a second VCR ("VCR2") while watching a videotape. Chapter 2: Connecting your Monitor Connecting two VCRs This connection allows you to record (dub/edit) from ANT CH 3 CH 4 OUT to TV VIDEO AUDIO L R IN OUT L ...CH 4 OUT to TV VIDEO AUDIO L R IN OUT L R Connecting a camcorder You will need : • standard A/V cables - To program the monitor's remote control to operate other devices" on the remote control (- page 25). For better picture performance, if your other devices, see "Using the remote control...
Owners Manual
Page 14
... IN (VGA) port are required (see illustration). - Separate analog audio cables are trademarks or registered trademarks of uncompressed digital video with the monitor. DVI device connection To connect a DVI device, you will not output sound. Because this is an evolving technology, it is recommended that ...you follow these procedures: • When turning on your electronic components, turn off the HDMI or DVI device first, and then the monitor. [1] EIA/CEA-861-861B compliance covers the transmission of HDMI Licensing LLC. 14 HDMI, the HDMI logo and High-Definition Multimedia ...
... IN (VGA) port are required (see illustration). - Separate analog audio cables are trademarks or registered trademarks of uncompressed digital video with the monitor. DVI device connection To connect a DVI device, you will not output sound. Because this is an evolving technology, it is recommended that ...you follow these procedures: • When turning on your electronic components, turn off the HDMI or DVI device first, and then the monitor. [1] EIA/CEA-861-861B compliance covers the transmission of HDMI Licensing LLC. 14 HDMI, the HDMI logo and High-Definition Multimedia ...

Owners Manual
Page 15
... B NC (not connected) NC Ground Ground Ground NC Ground NC NC H-sync V-sync NC Note: • Some PC models cannot be connected to this monitor. • An adapter is not needed for computers with a DOS/V compatible mini D-sub15-pin terminal. • Depending on the DVD's title and the... be displayed: - VGA: 640 5 480 @ 60Hz - XGA: 1024 5 768 @ 60Hz - "Using the PC setting feature" on the monitor's screen. Chapter 2: Connecting your Monitor Connecting a personal computer (PC) This connection allows you may be skipped or you to view the image from a PC on page 37). When connecting...
... B NC (not connected) NC Ground Ground Ground NC Ground NC NC H-sync V-sync NC Note: • Some PC models cannot be connected to this monitor. • An adapter is not needed for computers with a DOS/V compatible mini D-sub15-pin terminal. • Depending on the DVD's title and the... be displayed: - VGA: 640 5 480 @ 60Hz - XGA: 1024 5 768 @ 60Hz - "Using the PC setting feature" on the monitor's screen. Chapter 2: Connecting your Monitor Connecting a personal computer (PC) This connection allows you may be skipped or you to view the image from a PC on page 37). When connecting...

Owners Manual
Page 16
... range For optimum performance, aim the remote control directly at the monitor and make sure there is not preprogrammed to be disposed of with new ones. page 20). If you have a non-Toshiba device or a Toshiba device that the remote control is no obstruction between the remote control... it will prevent battery acid from the remote control if they are dead or if the remote control is preprogrammed to operate most Toshiba devices (- signs on front of monitor. 2 Install two "AAA" size batteries, making sure to use AAA size batteries. • Dispose of batteries in a designated ...
... range For optimum performance, aim the remote control directly at the monitor and make sure there is not preprogrammed to be disposed of with new ones. page 20). If you have a non-Toshiba device or a Toshiba device that the remote control is no obstruction between the remote control... it will prevent battery acid from the remote control if they are dead or if the remote control is preprogrammed to operate most Toshiba devices (- signs on front of monitor. 2 Install two "AAA" size batteries, making sure to use AAA size batteries. • Dispose of batteries in a designated ...

Owners Manual
Page 17
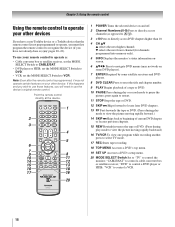
...: Natural, TheaterWide 1/2/3, Full, and 4:3 HD (- adjusts the volume level. 7 PIC MODE selects the picture mode (page 29). 8 RECALL displays the monitor's setting information onscreen (- Press p to turn on and off the sound (- page 18). For a complete list of the remote control's functions, see ... is not available. 17 Chapter 3: Using the remote control Learning about the remote control The buttons used for a function that is on the monitor's front panel will be illuminated. page 26). 5 INPUT selects the video input source (- The red LED indicator on -screen, these buttons ...
...: Natural, TheaterWide 1/2/3, Full, and 4:3 HD (- adjusts the volume level. 7 PIC MODE selects the picture mode (page 29). 8 RECALL displays the monitor's setting information onscreen (- Press p to turn on and off the sound (- page 18). For a complete list of the remote control's functions, see ... is not available. 17 Chapter 3: Using the remote control Learning about the remote control The buttons used for a function that is on the monitor's front panel will be illuminated. page 26). 5 INPUT selects the video input source (- The red LED indicator on -screen, these buttons ...
Owners Manual
Page 18
...TOP MENU Accesses a DVD's top menu. 19 SET UP Accesses a DVD's setup menu. 20 MODE SELECT Switch Set to "TV" to control the monitor; To use your remote control to operate a: • Cable converter box or satellite receiver, set the MODE SELECT Switch to CABLE/SAT. • DVD... channel (for channels programmed into memory only). 5 INFO Displays the monitor's status information onscreen. 6 BbC c Press to navigate DVD menus (may not operate certain features on your other devices If you have a non-Toshiba device or a Toshiba device that the remote control is programmed, it may not work on...
...TOP MENU Accesses a DVD's top menu. 19 SET UP Accesses a DVD's setup menu. 20 MODE SELECT Switch Set to "TV" to control the monitor; To use your remote control to operate a: • Cable converter box or satellite receiver, set the MODE SELECT Switch to CABLE/SAT. • DVD... channel (for channels programmed into memory only). 5 INFO Displays the monitor's status information onscreen. 6 BbC c Press to navigate DVD menus (may not operate certain features on your other devices If you have a non-Toshiba device or a Toshiba device that the remote control is programmed, it may not work on...

Owners Manual
Page 19
... --- Fast FWD --- CHBb PIC SIZE MUTE FF PAUSE/STEP PLAY REW PIC MODE STOP FREEZE SKIP Z SKIP z TV/VCR REC SET UP TOP MENU TV (monitor) Power Sleep timer TV/Video select (*) Sends a signal * * RECALL * --Menu/DVD Menu Menu select/* Menu select Menu select Enter Exit Volume up/down * Picture size... the remote control Remote Control functional key chart Note key does not send a signal in that remote control mode. • sTV = key will affect the monitor, even when the remote control is not in the "TV" device mode. *: Not available for the...
... --- Fast FWD --- CHBb PIC SIZE MUTE FF PAUSE/STEP PLAY REW PIC MODE STOP FREEZE SKIP Z SKIP z TV/VCR REC SET UP TOP MENU TV (monitor) Power Sleep timer TV/Video select (*) Sends a signal * * RECALL * --Menu/DVD Menu Menu select/* Menu select Menu select Enter Exit Volume up/down * Picture size... the remote control Remote Control functional key chart Note key does not send a signal in that remote control mode. • sTV = key will affect the monitor, even when the remote control is not in the "TV" device mode. *: Not available for the...
Owners Manual
Page 20
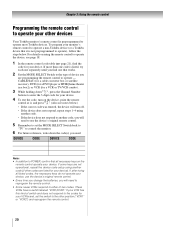
...DEVICE CODE Note: • In addition to POWER, confirm that all listed codes, the necessary keys do not operate your monitor's remote control to operate a non-Toshiba device (or a Toshiba device that works. 2 Set the MODE SELECT Switch to the type of two codes. Chapter 3: Using the remote control... Programming the remote control to operate your other devices Your Toshiba monitor's remote control is listed, try each one separately until you find the code for your device. If some keys are not operational, ...
...DEVICE CODE Note: • In addition to POWER, confirm that all listed codes, the necessary keys do not operate your monitor's remote control to operate a non-Toshiba device (or a Toshiba device that works. 2 Set the MODE SELECT Switch to the type of two codes. Chapter 3: Using the remote control... Programming the remote control to operate your other devices Your Toshiba monitor's remote control is listed, try each one separately until you find the code for your device. If some keys are not operational, ...