
User Manual
Page 1
..., please contact your TV antenna installer, cable provider, or satellite provider. 2010 TOSHIBA CORPORATION All Rights Reserved Owner's Record The model number and serial number are on the back of steps for setting up your new TV, see page 10. Record these numbers whenever you communicate ...with your TV. Refer to these numbers in the spaces below. Owner's Manual Integrated High Definition LCD Television 19SL410U 24SL410U 32SL410U For an overview of your Toshiba dealer about this ...
..., please contact your TV antenna installer, cable provider, or satellite provider. 2010 TOSHIBA CORPORATION All Rights Reserved Owner's Record The model number and serial number are on the back of steps for setting up your new TV, see page 10. Record these numbers whenever you communicate ...with your TV. Refer to these numbers in the spaces below. Owner's Manual Integrated High Definition LCD Television 19SL410U 24SL410U 32SL410U For an overview of your Toshiba dealer about this ...

User Manual
Page 2
...the display is intended to alert the user to the presence of important operating and maintenance (servicing) instructions in accordance with furniture and television sets. • Don't place flat panel displays on furniture that can easily be used as steps, such as a chest of drawers. &#... you have any wall bracket other than life" flat panel display. See item 25 on page 4. NEC, which provides guidelines for installation. TOSHIBA Cares! • The consumer electronics industry is a reminder to call the CATV system installer's attention to wall mount this television, always use...
...the display is intended to alert the user to the presence of important operating and maintenance (servicing) instructions in accordance with furniture and television sets. • Don't place flat panel displays on furniture that can easily be used as steps, such as a chest of drawers. &#... you have any wall bracket other than life" flat panel display. See item 25 on page 4. NEC, which provides guidelines for installation. TOSHIBA Cares! • The consumer electronics industry is a reminder to call the CATV system installer's attention to wall mount this television, always use...
User Manual
Page 6
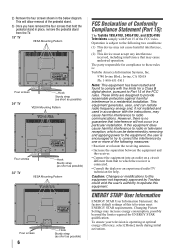
.... The party responsible for ENERGY STAR qualification. ENERGY STAR® User Information ENERGY STAR User Information Statement: the factory default settings of the FCC rules. These limits are designed to the following measures: • Reorient or relocate the receiving antenna. &#... Pattern Four screws 6 Hook Sturdy strap (as short as possible) FCC Declaration of Conformity Compliance Statement (Part 15): The Toshiba 19SL410U, 24SL410U, and 32SL410U Televisions comply with Part 15 of this equipment does cause harmful interference to radio or television reception, which the ...
.... The party responsible for ENERGY STAR qualification. ENERGY STAR® User Information ENERGY STAR User Information Statement: the factory default settings of the FCC rules. These limits are designed to the following measures: • Reorient or relocate the receiving antenna. &#... Pattern Four screws 6 Hook Sturdy strap (as short as possible) FCC Declaration of Conformity Compliance Statement (Part 15): The Toshiba 19SL410U, 24SL410U, and 32SL410U Televisions comply with Part 15 of this equipment does cause harmful interference to radio or television reception, which the ...
User Manual
Page 7
...your LCD TV The following symptoms are technical limitations of LCD Display technology and are registered U.S. marks. To return to [Home] mode settings, select [Standard] picture mode. [Standard] mode is manufactured using an extremely high level of precision technology; Such pixels are trademarks or...this TV. ENERGY STAR® qualified TV. Products that does not operate properly (does not light, remains constantly lit, etc.). therefore, Toshiba is not responsible for a long period of malfunction, and is not covered under license from a normal viewing distance. This is a ...
...your LCD TV The following symptoms are technical limitations of LCD Display technology and are registered U.S. marks. To return to [Home] mode settings, select [Standard] picture mode. [Standard] mode is manufactured using an extremely high level of precision technology; Such pixels are trademarks or...this TV. ENERGY STAR® qualified TV. Products that does not operate properly (does not light, remains constantly lit, etc.). therefore, Toshiba is not responsible for a long period of malfunction, and is not covered under license from a normal viewing distance. This is a ...
User Manual
Page 8
... feature 42 Using the Game Timer 43 Using the control panel lock feature 43 Using the PC settings feature 43 Setting the PC Audio 44 Using the Media Player 44 Using the Media Player with USB 44 To ... the last mode memory feature 50 Chapter 7: Using the TV's advanced features ......... 51 Using the advanced picture settings features 51 Using Dynamic Contrast 51 Using the static gamma feature 51 Selecting the color temperature 51 Using CableClear®...Limited United States Warranty for LCD Televisions .. 57 Limited Canadian Warranty for Toshiba Brand Flat Panel Televisions 58
... feature 42 Using the Game Timer 43 Using the control panel lock feature 43 Using the PC settings feature 43 Setting the PC Audio 44 Using the Media Player 44 Using the Media Player with USB 44 To ... the last mode memory feature 50 Chapter 7: Using the TV's advanced features ......... 51 Using the advanced picture settings features 51 Using Dynamic Contrast 51 Using the static gamma feature 51 Selecting the color temperature 51 Using CableClear®...Limited United States Warranty for LCD Televisions .. 57 Limited Canadian Warranty for Toshiba Brand Flat Panel Televisions 58
User Manual
Page 9
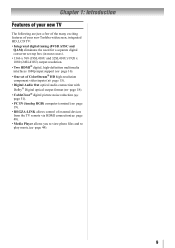
... exciting features of your new Toshiba widescreen, integrated HD, LCD TV: • Integrated digital tuning (8VSB ATSC and QAM) eliminates the need for a separate digital converter set-top box (in most cases). • 1366 x 768 (19SL410U and 32SL410U)/1920 x 1080 (24SL410U) output resolution. •... Two HDMI® digital, high-definition multimedia interfaces 1080p input support ( page 16). • One set of ColorStream® HD high-resolution component video inputs ( page 15). •...
... exciting features of your new Toshiba widescreen, integrated HD, LCD TV: • Integrated digital tuning (8VSB ATSC and QAM) eliminates the need for a separate digital converter set-top box (in most cases). • 1366 x 768 (19SL410U and 32SL410U)/1920 x 1080 (24SL410U) output resolution. •... Two HDMI® digital, high-definition multimedia interfaces 1080p input support ( page 16). • One set of ColorStream® HD high-resolution component video inputs ( page 15). •...
User Manual
Page 10
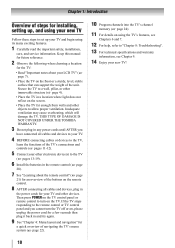
..., installation, care, and service information. THIS TYPE OF DAMAGE IS NOT COVERED UNDER THE TOSHIBA WARRANTY. 3 Do not plug in any power cords until AFTER you cannot turn on using your new TV Follow these steps to set up your other objects to the remote control or TV control panel and you... back in the power cords for the TV: • Read "Important notes about the remote control" ( page 21) for an overview of steps for installing, setting up, and using the TV's features, see Chapter 9. 14 Enjoy your LCD TV" ( page 7). • Place the TV on the floor or a sturdy, level, ...
..., installation, care, and service information. THIS TYPE OF DAMAGE IS NOT COVERED UNDER THE TOSHIBA WARRANTY. 3 Do not plug in any power cords until AFTER you cannot turn on using your new TV Follow these steps to set up your other objects to the remote control or TV control panel and you... back in the power cords for the TV: • Read "Important notes about the remote control" ( page 21) for an overview of steps for installing, setting up, and using the TV's features, see Chapter 9. 14 Enjoy your LCD TV" ( page 7). • Place the TV on the floor or a sturdy, level, ...
User Manual
Page 13
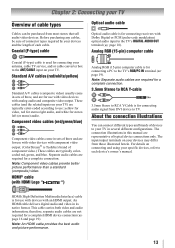
... Note: Component video cables provide better picture performance than a standard (composite) video. HDMI (High-Definition Multimedia Interface) cable is Toshiba's brand of component video.) These cables are representative of typical device connections only. Before purchasing any cables, be purchased from those ...illustrated herein. Standard A/V cables (red/white/yellow) Standard A/V cables (composite video) usually come in sets of three and are required for a complete connection. 3.5mm Stereo to RCA Y-cable 3.5mm Stereo to RCA Y-Cable is used for...
... Note: Component video cables provide better picture performance than a standard (composite) video. HDMI (High-Definition Multimedia Interface) cable is Toshiba's brand of component video.) These cables are representative of typical device connections only. Before purchasing any cables, be purchased from those ...illustrated herein. Standard A/V cables (red/white/yellow) Standard A/V cables (composite video) usually come in sets of three and are required for a complete connection. 3.5mm Stereo to RCA Y-cable 3.5mm Stereo to RCA Y-Cable is used for...
User Manual
Page 14
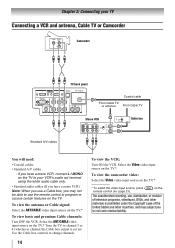
... VCR) Note: When you use a Cable box, you may not be able to use , distribution, or revision of the United States and other materials is set to civil and criminal liability. To view the antenna or Cable signal: Select the ANT/CABLE video input source on the TV.* * To select the...
... VCR) Note: When you use a Cable box, you may not be able to use , distribution, or revision of the United States and other materials is set to civil and criminal liability. To view the antenna or Cable signal: Select the ANT/CABLE video input source on the TV.* * To select the...
User Manual
Page 16
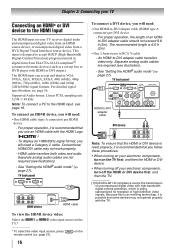
... and uncompressed digital video from an HDMI source device, or uncompressed digital video from EIA/CEA-861-D-compliant[1] consumer electronic devices (such as a set-top box or DVD player with high-bandwidth digital content protection, which is 6.6 ft (2m). • One 3.5mm stereo to -DVI ...). - Chapter 2: Connecting your TV Connecting an HDMI® or DVI device to -DVI adapter cable (HDMI type A connector) per HDMI device - See "Setting the HDMI® audio mode" ( page 27). Because this is an evolving technology, it is possible that you will need : • One HDMI cable...
... and uncompressed digital video from an HDMI source device, or uncompressed digital video from EIA/CEA-861-D-compliant[1] consumer electronic devices (such as a set-top box or DVD player with high-bandwidth digital content protection, which is 6.6 ft (2m). • One 3.5mm stereo to -DVI ...). - Chapter 2: Connecting your TV Connecting an HDMI® or DVI device to -DVI adapter cable (HDMI type A connector) per HDMI device - See "Setting the HDMI® audio mode" ( page 27). Because this is an evolving technology, it is possible that you will need : • One HDMI cable...
User Manual
Page 17
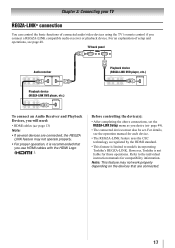
...the REGZA LINK feature may not work properly depending on the devices that you desire ( page 49). • The connected devices must also be set the REGZA-LINK Setup menu as you use HDMI cables with the HDMI Logo ( ). Note: This feature may not operate properly. • ...For proper operation, it is limited to the individual instruction manuals for those operations. For details, see page 48. Refer to models incorporating Toshiba's REGZA-LINK. TV back panel Audio receiver Playback device (REGZA-LINK DVD player, etc.) Playback device (REGZA-LINK DVD player, etc.) To ...
...the REGZA LINK feature may not work properly depending on the devices that you desire ( page 49). • The connected devices must also be set the REGZA-LINK Setup menu as you use HDMI cables with the HDMI Logo ( ). Note: This feature may not operate properly. • ...For proper operation, it is limited to the individual instruction manuals for those operations. For details, see page 48. Refer to models incorporating Toshiba's REGZA-LINK. TV back panel Audio receiver Playback device (REGZA-LINK DVD player, etc.) Playback device (REGZA-LINK DVD player, etc.) To ...
User Manual
Page 18
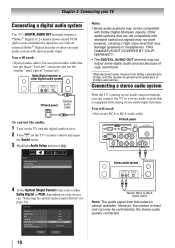
... terminal may damage speakers or headphones. You will need : • One stereo RCA to RCA audio cable TV back panel Sound Digital Audio Selector Audio Settings Audio Setup Stereo audio system 4 In the Optical Output Format field, select either Dolby Digital or PCM, depending on your TV Connecting a digital audio system...
... terminal may damage speakers or headphones. You will need : • One stereo RCA to RCA audio cable TV back panel Sound Digital Audio Selector Audio Settings Audio Setup Stereo audio system 4 In the Optical Output Format field, select either Dolby Digital or PCM, depending on your TV Connecting a digital audio system...
User Manual
Page 19
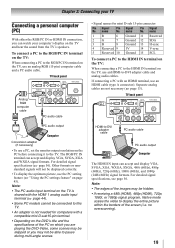
... connecting a PC to the HDMI IN terminal on the TV, use an HDMI-to the RGB/PC IN terminal on the TV, use a PC, set the monitor output resolution on the PC before connecting it to pause during multi-angle scenes. • Signal names for computers with an HDMI terminal..., use the PC setting feature ( "Using the PC settings feature" on page 43). If connecting a PC with a compatible mini D-sub15-pin terminal. • Depending on the DVD's title and the specifications...
... connecting a PC to the HDMI IN terminal on the TV, use an HDMI-to the RGB/PC IN terminal on the TV, use a PC, set the monitor output resolution on the PC before connecting it to pause during multi-angle scenes. • Signal names for computers with an HDMI terminal..., use the PC setting feature ( "Using the PC settings feature" on page 43). If connecting a PC with a compatible mini D-sub15-pin terminal. • Depending on the DVD's title and the specifications...
User Manual
Page 22
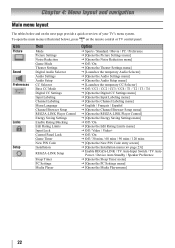
... Labeling menu] J English / Français / Español J [Opens the Channel Browser Setup menu] J [Opens the REGZA-LINK Player Control] J [Opens the Energy Saving Settings menu] J Off / On J [Opens the Edit Rating Limits menu] J Off / Video / Video+ J Off / On J Off / 30 mins / 60 mins / 90 ...REGZA-LINK / TV Auto Input Switch / TV Auto Power / Device Auto Standby / Speaker Preference J [Opens the Sleep Timer menu] J [Opens the PC Settings menu] J [Opens the Media Playermenu] 22 Chapter 4: Menu layout and navigation Main menu layout The tables below ), press on the next page provide a quick...
... Labeling menu] J English / Français / Español J [Opens the Channel Browser Setup menu] J [Opens the REGZA-LINK Player Control] J [Opens the Energy Saving Settings menu] J Off / On J [Opens the Edit Rating Limits menu] J Off / Video / Video+ J Off / On J Off / 30 mins / 60 mins / 90 ...REGZA-LINK / TV Auto Input Switch / TV Auto Power / Device Auto Standby / Speaker Preference J [Opens the Sleep Timer menu] J [Opens the PC Settings menu] J [Opens the Media Playermenu] 22 Chapter 4: Menu layout and navigation Main menu layout The tables below ), press on the next page provide a quick...
User Manual
Page 23
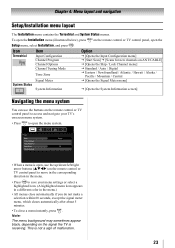
...buttons on the remote control or TV control panel to move in the corresponding direction in the menu. • Press to save your menu settings or select a highlighted item. (A highlighted menu item appears in a different color in the menu.) • All menus close automatically if...signal meter menu, which closes automatically after about 5 minutes. • To close a menu instantly, press . Picture Mode Picture Settings Noise Reduction Game Mode Theater Settings Sports Off • When a menu is open the menu system. Note: The menu background may sometimes appear black, depending on...
...buttons on the remote control or TV control panel to move in the corresponding direction in the menu. • Press to save your menu settings or select a highlighted item. (A highlighted menu item appears in a different color in the menu.) • All menus close automatically if...signal meter menu, which closes automatically after about 5 minutes. • To close a menu instantly, press . Picture Mode Picture Settings Noise Reduction Game Mode Theater Settings Sports Off • When a menu is open the menu system. Note: The menu background may sometimes appear black, depending on...
User Manual
Page 24
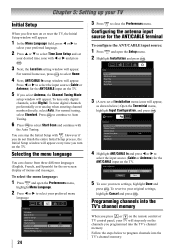
... continue to Auto Tuning. 6 Press to close the Preferences menu. Setup Installation REGZA-LINK Setup Sleep Timer PC Settings Media Player 3 (A new set your desired time zone with . To tune digital channels preferentially over analog when entering channel number directly, select Auto... ANT/CABLE input source: 1 Press and open the Preferences menu, highlight Menu Language. 2 Press W or X to your original settings, highlight Cancel and press . Installation Terrestrial Input Configuration Channel Program Channel Options Channel Tuning Mode Auto Time Zone Signal Meter 4 Highlight...
... continue to Auto Tuning. 6 Press to close the Preferences menu. Setup Installation REGZA-LINK Setup Sleep Timer PC Settings Media Player 3 (A new set your desired time zone with . To tune digital channels preferentially over analog when entering channel number directly, select Auto... ANT/CABLE input source: 1 Press and open the Preferences menu, highlight Menu Language. 2 Press W or X to your original settings, highlight Cancel and press . Installation Terrestrial Input Configuration Channel Program Channel Options Channel Tuning Mode Auto Time Zone Signal Meter 4 Highlight...

User Manual
Page 25
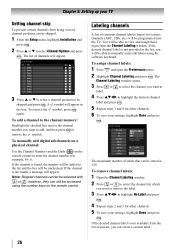
... the Terrestrial menu, highlight Channel Program and press to a channel not programmed in the channel memory. Setup Installation REGZA-LINK Setup Sleep Timer PC Settings Media Player 4 (A new set of Channels Found - 73 Scanning Digital Channels Found Channels - 118 Cancel The TV will take substantially longer than when the antenna input is... onscreen display and press ). Note: • You must use the Channel Number buttons on the remote control (or highlight Cancel in the channel memory. Chapter 5: Setting up the Start Scan, and press channel programming.
... the Terrestrial menu, highlight Channel Program and press to a channel not programmed in the channel memory. Setup Installation REGZA-LINK Setup Sleep Timer PC Settings Media Player 4 (A new set of Channels Found - 73 Scanning Digital Channels Found Channels - 118 Cancel The TV will take substantially longer than when the antenna input is... onscreen display and press ). Note: • You must use the Channel Number buttons on the remote control (or highlight Cancel in the channel memory. Chapter 5: Setting up the Start Scan, and press channel programming.
User Manual
Page 26
... TV. If the desired channel label is not provided in the box. The list of common channel labels (logos) for other channels. 6 To save your settings, highlight Done and press . If the channel is not found , the number will be added to the list and the box will be able to... select the channel for other channels. 5 To save your settings, highlight Done and press . Labeling channels A list of channels will appear. To remove channel labels: 1 Open the Channel Labeling window. 2 Press or to view and...
... TV. If the desired channel label is not provided in the box. The list of common channel labels (logos) for other channels. 6 To save your settings, highlight Done and press . If the channel is not found , the number will be added to the list and the box will be able to... select the channel for other channels. 5 To save your settings, highlight Done and press . Labeling channels A list of channels will appear. To remove channel labels: 1 Open the Channel Labeling window. 2 Press or to view and...
User Manual
Page 27
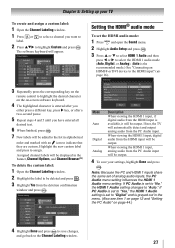
... TV will automatically detect and output analog audio from the HDMI input will be output. Note: Because the PC and HDMI 1 inputs share the same set the HDMI audio mode: 1 Press and open the Sound menu. 2 Highlight Audio Setup and press . 3 Press S or T to select HDMI 1...screen software keyboard. 4 The highlighted character is set to the HDMI input" ( page 16). If PC Audio is set to "Yes," the HDMI 1 Audio setting is set to "No," the HDMI 1 Audio setting changes to indicate that they are custom. Chapter 5: Setting up your settings, highlight Done and press . change channels. The...
... TV will automatically detect and output analog audio from the HDMI input will be output. Note: Because the PC and HDMI 1 inputs share the same set the HDMI audio mode: 1 Press and open the Sound menu. 2 Highlight Audio Setup and press . 3 Press S or T to select HDMI 1...screen software keyboard. 4 The highlighted character is set to the HDMI input" ( page 16). If PC Audio is set to "Yes," the HDMI 1 Audio setting is set to "No," the HDMI 1 Audio setting changes to indicate that they are custom. Chapter 5: Setting up your settings, highlight Done and press . change channels. The...
User Manual
Page 28
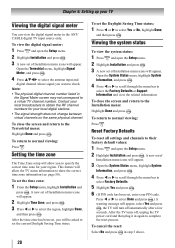
... Done, and then press . To view the digital signal meter: 1 Press and open the Setup menu. 2 Highlight Installation and press . 3 A new set of Installation menu icons will turn off , unplug the TV power cord and then plug it in step 5 above. Note: • The physical digital channel... number listed in the ANT/ CABLE digital TV input source only. To return to normal viewing: Press . To set , enter your region. Viewing the system status To view the system status: 1 Press and open the Setup menu. 2 Highlight Installation and press . To...
... Done, and then press . To view the digital signal meter: 1 Press and open the Setup menu. 2 Highlight Installation and press . 3 A new set of Installation menu icons will turn off , unplug the TV power cord and then plug it in step 5 above. Note: • The physical digital channel... number listed in the ANT/ CABLE digital TV input source only. To return to normal viewing: Press . To set , enter your region. Viewing the system status To view the system status: 1 Press and open the Setup menu. 2 Highlight Installation and press . To...


