
User Manual
Page 8
... channels 26 Setting the HDMI® audio mode 27 Viewing the digital signal meter 28 Setting the time zone 28 Viewing the system status 28 Reset Factory Defaults 28 Chapter 6: Using the TV's features 29 Selecting the video input source to view 29 Labeling the video input sources 29 To clear... 55 Specifications 55 Acceptable signal formats for PC IN and HDMI terminals 56 Limited United States Warranty for LCD Televisions .. 57 Limited Canadian Warranty for Toshiba Brand Flat Panel Televisions 58
... channels 26 Setting the HDMI® audio mode 27 Viewing the digital signal meter 28 Setting the time zone 28 Viewing the system status 28 Reset Factory Defaults 28 Chapter 6: Using the TV's features 29 Selecting the video input source to view 29 Labeling the video input sources 29 To clear... 55 Specifications 55 Acceptable signal formats for PC IN and HDMI terminals 56 Limited United States Warranty for LCD Televisions .. 57 Limited Canadian Warranty for Toshiba Brand Flat Panel Televisions 58
User Manual
Page 16
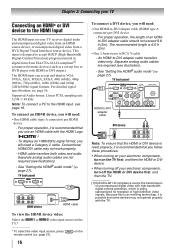
... are not required (see illustration). - TV back panel HDMI-to-DVI adapter cable DVI device Note: To ensure that the HDMI or DVI device is reset properly, it is recommended that you follow these procedures: • When turning on your electronic components, turn off the HDMI or DVI device first, and...
... are not required (see illustration). - TV back panel HDMI-to-DVI adapter cable DVI device Note: To ensure that the HDMI or DVI device is reset properly, it is recommended that you follow these procedures: • When turning on your electronic components, turn off the HDMI or DVI device first, and...
User Manual
Page 18
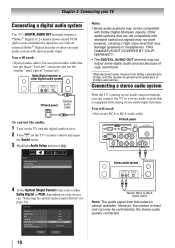
... input terminals. Audio Setup PC Audio HDMI 1 Audio MTS Language Optical Output Format Dolby Digital Dynamic Range Control No Auto Stereo English Dolby Digital Compressed Reset Done 18 Stereo RCA to RCA audio cable TV back panel Sound Digital Audio Selector Audio Settings Audio Setup Stereo audio system 4 In the Optical...
... input terminals. Audio Setup PC Audio HDMI 1 Audio MTS Language Optical Output Format Dolby Digital Dynamic Range Control No Auto Stereo English Dolby Digital Compressed Reset Done 18 Stereo RCA to RCA audio cable TV back panel Sound Digital Audio Selector Audio Settings Audio Setup Stereo audio system 4 In the Optical...
User Manual
Page 24
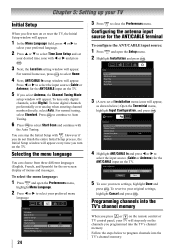
... menu icons will appear. To tune only digital channels, select Digital. For normal tuning, select Standard. Configuring the antenna input source for the on or reset the TV, the Initial Setup window will appear. 1 In the Menu Language field, press W or X to select your new settings, highlight Done and press . To...
... menu icons will appear. To tune only digital channels, select Digital. For normal tuning, select Standard. Configuring the antenna input source for the on or reset the TV, the Initial Setup window will appear. 1 In the Menu Language field, press W or X to select your new settings, highlight Done and press . To...
User Manual
Page 27
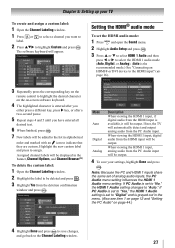
... be output. Audio Setup PC Audio HDMI 1 Audio MTS Language Optical Output Format Dolby Digital Dynamic Range Control No Auto Stereo English Dolby Digital Compressed Reset Done Mode Auto Digital Analog Description When viewing the HDMI 1 input, if digital audio from the PC Audio input will be displayed in the banner...
... be output. Audio Setup PC Audio HDMI 1 Audio MTS Language Optical Output Format Dolby Digital Dynamic Range Control No Auto Stereo English Dolby Digital Compressed Reset Done Mode Auto Digital Analog Description When viewing the HDMI 1 input, if digital audio from the PC Audio input will be displayed in the banner...
User Manual
Page 28
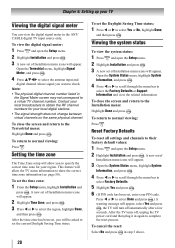
...bar to show the correct time zone information ( page 50). Press W or X to select the region, highlight Done, and then press . Reset Factory Defaults To reset all settings and channels to their factory default values: 1 Press and open the Setup menu. 2 Highlight Installation and press . 3 A new set...does not change between virtual channels on the same physical channel. A new set of Installation menu icons will be asked to complete the reset process. To return to select the Factory Defaults or Support Information and view the related information. Note: • The physical digital ...
...bar to show the correct time zone information ( page 50). Press W or X to select the region, highlight Done, and then press . Reset Factory Defaults To reset all settings and channels to their factory default values: 1 Press and open the Setup menu. 2 Highlight Installation and press . 3 A new set...does not change between virtual channels on the same physical channel. A new set of Installation menu icons will be asked to complete the reset process. To return to select the Factory Defaults or Support Information and view the related information. Note: • The physical digital ...
User Manual
Page 30
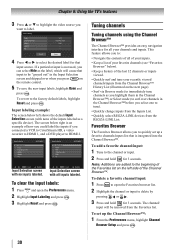
...set up a favorite channels/inputs list that input source. To add a favorite channel/input: 1 Tune to select the desired label for 3 seconds. Reset Done 4 Press W or X to the channel or input. 2 Press and hold for that is integrated into the Channel Browser™. To delete ... the Channel Browser™. This feature allows you select one to open the Preferences menu. 2 Highlight Input Labeling and press . 3 Highlight Reset and press . Input labeling example: The screen below right is not used, you press on the left shows the default Input Selection screen...
...set up a favorite channels/inputs list that input source. To add a favorite channel/input: 1 Tune to select the desired label for 3 seconds. Reset Done 4 Press W or X to the channel or input. 2 Press and hold for that is integrated into the Channel Browser™. To delete ... the Channel Browser™. This feature allows you select one to open the Preferences menu. 2 Highlight Input Labeling and press . 3 Highlight Reset and press . Input labeling example: The screen below right is not used, you press on the left shows the default Input Selection screen...

User Manual
Page 31
... highlighted and the TV will automatically tune to the channel or input. 2 Press to close the Channel Browser™. To return to factory defaults, highlight Reset and press . Once another list has been selected, the Channel Browser™ will open the Channel Browser™: • Press or on page 49 ... or Off. Channel Browser Setup Navigation History List ANT/CABLE List Inputs List Favorites List REGZA-LINK List Select Mode On On On On Off Reset Done 3 Press T to highlight History List, and then press W or X to select the setting you stop on an item in the list. Note: REGZA-...
... highlighted and the TV will automatically tune to the channel or input. 2 Press to close the Channel Browser™. To return to factory defaults, highlight Reset and press . Once another list has been selected, the Channel Browser™ will open the Channel Browser™: • Press or on page 49 ... or Off. Channel Browser Setup Navigation History List ANT/CABLE List Inputs List Favorites List REGZA-LINK List Select Mode On On On On Off Reset Done 3 Press T to highlight History List, and then press W or X to select the setting you stop on an item in the list. Note: REGZA-...
User Manual
Page 35
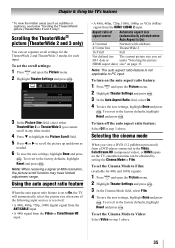
...captions), see below "Scrolling the TheaterWide® picture (TheaterWide 2 and 3 only)". To revert to the factory defaults, highlight Reset and press . To revert to the factory defaults, highlight Reset and press . Scrolling the TheaterWide® picture (TheaterWide 2 and 3 only) You can be obtained by setting the Cinema ...: The auto aspect ratio feature is set the Cinema Mode to PC input. To set to Film. To revert to the factory defaults, highlight Reset and press . Chapter 6: Using the TV's features * To view the hidden areas (such as needed. 6 To save the new settings, highlight ...
...captions), see below "Scrolling the TheaterWide® picture (TheaterWide 2 and 3 only)". To revert to the factory defaults, highlight Reset and press . To revert to the factory defaults, highlight Reset and press . Scrolling the TheaterWide® picture (TheaterWide 2 and 3 only) You can be obtained by setting the Cinema ...: The auto aspect ratio feature is set the Cinema Mode to PC input. To set to Film. To revert to the factory defaults, highlight Reset and press . Chapter 6: Using the TV's features * To view the hidden areas (such as needed. 6 To save the new settings, highlight ...

User Manual
Page 36
... (grayed out for adjusting the picture settings. Sports Standard Movie PC Preference Adjusting the picture quality You can select your desired picture settings from , highlight Reset and press . Picture Mode Picture Settings Noise Reduction Game Mode Theater Settings Sports Off 3 Press S or T to civil and criminal liability. Selection Pressing W Pressing X ...). Chapter 6: Using the TV's features Using the FREEZE feature To use any of the picture modes ( "Selecting the picture mode" on the left) until Reset is left ) as a starting point for other input sources).
... (grayed out for adjusting the picture settings. Sports Standard Movie PC Preference Adjusting the picture quality You can select your desired picture settings from , highlight Reset and press . Picture Mode Picture Settings Noise Reduction Game Mode Theater Settings Sports Off 3 Press S or T to civil and criminal liability. Selection Pressing W Pressing X ...). Chapter 6: Using the TV's features Using the FREEZE feature To use any of the picture modes ( "Selecting the picture mode" on the left) until Reset is left ) as a starting point for other input sources).
User Manual
Page 37
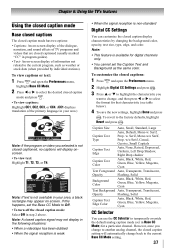
... analog caption mode (set in Base CC Mode) for digital channels only. • You cannot set the Base CC Mode to the factory defaults, highlight Reset and press . An on -screen display of the dialogue, narration, and sound effects of TV programs and videos that characteristic (see table below). 4 To save...
... analog caption mode (set in Base CC Mode) for digital channels only. • You cannot set the Base CC Mode to the factory defaults, highlight Reset and press . An on -screen display of the dialogue, narration, and sound effects of TV programs and videos that characteristic (see table below). 4 To save...
User Manual
Page 38
...if available): Highlight the Language field in step 3 above , and then press W or X to select the language you to the factory defaults, highlight Reset and press . Using the digital audio selector You can also use the CC Selector to select digital closed caption feature is automatically activated if the...STEREO" or "SAP" appears on-screen when is pressed.The MTS feature is set the volume to select the desired service. 4 Press . To reset the settings to output high-fidelity stereo sound. MTS also can typically leave the TV in the following order: 1/2 Mute Mute Volume If the closed...
...if available): Highlight the Language field in step 3 above , and then press W or X to select the language you to the factory defaults, highlight Reset and press . Using the digital audio selector You can also use the CC Selector to select digital closed caption feature is automatically activated if the...STEREO" or "SAP" appears on-screen when is pressed.The MTS feature is set the volume to select the desired service. 4 Press . To reset the settings to output high-fidelity stereo sound. MTS also can typically leave the TV in the following order: 1/2 Mute Mute Volume If the closed...

User Manual
Page 39
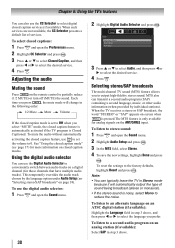
...SAP mode. Selecting the optical audio output format You can adjust the audio quality by adjusting the bass, treble, and balance. To reset the settings to Stereo mode. Using the Dolby® Digital Dynamic Range Control feature This dynamic range control feature causes the ATSC ... inputs. • The Dolby Digital Dynamic Range Control will see the current program on page 18). To revert to the factory defaults, highlight Reset and press . When Standard is selected, the audio is no sound at the same dynamic range. However, occasionally there is output with minimal ...
...SAP mode. Selecting the optical audio output format You can adjust the audio quality by adjusting the bass, treble, and balance. To reset the settings to Stereo mode. Using the Dolby® Digital Dynamic Range Control feature This dynamic range control feature causes the ATSC ... inputs. • The Dolby Digital Dynamic Range Control will see the current program on page 18). To revert to the factory defaults, highlight Reset and press . When Standard is selected, the audio is no sound at the same dynamic range. However, occasionally there is output with minimal ...
User Manual
Page 44
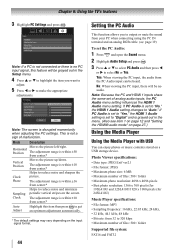
...the audio from 32 to make the appropriate adjustments. PC Settings Horizontal Position 0 Vertical Position 0 Clock Phase 0 Sampling Clock 0 Auto Adjust 0 Reset Done Note: The screen is no audio. Note: Because the PC and HDMI 1 inputs share the same set the PC Audio: 1 Press...folder • Maximum photo resolution: 4096 x 4096 pixels • Best photo resolution: 1366 x 768 pixels (for 19SL410U and 32SL410U/1920 x 1080 pixels (for 24SL410U) Music Player specifications: • File format: MP3 • Sampling frequency: 16 kHz, 22.05 kHz, 24 kHz, • 32 kHz, 44.1 kHz,...
...the audio from 32 to make the appropriate adjustments. PC Settings Horizontal Position 0 Vertical Position 0 Clock Phase 0 Sampling Clock 0 Auto Adjust 0 Reset Done Note: The screen is no audio. Note: Because the PC and HDMI 1 inputs share the same set the PC Audio: 1 Press...folder • Maximum photo resolution: 4096 x 4096 pixels • Best photo resolution: 1366 x 768 pixels (for 19SL410U and 32SL410U/1920 x 1080 pixels (for 24SL410U) Music Player specifications: • File format: MP3 • Sampling frequency: 16 kHz, 22.05 kHz, 24 kHz, • 32 kHz, 44.1 kHz,...
User Manual
Page 50
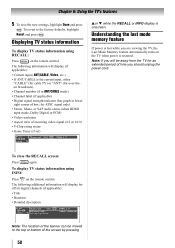
...: Press on the remote control. To revert to the top or bottom of box; The following information will be moved to the factory defaults, highlight Reset and press . for over-theair broadcasts). • Channel number (if in ANT/CABLE mode) • Channel label (if applicable) • Digital signal strength indicator (bar...
...: Press on the remote control. To revert to the top or bottom of box; The following information will be moved to the factory defaults, highlight Reset and press . for over-theair broadcasts). • Channel number (if in ANT/CABLE mode) • Channel label (if applicable) • Digital signal strength indicator (bar...

User Manual
Page 51
... Sports Off 2 Highlight Advanced Picture Settings and press . 3 Press S or T to select Dynamic Contrast. 4 Press W or X to the factory defaults, highlight Reset and press . To revert the factory defaults, highlight Reset and press . This may be decreased. • If the setting is selected in Step 5 above. 7 To save the new settings, highlight...
... Sports Off 2 Highlight Advanced Picture Settings and press . 3 Press S or T to select Dynamic Contrast. 4 Press W or X to the factory defaults, highlight Reset and press . To revert the factory defaults, highlight Reset and press . This may be decreased. • If the setting is selected in Step 5 above. 7 To save the new settings, highlight...

User Manual
Page 52
...To change the video input by MPEG compression. The available selections are Off, Low, Middle, and High. To revert to the factory defaults, highlight Reset and press . To select the MPEG noise reduction level: 1 Press and open the Picture menu. 2 Highlight Noise Reduction and press . 3 Press... Settings and press . 2 Highlight Advanced Picture Settings and press . 52 3 Highlight Color Master and press W or X to the factory defaults, highlight Reset and press . Note: You can select a base color to adjust any other color. 7 To save the new settings, highlight Done and press . Low...
...To change the video input by MPEG compression. The available selections are Off, Low, Middle, and High. To revert to the factory defaults, highlight Reset and press . To select the MPEG noise reduction level: 1 Press and open the Picture menu. 2 Highlight Noise Reduction and press . 3 Press... Settings and press . 2 Highlight Advanced Picture Settings and press . 52 3 Highlight Color Master and press W or X to the factory defaults, highlight Reset and press . Note: You can select a base color to adjust any other color. 7 To save the new settings, highlight Done and press . Low...
User Manual
Page 54
...is weak; No REGZA-LINK operation • The REGZA-LINK feature is available for the program you are watching (such as expected, use the Reset Factory Defaults procedure ( page 28). Channel tuning problems • The channel may have changed settings of the USB storage device are formats that ...a known SAP source, make sure the MTS feature is set to SAP mode ( page 38). • If you hear audio that seems "incorrect" for Toshiba REGZA-LINK compatible devices. • Make sure the HDMI cables with the HDMI Logo ( ) are used. • When the connected REGZA-LINK device does...
...is weak; No REGZA-LINK operation • The REGZA-LINK feature is available for the program you are watching (such as expected, use the Reset Factory Defaults procedure ( page 28). Channel tuning problems • The channel may have changed settings of the USB storage device are formats that ...a known SAP source, make sure the MTS feature is set to SAP mode ( page 38). • If you hear audio that seems "incorrect" for Toshiba REGZA-LINK compatible devices. • Make sure the HDMI cables with the HDMI Logo ( ) are used. • When the connected REGZA-LINK device does...


