User Guide
Page 3
... with Part 15 of the FCC Rules. To eliminate interference you can cause a malfunction and might cause TV or radio interference even when it . Operation is operating properly. Table of Contents FCC Information ...1 A Consumer Guide to Product Safety...the equipment and the radio or TV. • Use outlets on different electrical circuits for Use ...3 Clock Backup Battery Installtion Battery Low Indicator Controls and Indicators...4 Display with Indicators...5 Maintenance ...6 Daylight-Saving Time ...6 Setting Time and Date ...6 Alarm Operation ...7 Listening to Radio, Nature Sound or ...
... with Part 15 of the FCC Rules. To eliminate interference you can cause a malfunction and might cause TV or radio interference even when it . Operation is operating properly. Table of Contents FCC Information ...1 A Consumer Guide to Product Safety...the equipment and the radio or TV. • Use outlets on different electrical circuits for Use ...3 Clock Backup Battery Installtion Battery Low Indicator Controls and Indicators...4 Display with Indicators...5 Maintenance ...6 Daylight-Saving Time ...6 Setting Time and Date ...6 Alarm Operation ...7 Listening to Radio, Nature Sound or ...
User Guide
Page 5
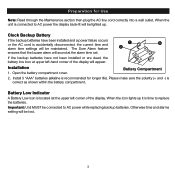
... replace the batteries. Preparation for longer life). Clock Backup Battery If the backup batteries have not been installed or are dead, the battery low icon at the alarm time set. Open the battery compartment cover. Battery Low Indicator A Battery Low icon is accidentally disconnected, the current time and alarm time settings will appear. Battery Compartment 2. Install 3 "AAA" batteries...
... replace the batteries. Preparation for longer life). Clock Backup Battery If the backup batteries have not been installed or are dead, the battery low icon at the alarm time set. Open the battery compartment cover. Battery Low Indicator A Battery Low icon is accidentally disconnected, the current time and alarm time settings will appear. Battery Compartment 2. Install 3 "AAA" batteries...
User Guide
Page 6
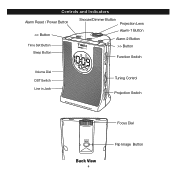
Controls and Indicators Alarm Reset / Power Button > Button Function Switch Volume Dial DST Switch Line in Jack Tuning Control Projection Switch Focus Dial Back View 4 Flip Image Button
Controls and Indicators Alarm Reset / Power Button > Button Function Switch Volume Dial DST Switch Line in Jack Tuning Control Projection Switch Focus Dial Back View 4 Flip Image Button
User Guide
Page 9
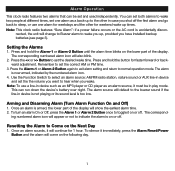
... lower part of the display. Alarm Operation This clock radio features two alarms that can run down the device's battery over night. Note: This clock radio features "Sure Alarm": if a power failure occurs or the AC cord is now armed, indicated by the numbered alarm icon. 4. Press the Alarm-1 or Alarm-2 Button again to exit alarm setting and return to Come on...
... lower part of the display. Alarm Operation This clock radio features two alarms that can run down the device's battery over night. Note: This clock radio features "Sure Alarm": if a power failure occurs or the AC cord is now armed, indicated by the numbered alarm icon. 4. Press the Alarm-1 or Alarm-2 Button again to exit alarm setting and return to Come on...
User Guide
Page 10
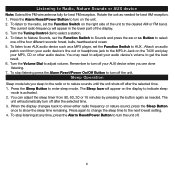
... to the next lowest setting. 4. When the display changes back to show the sleep time remaining. To listen to an AUX audio device such as a MP3 player, set the Function Switch on the unit. 2. To stop listening at any time, press the Alarm Reset/Power Button to Radio, Nature Sounds or AUX... device Note: Extend the FM wire antenna fully for best AM reception. 1. To stop listening press the Alarm Reset/Power On/Off Button...
... to the next lowest setting. 4. When the display changes back to show the sleep time remaining. To listen to an AUX audio device such as a MP3 player, set the Function Switch on the unit. 2. To stop listening at any time, press the Alarm Reset/Power Button to Radio, Nature Sounds or AUX... device Note: Extend the FM wire antenna fully for best AM reception. 1. To stop listening press the Alarm Reset/Power On/Off Button...
User Guide
Page 11
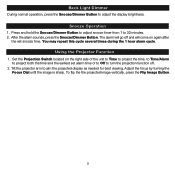
... to aim the projected display as needed for best viewing. Using the Projector Function 1. Set the Projection Switch located on again after the set alarm time or to Off to 30 minutes. 2. Tilt the projector arm to adjust the display brightness. To flip the the projected image ...You may repeat this cycle several times during the 1 hour alarm cycle. After the alarm sounds, press the Snooze/Dimmer Button. The alarm will come on the right side of the unit to Time to project the time, to Time/Alarm to project both the time and the earliest set snooze time. Snooze Operation 1.
... to aim the projected display as needed for best viewing. Using the Projector Function 1. Set the Projection Switch located on again after the set alarm time or to Off to 30 minutes. 2. Tilt the projector arm to adjust the display brightness. To flip the the projected image ...You may repeat this cycle several times during the 1 hour alarm cycle. After the alarm sounds, press the Snooze/Dimmer Button. The alarm will come on the right side of the unit to Time to project the time, to Time/Alarm to project both the time and the earliest set snooze time. Snooze Operation 1.


