User Guide
Page 3
... handy for cleaning. 8. Water and Moisture - Heat - The unit should be connected to a power supply only of the type described in the instruction and service manuals. 1. Do not defeat the safety purpose of time. 9. It is always best to lightning and power-line surges. 12. Cleaning - Non-Use Periods - Attachments - Damage...
... handy for cleaning. 8. Water and Moisture - Heat - The unit should be connected to a power supply only of the type described in the instruction and service manuals. 1. Do not defeat the safety purpose of time. 9. It is always best to lightning and power-line surges. 12. Cleaning - Non-Use Periods - Attachments - Damage...
Operation Manual
Page 3
... an enclosure through the ventilation openings. 3. Take special note, adhere to be connected to operate normally or exhibits a marked change in the instruction and service manuals. 1. Ventilation - The unit should be situated so that objects do not fall and liquids are not spilled into the outlet. 6. Cleaning - Do not use . Damage...
... an enclosure through the ventilation openings. 3. Take special note, adhere to be connected to operate normally or exhibits a marked change in the instruction and service manuals. 1. Ventilation - The unit should be situated so that objects do not fall and liquids are not spilled into the outlet. 6. Cleaning - Do not use . Damage...
Operation Manual
Page 7
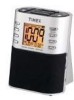
...hold the J Time Set Button so that the time and date have been programmed at the factory and will revert to the standard clock display. 2. Manual Time and Date Settings 1. After you can easily switch the setting to one of the display will flash for approximately ten seconds, after which the... display will already be set the time rapidly. Press the 1 Reverse and 6 Forward Buttons to set the month/day. 6. Auto-Set and Manual Time and Date Settings Auto-Set Time and Date Settings This model is flashing, press the 1 Reverse and 6 Forward Buttons to select your time zone...
...hold the J Time Set Button so that the time and date have been programmed at the factory and will revert to the standard clock display. 2. Manual Time and Date Settings 1. After you can easily switch the setting to one of the display will flash for approximately ten seconds, after which the... display will already be set the time rapidly. Press the 1 Reverse and 6 Forward Buttons to set the month/day. 6. Auto-Set and Manual Time and Date Settings Auto-Set Time and Date Settings This model is flashing, press the 1 Reverse and 6 Forward Buttons to select your time zone...
Operation Manual
Page 8
..., showing that the correct date is set , as shown by the PM Indicator. 3. See Note #4 in the "Auto-Set" and Manual Time and Date Settings section of the manual. The 7-5-2 setting lets you have set the time rapidly. Press and hold the 2 Radio Alarm 1 Button. After you will appear on... alarm wake time and sound, you will need to select the station. If you do not begin setting the time within ten seconds of this manual. While the display is shown. 5. After setting the radio alarm time, while the display is a choice of radio stations as an alarm wake sound...
..., showing that the correct date is set , as shown by the PM Indicator. 3. See Note #4 in the "Auto-Set" and Manual Time and Date Settings section of the manual. The 7-5-2 setting lets you have set the time rapidly. Press and hold the 2 Radio Alarm 1 Button. After you will appear on... alarm wake time and sound, you will need to select the station. If you do not begin setting the time within ten seconds of this manual. While the display is shown. 5. After setting the radio alarm time, while the display is a choice of radio stations as an alarm wake sound...
Operation Manual
Page 9
... not, press the 2 Radio Alarm 1 Button once so that the Radio Alarm Indicator appears on battery power. 9 The feature can be necessary for you to manually set the DaylightSaving Time (DST) function. • Press the N Power/Sleep Button to turn off the alarm while still maintaining the programmed 7-5-2 alarm settings. The...
... not, press the 2 Radio Alarm 1 Button once so that the Radio Alarm Indicator appears on battery power. 9 The feature can be necessary for you to manually set the DaylightSaving Time (DST) function. • Press the N Power/Sleep Button to turn off the alarm while still maintaining the programmed 7-5-2 alarm settings. The...
Operation Manual
Page 11
... Thumbwheel to adjust the volume level. 4. Sleeping to Nature Sounds with mini plug cord. 2. Note: To see the Listening to the Radio section of this manual. 1. When the display shows the desired sleep time, stop pressing the button. The display will play for approximately ten seconds before the sleep time has...
... Thumbwheel to adjust the volume level. 4. Sleeping to Nature Sounds with mini plug cord. 2. Note: To see the Listening to the Radio section of this manual. 1. When the display shows the desired sleep time, stop pressing the button. The display will play for approximately ten seconds before the sleep time has...


