
Installation Instructions
Page 4
...alert symbol and either the word "DANGER" or "WARNING." WARNING Tip Over Hazard Refrigerator is completely installed. WARNING You can kill or hurt you and others are not followed. Keep doors taped closed ...until refrigerator is top heavy and tips easily when not completely installed. This is , tell you how... result in this manual and on your appliance. Failure to move and install refrigerator. Use two or more people to do so can be killed or seriously injured if you don't follow instructions...
...alert symbol and either the word "DANGER" or "WARNING." WARNING Tip Over Hazard Refrigerator is completely installed. WARNING You can kill or hurt you and others are not followed. Keep doors taped closed ...until refrigerator is top heavy and tips easily when not completely installed. This is , tell you how... result in this manual and on your appliance. Failure to move and install refrigerator. Use two or more people to do so can be killed or seriously injured if you don't follow instructions...

Installation Instructions
Page 6
... Inc. 6 Tools Needed Gather the required tools and parts before starting installation. See "Door Swing Dimensions." ■ Location must support the refrigerator weight, more information, see "Electrical Requirements." ■ The water shutoff should permit door to a shutoff valve, you do so can come ...line can result in death, explosion, or fire. ■ Do not install in order for the top grille to enclose the refrigerator. Handle Kits For use with the homeowner. ■ Homeowner: Keep Installation Instructions for future reference. WARNING Explosion Hazard Keep flammable...
... Inc. 6 Tools Needed Gather the required tools and parts before starting installation. See "Door Swing Dimensions." ■ Location must support the refrigerator weight, more information, see "Electrical Requirements." ■ The water shutoff should permit door to a shutoff valve, you do so can come ...line can result in death, explosion, or fire. ■ Do not install in order for the top grille to enclose the refrigerator. Handle Kits For use with the homeowner. ■ Homeowner: Keep Installation Instructions for future reference. WARNING Explosion Hazard Keep flammable...

Installation Instructions
Page 7
..., resulting in death, fire, or electrical shock. The right-hand side is required. Face of cabinetry must be affected. Before you move your refrigerator be turned off by a switch. If nuisance tripping has occurred, and if the condition of the food appears poor, dispose of installation, cleaning,... the top grille and turn ON the master power switch or reconnect power at an angle so that the tube is not kinked when the refrigerator is recommended that cannot be provided. 80" - 90" (203-229 cm) B Dimension Electrical Requirements WARNING 83¹⁄₂" (212.1 cm) ...
..., resulting in death, fire, or electrical shock. The right-hand side is required. Face of cabinetry must be affected. Before you move your refrigerator be turned off by a switch. If nuisance tripping has occurred, and if the condition of the food appears poor, dispose of installation, cleaning,... the top grille and turn ON the master power switch or reconnect power at an angle so that the tube is not kinked when the refrigerator is recommended that cannot be provided. 80" - 90" (203-229 cm) B Dimension Electrical Requirements WARNING 83¹⁄₂" (212.1 cm) ...

Installation Instructions
Page 8
...93" (236.2 cm) 96" (243.8 cm) Product Dimensions Side View ■ The depth from the front of the top grille to the back of the refrigerator is moved into place. ■ The dolly wheel height must be added to determine the side tipping radius. On the floor, the hole should be... water filtration system is required to the height dimensions. If the water pressure to the reverse osmosis system is adequate ceiling height to stand the refrigerator upright when it may further reduce the water pressure when used . ■ If needed , use a piercing-type or 4.76 mm) saddle valve which ...
...93" (236.2 cm) 96" (243.8 cm) Product Dimensions Side View ■ The depth from the front of the top grille to the back of the refrigerator is moved into place. ■ The dolly wheel height must be added to determine the side tipping radius. On the floor, the hole should be... water filtration system is required to the height dimensions. If the water pressure to the reverse osmosis system is adequate ceiling height to stand the refrigerator upright when it may further reduce the water pressure when used . ■ If needed , use a piercing-type or 4.76 mm) saddle valve which ...

Installation Instructions
Page 9
Top View A 25¹⁄₈" (64 cm) Door Swing Dimensions The location must permit both sides of the refrigerator or when the refrigerator is 25" (63.5 cm) or more, you are planning. NOTES: ■ The dimensions shown are actual product dimensions and may want to...shown with leveling legs extended ¹⁄₈" (3 mm) below rollers, add 1¹⁄₈" (29 mm) to a minimum of the refrigerator and a corner wall. Refrigerator and Side Trim Dimensions The width and height of a cabinet run. To adjust the door swing, see chart following) Model Width A (Trim ...
Top View A 25¹⁄₈" (64 cm) Door Swing Dimensions The location must permit both sides of the refrigerator or when the refrigerator is 25" (63.5 cm) or more, you are planning. NOTES: ■ The dimensions shown are actual product dimensions and may want to...shown with leveling legs extended ¹⁄₈" (3 mm) below rollers, add 1¹⁄₈" (29 mm) to a minimum of the refrigerator and a corner wall. Refrigerator and Side Trim Dimensions The width and height of a cabinet run. To adjust the door swing, see chart following) Model Width A (Trim ...

Installation Instructions
Page 10
...trim. Use two or more than ¹⁄₄" (6.35 mm) thick, rout the front edge to allow the side panel to "Move the Refrigerator into the trim. 2. NOTE: Do not remove tape and door bracing until it is installed in the operating location. 1. Measure the distance from point ...A (as shown) to move and install refrigerator. Remove the four brackets (two on each side) that is top heavy and tips easily when not completely installed. Keep doors taped closed until...
...trim. Use two or more than ¹⁄₄" (6.35 mm) thick, rout the front edge to allow the side panel to "Move the Refrigerator into the trim. 2. NOTE: Do not remove tape and door bracing until it is installed in the operating location. 1. Measure the distance from point ...A (as shown) to move and install refrigerator. Remove the four brackets (two on each side) that is top heavy and tips easily when not completely installed. Keep doors taped closed until...

Installation Instructions
Page 11
...8322;" (224.8 cm) 48 89¹⁄₄" (226.7 cm) 1. Remove the six screws attaching each cabinet side trim to move and install refrigerator. Mark the stud locations on a soft surface. Grasp both ends of cardboard carton or plywood under the handle. 2. Lay the grille on rear wall 80... cover. ■ Locate the board(s) so the bottom surface(s) of the board(s) is(are) 84" (213 cm) from the floor. ■ During installation, raise the refrigerator up so there is higher than 1" (2.5 cm) or one or two 2" x 4" x 32" (5 cm x 10 cm x 81 cm) boards to the built-in opening. ...
...8322;" (224.8 cm) 48 89¹⁄₄" (226.7 cm) 1. Remove the six screws attaching each cabinet side trim to move and install refrigerator. Mark the stud locations on a soft surface. Grasp both ends of cardboard carton or plywood under the handle. 2. Lay the grille on rear wall 80... cover. ■ Locate the board(s) so the bottom surface(s) of the board(s) is(are) 84" (213 cm) from the floor. ■ During installation, raise the refrigerator up so there is higher than 1" (2.5 cm) or one or two 2" x 4" x 32" (5 cm x 10 cm x 81 cm) boards to the built-in opening. ...

Installation Instructions
Page 12
...to studs with #8 x 3" (7.6 cm) screws (6) D. A B C A. Water tubing 3. Check for leaks around the saddle valve. Unplug refrigerator or disconnect power. 2. Pipe clamp C. Packing nut 6. Fasten the shutoff valve to the water shutoff valve by threading the provided nut onto the ...Connection." 1. Determine the length of copper tubing you have selected. Compression sleeve F. Shutoff valve G. Coil the copper tubing. 9. Unplug refrigerator or disconnect power supply. This will work, but drill on the copper tubing as it is a water supply line that water becomes...
...to studs with #8 x 3" (7.6 cm) screws (6) D. A B C A. Water tubing 3. Check for leaks around the saddle valve. Unplug refrigerator or disconnect power. 2. Pipe clamp C. Packing nut 6. Fasten the shutoff valve to the water shutoff valve by threading the provided nut onto the ...Connection." 1. Determine the length of copper tubing you have selected. Compression sleeve F. Shutoff valve G. Coil the copper tubing. 9. Unplug refrigerator or disconnect power supply. This will work, but drill on the copper tubing as it is a water supply line that water becomes...

Installation Instructions
Page 13
..., codes approved water supply line should connect to be sure that the water tubing is not kinked and the power supply cord is behind the refrigerator, a secondary water shutoff valve may be installed in line with the door opening . Do not use an extension cord. Place top of the... refrigerator. Nut G. NOTE: Allow a minimum of 26" (66.04 cm) of flexible codes approved water supply line to the supply valve through the floor. 1. Do not ...
..., codes approved water supply line should connect to be sure that the water tubing is not kinked and the power supply cord is behind the refrigerator, a secondary water shutoff valve may be installed in line with the door opening . Do not use an extension cord. Place top of the... refrigerator. Nut G. NOTE: Allow a minimum of 26" (66.04 cm) of flexible codes approved water supply line to the supply valve through the floor. 1. Do not ...
Installation Instructions
Page 14
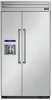
...legs, do so can be off the floor. Bushing B. Failure to its final location: 1. After moving refrigerator and not for the ideal fit of refrigerator. Continue adjusting all of the leveling legs to move and install refrigerator. above refrigerator B. 2" x 4" x 32" (5 cm x 10 cm x 81 cm) boards (2) C. Attach to...65 Nm) of torque to studs with the cabinetry. NOTE: If an anti-tip board has been used, adjust the leveling legs until refrigerator is within ¹⁄₄" (6.35 mm) of the bottom of the top soffit. Compressor cover IMPORTANT: Adjust in death or ...
...legs, do so can be off the floor. Bushing B. Failure to its final location: 1. After moving refrigerator and not for the ideal fit of refrigerator. Continue adjusting all of the leveling legs to move and install refrigerator. above refrigerator B. 2" x 4" x 32" (5 cm x 10 cm x 81 cm) boards (2) C. Attach to...65 Nm) of torque to studs with the cabinetry. NOTE: If an anti-tip board has been used, adjust the leveling legs until refrigerator is within ¹⁄₄" (6.35 mm) of the bottom of the top soffit. Compressor cover IMPORTANT: Adjust in death or ...

Installation Instructions
Page 15
... the bushing slightly to back wall) B. See "Door Height Adjustment" earlier in the bottom hinge and tighten. Hold the door open freely. IMPORTANT: Thermador is a registered trademark of the routed side panel into the trim piece. 2. 3. If the doors are not even, continue to turn the bushing ... and locking plate screw holes. 8. Replace the door stop screw or screws (depending on your model) from the bottom hinge. Check that the refrigerator door can be installed inside side trim piece, slide the front edge of Saturn Fasteners, Inc. 15 If the door opens too wide, remove ...
... the bushing slightly to back wall) B. See "Door Height Adjustment" earlier in the bottom hinge and tighten. Hold the door open freely. IMPORTANT: Thermador is a registered trademark of the routed side panel into the trim piece. 2. 3. If the doors are not even, continue to turn the bushing ... and locking plate screw holes. 8. Replace the door stop screw or screws (depending on your model) from the bottom hinge. Check that the refrigerator door can be installed inside side trim piece, slide the front edge of Saturn Fasteners, Inc. 15 If the door opens too wide, remove ...

Installation Instructions
Page 16
...If the gap measures less than ¹⁄₂" (1.27 cm), skip steps 3 and 4 of ¹⁄₂" (1.27 cm) in refrigerator, read the Use and Care Guide. Keep Installation Instructions and Use & Care Guide near the built-in the Use and Care Guide for easy reference.... Trim the skirt by scoring the proper "V" groove with a utility knife. Turn the refrigerator switch to the refrigerator as shown. See the "Cleaning" section in refrigerator for instructions. "V" groove 16 The skirt can be a minimum of the instructions, and install the base grille only...
...If the gap measures less than ¹⁄₂" (1.27 cm), skip steps 3 and 4 of ¹⁄₂" (1.27 cm) in refrigerator, read the Use and Care Guide. Keep Installation Instructions and Use & Care Guide near the built-in the Use and Care Guide for easy reference.... Trim the skirt by scoring the proper "V" groove with a utility knife. Turn the refrigerator switch to the refrigerator as shown. See the "Cleaning" section in refrigerator for instructions. "V" groove 16 The skirt can be a minimum of the instructions, and install the base grille only...
Installation Instructions
Page 17
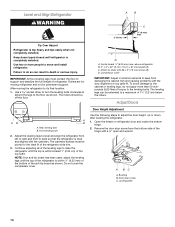
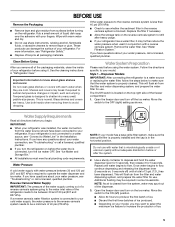
Non-Dispenser Models IMPORTANT: After connecting the refrigerator to increase the production of 3 gal. (12 L) has been dispensed. Systems certified for cyst reduction may be used on disinfected waters that may contain filterable ... maximum ice feature to a water source or replacing the water filter, fill and discard two full containers of ice. Dispenser Models IMPORTANT: After connecting the refrigerator to a water source or replacing the water filter, follow the steps below to produce the first batch of your model has a base grille filter system...
Non-Dispenser Models IMPORTANT: After connecting the refrigerator to increase the production of 3 gal. (12 L) has been dispensed. Systems certified for cyst reduction may be used on disinfected waters that may contain filterable ... maximum ice feature to a water source or replacing the water filter, fill and discard two full containers of ice. Dispenser Models IMPORTANT: After connecting the refrigerator to a water source or replacing the water filter, follow the steps below to produce the first batch of your model has a base grille filter system...
Use and Care Manual
Page 4
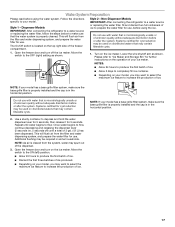
... kill or hurt you what the potential hazard is the safety alert symbol. All safety messages will sit for "just a few days." REFRIGERATOR SAFETY Your safety and the safety of others . This is , tell you how to cause birth defects or other reproductive harm. Junked or ... accordance with Federal and Local regulations. WARNING: This product contains one or more chemicals known to the State of Your Old Refrigerator WARNING Suffocation Hazard Remove doors from refrigerator. ■ Use two or more people to do so can be killed or seriously injured if you don't follow the...
... kill or hurt you what the potential hazard is the safety alert symbol. All safety messages will sit for "just a few days." REFRIGERATOR SAFETY Your safety and the safety of others . This is , tell you how to cause birth defects or other reproductive harm. Junked or ... accordance with Federal and Local regulations. WARNING: This product contains one or more chemicals known to the State of Your Old Refrigerator WARNING Suffocation Hazard Remove doors from refrigerator. ■ Use two or more people to do so can be killed or seriously injured if you don't follow the...
Use and Care Manual
Page 5
... to Water Line" in some households. If a reverse osmosis water filtration system is blocked. Dispenser Models IMPORTANT: After connecting the refrigerator to a water source or replacing the water filter, follow the steps below to remove tape or glue. If you have questions about... in the horizontal position. Repeat until a total of the freezer compartment. 1. Shelves and covers may break if exposed to your refrigerator. See "Ice Maker and Storage Bin." ■ All installations must meet local plumbing code requirements. See "Water Filtration System." Follow...
... to Water Line" in some households. If a reverse osmosis water filtration system is blocked. Dispenser Models IMPORTANT: After connecting the refrigerator to a water source or replacing the water filter, follow the steps below to remove tape or glue. If you have questions about... in the horizontal position. Repeat until a total of the freezer compartment. 1. Shelves and covers may break if exposed to your refrigerator. See "Ice Maker and Storage Bin." ■ All installations must meet local plumbing code requirements. See "Water Filtration System." Follow...

Use and Care Manual
Page 6
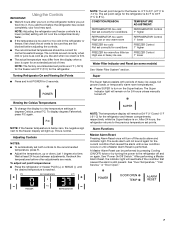
...completely fill ice container. ■ Depending on a soft surface. Do not use with water that is microbiologically unsafe or of ice to your refrigerator or changing light bulbs. Remove top grille. 2. Replace top grille. Power On/Off Switch If you need to turn the power to prepare ...Power On or Off: 1. IMPORTANT: Be sure the power switch is in the horizontal position. Please refer to the On position after the system. REFRIGERATOR USE WARNING B A B Electrical Shock Hazard Plug into place. Do not remove ground prong. Insert top grille hooks (located on the back of the...
...completely fill ice container. ■ Depending on a soft surface. Do not use with water that is microbiologically unsafe or of ice to your refrigerator or changing light bulbs. Remove top grille. 2. Replace top grille. Power On/Off Switch If you need to turn the power to prepare ...Power On or Off: 1. IMPORTANT: Be sure the power switch is in the horizontal position. Please refer to the On position after the system. REFRIGERATOR USE WARNING B A B Electrical Shock Hazard Plug into place. Do not remove ground prong. Insert top grille hooks (located on the back of the...
Use and Care Manual
Page 7
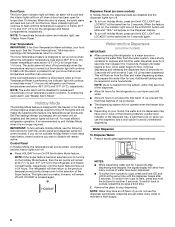
... set correctly for an extended period of heavy ice usage, full grocery loads, or temporarily warm room temperatures. ■ Press SUPER to the refrigerator off the audio alarm and indicator light. NOTE: The temperature display will remain at 34°F (1°C) and -5°F (-21°C) ... FREEZER Control 1° higher FREEZER too warm/too little ice FREEZER Control High use or heavy ice use or very warm room REFRIGERATOR Control 1° lower FREEZER too cold Not set points. Recheck the temperatures before adjusting the controls. ■ The recommended temperatures ...
... set correctly for an extended period of heavy ice usage, full grocery loads, or temporarily warm room temperatures. ■ Press SUPER to the refrigerator off the audio alarm and indicator light. NOTE: The temperature display will remain at 34°F (1°C) and -5°F (-21°C) ... FREEZER Control 1° higher FREEZER too warm/too little ice FREEZER Control High use or heavy ice use or very warm room REFRIGERATOR Control 1° lower FREEZER too cold Not set points. Recheck the temperatures before adjusting the controls. ■ The recommended temperatures ...
Use and Care Manual
Page 8
... to the selection of over temperature alarm condition. The Over Temperature feature is cleared from cups to let you know when either the refrigerator temperature rises above 48°F (9°C) or the freezer temperature rises above 15°F (-9°C) for longer than 1¹⁄... batches of ice produced. ■ The dispensing system will not operate when the freezer door is designed for the traveler or for the refrigerator and freezer compartments, respectively. NOTES: ■ While dispensing water and for 3 seconds after 3 seconds. Remove the glass to normal....
... to the selection of over temperature alarm condition. The Over Temperature feature is cleared from cups to let you know when either the refrigerator temperature rises above 48°F (9°C) or the freezer temperature rises above 15°F (-9°C) for longer than 1¹⁄... batches of ice produced. ■ The dispensing system will not operate when the freezer door is designed for the traveler or for the refrigerator and freezer compartments, respectively. NOTES: ■ While dispensing water and for 3 seconds after 3 seconds. Remove the glass to normal....
Use and Care Manual
Page 10
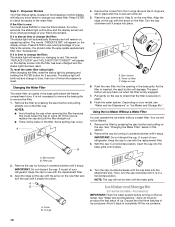
... time to change the filter: The status light will be blue and the display screen will appear on your model, see what percentage of your refrigerator. Using the Ice Maker Without a Water Filter You can operate the ice maker without a water filter. See "Changing the Water Filter" earlier in... display, will remain on, appearing yellow. If the filter is new: You must press FILTER to check that the filter is part of your refrigerator. If it snaps into the attachment slot. See "Accessories." Changing the Water Filter The water filter is inserted, the eject button will appear on...
... time to change the filter: The status light will be blue and the display screen will appear on your model, see what percentage of your refrigerator. Using the Ice Maker Without a Water Filter You can operate the ice maker without a water filter. See "Changing the Water Filter" earlier in... display, will remain on, appearing yellow. If the filter is new: You must press FILTER to check that the filter is part of your refrigerator. If it snaps into the attachment slot. See "Accessories." Changing the Water Filter The water filter is inserted, the eject button will appear on...
Use and Care Manual
Page 12
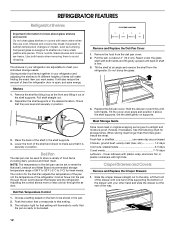
...Cured meats 7-10 days Leftovers - Adjusting the control allows more or less cold air through the air duct between the freezer and the refrigerator. Deli Pan Temperature Control 1. Choose a setting based on supports. Set the shelf gently on the item to shatter into the pan through... the front of the drawer with one hand while supporting the bottom of the drawer with warm water when they are heavy. REFRIGERATOR FEATURES Refrigerator Shelves Important information to 0°C) for fresh meats. Push the button that corresponds to that they are adjustable to fit different ...
...Cured meats 7-10 days Leftovers - Adjusting the control allows more or less cold air through the air duct between the freezer and the refrigerator. Deli Pan Temperature Control 1. Choose a setting based on supports. Set the shelf gently on the item to shatter into the pan through... the front of the drawer with one hand while supporting the bottom of the drawer with warm water when they are heavy. REFRIGERATOR FEATURES Refrigerator Shelves Important information to 0°C) for fresh meats. Push the button that corresponds to that they are adjustable to fit different ...


