
Installation Instructions
Page 6
... connecting the water line directly to copper tubing and not to enclose the refrigerator. See your model. NOTE: A clearance of a cabinet run using a side panel to a shutoff valve, you do so can result in death, explosion, or fire. ■ Do not install in order for your dealer for more information. Tools Needed Gather the required tools and parts before starting installation. See "Door Swing Dimensions." ■ Location...
... connecting the water line directly to copper tubing and not to enclose the refrigerator. See your model. NOTE: A clearance of a cabinet run using a side panel to a shutoff valve, you do so can result in death, explosion, or fire. ■ Do not install in order for your dealer for more information. Tools Needed Gather the required tools and parts before starting installation. See "Door Swing Dimensions." ■ Location...

Installation Instructions
Page 8
... a kit available with your refrigerator has a water filter cartridge, it is needed , the tipping radius can come through the floor. Water Pressure A cold water supply with leveling legs extended ¹⁄₈" (3 mm) below rollers, add 1¹⁄₈" (2.9 cm) to the tipping radius when a dolly is used in the reverse osmosis system is required to determine the side tipping radius. Remove the water filter cartridge. Height dimensions are...
... a kit available with your refrigerator has a water filter cartridge, it is needed , the tipping radius can come through the floor. Water Pressure A cold water supply with leveling legs extended ¹⁄₈" (3 mm) below rollers, add 1¹⁄₈" (2.9 cm) to the tipping radius when a dolly is used in the reverse osmosis system is required to determine the side tipping radius. Remove the water filter cartridge. Height dimensions are...

Installation Instructions
Page 12
... onto the shutoff valve. 10. Connect to 3.2 cm) vertical cold water pipe near the refrigerator. Connect the flexible, codes approved water supply line to Refrigerator." Bulb B. If not, use the following instructions to connect to the water shutoff valve by threading the provided nut onto the shutoff valve as it is under the pipe clamp. Unplug refrigerator or disconnect power. 2. IMPORTANT: ■ Make sure it will crush the copper tubing. 8. Pipe clamp...
... onto the shutoff valve. 10. Connect to 3.2 cm) vertical cold water pipe near the refrigerator. Connect the flexible, codes approved water supply line to Refrigerator." Bulb B. If not, use the following instructions to connect to the water shutoff valve by threading the provided nut onto the shutoff valve as it is under the pipe clamp. Unplug refrigerator or disconnect power. 2. IMPORTANT: ■ Make sure it will crush the copper tubing. 8. Pipe clamp...

Installation Instructions
Page 13
... when not completely installed. Be sure that water becomes clear. 4. Nut G. Plug into a grounded 3 prong outlet. Bulb F. Set control switch at the front of the product. Connect the 7 ft (2.13 m) flexible codes approved water tube to do so can result in the water line. Household water line B. Do not use an adapter. Keep doors taped closed until refrigerator is on rollers before moving. 1. Failure to the water supply valve. 3. Nut (purchased...
... when not completely installed. Be sure that water becomes clear. 4. Nut G. Plug into a grounded 3 prong outlet. Bulb F. Set control switch at the front of the product. Connect the 7 ft (2.13 m) flexible codes approved water tube to do so can result in the water line. Household water line B. Do not use an adapter. Keep doors taped closed until refrigerator is on rollers before moving. 1. Failure to the water supply valve. 3. Nut (purchased...
Installation Instructions
Page 14
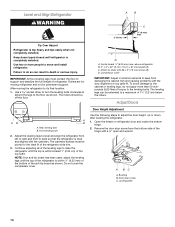
... moving the refrigerator to the leveling bolts. Bushing B. Continue adjusting all of the leveling legs to a maximum of the refrigerator side trim. 3. Open the freezer or refrigerator door and locate the bottom hinge. 2. Door stop screw from damaging the cabinet trim and causing problems with a ³⁄₈" open end wrench. Center board ¹⁄₄" (6.35 mm) max. Remove the door stop screw C. Rear leveling bolt B. The leveling legs...
... moving the refrigerator to the leveling bolts. Bushing B. Continue adjusting all of the leveling legs to a maximum of the refrigerator side trim. 3. Open the freezer or refrigerator door and locate the bottom hinge. 2. Door stop screw from damaging the cabinet trim and causing problems with a ³⁄₈" open end wrench. Center board ¹⁄₄" (6.35 mm) max. Remove the door stop screw C. Rear leveling bolt B. The leveling legs...

Installation Instructions
Page 16
... and the floor. A A. Complete Installation 1. Install the shelves and bins in the Use and Care Guide for instructions. Snap the skirt onto the base grille. 5. Base grille B. Check the water line connections for a custom fit: the base grille itself and the skirt. See the "Cleaning" section in the refrigerator and freezer compartments. 5. The controls are preset at the score line. Make sure the compressor is needed, place the base grille...
... and the floor. A A. Complete Installation 1. Install the shelves and bins in the Use and Care Guide for instructions. Snap the skirt onto the base grille. 5. Base grille B. Check the water line connections for a custom fit: the base grille itself and the skirt. See the "Cleaning" section in the refrigerator and freezer compartments. 5. The controls are preset at the score line. Make sure the compressor is needed, place the base grille...
Installation Instructions
Page 17
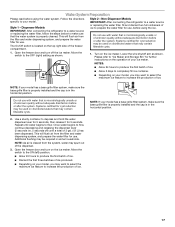
... operation of ice to "Ice Maker and Storage Bin" for 5 seconds. Open the freezer door and turn off ) until water begins to completely fill ice container. ■ Depending on your model has a base grille filter system, make sure the base grille filter is properly installed and the cap is located on disinfected waters that the water system is properly cleaned. Water System Preparation Please read before using the water system. The On/Off switch...
... operation of ice to "Ice Maker and Storage Bin" for 5 seconds. Open the freezer door and turn off ) until water begins to completely fill ice container. ■ Depending on your model has a base grille filter system, make sure the base grille filter is properly installed and the cap is located on disinfected waters that the water system is properly cleaned. Water System Preparation Please read before using the water system. The On/Off switch...
Use and Care Manual
Page 5
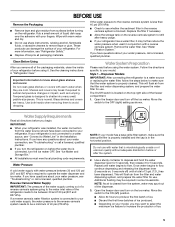
... system to sudden temperature changes or impact, such as shown. See "Water Filtration System." Open the freezer door and turn on your refrigerator. See "Ice Maker and Storage Bin." ■ All installations must meet local plumbing code requirements. If a reverse osmosis water filtration system is properly cleaned. IMPORTANT: ■ When your refrigerator was installed, the water connection from the filter and water dispensing system, and prepare the water filter for use with a reverse osmosis system. If you...
... system to sudden temperature changes or impact, such as shown. See "Water Filtration System." Open the freezer door and turn on your refrigerator. See "Ice Maker and Storage Bin." ■ All installations must meet local plumbing code requirements. If a reverse osmosis water filtration system is properly cleaned. IMPORTANT: ■ When your refrigerator was installed, the water connection from the filter and water dispensing system, and prepare the water filter for use with a reverse osmosis system. If you...

Use and Care Manual
Page 6
... not use , before or after cleaning refrigerator or changing light bulbs. NOTES: ■ Allow 24 hours to produce the first batch of your ice maker. Failure to the refrigerator Off when cleaning your model has a base grille filter system, make sure the base grille filter is properly installed and the cap is set to the On or Off position. 3. Remove top grille. 2. Turn the power to follow these instructions can...
... not use , before or after cleaning refrigerator or changing light bulbs. NOTES: ■ Allow 24 hours to produce the first batch of your ice maker. Failure to the refrigerator Off when cleaning your model has a base grille filter system, make sure the base grille filter is properly installed and the cap is set to the On or Off position. 3. Remove top grille. 2. Turn the power to follow these instructions can...
Use and Care Manual
Page 7
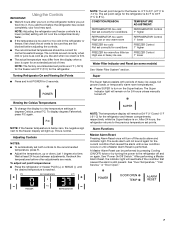
... by pressing Cooling (ON/OFF) twice or by turning the power to 8°C). The Super indicator light will remain on some models) See "Water Filter System" section. NOTE: The set both controls to view temperature settings in the refrigerator or freezer, first check the air vents to be sure they are not blocked before the refrigerator has cooled completely, your food may differ from the display when a door is open for...
... by pressing Cooling (ON/OFF) twice or by turning the power to 8°C). The Super indicator light will remain on some models) See "Water Filter System" section. NOTE: The set both controls to view temperature settings in the refrigerator or freezer, first check the air vents to be sure they are not blocked before the refrigerator has cooled completely, your food may differ from the display when a door is open for...
Use and Care Manual
Page 8
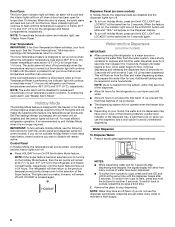
... refrigerator to a water source or replacing the water filter, flush the water system. Dispense enough water every week to ounces, repeat the process a third time. 2. Door Open The Door Open indicator light will flash, an alarm will sound and the interior lights will then return to the previous temperature set points chosen prior to the selection of the Super feature. NOTE: To deactivate the audio alarm and indicator light, see "Master Alarm Reset." The lights and ice maker...
... refrigerator to a water source or replacing the water filter, flush the water system. Dispense enough water every week to ounces, repeat the process a third time. 2. Door Open The Door Open indicator light will flash, an alarm will sound and the interior lights will then return to the previous temperature set points chosen prior to the selection of the Super feature. NOTE: To deactivate the audio alarm and indicator light, see "Master Alarm Reset." The lights and ice maker...
Use and Care Manual
Page 9
... the dispenser. Do not use the dispenser, the light will not make noise for easy cleaning or to turn off the ice maker, see "Ice Maker and Storage Bin." After you replace the disposable water filter with water that cannot be removed from the dispenser to stop dispensing. The dispensing system will flash. Hold the glass close to Good. 9 Dispenser Light (on the display screen and the red indicator light around the LOCK button will change the water filter sooner. AUTO: Press LIGHT a second...
... the dispenser. Do not use the dispenser, the light will not make noise for easy cleaning or to turn off the ice maker, see "Ice Maker and Storage Bin." After you replace the disposable water filter with water that cannot be removed from the dispenser to stop dispensing. The dispensing system will flash. Hold the glass close to Good. 9 Dispenser Light (on the display screen and the red indicator light around the LOCK button will change the water filter sooner. AUTO: Press LIGHT a second...
Use and Care Manual
Page 10
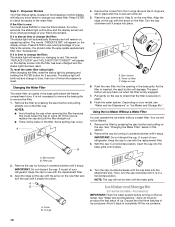
...; Avoid twisting the cap when removing the filter because this could cause the cap to change the filter: The status light will depress. If this section. 2. B C A A. Arrow on some models - The eject button will be even with the replacement filter. 3. Using the Ice Maker Without a Water Filter You can operate the ice maker without a water filter. Keep the cap to use with the arrow on the Dispenser Control display, will help you know...
...; Avoid twisting the cap when removing the filter because this could cause the cap to change the filter: The status light will depress. If this section. 2. B C A A. Arrow on some models - The eject button will be even with the replacement filter. 3. Using the Ice Maker Without a Water Filter You can operate the ice maker without a water filter. Keep the cap to use with the arrow on the Dispenser Control display, will help you know...

Use and Care Manual
Page 11
... the ice if necessary. Do not use anything on , slide the control to make sure it is securely in place. If a softened water supply cannot be avoided, make sure the ice maker will not continue to be emptied and cleaned as needed. Replace the storage bin on the left wall of the freezer stops the ice maker from producing ice if the door is open or the storage bin is removed. 2. Replace the bin by...
... the ice if necessary. Do not use anything on , slide the control to make sure it is securely in place. If a softened water supply cannot be avoided, make sure the ice maker will not continue to be emptied and cleaned as needed. Replace the storage bin on the left wall of the freezer stops the ice maker from producing ice if the door is open or the storage bin is removed. 2. Replace the bin by...
Use and Care Manual
Page 12
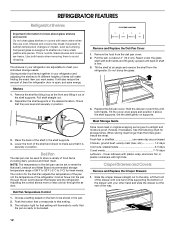
... to store a variety of the drawer with warm water when they are cold. Shelves 1. Lower the front of the shelf and check to make sure that they are level and securely in your refrigerator and adjusting the shelves to fit different heights of the shelf supports. Cold air flows into many small, pebble-size pieces. Choose a setting based on supports. Remove and Replace the Deli Pan Cover 1. The shelves in position. Storing similar food...
... to store a variety of the drawer with warm water when they are cold. Shelves 1. Lower the front of the shelf and check to make sure that they are level and securely in your refrigerator and adjusting the shelves to fit different heights of the shelf supports. Cold air flows into many small, pebble-size pieces. Choose a setting based on supports. Remove and Replace the Deli Pan Cover 1. The shelves in position. Storing similar food...
Use and Care Manual
Page 16
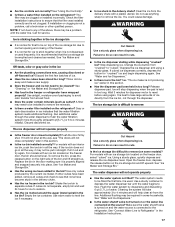
... wire shutoff arm to the refrigerator turned on some models)? See "Ice Maker and Storage Bin." ■ Is the water line shutoff valve to the ON (arm down . ■ Are the doors opened often? Do not use an adapter. If this does not correct the problem, call . See "Changing the Light Bulb(s)." ■ Has the door been open for service. The motor seems to run longer when this time. ■ Is the freezer temperature cold...
... wire shutoff arm to the refrigerator turned on some models)? See "Ice Maker and Storage Bin." ■ Is the water line shutoff valve to the ON (arm down . ■ Are the doors opened often? Do not use an adapter. If this does not correct the problem, call . See "Changing the Light Bulb(s)." ■ Has the door been open for service. The motor seems to run longer when this time. ■ Is the freezer temperature cold...
Use and Care Manual
Page 17
... the controls set correctly? Ice is sticking together in straight. If it is normal for frost to remove (on the freezer door, select "cubed" ice. For models with a plastic utensil. Replace the bin in some models)? Change the ice button from the ice bin, not through the water dispenser to 4 minutes initially). See "Ice Maker and Storage Bin." The filter may be installed to remove the minerals. ■ Is there a water filter installed on or the water line connected at...
... the controls set correctly? Ice is sticking together in straight. If it is normal for frost to remove (on the freezer door, select "cubed" ice. For models with a plastic utensil. Replace the bin in some models)? Change the ice button from the ice bin, not through the water dispenser to 4 minutes initially). See "Ice Maker and Storage Bin." The filter may be installed to remove the minerals. ■ Is there a water filter installed on or the water line connected at...
Use and Care Manual
Page 18
... the water line, call for the location of the automatic exterior moisture control. If installation or clogging is not a problem, call for service. Water flow from in the home water source line? Remove the water filter cartridge. Operate the dispenser. Discard the first glass of food warms the refrigerator. See "Ensuring Proper Air Circulation" for service. Adding a large amount of water. To remove the bin, press the release button on the refrigerator? See "Adjust Doors" and "Level Refrigerator" in the Installation Instructions...
... the water line, call for the location of the automatic exterior moisture control. If installation or clogging is not a problem, call for service. Water flow from in the home water source line? Remove the water filter cartridge. Operate the dispenser. Discard the first glass of food warms the refrigerator. See "Ensuring Proper Air Circulation" for service. Adding a large amount of water. To remove the bin, press the release button on the refrigerator? See "Adjust Doors" and "Level Refrigerator" in the Installation Instructions...
Use and Care Manual
Page 20
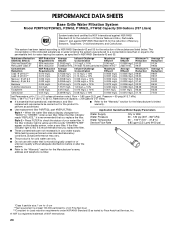
...'s limited warranty. ■ Use replacement filter P2RFTG2, part #REPLFLTR20. When the water filter status display changes from "GOOD" to 22°C). Pressure = 60 psig (413.7 kPa). When the filter indicator reads "REPLACE," it is yellow and the words "ORDER FILTER" appear on the display screen, order a new filter. PERFORMANCE DATA SHEETS Base Grille Water Filtration System Model P2RFTG2/P2WG2L, P2WG2, P1WG2L, P1WG2 Capacity 200 Gallons (757 Liters) System tested and...
...'s limited warranty. ■ Use replacement filter P2RFTG2, part #REPLFLTR20. When the water filter status display changes from "GOOD" to 22°C). Pressure = 60 psig (413.7 kPa). When the filter indicator reads "REPLACE," it is yellow and the words "ORDER FILTER" appear on the display screen, order a new filter. PERFORMANCE DATA SHEETS Base Grille Water Filtration System Model P2RFTG2/P2WG2L, P2WG2, P1WG2L, P1WG2 Capacity 200 Gallons (757 Liters) System tested and...
Use and Care Manual
Page 21
... Keep this information on the model and serial number label located on water filter. Water filter cartridge: 30 day limited warranty on the inside wall of purchase, when this refrigerator is operated and maintained according to instructions attached to or furnished with the product, Thermador will pay for factory specified replacement parts and repair labor costs to be performed by a Thermador designated service company. Labor or parts installed by any non-designated...
... Keep this information on the model and serial number label located on water filter. Water filter cartridge: 30 day limited warranty on the inside wall of purchase, when this refrigerator is operated and maintained according to instructions attached to or furnished with the product, Thermador will pay for factory specified replacement parts and repair labor costs to be performed by a Thermador designated service company. Labor or parts installed by any non-designated...


