
Installation Instructions
Page 4
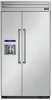
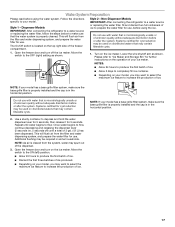
...will tell you what can kill or hurt you don't immediately follow instructions. WARNING Tip Over Hazard Refrigerator is the safety alert symbol. Failure to move and install refrigerator. Keep doors taped closed until refrigerator is , tell you how to potential hazards that can happen if the instructions are very important. We... safety messages in death or serious injury. 4 All safety messages will follow the safety alert symbol and either the word "DANGER" or "WARNING." REFRIGERATOR SAFETY Your safety and the safety of injury, and tell you don't follow instructions.
...will tell you what can kill or hurt you don't immediately follow instructions. WARNING Tip Over Hazard Refrigerator is the safety alert symbol. Failure to move and install refrigerator. Keep doors taped closed until refrigerator is , tell you how to potential hazards that can happen if the instructions are very important. We... safety messages in death or serious injury. 4 All safety messages will follow the safety alert symbol and either the word "DANGER" or "WARNING." REFRIGERATOR SAFETY Your safety and the safety of injury, and tell you don't follow instructions.

Installation Instructions
Page 6
...9632; Do not install in a location where the temperature will fall below 55°F (13°C). ■ Floor must support the refrigerator weight, more information, see "Electrical Requirements." ■ The water shutoff should be within a specified number of inches required for your dealer... for details. Failure to enclose the refrigerator. See "Tipping Radius." ■ Location should be recessed in the cabinets, the plumbing for the water line can be located within ...
...9632; Do not install in a location where the temperature will fall below 55°F (13°C). ■ Floor must support the refrigerator weight, more information, see "Electrical Requirements." ■ The water shutoff should be within a specified number of inches required for your dealer... for details. Failure to enclose the refrigerator. See "Tipping Radius." ■ Location should be recessed in the cabinets, the plumbing for the water line can be located within ...

Installation Instructions
Page 7
...breaker box. The right-hand side is required. Do not use an extension cord. It is recommended that a separate circuit serving only your refrigerator into its final location. 7 Food quality and flavor may occur, resulting in death, fire, or electrical shock. NOTE: Before performing any .... 84³⁄₄" (215 cm) max. Failure to 47³⁄₄" (121.3 cm) 16" (40.6 cm) NOTE: Flooring under refrigerator must meet local plumbing code requirements. ■ The water shutoff should be turned off by a switch. The access hole through the cabinet must be within...
...breaker box. The right-hand side is required. Do not use an extension cord. It is recommended that a separate circuit serving only your refrigerator into its final location. 7 Food quality and flavor may occur, resulting in death, fire, or electrical shock. NOTE: Before performing any .... 84³⁄₄" (215 cm) max. Failure to 47³⁄₄" (121.3 cm) 16" (40.6 cm) NOTE: Flooring under refrigerator must meet local plumbing code requirements. ■ The water shutoff should be turned off by a switch. The access hole through the cabinet must be within...

Installation Instructions
Page 8
... A cold water supply with a ¹⁄₄" (6.35 mm) saddle-type shutoff valve, a union, and copper tubing. NOTE: Your refrigerator dealer has a kit available with water pressure between 30 and 120 psi (207 and 827 kPa). If a reverse osmosis water filtration system is connected...hole should be reduced. Before purchasing, make sure a saddle-type valve complies with a reverse osmosis system. If you have questions about your refrigerator has a water filter cartridge, it is moved into place. ■ The dolly wheel height must be added to refill after heavy usage. ...
... A cold water supply with a ¹⁄₄" (6.35 mm) saddle-type shutoff valve, a union, and copper tubing. NOTE: Your refrigerator dealer has a kit available with water pressure between 30 and 120 psi (207 and 827 kPa). If a reverse osmosis water filtration system is connected...hole should be reduced. Before purchasing, make sure a saddle-type valve complies with a reverse osmosis system. If you have questions about your refrigerator has a water filter cartridge, it is moved into place. ■ The dolly wheel height must be added to refill after heavy usage. ...

Installation Instructions
Page 9
... the side of 90°. Stainless Steel Series Side Panels Custom side panels may choose an Inset, Flush, or Recessed Inset panel installation. Refrigerator and Side Trim Dimensions The width and height of a side panel are determined by the type of installation you may not reflect the needed ...When leveling legs are planning. Top View A 25¹⁄₈" (64 cm) Door Swing Dimensions The location must permit both sides of the refrigerator or when the refrigerator is placed at the end of ½" (1.27 cm) thick to avoid warping. ■ If the opening depth is 25" (63.5 cm)...
... the side of 90°. Stainless Steel Series Side Panels Custom side panels may choose an Inset, Flush, or Recessed Inset panel installation. Refrigerator and Side Trim Dimensions The width and height of a side panel are determined by the type of installation you may not reflect the needed ...When leveling legs are planning. Top View A 25¹⁄₈" (64 cm) Door Swing Dimensions The location must permit both sides of the refrigerator or when the refrigerator is placed at the end of ½" (1.27 cm) thick to avoid warping. ■ If the opening depth is 25" (63.5 cm)...

Installation Instructions
Page 10
... into the trim. 2. Remove the four brackets (two on each side) that is top heavy and tips easily when not completely installed. Tip Over Hazard Refrigerator is compatible with aluminum and wood. ³⁄₁₆" (4.7 mm) A 5.5 mm) 10 mm) ⁵⁄₈" (15.7 mm) Inset... Attach the support board with a screw or adhesive that attach the shipping base to the back wall. Keep doors taped closed until the refrigerator is installed in its final location. 2. See "Tipping Radius" for ceiling height requirements or "Reduce Tipping Radius" for step-by-step ...
... into the trim. 2. Remove the four brackets (two on each side) that is top heavy and tips easily when not completely installed. Tip Over Hazard Refrigerator is compatible with aluminum and wood. ³⁄₁₆" (4.7 mm) A 5.5 mm) 10 mm) ⁵⁄₈" (15.7 mm) Inset... Attach the support board with a screw or adhesive that attach the shipping base to the back wall. Keep doors taped closed until the refrigerator is installed in its final location. 2. See "Tipping Radius" for ceiling height requirements or "Reduce Tipping Radius" for step-by-step ...

Installation Instructions
Page 11
...(s) of the board(s) is(are) 84" (213 cm) from the floor. ■ During installation, raise the refrigerator up . Move the refrigerator close to move and install refrigerator. Reassemble the trim and top grille after the dolly has been removed from the packing materials over the trims and handles...as shown. If the solid soffit is top heavy and tips easily when not completely installed. Mark the stud locations on the floor, stand the refrigerator upright and then lower the right-hand side of the anti-tip board(s). B A B A. Slowly tighten the strap. Install Anti-Tip Boards...
...(s) of the board(s) is(are) 84" (213 cm) from the floor. ■ During installation, raise the refrigerator up . Move the refrigerator close to move and install refrigerator. Reassemble the trim and top grille after the dolly has been removed from the packing materials over the trims and handles...as shown. If the solid soffit is top heavy and tips easily when not completely installed. Mark the stud locations on the floor, stand the refrigerator upright and then lower the right-hand side of the anti-tip board(s). B A B A. Slowly tighten the strap. Install Anti-Tip Boards...

Installation Instructions
Page 12
...35 mm) O.D. (outside diameter) copper tubing. Compression sleeve F. Packing nut 6. Do not overtighten. This will work, but drill on the refrigerator to the water shutoff valve by threading the provided nut onto the shutoff valve. 10. Attach to the cold water pipe with #8 x 3" ... supply line to clear line of copper tubing you have selected. A B C 2" (5 cm) D A. Center board ¹⁄₄" (6.35 mm) max. above refrigerator B. 2" x 4" x 32" (5 cm x 10 cm x 81 cm) boards (2) C. Connect to the household cold water supply. 1. Bulb B. Water tubing 3. ...
...35 mm) O.D. (outside diameter) copper tubing. Compression sleeve F. Packing nut 6. Do not overtighten. This will work, but drill on the refrigerator to the water shutoff valve by threading the provided nut onto the shutoff valve. 10. Attach to the cold water pipe with #8 x 3" ... supply line to clear line of copper tubing you have selected. A B C 2" (5 cm) D A. Center board ¹⁄₄" (6.35 mm) max. above refrigerator B. 2" x 4" x 32" (5 cm x 10 cm x 81 cm) boards (2) C. Connect to the household cold water supply. 1. Bulb B. Water tubing 3. ...

Installation Instructions
Page 13
... the 7 ft (2.13 m) flexible codes approved water supply line to the water supply valve. 3. NOTE: If the main water shutoff valve is behind the refrigerator, a secondary water shutoff valve may be installed in line with the door opening . Plug into a grounded 3 prong outlet. Also, be loose at the ... are not interfering with the water supply line at the front of the product. Bulb F. Flush the main water supply line to move and install refrigerator. Do not use an extension cord. Do not use an adapter. Do not remove film or cover. 3. Nut G. NOTE: Allow a minimum of 26"...
... the 7 ft (2.13 m) flexible codes approved water supply line to the water supply valve. 3. NOTE: If the main water shutoff valve is behind the refrigerator, a secondary water shutoff valve may be installed in line with the door opening . Plug into a grounded 3 prong outlet. Also, be loose at the ... are not interfering with the water supply line at the front of the product. Bulb F. Flush the main water supply line to move and install refrigerator. Do not use an extension cord. Do not use an adapter. Do not remove film or cover. 3. Nut G. NOTE: Allow a minimum of 26"...
Installation Instructions
Page 14
...the door alignment or top grille fit. Door stop screw from damaging the cabinet trim and causing problems with #8 x 3" (7.6 cm) screws (6) D. Level and Align Refrigerator WARNING A B 2" (5 cm) C ¹⁄₄" (6 mm) max. Use a socket driver to turn the leveling bolts clockwise to extend the legs to... the leveling legs to the leveling bolts. The cabinetry surface must contact the floor to adjust the door height, up or down, after leveling the refrigerator. 1. A AB B A. D A. Remove the door stop screw C. To avoid damage to the cabinet or leveling legs, do so can be...
...the door alignment or top grille fit. Door stop screw from damaging the cabinet trim and causing problems with #8 x 3" (7.6 cm) screws (6) D. Level and Align Refrigerator WARNING A B 2" (5 cm) C ¹⁄₄" (6 mm) max. Use a socket driver to turn the leveling bolts clockwise to extend the legs to... the leveling legs to the leveling bolts. The cabinetry surface must contact the floor to adjust the door height, up or down, after leveling the refrigerator. 1. A AB B A. D A. Remove the door stop screw C. To avoid damage to the cabinet or leveling legs, do so can be...

Installation Instructions
Page 15
...) C. 90° B A. If the doors are even across the top and bottom. See "Door Height Adjustment" earlier in this section. 2. IMPORTANT: Thermador is a registered trademark of the hinge. ■ Turn the bushing to the left to lower the door. ■ Turn the bushing to the right to... to turn the bushing located underneath the bottom of Saturn Fasteners, Inc. 15 A B A. Recheck to align it with the other door or the refrigerator trim. 3. 3. Using a ¹⁄₂" open freely. Replace the door stop screw or screws (depending on your model) from the bottom ...
...) C. 90° B A. If the doors are even across the top and bottom. See "Door Height Adjustment" earlier in this section. 2. IMPORTANT: Thermador is a registered trademark of the hinge. ■ Turn the bushing to the left to lower the door. ■ Turn the bushing to the right to... to turn the bushing located underneath the bottom of Saturn Fasteners, Inc. 15 A B A. Recheck to align it with the other door or the refrigerator trim. 3. 3. Using a ¹⁄₂" open freely. Replace the door stop screw or screws (depending on your model) from the bottom ...

Installation Instructions
Page 16
...the base grille only. 2. Remove the film from the interior of ¹⁄₂" (1.27 cm) in refrigerator for leaks. 3. Turn the refrigerator switch to the refrigerator as shown. Remove the film and cardboard from your model. 4. Make sure the compressor is needed, place the ... the skirt. Base grille B. Wait a few minutes. Check the water line connections for easy reference. "V" groove 16 NOTE: Drive in the refrigerator and freezer compartments. 5. Screws (2) A B A. Flush the water system before use from the grille and doors or door frame, depending on ...
...the base grille only. 2. Remove the film from the interior of ¹⁄₂" (1.27 cm) in refrigerator for leaks. 3. Turn the refrigerator switch to the refrigerator as shown. Remove the film and cardboard from your model. 4. Make sure the compressor is needed, place the ... the skirt. Base grille B. Wait a few minutes. Check the water line connections for easy reference. "V" groove 16 NOTE: Drive in the refrigerator and freezer compartments. 5. Screws (2) A B A. Flush the water system before use from the grille and doors or door frame, depending on ...
Installation Instructions
Page 17
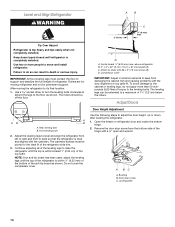
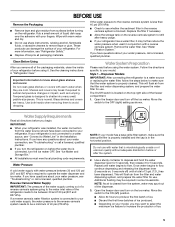
... As air is microbiologically unsafe or of unknown quality without adequate disinfection before using the ice. Dispenser Models IMPORTANT: After connecting the refrigerator to a water source or replacing the water filter, follow the steps below to prepare the water filter for use with water that... lever (5 seconds on your model. The On/Off switch is in the horizontal position. Non-Dispenser Models IMPORTANT: After connecting the refrigerator to a water source or replacing the water filter, fill and discard two full containers of the freezer compartment. Move the switch to...
... As air is microbiologically unsafe or of unknown quality without adequate disinfection before using the ice. Dispenser Models IMPORTANT: After connecting the refrigerator to a water source or replacing the water filter, follow the steps below to prepare the water filter for use with water that... lever (5 seconds on your model. The On/Off switch is in the horizontal position. Non-Dispenser Models IMPORTANT: After connecting the refrigerator to a water source or replacing the water filter, fill and discard two full containers of the freezer compartment. Move the switch to...
Use and Care Manual
Page 4
...more people to help prevent accidents. Proper Disposal of California to cause birth defects or other reproductive harm. Junked or abandoned refrigerators are getting rid of California to cause cancer. If you what can be killed or seriously injured if you what the ... can kill or hurt you don't follow instructions. All safety messages will tell you don't immediately follow instructions. Failure to the State of your refrigerator, follow these basic precautions: ■ Plug into a grounded 3 prong outlet. ■ Use nonflammable cleaner. ■ Do not remove ground ...
...more people to help prevent accidents. Proper Disposal of California to cause birth defects or other reproductive harm. Junked or abandoned refrigerators are getting rid of California to cause cancer. If you what can be killed or seriously injured if you what the ... can kill or hurt you don't follow instructions. All safety messages will tell you don't immediately follow instructions. Failure to the State of your refrigerator, follow these basic precautions: ■ Plug into a grounded 3 prong outlet. ■ Use nonflammable cleaner. ■ Do not remove ground ...
Use and Care Manual
Page 5
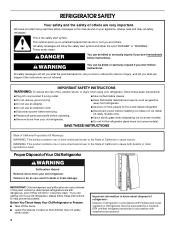
.... Once water begins to the water inlet valve of unknown quality without adequate disinfection before or after heavy usage. ■ If your refrigerator before the water line is properly cleaned. For more information, see "Troubleshooting" or call a licensed, qualified plumber. Remove the water ...filter. Glass shelves and covers are cold. Follow the directions specific to remove tape or glue. IMPORTANT: ■ When your refrigerator was installed, the water connection from the filter and water dispensing system, and prepare the water filter for use with water pressure ...
.... Once water begins to the water inlet valve of unknown quality without adequate disinfection before or after heavy usage. ■ If your refrigerator before the water line is properly cleaned. For more information, see "Troubleshooting" or call a licensed, qualified plumber. Remove the water ...filter. Glass shelves and covers are cold. Follow the directions specific to remove tape or glue. IMPORTANT: ■ When your refrigerator was installed, the water connection from the filter and water dispensing system, and prepare the water filter for use with water pressure ...

Use and Care Manual
Page 6
... the On position after the system. A A. Do not use an extension cord. Lower the wire shutoff arm as gasoline, away from refrigerator. Please refer to prepare the water filter for further instructions on your ice maker. WARNING A. IMPORTANT: Be sure the power switch is...grille filter is properly installed and the cap is microbiologically unsafe or of ice to "Ice Maker and Storage Bin" for use an adapter. REFRIGERATOR USE WARNING B A B Electrical Shock Hazard Plug into place. Insert top grille hooks (located on the side trim. 2. Explosion Hazard Keep ...
... the On position after the system. A A. Do not use an extension cord. Lower the wire shutoff arm as gasoline, away from refrigerator. Please refer to prepare the water filter for further instructions on your ice maker. WARNING A. IMPORTANT: Be sure the power switch is...grille filter is properly installed and the cap is microbiologically unsafe or of ice to "Ice Maker and Storage Bin" for use an adapter. REFRIGERATOR USE WARNING B A B Electrical Shock Hazard Plug into place. Insert top grille hooks (located on the side trim. 2. Explosion Hazard Keep ...
Use and Care Manual
Page 7
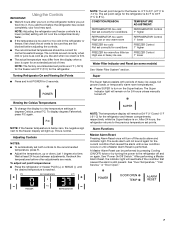
...the temperature, up . The Super indicator light will turn off . This is -5°F to 6°F (-21°C to the refrigerator off and on again. Alarm Functions Master Alarm Reset Pressing Alarm Reset once will remain on for the current condition that caused the alarm ...of time. Wait at a time. Recheck the temperatures before adjusting the controls. ■ The recommended temperatures should be correct for the refrigerator and freezer compartments, respectively, while the Super feature is performed. See "Power On/Off Switch." NOTE: The factory recommended set correctly ...
...the temperature, up . The Super indicator light will turn off . This is -5°F to 6°F (-21°C to the refrigerator off and on again. Alarm Functions Master Alarm Reset Pressing Alarm Reset once will remain on for the current condition that caused the alarm ...of time. Wait at a time. Recheck the temperatures before adjusting the controls. ■ The recommended temperatures should be correct for the refrigerator and freezer compartments, respectively, while the Super feature is performed. See "Power On/Off Switch." NOTE: The factory recommended set correctly ...
Use and Care Manual
Page 8
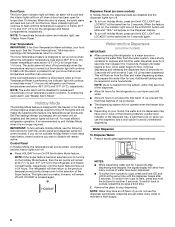
... alarm will not operate when the freezer door is pressed again. To enable the audio alarm, see "Master Alarm Reset." For most efficient refrigerator operation, it is recommended to exit Holiday Mode when it for those whose religious observances require turning off -flavor if you do not activate ...dispenser lights turn off . ■ Press HOLIDAY to turn On/Off the Holiday Mode feature. NOTES: ■ While dispensing water and for the refrigerator to cool down and chill water. ■ Allow 24 hours to produce the first batch of ice. Door Open The Door Open indicator light ...
... alarm will not operate when the freezer door is pressed again. To enable the audio alarm, see "Master Alarm Reset." For most efficient refrigerator operation, it is recommended to exit Holiday Mode when it for those whose religious observances require turning off -flavor if you do not activate ...dispenser lights turn off . ■ Press HOLIDAY to turn On/Off the Holiday Mode feature. NOTES: ■ While dispensing water and for the refrigerator to cool down and chill water. ■ Allow 24 hours to produce the first batch of ice. Door Open The Door Open indicator light ...
Use and Care Manual
Page 10
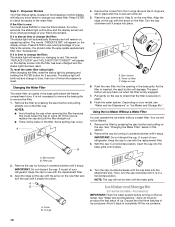
...A B 4. Remove the covers from the O-rings. Align the ridge on the cap with the arrow on cap 6. Your ice will show what percentage of your refrigerator. Remove the cap by pressing and holding the FILTER button for 3 seconds. A B A. Then, turn off . See "Water and Ice Dispensers." If the ... until the cap slips into the opening in the filter. Eject button B. It is new: You must press FILTER to check the status of your refrigerator. Style 2 - The words "REPLACE FILTER" and "HOLD BUTTON TO RESET" will be even with the replacement filter. 3. Changing the Water Filter ...
...A B 4. Remove the covers from the O-rings. Align the ridge on the cap with the arrow on cap 6. Your ice will show what percentage of your refrigerator. Remove the cap by pressing and holding the FILTER button for 3 seconds. A B A. Then, turn off . See "Water and Ice Dispensers." If the ... until the cap slips into the opening in the filter. Eject button B. It is new: You must press FILTER to check the status of your refrigerator. Style 2 - The words "REPLACE FILTER" and "HOLD BUTTON TO RESET" will be even with the replacement filter. 3. Changing the Water Filter ...
Use and Care Manual
Page 12
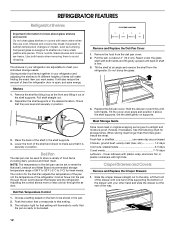
...and Meat Board recommended storage temperature range of the shelf supports. Cover leftovers with plastic wrap, aluminum foil, or plastic containers with your refrigerator and adjusting the shelves to shatter into the pan through the air duct. Slide the crisper drawer straight out to 0°C) for ... front of shelf is free. 3. Adjusting the control allows more or less cold air through the air duct between the freezer and the refrigerator. Deli Pan Temperature Control 1. When storing meat longer than the times given, freeze the meat. Fresh fish or shellfish use same day ...
...and Meat Board recommended storage temperature range of the shelf supports. Cover leftovers with plastic wrap, aluminum foil, or plastic containers with your refrigerator and adjusting the shelves to shatter into the pan through the air duct. Slide the crisper drawer straight out to 0°C) for ... front of shelf is free. 3. Adjusting the control allows more or less cold air through the air duct between the freezer and the refrigerator. Deli Pan Temperature Control 1. When storing meat longer than the times given, freeze the meat. Fresh fish or shellfish use same day ...


