
Installation Instructions
Page 6
...top grille in order for the top grille to open -end wrenches hex key and socket drivers ■ Tape measure ■ Utility knife Parts Needed ■ #8 x 3" (7.6 cm) wood screws (longer screws may be located within 1" (2.5 cm) maximum above the refrigerator. See... Requirements" for more information. PROHNDL160-Pro Handle Kit PROHNDL165-Designer Pro Handle Kit MASTHNDL55-Masterpiece Handle Kit INSTALLATION REQUIREMENTS Tools and Parts IMPORTANT: ■ Installer: Leave Installation Instructions with Stainless Steel models. See the chart following the graphic for the number of...
...top grille in order for the top grille to open -end wrenches hex key and socket drivers ■ Tape measure ■ Utility knife Parts Needed ■ #8 x 3" (7.6 cm) wood screws (longer screws may be located within 1" (2.5 cm) maximum above the refrigerator. See... Requirements" for more information. PROHNDL160-Pro Handle Kit PROHNDL165-Designer Pro Handle Kit MASTHNDL55-Masterpiece Handle Kit INSTALLATION REQUIREMENTS Tools and Parts IMPORTANT: ■ Installer: Leave Installation Instructions with Stainless Steel models. See the chart following the graphic for the number of...

Installation Instructions
Page 10
...) 4.5 mm) A Flush Installation Dimensions 1. Measure the distance from point A (as shown) to fit into the trim. Rout the front edge of the refrigerator and the parts bag behind the grille. Remove the four brackets (two on each side) that is in its final location. 2. Tip Over Hazard Refrigerator is installed in...
...) 4.5 mm) A Flush Installation Dimensions 1. Measure the distance from point A (as shown) to fit into the trim. Rout the front edge of the refrigerator and the parts bag behind the grille. Remove the four brackets (two on each side) that is in its final location. 2. Tip Over Hazard Refrigerator is installed in...

Installation Instructions
Page 12
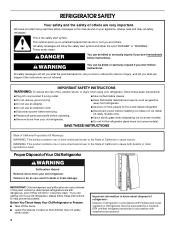
... enough flow so that water becomes clear. Tighten the packing nut. Turn OFF main water supply. Shutoff valve G. Fasten the shutoff valve to Water Line Parts Needed: ■ Minimum 7 ft (2.13 m) flexible, codes approved water supply line Style 1-Shutoff Valve Connection NOTE: If your water line connection does not look like...
... enough flow so that water becomes clear. Tighten the packing nut. Turn OFF main water supply. Shutoff valve G. Fasten the shutoff valve to Water Line Parts Needed: ■ Minimum 7 ft (2.13 m) flexible, codes approved water supply line Style 1-Shutoff Valve Connection NOTE: If your water line connection does not look like...

Installation Instructions
Page 13
... C B A D E FG Electrical Shock Hazard Plug into a grounded 3 prong outlet. Remove dolly. 2. Move the refrigerator straight back and evenly into the opening . Nut G. Connect to Refrigerator Parts Supplied to ¹⁄₄" (6.35 mm to 6.35 mm) male-to do so can result in death, fire, or electrical shock. 1. Turn on rollers...
... C B A D E FG Electrical Shock Hazard Plug into a grounded 3 prong outlet. Remove dolly. 2. Move the refrigerator straight back and evenly into the opening . Nut G. Connect to Refrigerator Parts Supplied to ¹⁄₄" (6.35 mm to 6.35 mm) male-to do so can result in death, fire, or electrical shock. 1. Turn on rollers...

Installation Instructions
Page 16
.... Screws (2) A B A. Remove all the way to the floor. 1. Keep Installation Instructions and Use & Care Guide near the built-in order to extend it all boxes, parts packages and packing materials from your model. 4. Check the water line connections for leaks. 3. Skirt 4.
.... Screws (2) A B A. Remove all the way to the floor. 1. Keep Installation Instructions and Use & Care Guide near the built-in order to extend it all boxes, parts packages and packing materials from your model. 4. Check the water line connections for leaks. 3. Skirt 4.
Use and Care Manual
Page 4
...; Disconnect power before servicing. ■ Replace all safety messages. WARNING: This product contains one or more people to cause cancer. Always read and obey all parts and panels before operating. ■ Remove doors from refrigerator. ■ Use two or more chemicals known to the State of California to reduce the chance...
...; Disconnect power before servicing. ■ Replace all safety messages. WARNING: This product contains one or more people to cause cancer. Always read and obey all parts and panels before operating. ■ Remove doors from refrigerator. ■ Use two or more chemicals known to the State of California to reduce the chance...
Use and Care Manual
Page 10
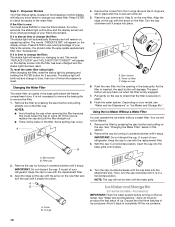
... this could cause the cap to red. Ridge on the ice maker. Your ice will appear on , changing to come off when the system is part of your filter's life remains. With the cap in the base grille. Filter cap 2. It is reset. A B A. NOTE: The cap will show what percentage of... the cap (removed in this occurs, replace the cap and pull the filter straight out. ■ There will pop back out when the filter is part of the water filter. Dispenser Models The Filter Status lights, located on the new filter and turn off . See "Changing the Water Filter" earlier in...
... this could cause the cap to red. Ridge on the ice maker. Your ice will appear on , changing to come off when the system is part of your filter's life remains. With the cap in the base grille. Filter cap 2. It is reset. A B A. NOTE: The cap will show what percentage of... the cap (removed in this occurs, replace the cap and pull the filter straight out. ■ There will pop back out when the filter is part of the water filter. Dispenser Models The Filter Status lights, located on the new filter and turn off . See "Changing the Water Filter" earlier in...

Use and Care Manual
Page 11
... flushed out of the system. ■ The quality of your ice maker. ■ Avoid connecting the ice maker to restart ice production. A A. This can damage parts of the ice maker and lead to make sure it clicks into the OFF (up the ice in the bin or bucket. Lift the wire...
... flushed out of the system. ■ The quality of your ice maker. ■ Avoid connecting the ice maker to restart ice production. A A. This can damage parts of the ice maker and lead to make sure it clicks into the OFF (up the ice in the bin or bucket. Lift the wire...
Use and Care Manual
Page 14
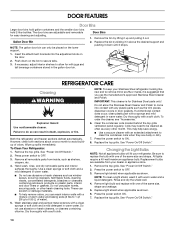
...with a clean sponge or soft cloth and a mild detergent in warm water. Wash stainless steel and painted metal exteriors with any plastic parts such as every other harsh cleaning tools. Clean the condenser coils located behind the top grille ventilation panel regularly. See "Power On/Off... the door. 2. Remove light shield when applicable as shown. 6. NOTE: To keep your refrigerator. Hand wash, rinse, and dry removable parts and interior surfaces thoroughly. IMPORTANT: This cleaner is suggested that you can only be cleaned as often as the trim pieces, dispenser covers or...
...with a clean sponge or soft cloth and a mild detergent in warm water. Wash stainless steel and painted metal exteriors with any plastic parts such as every other harsh cleaning tools. Clean the condenser coils located behind the top grille ventilation panel regularly. See "Power On/Off... the door. 2. Remove light shield when applicable as shown. 6. NOTE: To keep your refrigerator. Hand wash, rinse, and dry removable parts and interior surfaces thoroughly. IMPORTANT: This cleaner is suggested that you can only be cleaned as often as the trim pieces, dispenser covers or...

Use and Care Manual
Page 19
... recommend that you still need further assistance, you the cost of your appliance. Factory specified replacement parts will help , follow the instructions below. Call the Thermador Customer Interaction Center toll free: 1-800-735-4328. Our consultants provide assistance with: ■ Features and specifications on our... In the U.S.A. This information will fit right and work right because they are trained to build every new THERMADOR® appliance. Accessories To order replacement parts, in Canada Call 1-800-735-4328. ASSISTANCE OR SERVICE Before calling for the authorized...
... recommend that you still need further assistance, you the cost of your appliance. Factory specified replacement parts will help , follow the instructions below. Call the Thermador Customer Interaction Center toll free: 1-800-735-4328. Our consultants provide assistance with: ■ Features and specifications on our... In the U.S.A. This information will fit right and work right because they are trained to build every new THERMADOR® appliance. Accessories To order replacement parts, in Canada Call 1-800-735-4328. ASSISTANCE OR SERVICE Before calling for the authorized...
Use and Care Manual
Page 20
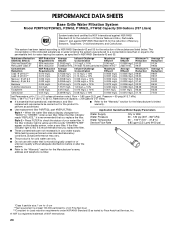
... water that is recommended that you replace the filter. Press FILTER to the permissible limit for the Manufacturer's limited warranty. ■ Use replacement filter P2RFTG2, part #REPLFLTR20. Rated service capacity = 200 gallons (757 liters). ■ It is yellow and the words "ORDER FILTER" appear on the display screen, order a new filter...
... water that is recommended that you replace the filter. Press FILTER to the permissible limit for the Manufacturer's limited warranty. ■ Use replacement filter P2RFTG2, part #REPLFLTR20. Rated service capacity = 200 gallons (757 liters). ■ It is yellow and the words "ORDER FILTER" appear on the display screen, order a new filter...
Use and Care Manual
Page 21
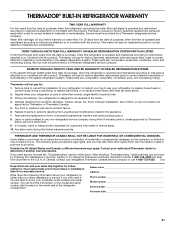
... when this refrigerator is operated and maintained according to instructions attached to or furnished with the product, Thermador will pay for factory specified replacement parts and repair labor costs to correct defects in materials or workmanship in the sealed refrigeration system. Your ...the water filter cartridges) is operated and maintained according to instructions attached to or furnished with the product, Thermador will pay for factory specified replacement parts to correct defects in materials or workmanship in the sealed refrigeration system. THIRD THROUGH SIXTH YEAR FULL WARRANTY...
... when this refrigerator is operated and maintained according to instructions attached to or furnished with the product, Thermador will pay for factory specified replacement parts and repair labor costs to correct defects in materials or workmanship in the sealed refrigeration system. Your ...the water filter cartridges) is operated and maintained according to instructions attached to or furnished with the product, Thermador will pay for factory specified replacement parts to correct defects in materials or workmanship in the sealed refrigeration system. THIRD THROUGH SIXTH YEAR FULL WARRANTY...


