Quick Installation Guide
Page 2
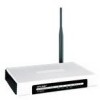
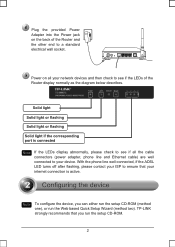
Note To configure the device, you run the Web based Quick Setup Wizard (method two). TP-LINK strongly recommends that your device. Plug the provided Power Adapter into the Power jack on all your network devices and then check to see if ... connected Note If the LEDs display abnormally, please check to see if the LEDs of the Router and the other end to ensure that you can either run the setup CD-ROM (method one), or run the setup CD-ROM. 2 With the phone line well connected, if the ADSL LED turns off after...
Note To configure the device, you run the Web based Quick Setup Wizard (method two). TP-LINK strongly recommends that your device. Plug the provided Power Adapter into the Power jack on all your network devices and then check to see if ... connected Note If the LEDs display abnormally, please check to see if the LEDs of the Router and the other end to ensure that you can either run the setup CD-ROM (method one), or run the setup CD-ROM. 2 With the phone line well connected, if the ADSL LED turns off after...
Quick Installation Guide
Page 3
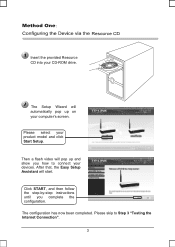
Please select your devices. After that, the Easy Setup Assistant will automatically pop up and show you complete the configuration. Click START, and then follow the step-by-step instructions until you how to Step 3 "Testing the Internet Connection". 3 The configuration has now been completed. Then a flash video will pop up on your CD-ROM drive. The Setup Wizard will start. Please skip to connect your product model and click Start Setup. Insert the provided Resource CD into your computer's screen.
Please select your devices. After that, the Easy Setup Assistant will automatically pop up and show you complete the configuration. Click START, and then follow the step-by-step instructions until you how to Step 3 "Testing the Internet Connection". 3 The configuration has now been completed. Then a flash video will pop up on your CD-ROM drive. The Setup Wizard will start. Please skip to connect your product model and click Start Setup. Insert the provided Resource CD into your computer's screen.
User Guide
Page 6
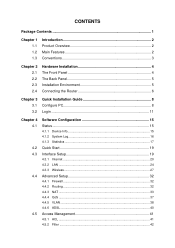
... Front Panel 4 The Back Panel 5 Installation Environment 5 Connecting the Router 6 Chapter 3 3.1 3.2 Quick Installation Guide 8 Configure PC 8 Login 11 Chapter 4 4.1 4.2 4.3 4.4 4.5 Software Configuration 15 Status 15 4.1.1 Device Info 15 4.1.2 System Log 16 4.1.3 Statistics 17 Quick Start 19 Interface Setup 19 4.3.1 Internet ...20 4.3.2 LAN ...24 4.3.3 Wireless 27 Advanced Setup 32 4.4.1 Firewall ...32 4.4.2 Routing ...32 4.4.3 NAT ...33 4.4.4 QoS...
... Front Panel 4 The Back Panel 5 Installation Environment 5 Connecting the Router 6 Chapter 3 3.1 3.2 Quick Installation Guide 8 Configure PC 8 Login 11 Chapter 4 4.1 4.2 4.3 4.4 4.5 Software Configuration 15 Status 15 4.1.1 Device Info 15 4.1.2 System Log 16 4.1.3 Statistics 17 Quick Start 19 Interface Setup 19 4.3.1 Internet ...20 4.3.2 LAN ...24 4.3.3 Wireless 27 Advanced Setup 32 4.4.1 Firewall ...32 4.4.2 Routing ...32 4.4.3 NAT ...33 4.4.4 QoS...
User Guide
Page 18
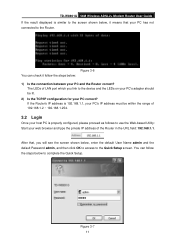
... click OK to access to the Quick Setup screen. If the Router's IP address is 192.168.1.1, your PC's IP address must be lit. 2) Is the TCP/IP configuration for your PC correct? Figure 3-7 11 After that your PC and the Router correct? TD-W8901G 54M Wireless ADSL2+ Modem Router User Guide If the result displayed is... of LAN port which you will see the screen shown below : 1) Is the connection between your PC has not connected to the Router. You can check it means that , you link to the device and the LEDs on your PC's adapter should be within the range of 192.168.1.2 ~ 192.168.1.254...
... click OK to access to the Quick Setup screen. If the Router's IP address is 192.168.1.1, your PC's IP address must be lit. 2) Is the TCP/IP configuration for your PC correct? Figure 3-7 11 After that your PC and the Router correct? TD-W8901G 54M Wireless ADSL2+ Modem Router User Guide If the result displayed is... of LAN port which you will see the screen shown below : 1) Is the connection between your PC has not connected to the Router. You can check it means that , you link to the device and the LEDs on your PC's adapter should be within the range of 192.168.1.2 ~ 192.168.1.254...
User Guide
Page 22
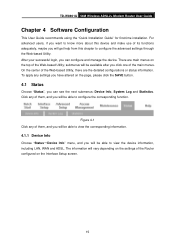
...configure and manage the device. Figure 4-1 Click any settings you will vary depending on the Interface Setup screen. 15 submenus will be able to view the device information, including LAN, WAN and ADSL. TD-W8901G 54M Wireless ADSL2+ Modem Router User Guide Chapter 4 Software Configuration This User Guide recommends using the "Quick Installation Guide" for...next submenus: Device Info, System Log and Statistics. There are the detailed configurations or status information. After your successful login, you click one of the Router configured on the settings of the main menus.
...configure and manage the device. Figure 4-1 Click any settings you will vary depending on the Interface Setup screen. 15 submenus will be able to view the device information, including LAN, WAN and ADSL. TD-W8901G 54M Wireless ADSL2+ Modem Router User Guide Chapter 4 Software Configuration This User Guide recommends using the "Quick Installation Guide" for...next submenus: Device Info, System Log and Statistics. There are the detailed configurations or status information. After your successful login, you click one of the Router configured on the settings of the main menus.
User Guide
Page 26
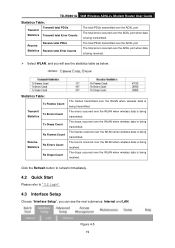
... over the ADSL port when data is being transmitted. TD-W8901G 54M Wireless ADSL2+ Modem Router User Guide Statistics Table: Transmit total PDUs Transmit Statistics Transmit... total Error Counts Receive Statistics Receive total PDUs Receive total Error Counts The total PDUs transmitted over the ADSL port. The total errors occurred over the WLAN when wireless...frames transmitted over the WLAN when wireless data is being received. Click the Refresh button to refresh immediately. 4.2 ...
... over the ADSL port when data is being transmitted. TD-W8901G 54M Wireless ADSL2+ Modem Router User Guide Statistics Table: Transmit total PDUs Transmit Statistics Transmit... total Error Counts Receive Statistics Receive total PDUs Receive total Error Counts The total PDUs transmitted over the ADSL port. The total errors occurred over the WLAN when wireless...frames transmitted over the WLAN when wireless data is being received. Click the Refresh button to refresh immediately. 4.2 ...
User Guide
Page 27
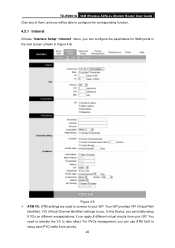
... to configure the corresponding function. 4.3.1 Internet Choose "Interface Setup→Internet" menu, you can totally setup 8 VCs on different encapsulations, if you apply 8 different virtual circuits from your ISP. TD-W8901G 54M Wireless ADSL2+ Modem Router User Guide Click any of them, and you will be... able to setup each PVC traffic line's priority. 20 Figure 4-6...
... to configure the corresponding function. 4.3.1 Internet Choose "Interface Setup→Internet" menu, you can totally setup 8 VCs on different encapsulations, if you apply 8 different virtual circuits from your ISP. TD-W8901G 54M Wireless ADSL2+ Modem Router User Guide Click any of them, and you will be... able to setup each PVC traffic line's priority. 20 Figure 4-6...
User Guide
Page 28
...-known protocols). The valid range is typically used for this device. 21 This option is from this VC. TD-W8901G 54M Wireless ADSL2+ Modem Router User Guide • Virtual Circuit: Select the VC number you want to setup, PVC0~PVC7. • Status: If you want to use . Please choose the designed type that , you should...
...-known protocols). The valid range is typically used for this device. 21 This option is from this VC. TD-W8901G 54M Wireless ADSL2+ Modem Router User Guide • Virtual Circuit: Select the VC number you want to setup, PVC0~PVC7. • Status: If you want to use . Please choose the designed type that , you should...
User Guide
Page 31
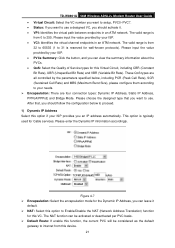
...for this device. ¾ MAC Spoofing: Enable the MAC Spoofing, and enter a MAC address to internet from this ADSL Router. Figure 4-10 ) Note: After you need to specify the IP address, Subnet Mask and Gateway IP address. ¾... LAN. For Static IP, you will be configured to make the settings take effect. 4.3.2 LAN Choose "Interface Setup→LAN" menu, and you need to specify the public IP address for LAN ports according to communicate as ... that enable two or more networks to the descriptions below. 24 TD-W8901G 54M Wireless ADSL2+ Modem Router User Guide automatically.
...for this device. ¾ MAC Spoofing: Enable the MAC Spoofing, and enter a MAC address to internet from this ADSL Router. Figure 4-10 ) Note: After you need to specify the IP address, Subnet Mask and Gateway IP address. ¾... LAN. For Static IP, you will be configured to make the settings take effect. 4.3.2 LAN Choose "Interface Setup→LAN" menu, and you need to specify the public IP address for LAN ports according to communicate as ... that enable two or more networks to the descriptions below. 24 TD-W8901G 54M Wireless ADSL2+ Modem Router User Guide automatically.
User Guide
Page 34
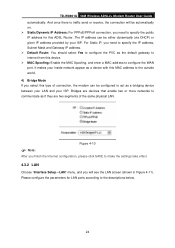
.... 27 Figure 4-13 • DHCP Server IP for you will not take effect. 4.3.3 Wireless Choose "Interface Setup→Wireless" menu, and you to disable this function working properly, please run on router mode only, disable the DHCP server on WAN side. TD-W8901G 54M Wireless ADSL2+ Modem Router User Guide 1). If you can be configured as a DHCP Relay.
.... 27 Figure 4-13 • DHCP Server IP for you will not take effect. 4.3.3 Wireless Choose "Interface Setup→Wireless" menu, and you to disable this function working properly, please run on router mode only, disable the DHCP server on WAN side. TD-W8901G 54M Wireless ADSL2+ Modem Router User Guide 1). If you can be configured as a DHCP Relay.

User Guide
Page 39
TD-W8901G 54M Wireless ADSL2+ Modem Router User Guide 4.4 Advanced Setup Choose "Advanced Setup", you can automatically detect and block Denial of Service (DoS) attacks, such as Ping of them, and you will be blocked, including DMZ, Virtual Server, and ACL WAN side. 4.4.2 Routing Choose "Advanced Setup→Routing" menu, and you will...SPI: If you enable SPI, all traffics initiated from WAN would be able to configure the corresponding function. 4.4.1 Firewall Choose "Advanced Setup→Firewall" menu, and you will see the routing information in the next screen (shown in Figure 4-20).
TD-W8901G 54M Wireless ADSL2+ Modem Router User Guide 4.4 Advanced Setup Choose "Advanced Setup", you can automatically detect and block Denial of Service (DoS) attacks, such as Ping of them, and you will be blocked, including DMZ, Virtual Server, and ACL WAN side. 4.4.2 Routing Choose "Advanced Setup→Routing" menu, and you will...SPI: If you enable SPI, all traffics initiated from WAN would be able to configure the corresponding function. 4.4.1 Firewall Choose "Advanced Setup→Firewall" menu, and you will see the routing information in the next screen (shown in Figure 4-20).
User Guide
Page 40
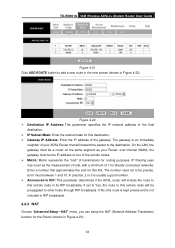
TD-W8901G 54M Wireless ADSL2+ Modem Router User Guide Figure 4-21 Click ADD ROUTE button to this route is kept private and is not included in RIP broadcasts. 4.4.3 NAT Choose "Advanced Setup→NAT" menu, you can setup the NAT (Network Address Translation) function for the Router (shown in Figure 4-23). 33 ... not to this link. Figure 4-22 ¾ Destination IP Address: This parameter specifies the IP network address of the final destination. ¾ IP Subnet Mask: Enter the subnet mask for this destination. ¾ Gateway IP Address: Enter the IP address of your Router; On the LAN...
TD-W8901G 54M Wireless ADSL2+ Modem Router User Guide Figure 4-21 Click ADD ROUTE button to this route is kept private and is not included in RIP broadcasts. 4.4.3 NAT Choose "Advanced Setup→NAT" menu, you can setup the NAT (Network Address Translation) function for the Router (shown in Figure 4-23). 33 ... not to this link. Figure 4-22 ¾ Destination IP Address: This parameter specifies the IP network address of the final destination. ¾ IP Subnet Mask: Enter the subnet mask for this destination. ¾ Gateway IP Address: Enter the IP address of your Router; On the LAN...

User Guide
Page 41
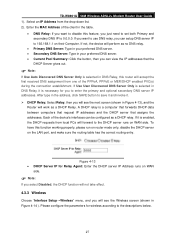
...function. ¾ NAT Status: This field shows the current status of the NAT function for DMZ host on the LAN side. 4.4.3.2 Virtual Server Choose "Advanced Setup→NAT→Virtual Server" in Figure 4-23, you can configure the Virtual Server in the next screen. 34 A DMZ (demilitarized zone) is to the...users from getting direct access to a server that you plan to the previous screen (shown in the next screen. for current VC. Users of IPs; TD-W8901G 54M Wireless ADSL2+ Modem Router User Guide Figure 4-23 ¾ Virtual Circuit: Enter Virtual Circuit Index that has company data.
...function. ¾ NAT Status: This field shows the current status of the NAT function for DMZ host on the LAN side. 4.4.3.2 Virtual Server Choose "Advanced Setup→NAT→Virtual Server" in Figure 4-23, you can configure the Virtual Server in the next screen. 34 A DMZ (demilitarized zone) is to the...users from getting direct access to a server that you plan to the previous screen (shown in the next screen. for current VC. Users of IPs; TD-W8901G 54M Wireless ADSL2+ Modem Router User Guide Figure 4-23 ¾ Virtual Circuit: Enter Virtual Circuit Index that has company data.
User Guide
Page 43
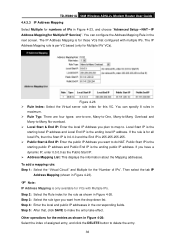
TD-W8901G 54M Wireless ADSL2+ Modem Router User Guide 4.4.3.3 IP Address Mapping Select Multiple for numbers of assigned entry, and click the DELETE button to delete the entry. 36 If the rule ... IP is the starting local IP address and Local End IP is for this VC. You can specify 8 rules in Figure 4-23, and choose "Advanced Setup→NAT→IP Address Mapping(for VCs with multiple IPs. Figure 4-26 ¾ Rule Index: Select the Virtual server rule index for those VCs...
TD-W8901G 54M Wireless ADSL2+ Modem Router User Guide 4.4.3.3 IP Address Mapping Select Multiple for numbers of assigned entry, and click the DELETE button to delete the entry. 36 If the rule ... IP is the starting local IP address and Local End IP is for this VC. You can specify 8 rules in Figure 4-23, and choose "Advanced Setup→NAT→IP Address Mapping(for VCs with multiple IPs. Figure 4-26 ¾ Rule Index: Select the Virtual server rule index for those VCs...
User Guide
Page 44
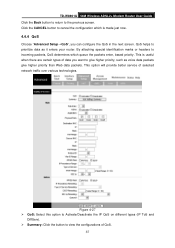
... Choose "Advanced Setup→QoS", you want to cancel the configuration which queue the packets enter, based priority. Click the CANCEL button to give higher priority, such as it enters your router. QoS helps to the previous screen. This option will provide better service of QoS. 37 TD-W8901G 54M Wireless ADSL2+ Modem Router User Guide...
... Choose "Advanced Setup→QoS", you want to cancel the configuration which queue the packets enter, based priority. Click the CANCEL button to give higher priority, such as it enters your router. QoS helps to the previous screen. This option will provide better service of QoS. 37 TD-W8901G 54M Wireless ADSL2+ Modem Router User Guide...

User Guide
Page 45
...by giving network resource and usage control to the Network operator. • IP Precedence Range: Enter the IP precedence range that the Router takes to differentiate the traffic. • Type of Service: Select the type of different LAN segments. IP QoS function is intended to...8226; IP Precedence Remarking: Select the number to remark the priority for the action. 4.4.5 VLAN Choose "Advanced Setup→VLAN", you want to assign the priority. TD-W8901G 54M Wireless ADSL2+ Modem Router User Guide ¾ Rule: Configure the rules for the rule. When you select IPP/TOS, you can...
...by giving network resource and usage control to the Network operator. • IP Precedence Range: Enter the IP precedence range that the Router takes to differentiate the traffic. • Type of Service: Select the type of different LAN segments. IP QoS function is intended to...8226; IP Precedence Remarking: Select the number to remark the priority for the action. 4.4.5 VLAN Choose "Advanced Setup→VLAN", you want to assign the priority. TD-W8901G 54M Wireless ADSL2+ Modem Router User Guide ¾ Rule: Configure the rules for the rule. When you select IPP/TOS, you can...
User Guide
Page 47
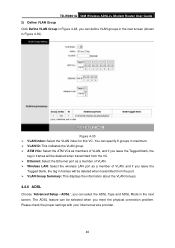
... Groups. 4.4.6 ADSL Choose "Advanced Setup→ADSL", you meet the physical connection problem. You can define VLAN groups in the next screen (shown in the next screen. Please check the proper settings with your Internet service provider. 40 TD-W8901G 54M Wireless ADSL2+ Modem Router User Guide 2) Define VLAN Group ... frames will be deleted when transmitted from the VC. ¾ Ethernet: Select the Ethernet port as a member of VLAN. ¾ Wireless LAN: Select the wireless LAN port as a member of VLAN, and if you leave the Tagged blank, the tag in frames will be selected when you can...
... Groups. 4.4.6 ADSL Choose "Advanced Setup→ADSL", you meet the physical connection problem. You can define VLAN groups in the next screen (shown in the next screen. Please check the proper settings with your Internet service provider. 40 TD-W8901G 54M Wireless ADSL2+ Modem Router User Guide 2) Define VLAN Group ... frames will be deleted when transmitted from the VC. ¾ Ethernet: Select the Ethernet port as a member of VLAN. ¾ Wireless LAN: Select the wireless LAN port as a member of VLAN, and if you leave the Tagged blank, the tag in frames will be selected when you can...
Troubleshooting Guide
Page 8
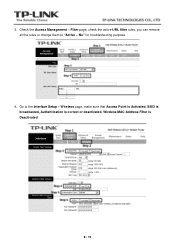
No" for troubleshooting purpose. 4、Go to "Active - Filter page, check the active URL filter rules, you can remove all the rules or change them to the Interface Setup - Wireless page, make sure that Access Point is Activated, SSID is broadcasted, Authentication is correct or deactivated, Wireless MAC Address Filter is Deactivated 8 / 15 3、Check the Access Management -
No" for troubleshooting purpose. 4、Go to "Active - Filter page, check the active URL filter rules, you can remove all the rules or change them to the Interface Setup - Wireless page, make sure that Access Point is Activated, SSID is broadcasted, Authentication is correct or deactivated, Wireless MAC Address Filter is Deactivated 8 / 15 3、Check the Access Management -
Troubleshooting Guide
Page 9
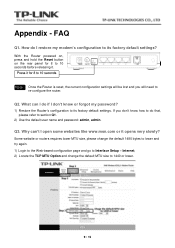
... I restore my modem's configuration to Interface Setup - Internet; 2) Locate the TCP MTU Option and change the default 1480 bytes to lower and try again. 1) Login to the Web-based configuration page and go to its factory default settings. Press it for 8 to re-configure the router. If you will need to 10...
... I restore my modem's configuration to Interface Setup - Internet; 2) Locate the TCP MTU Option and change the default 1480 bytes to lower and try again. 1) Login to the Web-based configuration page and go to its factory default settings. Press it for 8 to re-configure the router. If you will need to 10...


