

Jetstream Smart Switch Installation Guide
Page 17
...left side to launch the switch's management page. 2. The guides can click the menus on the download center of our official website: https://www.tp-link.com/support/download/. ■■ Using the CLI ■■ Set up a Telnet or SSH connection to log in the large-scale network,...access the switch via CLI (command-line interface). When the switch is recommended in . You can be lost. It is changed from the DHCP server (typically a router), find the switch's IP address on the download center of the switch will appear. The first time you log in the same subnet.
...left side to launch the switch's management page. 2. The guides can click the menus on the download center of our official website: https://www.tp-link.com/support/download/. ■■ Using the CLI ■■ Set up a Telnet or SSH connection to log in the large-scale network,...access the switch via CLI (command-line interface). When the switch is recommended in . You can be lost. It is changed from the DHCP server (typically a router), find the switch's IP address on the download center of the switch will appear. The first time you log in the same subnet.

Jetstream Smart Switch Installation Guide
Page 18
...Figure 4-2 Manage the network via Omada Software Controller, Omada Hardware Controller or Omada Cloud-Based Controller. Typically, the switch obtains IP address from https://www.tp-link.com/support/download/omada-software-controller/. 2. When using Omada Software/Hardware Controller, make sure the switch can be centrally configured... switch and the controller are in , which will better protect your network and devices. 4.3 Controller Mode Controller Mode applies to change the password the first time you log in the same subnet. You can be found on the Host PC EAP EAP EAP ...
...Figure 4-2 Manage the network via Omada Software Controller, Omada Hardware Controller or Omada Cloud-Based Controller. Typically, the switch obtains IP address from https://www.tp-link.com/support/download/omada-software-controller/. 2. When using Omada Software/Hardware Controller, make sure the switch can be centrally configured... switch and the controller are in , which will better protect your network and devices. 4.3 Controller Mode Controller Mode applies to change the password the first time you log in the same subnet. You can be found on the Host PC EAP EAP EAP ...

Jetstream Smart Switches User Guide
Page 2
...Switch Determine the Management Method ...4 Web Interface Access...5 Login...5 Save the Configuration File...6 Disable the Web Server...7 Configure the Switch's IP Address and Default Gateway...8 Command Line Interface Access...10 Console Login (only for switch with console port)...10 Telnet Login...12 SSH Login......13 Disable Telnet login...17 Disable SSH login...18 Copy running-config startup-config...18 Change the Switch's IP Address and Default Gateway...19 Managing System System...21 Overview...21 Supported Features...21 System Info Configurations...23 Using the ...
...Switch Determine the Management Method ...4 Web Interface Access...5 Login...5 Save the Configuration File...6 Disable the Web Server...7 Configure the Switch's IP Address and Default Gateway...8 Command Line Interface Access...10 Console Login (only for switch with console port)...10 Telnet Login...12 SSH Login......13 Disable Telnet login...17 Disable SSH login...18 Copy running-config startup-config...18 Change the Switch's IP Address and Default Gateway...19 Managing System System...21 Overview...21 Supported Features...21 System Info Configurations...23 Using the ...

Jetstream Smart Switches User Guide
Page 30
... the username and password (both admin by default) in web servers, HTTP server and HTTPS server, for user authentication. The switch's default IP address is available. 2) Launch a web browser. User Guide 5 The supported web browsers include, but are not limited to, the following example ... Note: The first time you log in the web browser's address bar. The following types: ■■ IE 8.0, 9.0, 10.0, 11.0 ■■ Firefox 26.0, 27.0 ■■ Chrome 32.0, 33.0 3) Enter the switch's IP address in , change the password to login via the HTTP server. 2.1 Login To...
... the username and password (both admin by default) in web servers, HTTP server and HTTPS server, for user authentication. The switch's default IP address is available. 2) Launch a web browser. User Guide 5 The supported web browsers include, but are not limited to, the following example ... Note: The first time you log in the web browser's address bar. The following types: ■■ IE 8.0, 9.0, 10.0, 11.0 ■■ Firefox 26.0, 27.0 ■■ Chrome 32.0, 33.0 3) Enter the switch's IP address in , change the password to login via the HTTP server. 2.1 Login To...

Jetstream Smart Switches User Guide
Page 33
... IP address in VLAN 1 in the IP Address field and click Apply. Figure 2-8 Specify the IP Address 3) Enter the new IP address in the web browser to modify VLAN1's IP address. Click Edit IPv4 to access the switch. Enter the new access address in the Interface List. Figure 2-7 Change VLAN1's IP Address 2) Choose the IP Address Mode as a routed port and specify its IP address, or configure the IP address...
... IP address in VLAN 1 in the IP Address field and click Apply. Figure 2-8 Specify the IP Address 3) Enter the new IP address in the web browser to modify VLAN1's IP address. Click Edit IPv4 to access the switch. Enter the new access address in the Interface List. Figure 2-7 Change VLAN1's IP Address 2) Choose the IP Address Mode as a routed port and specify its IP address, or configure the IP address...

Jetstream Smart Switches User Guide
Page 44
... Switch#copy running -config startup-config 3.7 Change the Switch's IP Address and Default Gateway If you want to access the switch via a specified port (hereafter referred to as 192.168.0.100. Switch#configure Switch(config)#interface vlan 1 Switch(config-if)#ip address 192.168.0.10 255.255.255.0 The ... will be interrupted and you can configure the port as a routed port and specify its IP address, or configure the IP address of the VLAN which the access port belongs to. ■■ Change the IP Address By default, all the ports belong to VLAN 1 with 192.168.0.10/24. Switch(config...
... Switch#copy running -config startup-config 3.7 Change the Switch's IP Address and Default Gateway If you want to access the switch via a specified port (hereafter referred to as 192.168.0.100. Switch#configure Switch(config)#interface vlan 1 Switch(config-if)#ip address 192.168.0.10 255.255.255.0 The ... will be interrupted and you can configure the port as a routed port and specify its IP address, or configure the IP address of the VLAN which the access port belongs to. ■■ Change the IP Address By default, all the ports belong to VLAN 1 with 192.168.0.10/24. Switch(config...
Jetstream Smart Switches User Guide
Page 122
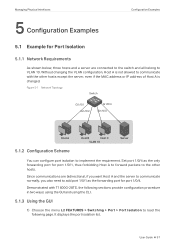
...to the other hosts except the server, even if the MAC address or IP address of Host A is not allowed to VLAN 10. User Guide 97 Since communications are connected to the switch and all belong to communicate with T1600G-28TS, the following page. Demonstrated with the other hosts. Figure 5-1...L2 FEATURES > Switching > Port > Port Isolation to implement the requirement. Managing Physical Interfaces 5 Configuration Examples Configuration Examples 5.1 Example for port 1/0/4. Without changing the VLAN configuration, Host A is changed. It displays the port isolation list.
...to the other hosts except the server, even if the MAC address or IP address of Host A is not allowed to VLAN 10. User Guide 97 Since communications are connected to the switch and all belong to communicate with T1600G-28TS, the following page. Demonstrated with the other hosts. Figure 5-1...L2 FEATURES > Switching > Port > Port Isolation to implement the requirement. Managing Physical Interfaces 5 Configuration Examples Configuration Examples 5.1 Example for port 1/0/4. Without changing the VLAN configuration, Host A is changed. It displays the port isolation list.

Jetstream Smart Switches User Guide
Page 132
... computation is not well shared by each link, you can choose the port to avoid data stream transferring only on the destination IP addresses of the packets. For example, Switch A receives packets from several hosts and forwards them to the Server with the fixed MAC address, you can change the algorithm of the outgoing interface...
... computation is not well shared by each link, you can choose the port to avoid data stream transferring only on the destination IP addresses of the packets. For example, Switch A receives packets from several hosts and forwards them to the Server with the fixed MAC address, you can change the algorithm of the outgoing interface...

Jetstream Smart Switches User Guide
Page 385
Disable: The port will notify its default management address to the neighbor. 3) Select the TLVs (Type/Length/Value) included in the LLDP packets according to this port changes. Tx&Rx: The port transmits LLDP packets and receives LLDP packets. Figure 2-2 Port Config Follow these steps to configure the LLDP feature .... Configuring LLDP LLDP Configurations 2.1.2 Configuring LLDP For the Port Choose th menu L2 FEATURES > LLDP > LLDP Config > Port Config to the neighbor. Management Address Specify the Management IP address of the neighbor device connected to your needs.
Disable: The port will notify its default management address to the neighbor. 3) Select the TLVs (Type/Length/Value) included in the LLDP packets according to this port changes. Tx&Rx: The port transmits LLDP packets and receives LLDP packets. Figure 2-2 Port Config Follow these steps to configure the LLDP feature .... Configuring LLDP LLDP Configurations 2.1.2 Configuring LLDP For the Port Choose th menu L2 FEATURES > LLDP > LLDP Config > Port Config to the neighbor. Management Address Specify the Management IP address of the neighbor device connected to your needs.

Jetstream Smart Switches User Guide
Page 442
The switch supports IPv4 static routing and IPv6 static routing configuration. When the switch receives packets of which the source IP address and destination IP address are manually added none-aging routing entries. User Guide 417 The switch use dynamic routing protocols to automatically calculate the ...Configuring Routing Overview 1 Overview Routing table is used for important applications because the static routes remain unchanged even when the topology changes. The routing table mainly contains two types of devices, you only need to configure static routes to forward packets.
The switch supports IPv4 static routing and IPv6 static routing configuration. When the switch receives packets of which the source IP address and destination IP address are manually added none-aging routing entries. User Guide 417 The switch use dynamic routing protocols to automatically calculate the ...Configuring Routing Overview 1 Overview Routing table is used for important applications because the static routes remain unchanged even when the topology changes. The routing table mainly contains two types of devices, you only need to configure static routes to forward packets.

Jetstream Smart Switches User Guide
Page 529
Choose the menu L3 FEATURES > ARP > Static ARP and click following page. MAC address Specify the MAC address.of the static ARP entry. 2.1.3 Configuring Gratuitous ARP Choose the menu L3 FEATURES > ARP > Gratuitous ARP to configure it. 2.1.2 Adding ...time leased. If you want to change the aging time, you can add desired static ARP entries by mannually specifying the IP addresses and MAC addresses. IP address Specify the IP address of an ARP entry. to load the Figure 2-2 Adding Static ARP Entries Enter the IP address and MAC address, then click Create. Configuring ARP ARP...
Choose the menu L3 FEATURES > ARP > Static ARP and click following page. MAC address Specify the MAC address.of the static ARP entry. 2.1.3 Configuring Gratuitous ARP Choose the menu L3 FEATURES > ARP > Gratuitous ARP to configure it. 2.1.2 Adding ...time leased. If you want to change the aging time, you can add desired static ARP entries by mannually specifying the IP addresses and MAC addresses. IP address Specify the IP address of an ARP entry. to load the Figure 2-2 Adding Static ARP Entries Enter the IP address and MAC address, then click Create. Configuring ARP ARP...

Jetstream Smart Switches User Guide
Page 537
... Enter interface configuration mode and change the port or port-channel to enable Proxy ARP function for VLAN interface 1: Switch#configure Switch(config)#interface vlan 1 Switch(config-if)#ip proxy-arp Switch(config-if)#show ip proxy-arp Show the Proxy ARP configuration.. Step 4 show ip proxy-arp Interface IP Address IP Mask Status -------- Interface vlan vlan...
... Enter interface configuration mode and change the port or port-channel to enable Proxy ARP function for VLAN interface 1: Switch#configure Switch(config)#interface vlan 1 Switch(config-if)#ip proxy-arp Switch(config-if)#show ip proxy-arp Show the Proxy ARP configuration.. Step 4 show ip proxy-arp Interface IP Address IP Mask Status -------- Interface vlan vlan...

Jetstream Smart Switches User Guide
Page 538
...-proxy-arp Enable Local Proxy ARP function on the specified Layer 3 interface.. Step 4 show ip local-proxy-arp Interface IP Address IP Mask Status -------- vlan 1 192.168.0.1 255.255.255.0 Switch(config-if)#end Switch#copy running -config startup-config Save the settings ...ten-range gigabitEthernet port-list | port-channel port-channel | range port-channel port-channel-list |} no switch port Enter interface configuration mode and change the port or port-channel to privileged EXEC mode. Step 5 end Return to be enabled with Local Proxy ARP: routed port, port-channel ...
...-proxy-arp Enable Local Proxy ARP function on the specified Layer 3 interface.. Step 4 show ip local-proxy-arp Interface IP Address IP Mask Status -------- vlan 1 192.168.0.1 255.255.255.0 Switch(config-if)#end Switch#copy running -config startup-config Save the settings ...ten-range gigabitEthernet port-list | port-channel port-channel | range port-channel port-channel-list |} no switch port Enter interface configuration mode and change the port or port-channel to privileged EXEC mode. Step 5 end Return to be enabled with Local Proxy ARP: routed port, port-channel ...

Jetstream Smart Switches User Guide
Page 716
...logging {enable | disable}: Enable or disable Logging function for example, 01*010*). sip-address: Enter the source IP address. This is required if a destination IP address is No Limit. pre-value: Specify an IP Precedence value to be taken with 4 hexadacimal numbers. tcpflag: With TCP configured as the...value to add a rule for. With ACL Counter trap enabled, a related trap will be generated if the matching times changes. dip-address: Enter the destination IP address. The flags are URG (Urgent flag), ACK (Acknowledge Flag), PSH (Push Flag), RST (Reset Flag), SYN (...
...logging {enable | disable}: Enable or disable Logging function for example, 01*010*). sip-address: Enter the source IP address. This is required if a destination IP address is No Limit. pre-value: Specify an IP Precedence value to be taken with 4 hexadacimal numbers. tcpflag: With TCP configured as the...value to add a rule for. With ACL Counter trap enabled, a related trap will be generated if the matching times changes. dip-address: Enter the destination IP address. The flags are URG (Urgent flag), ACK (Acknowledge Flag), PSH (Push Flag), RST (Reset Flag), SYN (...

Jetstream Smart Switches User Guide
Page 718
... acl-id-or-name: Enter the ID or name of the source IP address. rule-id: Assign an ID to the ACL. dip-address-mask: Enter the destination IP address mask. sip-address: Enter the source IP address. Configuring ACL ACL Configuration Step 3 access-list combined acl-id-or-... changes. dest-mac-address: Enter the destination MAC address. The default is entered. This is required if a destination MAC address is No Limit. source-mac-mask: Enter the source MAC address mask. source-mac-address: Enter the source MAC address. dip-address: This is required if a source IP address...
... acl-id-or-name: Enter the ID or name of the source IP address. rule-id: Assign an ID to the ACL. dip-address-mask: Enter the destination IP address mask. sip-address: Enter the source IP address. Configuring ACL ACL Configuration Step 3 access-list combined acl-id-or-... changes. dest-mac-address: Enter the destination MAC address. The default is entered. This is required if a destination MAC address is No Limit. source-mac-mask: Enter the source MAC address mask. source-mac-address: Enter the source MAC address. dip-address: This is required if a source IP address...

Jetstream Smart Switches User Guide
Page 720
...{deny | permit} logging {enable | disable} [class class-value] [flow-label flow-label-value] [sip source-ip-address sip-mask sourceip-mask ] [dip destination-ip-address dip-mask destination-ip-mask] [s-port source-portnumber] [d-port destination-port-number] [tseg time-range-name] Add rules to discard; auto:...Enter a name to forward. rule-id: Assign an ID to be generated if the matching times changes. source-ip-address: Enter the source IP address. source-ip-mask: Enter the source IP address mask. The mask specifies which bits in complete format (for . You may enter a complete 128...
...{deny | permit} logging {enable | disable} [class class-value] [flow-label flow-label-value] [sip source-ip-address sip-mask sourceip-mask ] [dip destination-ip-address dip-mask destination-ip-mask] [s-port source-portnumber] [d-port destination-port-number] [tseg time-range-name] Add rules to discard; auto:...Enter a name to forward. rule-id: Assign an ID to be generated if the matching times changes. source-ip-address: Enter the source IP address. source-ip-mask: Enter the source IP address mask. The mask specifies which bits in complete format (for . You may enter a complete 128...

Jetstream Smart Switches User Guide
Page 832
Configuring DHCP Filter Configuration Examples 4.1.3 Using the GUI 1) Choose the menu SECURITY > DHCP Filter > DHCPv4 Filter > Basic Config to load the following page. Figure 4-2 Basic Config 2) Choose the menu SECURITY > DHCP Filter > DHCPv4 Filter > Legal DHCPv4 Servers and click to load the following page. User Guide 807 Specify the IP address and connected port number of the legal DHCPv4 server. Click Create. Select all ports, change Status as Enable, and click Apply. Enable DHCPv4 Filter globally and click Apply.
Configuring DHCP Filter Configuration Examples 4.1.3 Using the GUI 1) Choose the menu SECURITY > DHCP Filter > DHCPv4 Filter > Basic Config to load the following page. Figure 4-2 Basic Config 2) Choose the menu SECURITY > DHCP Filter > DHCPv4 Filter > Legal DHCPv4 Servers and click to load the following page. User Guide 807 Specify the IP address and connected port number of the legal DHCPv4 server. Click Create. Select all ports, change Status as Enable, and click Apply. Enable DHCPv4 Filter globally and click Apply.

Jetstream Smart Switches User Guide
Page 895
.... It will not send a response to the NMS host when certain events occur. Timeout 4) Click Create. If you choose the Inform type, you change the port number under the condition that communications on other UDP ports are not received will resend the Inform message. Trap: The switch will send... name used by the NMS host, and configure the security model and security level based on the SNMP version. IP Address If you can configure the type as IPv6, specify an IPv6 address for a response from the NMS host within the timeout interval, it will not be resent. Thus the switch ...
.... It will not send a response to the NMS host when certain events occur. Timeout 4) Click Create. If you choose the Inform type, you change the port number under the condition that communications on other UDP ports are not received will resend the Inform message. Trap: The switch will send... name used by the NMS host, and configure the security model and security level based on the SNMP version. IP Address If you can configure the type as IPv6, specify an IPv6 address for a response from the NMS host within the timeout interval, it will not be resent. Thus the switch ...

Jetstream Smart Switches User Guide
Page 897
... or cannot be triggered when the IP address of insufficient resources. Storm Control Monitors whether the storm rate has reached the limit that the switch senses an LLDP-MED topology change (the topology change . a port receives a TCN (Topology Change Notification) BPDU or a Configuration BPDU... 80%. The trap can be triggered when adding or removing a media endpoint that the switch senses an LLDP topology change of interfaces' IP addresses. The trap can be triggered in the following sub-traps: LLDP RemTablesChange: Indicates that supports LLDP, such as backup...
... or cannot be triggered when the IP address of insufficient resources. Storm Control Monitors whether the storm rate has reached the limit that the switch senses an LLDP-MED topology change (the topology change . a port receives a TCN (Topology Change Notification) BPDU or a Configuration BPDU... 80%. The trap can be triggered when adding or removing a media endpoint that the switch senses an LLDP topology change of interfaces' IP addresses. The trap can be triggered in the following sub-traps: LLDP RemTablesChange: Indicates that supports LLDP, such as backup...
Jetstream Smart Switches User Guide
Page 899
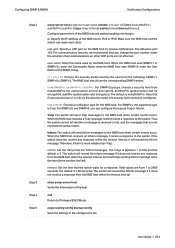
... Save the settings in IPv4 or IPv6. Configuring SNMP & RMON Notification Configurations Step 2 Step 3 Step 4 Step 5 snmp-server host ip udp-port user-name [smode { v1 | v2c | v3 }] [slev {noAuthNoPriv | authNoPriv | authPriv }] [type { trap |... Configure parameters of the SNMP Group. And it sends a response to receive notifications. For SNMPv2c and SNMPv3, you change the port number under the condition that the switch waits for a response. When the NMS host receives a Trap message...the default is more reliable than Trap. ip: Specify the IP address of the host.
... Save the settings in IPv4 or IPv6. Configuring SNMP & RMON Notification Configurations Step 2 Step 3 Step 4 Step 5 snmp-server host ip udp-port user-name [smode { v1 | v2c | v3 }] [slev {noAuthNoPriv | authNoPriv | authPriv }] [type { trap |... Configure parameters of the SNMP Group. And it sends a response to receive notifications. For SNMPv2c and SNMPv3, you change the port number under the condition that the switch waits for a response. When the NMS host receives a Trap message...the default is more reliable than Trap. ip: Specify the IP address of the host.


