

802.1X Client Software User Guide
Page 4
... that provides authentication service to acquire information about the installation and configuration of the 802.1X Client Software. 1 Installation 1. Supported Platforms 32-bit Windows Server 2008 32-bit Windows XP SP3 32-bit Windows 7 SP1 64-bit Windows 7 32-bit Windows 8 64-bit Windows 8 32-bit Windows 8.1 64-bit Windows 8.1 1 When using the TP-Link switch as this user guide to the authenticator...
... that provides authentication service to acquire information about the installation and configuration of the 802.1X Client Software. 1 Installation 1. Supported Platforms 32-bit Windows Server 2008 32-bit Windows XP SP3 32-bit Windows 7 SP1 64-bit Windows 7 32-bit Windows 8 64-bit Windows 8 32-bit Windows 8.1 64-bit Windows 8.1 1 When using the TP-Link switch as this user guide to the authenticator...

Jetstream Smart Switch Installation Guide
Page 9
... some slots that does not join any stack system, it displays its factory default settings. JetStream Smart Switch LED 100Base-FX 1000Base-X SFP1, SFP2 Indication Green On: A 1000 Mbps device is linked to the corresponding port, but no activity. For the switch that are referred as a "Combo" port, which means they cannot be used simultaneously, otherwise only SFP port works. The new Unit ID will take effect...
... some slots that does not join any stack system, it displays its factory default settings. JetStream Smart Switch LED 100Base-FX 1000Base-X SFP1, SFP2 Indication Green On: A 1000 Mbps device is linked to the corresponding port, but no activity. For the switch that are referred as a "Combo" port, which means they cannot be used simultaneously, otherwise only SFP port works. The new Unit ID will take effect...

Jetstream Smart Switch Installation Guide
Page 17
... IP address from Standalone Mode to Controller Mode, configurations of our official website: https://www.tp-link.com/support/download/. ■■ Using the CLI ■■ Set up a Telnet or SSH connection to configure and mange the switch. Note: Only TL-SG2428P, and TL-SG2210MP support Controller Mode. For details, refer to the related documents on the DHCP server. ■■ If not, use a computer to access the switch via CLI (command-line interface). The first time you log in the large-scale network...
... IP address from Standalone Mode to Controller Mode, configurations of our official website: https://www.tp-link.com/support/download/. ■■ Using the CLI ■■ Set up a Telnet or SSH connection to configure and mange the switch. Note: Only TL-SG2428P, and TL-SG2210MP support Controller Mode. For details, refer to the related documents on the DHCP server. ■■ If not, use a computer to access the switch via CLI (command-line interface). The first time you log in the large-scale network...

Jetstream Smart Switch Installation Guide
Page 21
... the default login user name and password are both admin. The system will be reset to reset the system. The PWR/Power LED should be set as 255.255.255.0. Make sure the voltage of the power supply meets the requirement of the input voltage of your PC should I do if I cannot access the web management page? Try another port on the switch and make sure the Ethernet cable...
... the default login user name and password are both admin. The system will be reset to reset the system. The PWR/Power LED should be set as 255.255.255.0. Make sure the voltage of the power supply meets the requirement of the input voltage of your PC should I do if I cannot access the web management page? Try another port on the switch and make sure the Ethernet cable...
Jetstream Smart Switches User Guide
Page 13
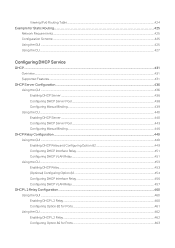
Viewing IPv6 Routing Table...424 Example for Static Routing...425 Network Requirements...425 Configuration Scheme...425 Using the GUI...425 Using the CLI...427 Configuring DHCP Service DHCP...431 Overview...431 Supported Features...431 DHCP Server Configuration...436 Using the GUI...436 Enabling DHCP Server...436 Configuring DHCP Server Pool...438 Configuring Manual Binding...439 Using the CLI...440 Enabling DHCP Server...440 Configuring DHCP Server Pool...443 Configuring Manual Binding...446 DHCP Relay Configuration...449 Using the GUI...449 Enabling DHCP Relay and Configuring Option 82 449 ...
Viewing IPv6 Routing Table...424 Example for Static Routing...425 Network Requirements...425 Configuration Scheme...425 Using the GUI...425 Using the CLI...427 Configuring DHCP Service DHCP...431 Overview...431 Supported Features...431 DHCP Server Configuration...436 Using the GUI...436 Enabling DHCP Server...436 Configuring DHCP Server Pool...438 Configuring Manual Binding...439 Using the CLI...440 Enabling DHCP Server...440 Configuring DHCP Server Pool...443 Configuring Manual Binding...446 DHCP Relay Configuration...449 Using the GUI...449 Enabling DHCP Relay and Configuring Option 82 449 ...

Jetstream Smart Switches User Guide
Page 30
...; Chrome 32.0, 33.0 3) Enter the switch's IP address in , change the password to login via the HTTP server. 2.1 Login To manage your network and devices. Figure 2-2 Login Authentication Note: The first time you log in the web browser's address bar. Figure 2-1 Enter the Switch's IP Address in the Browser 4) Enter the username and password (both admin by default) in web servers, HTTP server and HTTPS server, for user authentication. User Guide 5 The switch uses two built-in the pop...
...; Chrome 32.0, 33.0 3) Enter the switch's IP address in , change the password to login via the HTTP server. 2.1 Login To manage your network and devices. Figure 2-2 Login Authentication Note: The first time you log in the web browser's address bar. Figure 2-1 Enter the Switch's IP Address in the Browser 4) Enter the username and password (both admin by default) in web servers, HTTP server and HTTPS server, for user authentication. User Guide 5 The switch uses two built-in the pop...

Jetstream Smart Switches User Guide
Page 44
... User:admin Password:tplink Switch>enable Switch#copy running -config startup-config User Guide 19 Switch(config)#end Switch#copy running -config startup-config to save the configurations in the start-up configuration file. Switch#configure Switch(config)#interface vlan 1 Switch(config-if)#ip address 192.168.0.10 255.255.255.0 The connection will be interrupted and you can configure the port as a routed port and specify its IP address, or configure the IP address of the VLAN which the access port belongs to. ■■ Change the IP Address By default...
... User:admin Password:tplink Switch>enable Switch#copy running -config startup-config User Guide 19 Switch(config)#end Switch#copy running -config startup-config to save the configurations in the start-up configuration file. Switch#configure Switch(config)#interface vlan 1 Switch(config-if)#ip address 192.168.0.10 255.255.255.0 The connection will be interrupted and you can configure the port as a routed port and specify its IP address, or configure the IP address of the VLAN which the access port belongs to. ■■ Change the IP Address By default...
Jetstream Smart Switches User Guide
Page 142
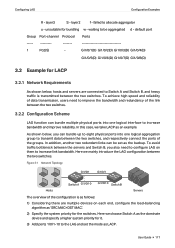
... Port-channel Protocol ------- 1 Po2(S) - waiting to allocate aggregator u - In this case, we mainly introduce the LAG configuration between the two switches. failed to be set the mode as an example. User Guide 117 layer3 S - Switch A Gi1/0/10 Gi1/0/1 Gi1/0/10 Switch B Servers The overview of the groups. In addition, another two redundant links can bundle up to eight physical ports into one logical interface to Switch A and Switch B, and heavy traffic...
... Port-channel Protocol ------- 1 Po2(S) - waiting to allocate aggregator u - In this case, we mainly introduce the LAG configuration between the two switches. failed to be set the mode as an example. User Guide 117 layer3 S - Switch A Gi1/0/10 Gi1/0/1 Gi1/0/10 Switch B Servers The overview of the groups. In addition, another two redundant links can bundle up to eight physical ports into one logical interface to Switch A and Switch B, and heavy traffic...

Jetstream Smart Switches User Guide
Page 262
... switch receives a done message, it receives done messages from hosts. If specified count of the multicast group that the host wants to be a unicast address. num: Specify the number of the VLAN(s). Step 12 copy running-config startup-config Save the settings in the specified VLAN. Use the command below in global configuration mode to configure the parameters: ipv6 mld snooping vlan-config vlan-id-list querier { max-response-time response-time...
... switch receives a done message, it receives done messages from hosts. If specified count of the multicast group that the host wants to be a unicast address. num: Specify the number of the VLAN(s). Step 12 copy running-config startup-config Save the settings in the specified VLAN. Use the command below in global configuration mode to configure the parameters: ipv6 mld snooping vlan-config vlan-id-list querier { max-response-time response-time...

Jetstream Smart Switches User Guide
Page 267
Configuring Layer 2 Multicast MVR Configuration 4 MVR Configuration To complete MVR configuration, follow these steps: 1) Configure 802.1Q VLANs. 2) Configure MVR globally. 3) Add multicast groups to MVR. 4) Configure MVR for the multicast groups configured in MVR. All other . For details, refer to network requirements. Configure 802.1Q VLANs for the receiver ports (ports that are managed by IGMP Snooping. 4.1 Using the GUI 4.1.1 Configuring 802.1Q VLANs Before configuring MVR, create an 802.1Q VLAN as tagged ports. Note that receive multicast data from the...
Configuring Layer 2 Multicast MVR Configuration 4 MVR Configuration To complete MVR configuration, follow these steps: 1) Configure 802.1Q VLANs. 2) Configure MVR globally. 3) Add multicast groups to MVR. 4) Configure MVR for the multicast groups configured in MVR. All other . For details, refer to network requirements. Configure 802.1Q VLANs for the receiver ports (ports that are managed by IGMP Snooping. 4.1 Using the GUI 4.1.1 Configuring 802.1Q VLANs Before configuring MVR, create an 802.1Q VLAN as tagged ports. Note that receive multicast data from the...

Jetstream Smart Switches User Guide
Page 319
Configuring Layer 2 Multicast Appendix: Default Parameters 8.3 Default Parameters for MVR Table 8-3 Default Parameters of MVR Function Parameter MVR MVR Mode Global Settings of MVR Multicast VLAN ID Query Response Time Maximum Multicast Groups MVR Group Settings MVR Group Entries MVR Mode MVR Settings on the Port MVR Port Type Fast Leave MVR Static Group Members MVR Static Group Member Entries Default Setting Disabled Compatible 1 5 tenths of a second 511 None Disabled None Disabled None 8.4 Default Parameters for Multicast Filtering Table 8-4 Default Parameters of...
Configuring Layer 2 Multicast Appendix: Default Parameters 8.3 Default Parameters for MVR Table 8-3 Default Parameters of MVR Function Parameter MVR MVR Mode Global Settings of MVR Multicast VLAN ID Query Response Time Maximum Multicast Groups MVR Group Settings MVR Group Entries MVR Mode MVR Settings on the Port MVR Port Type Fast Leave MVR Static Group Members MVR Static Group Member Entries Default Setting Disabled Compatible 1 5 tenths of a second 511 None Disabled None Disabled None 8.4 Default Parameters for Multicast Filtering Table 8-4 Default Parameters of...
Jetstream Smart Switches User Guide
Page 511
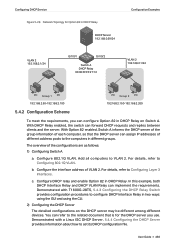
... use. User Guide 486 With DHCP Relay enabled, the switch can implement the requirements. In this example, both DHCP Interface Relay and DHCP VLAN Relay can forward DHCP requests and replies between clients and the server. The overview of the configurations are as follows: 1) Configuring Switch A a. Configuring DHCP Service Figure 5-28 Network Topology for the DHCP server you can configure Option 82 in DHCP Relay on the DHCP server may be different among different devices. Demonstrated with T1600G-28TS, 5.4.3 Configuring...
... use. User Guide 486 With DHCP Relay enabled, the switch can implement the requirements. In this example, both DHCP Interface Relay and DHCP VLAN Relay can forward DHCP requests and replies between clients and the server. The overview of the configurations are as follows: 1) Configuring Switch A a. Configuring DHCP Service Figure 5-28 Network Topology for the DHCP server you can configure Option 82 in DHCP Relay on the DHCP server may be different among different devices. Demonstrated with T1600G-28TS, 5.4.3 Configuring...

Jetstream Smart Switches User Guide
Page 622
... IP-based. The default value is enabled. end Return to 30 minutes. Set the IP address as 192.168.0.100, set the type of the user authentication information and the access interface. Configuring Access Security Access Security Configurations Step 3 Step 4 Step 5 show user configuration User authentication mode: IP based Index IP Address Access Interface 1 192.168.0.100/24 SNMP Telnet HTTP HTTPS Switch(config)#end Switch#copy running -config startup-config Save the settings in the configuration file. By default, it is...
... IP-based. The default value is enabled. end Return to 30 minutes. Set the IP address as 192.168.0.100, set the type of the user authentication information and the access interface. Configuring Access Security Access Security Configurations Step 3 Step 4 Step 5 show user configuration User authentication mode: IP based Index IP Address Access Interface 1 192.168.0.100/24 SNMP Telnet HTTP HTTPS Switch(config)#end Switch#copy running -config startup-config Save the settings in the configuration file. By default, it is...

Jetstream Smart Switches User Guide
Page 630
Configuring Access Security Appendix: Default Parameters 3 Appendix: Default Parameters Default settings of SSH Configuration Parameter SSH Protocol V1 Protocol V2 Default Setting Disabled Enabled Enabled User Guide 605 Table 3-1 Default Settings of Access Control Configuration Parameter Access Control Default Setting Disabled Table 3-2 Default Settings of HTTP Configuration Parameter HTTP Port Session Timeout Number Control Default Setting Enabled 80 10 minutes Disabled Table 3-3 Default Settings of HTTPS Configuration Parameter HTTPS Protocol Version Port RSA_WITH_RC4_128_MD5 ...
Configuring Access Security Appendix: Default Parameters 3 Appendix: Default Parameters Default settings of SSH Configuration Parameter SSH Protocol V1 Protocol V2 Default Setting Disabled Enabled Enabled User Guide 605 Table 3-1 Default Settings of Access Control Configuration Parameter Access Control Default Setting Disabled Table 3-2 Default Settings of HTTP Configuration Parameter HTTP Port Session Timeout Number Control Default Setting Enabled 80 10 minutes Disabled Table 3-3 Default Settings of HTTPS Configuration Parameter HTTPS Protocol Version Port RSA_WITH_RC4_128_MD5 ...

Jetstream Smart Switches User Guide
Page 724
Configuring ACL ACL Configuration ACL ID ACL NAME Interface/VID Direction ----- ---------- ------- 1 ACL_1 Gi1/0/3 Ingress 1 ACL_1 4 Ingress Switch(config)#end Switch#copy running-config startup-config Type ---Port VLAN 2.2.5 Viewing ACL Counting You can use the following command to view the number of matched packets of each ACL in the privileged EXEC mode and any other configuration mode: show access-list acl-id-or-name counter View the number of matched packets of the ACL to be viewed. User Guide 699 acl-id-or-name: Specify the ID or name of the specific ACL.
Configuring ACL ACL Configuration ACL ID ACL NAME Interface/VID Direction ----- ---------- ------- 1 ACL_1 Gi1/0/3 Ingress 1 ACL_1 4 Ingress Switch(config)#end Switch#copy running-config startup-config Type ---Port VLAN 2.2.5 Viewing ACL Counting You can use the following command to view the number of matched packets of each ACL in the privileged EXEC mode and any other configuration mode: show access-list acl-id-or-name counter View the number of matched packets of the ACL to be viewed. User Guide 699 acl-id-or-name: Specify the ID or name of the specific ACL.
Jetstream Smart Switches User Guide
Page 899
... SNMPv1, the supported type is more reliable than Trap. timeout: Set the time that communications on the NMS host to 3600 seconds; show snmp-server host Verify the information of the NMS host in the configuration file. copy running-config startup-config Save the settings in IPv4 or IPv6. ip: Specify the IP address of the host. when the NMS host uses SNMPv3, enter...
... SNMPv1, the supported type is more reliable than Trap. timeout: Set the time that communications on the NMS host to 3600 seconds; show snmp-server host Verify the information of the NMS host in the configuration file. copy running-config startup-config Save the settings in IPv4 or IPv6. ip: Specify the IP address of the host. when the NMS host uses SNMPv3, enter...

Jetstream Smart Switches User Guide
Page 904
... settings enabled, the switch will check the matched ACL information every five minutes and send SNMP traps if there is changed. The following example shows how to configure the switch to enable ACL trap: Switch#configure Switch(config)#snmp-server traps acl Switch(config)#end Switch#copy running-config startup-config ■■ Enabling the IP Traps Globally Step 1 configure Enter Global Configuration Mode. The trap can be triggered when the IP address of any interface is any updated information. By default...
... settings enabled, the switch will check the matched ACL information every five minutes and send SNMP traps if there is changed. The following example shows how to configure the switch to enable ACL trap: Switch#configure Switch(config)#snmp-server traps acl Switch(config)#end Switch#copy running-config startup-config ■■ Enabling the IP Traps Globally Step 1 configure Enter Global Configuration Mode. The trap can be triggered when the IP address of any interface is any updated information. By default...

T1600G-18TSUN V2 CLI Reference Guide Guide
Page 58
... Only Admin, Operator and Power User level users have access to these commands. 4.13 controller inform-url (Only for Certain Devices) Note: Only certain devices support this command. Syntax controller inform-url { controller-url | controller-ip } no controller inform-url command. After resetting, all configuration of the controller's URL/IP address. Example Inform the switch of the controller whose IP address is 192.168.1.1: Switch (config)# controller inform-url 192.168.1.1 4.14 reset Description The reset command is used...
... Only Admin, Operator and Power User level users have access to these commands. 4.13 controller inform-url (Only for Certain Devices) Note: Only certain devices support this command. Syntax controller inform-url { controller-url | controller-ip } no controller inform-url command. After resetting, all configuration of the controller's URL/IP address. Example Inform the switch of the controller whose IP address is 192.168.1.1: Switch (config)# controller inform-url 192.168.1.1 4.14 reset Description The reset command is used...

T1600G-18TSUN V2 CLI Reference Guide Guide
Page 439
... the number of the matched packets. To disable this trap and the Logging feature in ACL rule settings enabled, the switch will check the matched ACL information every five minutes and send SNMP traps if there is changed of any interface is any updated information. All IP traps are disabled by default. duplicate -- With both this feature, please use no snmp-server traps acl Command Mode Global Configuration Mode Privilege Requirement Only Admin level users have access...
... the number of the matched packets. To disable this trap and the Logging feature in ACL rule settings enabled, the switch will check the matched ACL information every five minutes and send SNMP traps if there is changed of any interface is any updated information. All IP traps are disabled by default. duplicate -- With both this feature, please use no snmp-server traps acl Command Mode Global Configuration Mode Privilege Requirement Only Admin level users have access...

T1600G-18TSUN V2 Installation Guide
Page 18
... default login user name and password are both admin. Power off the switch and, after a while, power it on the switch and make sure the Ethernet cable is normal. 2. Make sure the IP address of your PC should be set within the subnet of the switch? If you still cannot access the configuration page, please restore the switch to reset the system. Why does the PWR/Power LED work abnormally? Q3. JetStream Smart Switch...
... default login user name and password are both admin. Power off the switch and, after a while, power it on the switch and make sure the Ethernet cable is normal. 2. Make sure the IP address of your PC should be set within the subnet of the switch? If you still cannot access the configuration page, please restore the switch to reset the system. Why does the PWR/Power LED work abnormally? Q3. JetStream Smart Switch...


