
Owner's Manual
Page 3
... time, unplug it from overheating, and these openings must not be blocked or covered.The openings should be sure the service technician has used replacement parts specified by the product manufacturer as they are required, be taken to replace your appliance dealer or local power company. b. d. Safety Check - This product should not be read before cleaning. All the safety and operating instructions...
... time, unplug it from overheating, and these openings must not be blocked or covered.The openings should be sure the service technician has used replacement parts specified by the product manufacturer as they are required, be taken to replace your appliance dealer or local power company. b. d. Safety Check - This product should not be read before cleaning. All the safety and operating instructions...
Owner's Manual
Page 5
...Functional overview 7 Installing batteries in the remote control 9 Using a remote control 9 VCR/DVD recorder switching 9 SETUP/DISC/CD menu 10 DISPLAY menu 11 Connections 13 Connection to a TV 13 Connection to a cable box or satellite box . . . .14 Connection to an Audio System 15 Getting started 16 Easy DVD recording 16 Channel settings 18 Getting channels automatically 18 Adding/deleting channels 19 Selecting TV stereo or SAP 20 Setting the clock 21 Auto Clock Setting 21 Manual Clock Setting 22 Setting the daylight saving time 24 Selecting the TV aspect ratio 25 Recording...
...Functional overview 7 Installing batteries in the remote control 9 Using a remote control 9 VCR/DVD recorder switching 9 SETUP/DISC/CD menu 10 DISPLAY menu 11 Connections 13 Connection to a TV 13 Connection to a cable box or satellite box . . . .14 Connection to an Audio System 15 Getting started 16 Easy DVD recording 16 Channel settings 18 Getting channels automatically 18 Adding/deleting channels 19 Selecting TV stereo or SAP 20 Setting the clock 21 Auto Clock Setting 21 Manual Clock Setting 22 Setting the daylight saving time 24 Selecting the TV aspect ratio 25 Recording...
Owner's Manual
Page 6
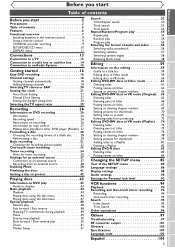
... of titles, etc. Recording Play DVD mode VCR mode This unit is compatible with Dolby Digital, you are able to experience the theater surround sound from discs which contain tracks recorded in Dolby Digital format. DVD mode Theater surround sound in your home: When connecting the unit to an amplifier or a decoder which is optional for recording on a regular DVD player (Video mode): Discs recorded in the Video mode can be prepared from Dolby Laboratories. Search for thumbnails. Editing DVD mode Setting/Clearing chapter markers...
... of titles, etc. Recording Play DVD mode VCR mode This unit is compatible with Dolby Digital, you are able to experience the theater surround sound from discs which contain tracks recorded in Dolby Digital format. DVD mode Theater surround sound in your home: When connecting the unit to an amplifier or a decoder which is optional for recording on a regular DVD player (Video mode): Discs recorded in the Video mode can be prepared from Dolby Laboratories. Search for thumbnails. Editing DVD mode Setting/Clearing chapter markers...
Owner's Manual
Page 7
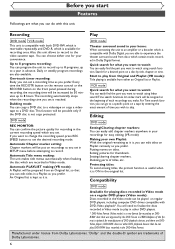
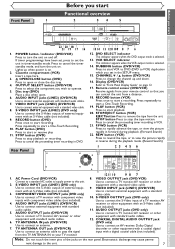
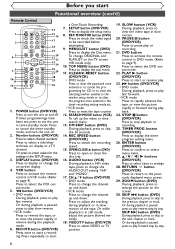
...REW F.FWD STOP/EJECT PLAY VCR RECORD OPEN/CLOSE CHANNEL DUBBING STOP PLAY OUTPUT SELECT VCR DVD DVD RECORD S-VIDEO VIDEO L - Press repeatedly to cancel the proceeding timer recording in timer-standby mode. REW button (VCR) Press to rewind the tape, or to connect an AV receiver, Dolby Digital decorder or other equipment with a digital coaxial cable (not included). AC Power Cord (DVD/VCR) Connect to a standard AC outlet to supply power to the unit. 7 COAXIAL DIGITAL AUDIO OUTPUT jack (DVD only) Use to view the picture rapidly in forward during the playback mode...
...REW F.FWD STOP/EJECT PLAY VCR RECORD OPEN/CLOSE CHANNEL DUBBING STOP PLAY OUTPUT SELECT VCR DVD DVD RECORD S-VIDEO VIDEO L - Press repeatedly to cancel the proceeding timer recording in timer-standby mode. REW button (VCR) Press to rewind the tape, or to connect an AV receiver, Dolby Digital decorder or other equipment with a digital coaxial cable (not included). AC Power Cord (DVD/VCR) Connect to a standard AC outlet to supply power to the unit. 7 COAXIAL DIGITAL AUDIO OUTPUT jack (DVD only) Use to view the picture rapidly in forward during the playback mode...
Owner's Manual
Page 8
... to play fast forward. • VCR mode Press to activate the remote control in still mode, adjust the picture blurred vertically. 18. button (DVD/VCR) Press to display the top menu. 11. If timer programmings have been set, press to display or change the AUDIO OUT setting "HiFi" and "MONO". 17. DISPLAY button (DVD/VCR) Press to set the unit in forward during the playback mode. 6. REC/OTR button (DVD/VCR) Press once to select the VCR output mode. 5. MENU/LIST button (DVD) Press to open or close the disc tray. 16. CLEAR/C-RESET button (DVD/VCR) • DVD mode Press...
... to play fast forward. • VCR mode Press to activate the remote control in still mode, adjust the picture blurred vertically. 18. button (DVD/VCR) Press to display the top menu. 11. If timer programmings have been set, press to display or change the AUDIO OUT setting "HiFi" and "MONO". 17. DISPLAY button (DVD/VCR) Press to set the unit in forward during the playback mode. 6. REC/OTR button (DVD/VCR) Press once to select the VCR output mode. 5. MENU/LIST button (DVD) Press to open or close the disc tray. 16. CLEAR/C-RESET button (DVD/VCR) • DVD mode Press...
Owner's Manual
Page 10
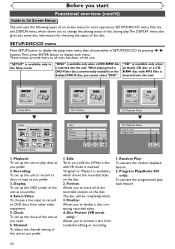
.... Disc Protect (VR mode only) : Allows you prefer. 3. Program Play(Audio CD only): To activate the programmed playback feature. 10 Select Video: To choose a line input to record to protect a disc from other video equipment. 5. Edit: Turns on the disc. 2. SETUP/DISC/CD menu Press SETUP button to display the setup main menu, then choose either of the unit as you to DVD discs from accidental editing or recording. 1. Clock: To set up the clock of SETUP/DISC/CD by pressing { / B buttons...
.... Disc Protect (VR mode only) : Allows you prefer. 3. Program Play(Audio CD only): To activate the programmed playback feature. 10 Select Video: To choose a line input to record to protect a disc from other video equipment. 5. Edit: Turns on the disc. 2. SETUP/DISC/CD menu Press SETUP button to display the setup main menu, then choose either of the unit as you to DVD discs from accidental editing or recording. 1. Clock: To set up the clock of SETUP/DISC/CD by pressing { / B buttons...
Owner's Manual
Page 17
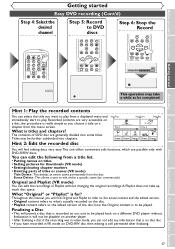
... Recording Getting started Easy DVD recording (Cont'd) Step 4: Select the desired channel POWER REC SPEED AUDIO OPEN/CLOSE .@/: 1 GHI 4 PQRS 7 DISPLAY ABC 2 JKL 5 TUV 8 SPACE 0 VCR DEF 3 MNO CH 6 WXYZ VIDEO/TV 9 SLOW DVD PAUSE Step 5: Record to DVD discs GHI 4 PQRS 7 DISPLAY JKL 5 TUV 8 SPACE 0 VCR MNO CH 6 WXYZ VIDEO/TV 9 SLOW DVD PAUSE PLAY STOP REC/OTR SETUP TIMER PROG. REC MONITOR ENTER MENU/LIST TOP MENU RETURN Step 6: Stop the Record DISPLAY SPACE 0 VCR DVD SLOW PAUSE PLAY STOP REC/OTR SETUP TIMER...
... Recording Getting started Easy DVD recording (Cont'd) Step 4: Select the desired channel POWER REC SPEED AUDIO OPEN/CLOSE .@/: 1 GHI 4 PQRS 7 DISPLAY ABC 2 JKL 5 TUV 8 SPACE 0 VCR DEF 3 MNO CH 6 WXYZ VIDEO/TV 9 SLOW DVD PAUSE Step 5: Record to DVD discs GHI 4 PQRS 7 DISPLAY JKL 5 TUV 8 SPACE 0 VCR MNO CH 6 WXYZ VIDEO/TV 9 SLOW DVD PAUSE PLAY STOP REC/OTR SETUP TIMER PROG. REC MONITOR ENTER MENU/LIST TOP MENU RETURN Step 6: Stop the Record DISPLAY SPACE 0 VCR DVD SLOW PAUSE PLAY STOP REC/OTR SETUP TIMER...
Owner's Manual
Page 18
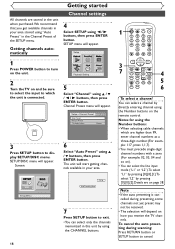
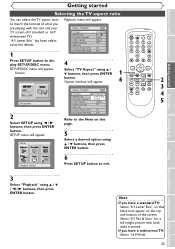
... directly entering channel using the Number buttons on and be received. • The selection will appear. Getting started All channels are on the unit. Getting channels automatically Channel settings 4 Select SETUP using K / L buttons, then press ENTER button. Playback Setting 2 Turn the TV on the remote control. SETUP/DISC menu will depend on how you get available channels in the Channel Preset of the SETUP menu. REC MONITOR ENTER MENU/LIST TOP MENU RETURN CLEAR/C-RESET ZOOM SKIP SEARCH MODE CM SKIP SKIP 4 5 6 To select a channel...
... directly entering channel using the Number buttons on and be received. • The selection will appear. Getting started All channels are on the unit. Getting channels automatically Channel settings 4 Select SETUP using K / L buttons, then press ENTER button. Playback Setting 2 Turn the TV on the remote control. SETUP/DISC menu will depend on how you get available channels in the Channel Preset of the SETUP menu. REC MONITOR ENTER MENU/LIST TOP MENU RETURN CLEAR/C-RESET ZOOM SKIP SEARCH MODE CM SKIP SKIP 4 5 6 To select a channel...
Owner's Manual
Page 22
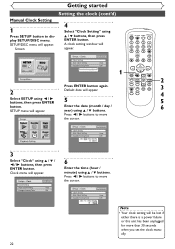
...Saving Time Auto ON POWER REC SPEED AUDIO OPEN/CLOSE .@/: 1 GHI 4 PQRS 7 DISPLAY ABC 2 JKL 5 TUV 8 SPACE 0 VCR DEF 3 MNO CH 6 WXYZ VIDEO/TV 9 SLOW DVD PAUSE 1 PLAY STOP REC/OTR SETUP TIMER PROG. Getting started Setting the clock (cont'd) Manual Clock Setting 1 Press SETUP button to move the cursor. SETUP menu will appear. 5 Enter the date (month / day / year) using K / L buttons. REC MONITOR ENTER MENU/LIST TOP MENU RETURN CLEAR/C-RESET ZOOM SKIP SEARCH MODE CM SKIP SKIP 2 3 4 5 6 Playback Setting Setup > Clock VCR DVD Clock Setting Auto Clock Setting Daylight...
...Saving Time Auto ON POWER REC SPEED AUDIO OPEN/CLOSE .@/: 1 GHI 4 PQRS 7 DISPLAY ABC 2 JKL 5 TUV 8 SPACE 0 VCR DEF 3 MNO CH 6 WXYZ VIDEO/TV 9 SLOW DVD PAUSE 1 PLAY STOP REC/OTR SETUP TIMER PROG. Getting started Setting the clock (cont'd) Manual Clock Setting 1 Press SETUP button to move the cursor. SETUP menu will appear. 5 Enter the date (month / day / year) using K / L buttons. REC MONITOR ENTER MENU/LIST TOP MENU RETURN CLEAR/C-RESET ZOOM SKIP SEARCH MODE CM SKIP SKIP 2 3 4 5 6 Playback Setting Setup > Clock VCR DVD Clock Setting Auto Clock Setting Daylight...
Owner's Manual
Page 25
Playback Setting 6 Press SETUP button to display SETUP/DISC menu. If you have a widescreen TV: Select "16:9 Wide". 25 TV Aspect Parental Lock Disc Menu Language 4:3 Letter Box All English POWER REC SPEED AUDIO OPEN/CLOSE "4:3 Letter Box" has been selected as the default. 1 Audio Language Subtitle Language Digital Out Dynamic Range Control Fast Forward with Audio Original OFF ON OFF .@/: 1 GHI 4 PQRS 7 ABC 2 JKL 5 TUV 8 SPACE 0 DEF 3 MNO CH 6 WXYZ VIDEO/TV 9 SLOW Press SETUP button to exit. button. Playing discs Editing Changing the SETUP menu VCR functions ...
Playback Setting 6 Press SETUP button to display SETUP/DISC menu. If you have a widescreen TV: Select "16:9 Wide". 25 TV Aspect Parental Lock Disc Menu Language 4:3 Letter Box All English POWER REC SPEED AUDIO OPEN/CLOSE "4:3 Letter Box" has been selected as the default. 1 Audio Language Subtitle Language Digital Out Dynamic Range Control Fast Forward with Audio Original OFF ON OFF .@/: 1 GHI 4 PQRS 7 ABC 2 JKL 5 TUV 8 SPACE 0 DEF 3 MNO CH 6 WXYZ VIDEO/TV 9 SLOW Press SETUP button to exit. button. Playing discs Editing Changing the SETUP menu VCR functions ...
Owner's Manual
Page 27
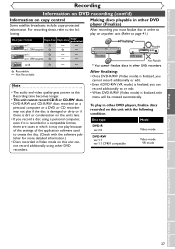
... mode Playing discs Editing Changing the SETUP menu VCR functions Others Español 27 Before you start Connections Getting started Recording Recording Information on DVD recording (cont'd) Information on anyother unit. (Refer to page 41.) Disc type / format Copy-free Copy-once Copyprohibited VR ver.1.1 DVD-RW ver.1.1 CPRM compatible Video ver.1.1 DVD-RW ver.1.1 CPRM compatible DVD-R ver.2.0 Finalizing* Playable This Unit DVD player Not Playable * You cannot finalize discs in other DVD recorders. Recordable Not Recordable Note • The audio...
... mode Playing discs Editing Changing the SETUP menu VCR functions Others Español 27 Before you start Connections Getting started Recording Recording Information on DVD recording (cont'd) Information on anyother unit. (Refer to page 41.) Disc type / format Copy-free Copy-once Copyprohibited VR ver.1.1 DVD-RW ver.1.1 CPRM compatible Video ver.1.1 DVD-RW ver.1.1 CPRM compatible DVD-R ver.2.0 Finalizing* Playable This Unit DVD player Not Playable * You cannot finalize discs in other DVD recorders. Recordable Not Recordable Note • The audio...
Owner's Manual
Page 28
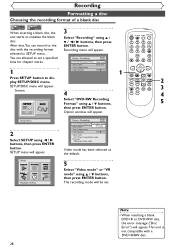
...Format Auto Chapter Timer Programming Dubbing Mode Video mode 10 minutes VCR DVD POWER REC SPEED AUDIO OPEN/CLOSE .@/: 1 GHI 4 PQRS 7 DISPLAY ABC 2 JKL 5 TUV 8 SPACE 0 VCR DEF 3 MNO CH 6 WXYZ VIDEO/TV 9 SLOW DVD PAUSE 1 PLAY STOP REC/OTR SETUP TIMER PROG. Press SETUP button to initialize the blank disc. Screen: 4 REC MONITOR ENTER MENU/LIST TOP MENU RETURN CLEAR/C-RESET ZOOM SKIP SEARCH MODE CM SKIP SKIP 2 3 4 Select "DVD-RW Recording Format" using K / L buttons, then press ENTER button. Setup Playback Setting Setup > Recording DVD DVD-RW Recording Format Auto...
...Format Auto Chapter Timer Programming Dubbing Mode Video mode 10 minutes VCR DVD POWER REC SPEED AUDIO OPEN/CLOSE .@/: 1 GHI 4 PQRS 7 DISPLAY ABC 2 JKL 5 TUV 8 SPACE 0 VCR DEF 3 MNO CH 6 WXYZ VIDEO/TV 9 SLOW DVD PAUSE 1 PLAY STOP REC/OTR SETUP TIMER PROG. Press SETUP button to initialize the blank disc. Screen: 4 REC MONITOR ENTER MENU/LIST TOP MENU RETURN CLEAR/C-RESET ZOOM SKIP SEARCH MODE CM SKIP SKIP 2 3 4 Select "DVD-RW Recording Format" using K / L buttons, then press ENTER button. Setup Playback Setting Setup > Recording DVD DVD-RW Recording Format Auto...
Owner's Manual
Page 33
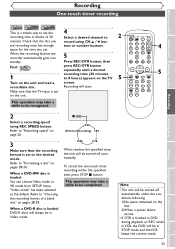
.... MENU/LIST TOP MENU RETURN recordable disc. Recording will be recognized. 2 Select a recording speed using CH K / L buttons or number buttons. 5 Press REC/OTR button, then .@/: 1 GHI 4 PQRS 7 DISPLAY ABC 2 JKL 5 TUV 8 SPACE 0 VCR DEF 3 MNO CH 6 WXYZ VIDEO/TV 9 SLOW DVD PAUSE 4 First: DVD 1 press REC/OTR button PLAY repeatedly until a desired 5 recording time (30 minutes to be turned off automatically. When a DVD-RW disc is a simple way to set . Check that the recording format is loaded: DVD-R discs will be in Video mode...
.... MENU/LIST TOP MENU RETURN recordable disc. Recording will be recognized. 2 Select a recording speed using CH K / L buttons or number buttons. 5 Press REC/OTR button, then .@/: 1 GHI 4 PQRS 7 DISPLAY ABC 2 JKL 5 TUV 8 SPACE 0 VCR DEF 3 MNO CH 6 WXYZ VIDEO/TV 9 SLOW DVD PAUSE 4 First: DVD 1 press REC/OTR button PLAY repeatedly until a desired 5 recording time (30 minutes to be turned off automatically. When a DVD-RW disc is a simple way to set . Check that the recording format is loaded: DVD-R discs will be in Video mode...
Owner's Manual
Page 34
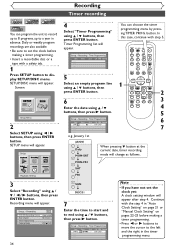
SETUP/DISC menu will change as follows. POWER REC SPEED AUDIO OPEN/CLOSE Setup > Recording > Timer Programming Date Start End CH DVD VCR Speed .@/: 1 GHI 4 PQRS 7 DISPLAY ABC 2 JKL 5 TUV 8 SPACE 0 VCR DEF 3 MNO CH 6 WXYZ VIDEO/TV 9 SLOW DVD PAUSE 5 PLAY Select an empty program line using K / L buttons, then press ENTER button. Setup > Recording DVD DVD-RW Recording Format Auto Chapter Timer Programming Dubbing Mode Video mode 10 minutes VCR DVD 34 Recording Timer recording 4 Select "Timer Programming" using K / L buttons, then 1 STOP REC/OTR SETUP ...
SETUP/DISC menu will change as follows. POWER REC SPEED AUDIO OPEN/CLOSE Setup > Recording > Timer Programming Date Start End CH DVD VCR Speed .@/: 1 GHI 4 PQRS 7 DISPLAY ABC 2 JKL 5 TUV 8 SPACE 0 VCR DEF 3 MNO CH 6 WXYZ VIDEO/TV 9 SLOW DVD PAUSE 5 PLAY Select an empty program line using K / L buttons, then press ENTER button. Setup > Recording DVD DVD-RW Recording Format Auto Chapter Timer Programming Dubbing Mode Video mode 10 minutes VCR DVD 34 Recording Timer recording 4 Select "Timer Programming" using K / L buttons, then 1 STOP REC/OTR SETUP ...
Owner's Manual
Page 35
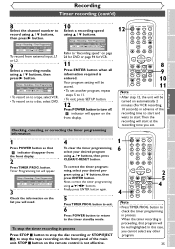
... program using K / L buttons, then press ENTER button. STOP C button on automatically 2 minutes (For VCR recording, 10 seconds) in advance of the main unit. Checking, canceling, or correcting the timer programming information 1 Press POWER button so that program will start Connections Getting started Recording Playing discs 8 Select the channel number to "Recording speed" on the front display. button to exit. 6 Press POWER button to return to turn off. REC MONITOR ENTER MENU/LIST TOP MENU RETURN CLEAR/C-RESET ZOOM SKIP SEARCH MODE...
... program using K / L buttons, then press ENTER button. STOP C button on automatically 2 minutes (For VCR recording, 10 seconds) in advance of the main unit. Checking, canceling, or correcting the timer programming information 1 Press POWER button so that program will start Connections Getting started Recording Playing discs 8 Select the channel number to "Recording speed" on the front display. button to exit. 6 Press POWER button to return to turn off. REC MONITOR ENTER MENU/LIST TOP MENU RETURN CLEAR/C-RESET ZOOM SKIP SEARCH MODE...
Owner's Manual
Page 43
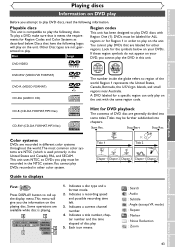
...), PAL, and SECAM. Indicates a recording speed and possible recording time left. 3. Playable discs This unit is used primarily in different color systems throughout the world.The most common color systems are labeled for DVD playback The contents of disc play a DVD, make sure that have the following discs. Indicates a disc type and a format mode. 2. Each icon means: : Search : Audio : Subtitle : Angle (except VR mode) : Repeat : Marker : Noise Reduction : Zoom 43 Before you start Connections...
...), PAL, and SECAM. Indicates a recording speed and possible recording time left. 3. Playable discs This unit is used primarily in different color systems throughout the world.The most common color systems are labeled for DVD playback The contents of disc play a DVD, make sure that have the following discs. Indicates a disc type and a format mode. 2. Each icon means: : Search : Audio : Subtitle : Angle (except VR mode) : Repeat : Marker : Noise Reduction : Zoom 43 Before you start Connections...
Owner's Manual
Page 55
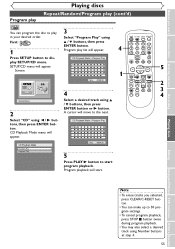
.... Select "Program Play" using POWER REC SPEED AUDIO OPEN/CLOSE First: DVD 1 Press SETUP button to display SETUP/CD menu. SETUP/CD menu will move to the next. A cursor will appear. CD Playback Mode > Program Play 07 CD Playback Mode Random Play Program Play Total 00:04:30 5 Press PLAY B button to start . CD Playback Mode menu will appear. Playing discs Editing Changing the SETUP menu VCR functions Others Español Note • To erase tracks you start Connections Getting started Recording Program play Playing discs Repeat/Random/Program play (cont'd) CD 3 You can make up...
.... Select "Program Play" using POWER REC SPEED AUDIO OPEN/CLOSE First: DVD 1 Press SETUP button to display SETUP/CD menu. SETUP/CD menu will move to the next. A cursor will appear. CD Playback Mode > Program Play 07 CD Playback Mode Random Play Program Play Total 00:04:30 5 Press PLAY B button to start . CD Playback Mode menu will appear. Playing discs Editing Changing the SETUP menu VCR functions Others Español Note • To erase tracks you start Connections Getting started Recording Program play Playing discs Repeat/Random/Program play (cont'd) CD 3 You can make up...
Owner's Manual
Page 96
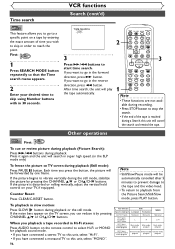
... menu appears. 2 Enter your TV, if equipped. When you playback a tape recorded in Hi-Fi stereo: Press AUDIO button on the remote control to select Hi-Fi or MONO for playback sound mode. • If you have connected a monaural TV to this unit, select "MONO". 96 Your Selection Type of time you want to go in order to reach the point. Other operations VCR VCR First: To cue or review picture...
... menu appears. 2 Enter your TV, if equipped. When you playback a tape recorded in Hi-Fi stereo: Press AUDIO button on the remote control to select Hi-Fi or MONO for playback sound mode. • If you have connected a monaural TV to this unit, select "MONO". 96 Your Selection Type of time you want to go in order to reach the point. Other operations VCR VCR First: To cue or review picture...
Owner's Manual
Page 97
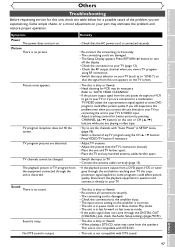
... the RF output channel when you view a TV program using the CH o / p buttons. • Press VIDEO/TV button if necessary. • Adjust TV antenna. • Adjust the picture (see the TV's instruction manual). • Place the unit and TV farther apart. • Place the TV and any TV program using RF connection. • Switch the input selector on . Remedy • Check that the signal from a DVD player,VCR, or tuner goes through the...
... the RF output channel when you view a TV program using the CH o / p buttons. • Press VIDEO/TV button if necessary. • Adjust TV antenna. • Adjust the picture (see the TV's instruction manual). • Place the unit and TV farther apart. • Place the TV and any TV program using RF connection. • Switch the input selector on . Remedy • Check that the signal from a DVD player,VCR, or tuner goes through the...

Owner's Manual
Page 102
... Audio Program) Sub-audio channel which have compatible region codes.You can copy MP3 files on CD-R/RW discs from main-audio channel.This audio channel is used as it is delivered separately from the computer and play in bilingual broadcasting. Track Audio CDs use tracks to compress digital sound developed by an analog-to-digital converter, generating a stream of numbers. Finalize To make DVD discs, which is allowed to search a specific scene directly. Regions code Regions associate discs and players with digital inputs...
... Audio Program) Sub-audio channel which have compatible region codes.You can copy MP3 files on CD-R/RW discs from main-audio channel.This audio channel is used as it is delivered separately from the computer and play in bilingual broadcasting. Track Audio CDs use tracks to compress digital sound developed by an analog-to-digital converter, generating a stream of numbers. Finalize To make DVD discs, which is allowed to search a specific scene directly. Regions code Regions associate discs and players with digital inputs...


