
Limited Warranty (U.S. Only)
Page 1
... Product for your unit. Instructions: To obtain warranty service, you . Any parts or product replaced under this Labor Warranty has expired but not limited to product issues due to be defective. it does not cover any software products whether or not contained in exchange for the time periods and as fuses or batteries). LIMITATION ON DAMAGES: SONY SHALL NOT...
... Product for your unit. Instructions: To obtain warranty service, you . Any parts or product replaced under this Labor Warranty has expired but not limited to product issues due to be defective. it does not cover any software products whether or not contained in exchange for the time periods and as fuses or batteries). LIMITATION ON DAMAGES: SONY SHALL NOT...
Installation/Connection Instructions
Page 1
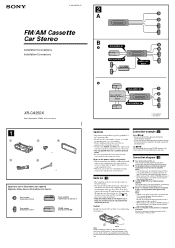
... (2) FM/AM Cassette Car Stereo Installation/Connections Installation/Connexions 2 A B BUS AUDIO IN BUS CONTROL IN AUDIO OUT REAR XR-CA350X Sony Corporation © 2003 Printed in Malaysia 1 1 4 2 3 × 4 5 × 2 Equipment used in illustrations (not supplied) Appareils utilisés dans les illustrations (non fournis) Front speaker Haut-parleur frontal Power amplifier Amplificateur de puissance Rear speaker Haut-parleur arrière CD/MD changer Changeur de CD/MD BUS AUDIO IN * Source selector * Sélecteur de source XA...
... (2) FM/AM Cassette Car Stereo Installation/Connections Installation/Connexions 2 A B BUS AUDIO IN BUS CONTROL IN AUDIO OUT REAR XR-CA350X Sony Corporation © 2003 Printed in Malaysia 1 1 4 2 3 × 4 5 × 2 Equipment used in illustrations (not supplied) Appareils utilisés dans les illustrations (non fournis) Front speaker Haut-parleur frontal Power amplifier Amplificateur de puissance Rear speaker Haut-parleur arrière CD/MD changer Changeur de CD/MD BUS AUDIO IN * Source selector * Sélecteur de source XA...
Operating Instructions (primary manual)
Page 1
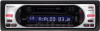
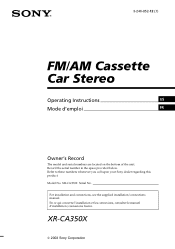
Model No. XR-CA350X Serial No. For installation and connections, see the supplied installation/connections manual. XR-CA350X 2003 Sony Corporation En ce qui concerne l'installation et les connexions, consulter le manuel d'installation/connexions fourni. Refer to these numbers whenever you call upon your Sony dealer regarding this product. Record the serial number in the space provided below. 3-246-852-12 (1) FM/AM Cassette Car Stereo Operating Instructions US Mode d'emploi FR Owner's Record The model and serial numbers are located on the bottom of the unit.
Model No. XR-CA350X Serial No. For installation and connections, see the supplied installation/connections manual. XR-CA350X 2003 Sony Corporation En ce qui concerne l'installation et les connexions, consulter le manuel d'installation/connexions fourni. Refer to these numbers whenever you call upon your Sony dealer regarding this product. Record the serial number in the space provided below. 3-246-852-12 (1) FM/AM Cassette Car Stereo Operating Instructions US Mode d'emploi FR Owner's Record The model and serial numbers are located on the bottom of the unit.
Operating Instructions (primary manual)
Page 2
... Sony Cassette Player. Welcome ! When you play a CD TEXT disc*2. *1 You can expand your nearest authorized Sony dealer for help. Warning This equipment has been tested and found to comply with the instructions, may cause harmful interference to radio communications. In addition to the cassette playback and radio operations, you for a Class B digital device, pursuant to provide reasonable protection against harmful interference in a particular installation...
... Sony Cassette Player. Welcome ! When you play a CD TEXT disc*2. *1 You can expand your nearest authorized Sony dealer for help. Warning This equipment has been tested and found to comply with the instructions, may cause harmful interference to radio communications. In addition to the cassette playback and radio operations, you for a Class B digital device, pursuant to provide reasonable protection against harmful interference in a particular installation...
Operating Instructions (primary manual)
Page 3
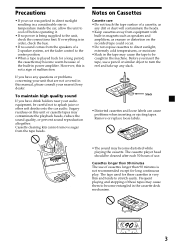
... cassette may become warm because of the built-in power amplifier. Precautions •If your car was parked in direct sunlight resulting in a considerable rise in temperature inside the car, allow the unit to cool off before operating it. •If no sound comes from the speakers of a 2-speaker system, set the fader control to the center position. •When a tape is played back...
... cassette may become warm because of the built-in power amplifier. Precautions •If your car was parked in direct sunlight resulting in a considerable rise in temperature inside the car, allow the unit to cool off before operating it. •If no sound comes from the speakers of a 2-speaker system, set the fader control to the center position. •When a tape is played back...
Operating Instructions (primary manual)
Page 4
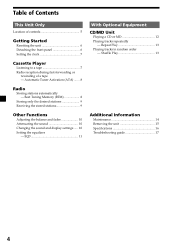
... front panel 6 Setting the clock 7 Cassette Player Listening to a tape 7 Radio reception during fast-forwarding or rewinding of a tape - Shuffle Play 13 Additional Information Maintenance 14 Removing the unit 15 Specifications 16 Troubleshooting guide 17 4 EQ3 11 With Optional Equipment CD/MD Unit Playing a CD or MD 12 Playing tracks repeatedly - Automatic Tuner Activation (ATA) ....... 8 Radio Storing stations automatically - Best Tuning Memory (BTM 8 Storing only the desired stations 9 Receiving the stored stations 9 Other Functions Adjusting the balance...
... front panel 6 Setting the clock 7 Cassette Player Listening to a tape 7 Radio reception during fast-forwarding or rewinding of a tape - Shuffle Play 13 Additional Information Maintenance 14 Removing the unit 15 Specifications 16 Troubleshooting guide 17 4 EQ3 11 With Optional Equipment CD/MD Unit Playing a CD or MD 12 Playing tracks repeatedly - Automatic Tuner Activation (ATA) ....... 8 Radio Storing stations automatically - Best Tuning Memory (BTM 8 Storing only the desired stations 9 Receiving the stored stations 9 Other Functions Adjusting the balance...
Operating Instructions (primary manual)
Page 5
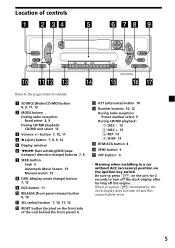
... (OFF) momentarily, the clock display does not turn off the clock display after turning off and this causes battery wear. 5 Location of the unit behind the front panel) 6 qd ATT (attenuate) button 10 qf Number buttons 10, 12 During radio reception: Preset number select 9 During CD/MD playback: (1) DISC - 13 (2) DISC + 13 (3) REP 13 (4) SHUF 13 qg BTM/ATA button 8 qh SENS button 9 qj OFF button* 6 * Warning when installing in a car without ACC (accessory) position...
... (OFF) momentarily, the clock display does not turn off the clock display after turning off and this causes battery wear. 5 Location of the unit behind the front panel) 6 qd ATT (attenuate) button 10 qf Number buttons 10, 12 During radio reception: Preset number select 9 During CD/MD playback: (1) DISC - 13 (2) DISC + 13 (3) REP 13 (4) SHUF 13 qg BTM/ATA button 8 qh SENS button 9 qj OFF button* 6 * Warning when installing in a car without ACC (accessory) position...
Operating Instructions (primary manual)
Page 6
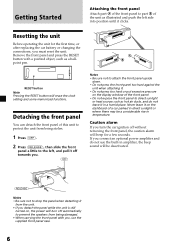
... the left , and pull it off without removing the front panel, the caution alarm will erase the clock setting and some memorized functions. A B RESET button Note Pressing the RESET button will beep for the first time, or after replacing the car battery or changing the connections, you , use the built-in amplifier, the beep sound will be a considerable rise in direct sunlight or where there may be deactivated. (RELEASE...
... the left , and pull it off without removing the front panel, the caution alarm will erase the clock setting and some memorized functions. A B RESET button Note Pressing the RESET button will beep for the first time, or after replacing the car battery or changing the connections, you , use the built-in amplifier, the beep sound will be a considerable rise in direct sunlight or where there may be deactivated. (RELEASE...
Operating Instructions (primary manual)
Page 7
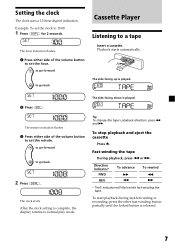
... Cassette Player Listening to go forward to a tape Insert a cassette. Fast-winding the tape During playback, press m or M. To start playback during fast-forwarding or rewinding, press the other fast-winding button partially until the locked button is played. The side facing up is released. 7 The hour indication flashes. 1 Press either side of the volume button to normal play mode. Setting the clock The clock uses...
... Cassette Player Listening to go forward to a tape Insert a cassette. Fast-winding the tape During playback, press m or M. To start playback during fast-forwarding or rewinding, press the other fast-winding button partially until the locked button is played. The side facing up is released. 7 The hour indication flashes. 1 Press either side of the volume button to normal play mode. Setting the clock The clock uses...
Operating Instructions (primary manual)
Page 8
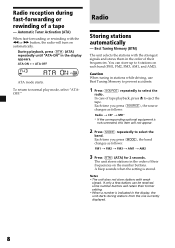
... displayed. 8 ATA-ON y ATA-OFF ATA mode starts. Each time you press (SOURCE), the source changes as follows: FM1 t FM2 t FM3 t AM1 t AM2 3 Press (BTM) (ATA) for 2 seconds. A beep sounds when the setting is not connected, this item will turn on automatically. Radio Storing stations automatically - In case of a tape - If only a few stations can store up to 6 stations on the number buttons. Best Tuning Memory (BTM) The unit selects...
... displayed. 8 ATA-ON y ATA-OFF ATA mode starts. Each time you press (SOURCE), the source changes as follows: FM1 t FM2 t FM3 t AM1 t AM2 3 Press (BTM) (ATA) for 2 seconds. A beep sounds when the setting is not connected, this item will turn on automatically. Radio Storing stations automatically - In case of a tape - If only a few stations can store up to 6 stations on the number buttons. Best Tuning Memory (BTM) The unit selects...
Operating Instructions (primary manual)
Page 9
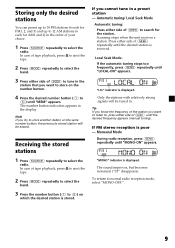
... frequency of tape playback, press Z to eject the tape. 2 Press (MODE) repeatedly to select the band. 3 Press the number button ((1) to (6)) on the number button. 4 Press the desired number button ((1) to (6)) until the desired station is displayed. Storing only the desired stations You can preset up to 18 FM stations (6 each for FM1, 2, and 3) and up to 12 AM stations (6 each for the station. Scanning stops when the unit receives a station...
... frequency of tape playback, press Z to eject the tape. 2 Press (MODE) repeatedly to select the band. 3 Press the number button ((1) to (6)) on the number button. 4 Press the desired number button ((1) to (6)) until the desired station is displayed. Storing only the desired stations You can preset up to 18 FM stations (6 each for FM1, 2, and 3) and up to 12 AM stations (6 each for the station. Scanning stops when the unit receives a station...
Operating Instructions (primary manual)
Page 10
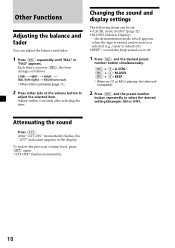
... mode which appears when the tape is ejected and no CD or MD is playing, this item will not appear. 2 Press (SEL) and the preset number button repeatedly to adjust the selected item. Changing the sound and display settings The following items can adjust the balance and fader. 1 Press (SEL) repeatedly until "BAL" or "FAD" appears. To restore the previous volume level, press (ATT) again. Other Functions Adjusting the balance...
... mode which appears when the tape is ejected and no CD or MD is playing, this item will not appear. 2 Press (SEL) and the preset number button repeatedly to adjust the selected item. Changing the sound and display settings The following items can adjust the balance and fader. 1 Press (SEL) repeatedly until "BAL" or "FAD" appears. To restore the previous volume level, press (ATT) again. Other Functions Adjusting the balance...
Operating Instructions (primary manual)
Page 11
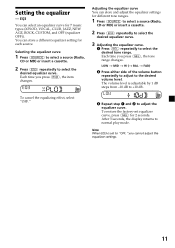
... 1 and 2 to select the desired equalizer curve. Selecting the equalizer curve 1 Press (SOURCE) to select a source (Radio, CD or MD) or insert a cassette. 2 Press (EQ3) repeatedly to adjust the equalizer curve. LOW t MID t HI (t BAL t FAD) 2 Press either side of the volume button repeatedly to adjust to normal play mode. After 3 seconds, the display returns to the desired volume level. The volume level is set equalizer curve, press (SEL) for 7 music types (XPLOD, VOCAL, CLUB...
... 1 and 2 to select the desired equalizer curve. Selecting the equalizer curve 1 Press (SOURCE) to select a source (Radio, CD or MD) or insert a cassette. 2 Press (EQ3) repeatedly to adjust the equalizer curve. LOW t MID t HI (t BAL t FAD) 2 Press either side of the volume button repeatedly to adjust to normal play mode. After 3 seconds, the display returns to the desired volume level. The volume level is set equalizer curve, press (SEL) for 7 music types (XPLOD, VOCAL, CLUB...
Operating Instructions (primary manual)
Page 12
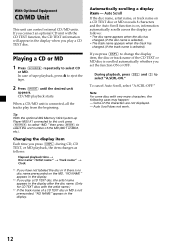
... MD2, etc.). Auto Scroll does not work. 12 Changing the display item Each time you press (DSPL) during CD, CD TEXT, or MD playback, the item changes as follows: Elapsed playback time t Disc name*1/Artist name*2 t Track name*3 t Clock *1 If you press (DSPL) to change the display item, the disc or track name of tape playback, press Z to select the unit number of the characters...
... MD2, etc.). Auto Scroll does not work. 12 Changing the display item Each time you press (DSPL) during CD, CD TEXT, or MD playback, the item changes as follows: Elapsed playback time t Disc name*1/Artist name*2 t Track name*3 t Clock *1 If you press (DSPL) to change the display item, the disc or track name of tape playback, press Z to select the unit number of the characters...
Operating Instructions (primary manual)
Page 14
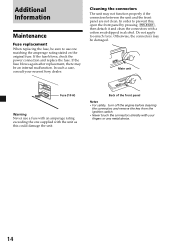
... too much force. If the fuse blows, check the power connection and replace the fuse. Back of the front panel Notes • For safety, turn off the engine before cleaning the connectors and remove the key from the ignition switch. • Never touch the connectors directly with your nearest Sony dealer. Main unit Fuse (10 A) Warning Never use one supplied with the unit as this , open the...
... too much force. If the fuse blows, check the power connection and replace the fuse. Back of the front panel Notes • For safety, turn off the engine before cleaning the connectors and remove the key from the ignition switch. • Never touch the connectors directly with your nearest Sony dealer. Main unit Fuse (10 A) Warning Never use one supplied with the unit as this , open the...
Operating Instructions (primary manual)
Page 16
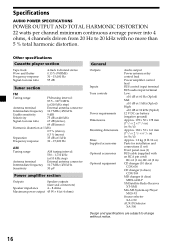
... 10 oz) Parts for installation and connections (1 set) Front panel case (1) BUS cable (supplied with no more than 5 % total harmonic distortion. Other specifications Cassette player section Tape track Wow and flutter Frequency response Signal-to-noise ratio 4-track 2-channel stereo 0.13 % (WRMS) 30 - 15,000 Hz 55 dB Tuner section FM Tuning range FM tuning interval: 87.5 - 107.9 MHz (at 200 kHz step) Antenna terminal External antenna connector Intermediate frequency 10.7 MHz...
... 10 oz) Parts for installation and connections (1 set) Front panel case (1) BUS cable (supplied with no more than 5 % total harmonic distortion. Other specifications Cassette player section Tape track Wow and flutter Frequency response Signal-to-noise ratio 4-track 2-channel stereo 0.13 % (WRMS) 30 - 15,000 Hz 55 dB Tuner section FM Tuning range FM tuning interval: 87.5 - 107.9 MHz (at 200 kHz step) Antenna terminal External antenna connector Intermediate frequency 10.7 MHz...
Operating Instructions (primary manual)
Page 17
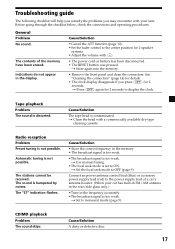
... of a car's antenna booster. (When your unit. Troubleshooting guide The following checklist will help you remedy the problems you press (OFF) for 2 seconds. Cause/Solution The tape head is too weak. CD/MD playback Problem The sound skips. Radio reception Problem Preset tuning is not possible. Automatic tuning is not possible. Connect an power antenna control lead (blue) or accessory power supply lead (red) to ON. The stations cannot be received. Before going...
... of a car's antenna booster. (When your unit. Troubleshooting guide The following checklist will help you remedy the problems you press (OFF) for 2 seconds. Cause/Solution The tape head is too weak. CD/MD playback Problem The sound skips. Radio reception Problem Preset tuning is not possible. Automatic tuning is not possible. Connect an power antenna control lead (blue) or accessory power supply lead (red) to ON. The stations cannot be received. Before going...
2003 Cassette Receiver Comparison Chart
Page 1
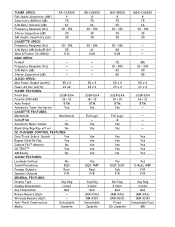
..., Cassette Seg Neg 3 Color Red (RM-X4S) (RM-X114) Detachable Face MD Wireless Remote (Opt) - Automatic Music Sensor No Blank Skip/Rep/Key off rel No CD CHANGER CONTROL FEATURES: Disc/Track Select, Search Yes Repeat/Shuffle Play Yes Custom File™ Memory No CD TEXT™ Yes XM Ready No AUDIO FEATURES: Loudness Contour No Sound Processing EQ3 Preamp Outputs Rear Speaker Outputs F/R GENERAL FEATURES: Display Type...
..., Cassette Seg Neg 3 Color Red (RM-X4S) (RM-X114) Detachable Face MD Wireless Remote (Opt) - Automatic Music Sensor No Blank Skip/Rep/Key off rel No CD CHANGER CONTROL FEATURES: Disc/Track Select, Search Yes Repeat/Shuffle Play Yes Custom File™ Memory No CD TEXT™ Yes XM Ready No AUDIO FEATURES: Loudness Contour No Sound Processing EQ3 Preamp Outputs Rear Speaker Outputs F/R GENERAL FEATURES: Display Type...
Marketing Specifications & diagrams
Page 1
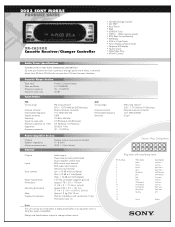
...; SSIR-EXA Tuner • 18FM + 12AM memory presets • BTM (Best Tuning Memory) • XM Ready • 45W x 4 High Power • Active Display w/Demo Mode • Negative LED display • Quartz Clock • Detachable Face • XT-XM1 Control Audio Power Specifications POWER OUTPUT AND TOTAL HARMONIC DISTORTION 22 watts per channel minimum continuous average power into 4 ohms, 4 channels driven from 20 Hz to a digital preamplifier or an equalizer which is Sony Bus system compatible. Pin Number 1 2 3 4 5 6 7 8 9 10...
...; SSIR-EXA Tuner • 18FM + 12AM memory presets • BTM (Best Tuning Memory) • XM Ready • 45W x 4 High Power • Active Display w/Demo Mode • Negative LED display • Quartz Clock • Detachable Face • XT-XM1 Control Audio Power Specifications POWER OUTPUT AND TOTAL HARMONIC DISTORTION 22 watts per channel minimum continuous average power into 4 ohms, 4 channels driven from 20 Hz to a digital preamplifier or an equalizer which is Sony Bus system compatible. Pin Number 1 2 3 4 5 6 7 8 9 10...
Marketing Specifications & diagrams
Page 2
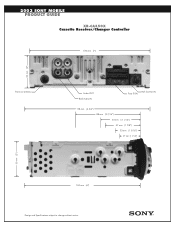
2003 SONY MOBILE PRODUCT GUIDE XR-CA350X Cassette Receiver/Changer Controller 178 mm (7”) 50 mm (2”) From car antenna Audio OUT BUS Audio IN BUS Control IN Fuse (10A) 178 mm (6 3/4”) 88 mm (3 7/16”) 53 mm ( 2 1/16”) 47 mm (1 7/8”) 33 mm (1 5/16”) 27 mm (1 1/16”) 50 mm (2”) 152 mm (6”) Design and Specifications subject to change without notice.
2003 SONY MOBILE PRODUCT GUIDE XR-CA350X Cassette Receiver/Changer Controller 178 mm (7”) 50 mm (2”) From car antenna Audio OUT BUS Audio IN BUS Control IN Fuse (10A) 178 mm (6 3/4”) 88 mm (3 7/16”) 53 mm ( 2 1/16”) 47 mm (1 7/8”) 33 mm (1 5/16”) 27 mm (1 1/16”) 50 mm (2”) 152 mm (6”) Design and Specifications subject to change without notice.


