
Limited Warranty (US Only)
Page 1
... event of a defect, these are covered by this Limited Warranty for a period of one (1) year from the original date of purchase of the product. For purposes of this Limited Warranty, "refurbished" means a product or part that for the LCD Projector Lamp the period will be ninety (90)... must deliver the product, freight prepaid, in exchange for the applicable labor charge. 2-515-710-01 ® VPL Front Projector LIMITED WARRANTY Sony Electronics Inc. ("Sony") warrants this product (including any repair, replacement part or replacement product for the remainder of the original Limited Warranty...
... event of a defect, these are covered by this Limited Warranty for a period of one (1) year from the original date of purchase of the product. For purposes of this Limited Warranty, "refurbished" means a product or part that for the LCD Projector Lamp the period will be ninety (90)... must deliver the product, freight prepaid, in exchange for the applicable labor charge. 2-515-710-01 ® VPL Front Projector LIMITED WARRANTY Sony Electronics Inc. ("Sony") warrants this product (including any repair, replacement part or replacement product for the remainder of the original Limited Warranty...
Operating Instructions
Page 7
...screen should be used for several days. • To disconnect the cord, pull it was originally packed at the factory. On LCD projector • The LCD projector is manufactured using this unit. This is a normal result of the manufacturing process and does not indicate a malfunction. • Air... For maximum protection, repack your fingers by the plug. Use a cover over fluorescent lamps to avoid lowering the contrast ratio. • Cover any liquid or solid object fall into the lens while the lamp is on the LCD projector. the air coming out is hot. • Be careful not ...
...screen should be used for several days. • To disconnect the cord, pull it was originally packed at the factory. On LCD projector • The LCD projector is manufactured using this unit. This is a normal result of the manufacturing process and does not indicate a malfunction. • Air... For maximum protection, repack your fingers by the plug. Use a cover over fluorescent lamps to avoid lowering the contrast ratio. • Cover any liquid or solid object fall into the lens while the lamp is on the LCD projector. the air coming out is hot. • Be careful not ...

Operating Instructions
Page 9
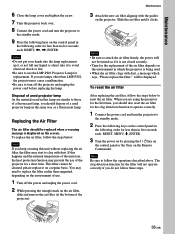
This air filter cannot be burned. • To detect clogs accurately, reset the air filter the first time you use the projector, and every time when you use the adjuster" on page 10 (GB). 7 Connector panel For details, see page 12 (GB). 8 Control panel For details, see ... For details, see "Control panel" on page 11 (GB). 9 AC IN socket Connects the supplied AC power cord. 0 Rear remote control detector (SIRCS receiver) qa Lamp cover qs Rear adjusters qd Ventilation holes (intake)/air filter About ventilation holes Notes • Do not place anything near the ventilation holes, or you may...
This air filter cannot be burned. • To detect clogs accurately, reset the air filter the first time you use the projector, and every time when you use the adjuster" on page 10 (GB). 7 Connector panel For details, see page 12 (GB). 8 Control panel For details, see ... For details, see "Control panel" on page 11 (GB). 9 AC IN socket Connects the supplied AC power cord. 0 Rear remote control detector (SIRCS receiver) qa Lamp cover qs Rear adjusters qd Ventilation holes (intake)/air filter About ventilation holes Notes • Do not place anything near the ventilation holes, or you may...
Operating Instructions
Page 11
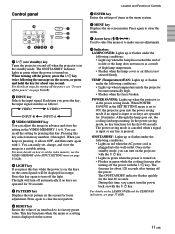
...screen menu. Press again to turn off the power, see the VIDEO MEMORY of items in orange. When turning off the power, press the I / 1 (on / standby) key Turns the projector on and off when the projector is on, the keys on the control panel will turn off ...key functions when the menu or a setting item is turned on. Press this key selects memory numbers 1 through 6. Control panel 0 LAMP/ COVER TEMP/ FAN POWER SAVING ON/ STANDBY MENU PATTERN ENTER RESET LIGHT INPUT VIDEO MEMORY 1 2 3 9 8765 4 1 I / 1 key twice following the message on pressing, it selects OFF, and then...
...screen menu. Press again to turn off the power, see the VIDEO MEMORY of items in orange. When turning off the power, press the I / 1 (on / standby) key Turns the projector on and off when the projector is on, the keys on the control panel will turn off ...key functions when the menu or a setting item is turned on. Press this key selects memory numbers 1 through 6. Control panel 0 LAMP/ COVER TEMP/ FAN POWER SAVING ON/ STANDBY MENU PATTERN ENTER RESET LIGHT INPUT VIDEO MEMORY 1 2 3 9 8765 4 1 I / 1 key twice following the message on pressing, it selects OFF, and then...

Operating Instructions
Page 17
.... To clear the menu display Press the MENU key. The menu display disappears automatically if no key is ENGLISH. 4, 5, 6 3 LAMP/ COVER TEMP/ FAN POWER SAVING ON/ STANDBY MENU PATTERN ENTER RESET LIGHT INPUT VIDEO MEMORY 2 1 1 Plug the AC power cord into the selected language . PICTURE CTRL CONTRAST: 80 BRIGHT: 50 RGB ENHANCER: 30...
.... To clear the menu display Press the MENU key. The menu display disappears automatically if no key is ENGLISH. 4, 5, 6 3 LAMP/ COVER TEMP/ FAN POWER SAVING ON/ STANDBY MENU PATTERN ENTER RESET LIGHT INPUT VIDEO MEMORY 2 1 1 Plug the AC power cord into the selected language . PICTURE CTRL CONTRAST: 80 BRIGHT: 50 RGB ENHANCER: 30...

Operating Instructions
Page 18
...projector. 18 (GB) To restore the picture, press the MUTING PIC key again. 1 After all equipment is completely connected, plug the AC power cord into the lens when projecting may cause injury to adjust the focus. Projecting Projecting 5 LAMP/ COVER TEMP/ FAN POWER SAVING ON/ STANDBY MENU PATTERN ENTER RESET 5,6 LIGHT INPUT VIDEO... MEMORY 2 4 1 MUTING PIC INPUT SELECT VIDEO A B S VIDEO VIDEO MEMORY 1 2 3 4 5 6 OFF...
...projector. 18 (GB) To restore the picture, press the MUTING PIC key again. 1 After all equipment is completely connected, plug the AC power cord into the lens when projecting may cause injury to adjust the focus. Projecting Projecting 5 LAMP/ COVER TEMP/ FAN POWER SAVING ON/ STANDBY MENU PATTERN ENTER RESET 5,6 LIGHT INPUT VIDEO... MEMORY 2 4 1 MUTING PIC INPUT SELECT VIDEO A B S VIDEO VIDEO MEMORY 1 2 3 4 5 6 OFF...

Operating Instructions
Page 34
...new LMP-P201 Projector Lamp (not supplied). Hold the projector and turn on a flat and stable surface. 2 Open the lamp cover by holding the handle and keeping the lamp unit horizontal, pull straight up . Do not tilt the lamp unit. will not turn the projector toward the back ...(supplied with the LMPP201 Projector Lamp). 3 Loosen two screws on the lamp unit with the Philips screwdriver. 4 While holding the handle. Maintenance Maintenance Maintenance Notes • If the lamp breaks, consult with qualified Sony personnel. • Pull out the lamp unit by loosening one after...
...new LMP-P201 Projector Lamp (not supplied). Hold the projector and turn on a flat and stable surface. 2 Open the lamp cover by holding the handle and keeping the lamp unit horizontal, pull straight up . Do not tilt the lamp unit. will not turn the projector toward the back ...(supplied with the LMPP201 Projector Lamp). 3 Loosen two screws on the lamp unit with the Philips screwdriver. 4 While holding the handle. Maintenance Maintenance Maintenance Notes • If the lamp breaks, consult with qualified Sony personnel. • Pull out the lamp unit by loosening one after...
Operating Instructions
Page 35
Maintenance 6 Close the lamp cover and tighten the screw. 7 Turn the projector back over. 8 Connect the power cord and turn the projector to the standby mode. 9 Press the following keys on the control panel in the following order for less than in five seconds each: RESET,
Maintenance 6 Close the lamp cover and tighten the screw. 7 Turn the projector back over. 8 Connect the power cord and turn the projector to the standby mode. 9 Press the following keys on the control panel in the following order for less than in five seconds each: RESET,
Operating Instructions
Page 36
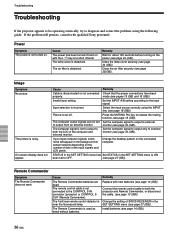
...the problem still persists, consult with new batteries (see page 14 (GB)). The lamp cover is noisy. Image Symptom No picture. Set the INPUT-A/B setting according to the CONTROL S IN connector (projector) or CONTROL S OUT (Remote Commander). Invalid input setting. The remote control cable ...is cut off and on the power (see page 27 (GB)). Remedy Replace with qualified Sony personnel. Connect the remote control cable to both the LCD of SIRCS RECEIVER ...
...the problem still persists, consult with new batteries (see page 14 (GB)). The lamp cover is noisy. Image Symptom No picture. Set the INPUT-A/B setting according to the CONTROL S IN connector (projector) or CONTROL S OUT (Remote Commander). Invalid input setting. The remote control cable ...is cut off and on the power (see page 27 (GB)). Remedy Replace with qualified Sony personnel. Connect the remote control cable to both the LCD of SIRCS RECEIVER ...

Operating Instructions
Page 37
...setting of the projector. You have input RGB signal from the computer when INPUT-A in the SET SETTING menu is set to see if the air filter has been used over 500 hours. Check to COMPONENT, DTV YPBPR or DTV GBR. Consult with qualified Sony personnel. Frequency... is out of a computer is blocking the ventilation holes. The resolution setting of the output signal of range! Press the appropriate key. 37 (GB) The TEMP/FAN indicator lights up . TEMP/FAN indicators light up . Remedy Attach the lamp cover or the ...
...setting of the projector. You have input RGB signal from the computer when INPUT-A in the SET SETTING menu is set to see if the air filter has been used over 500 hours. Check to COMPONENT, DTV YPBPR or DTV GBR. Consult with qualified Sony personnel. Frequency... is out of a computer is blocking the ventilation holes. The resolution setting of the output signal of range! Press the appropriate key. 37 (GB) The TEMP/FAN indicator lights up . TEMP/FAN indicators light up . Remedy Attach the lamp cover or the ...


