Operating Instructions
Page 8
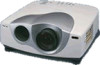
...LCD panel The newly developed high-resolution wide LCD panel (1366 × 768 dots) provides higher uniformity and reduced ghosts. • Wide Screen This projector utilizes a 16:9 aspect ratio LCD...lamp, optical unit and lens achieves a high brightness of NEC Corporation. The projector's white color goes with 16:9 RGB1) • Reduced noise The exhaust opening is a trademark of the Video Electronics Standard Association. To detect clogs accurately, reset...These include DRC-MF (Digital Reality Creation Multifunction) (Sony's proprietary high-quality image technology); This means the ...
...LCD panel The newly developed high-resolution wide LCD panel (1366 × 768 dots) provides higher uniformity and reduced ghosts. • Wide Screen This projector utilizes a 16:9 aspect ratio LCD...lamp, optical unit and lens achieves a high brightness of NEC Corporation. The projector's white color goes with 16:9 RGB1) • Reduced noise The exhaust opening is a trademark of the Video Electronics Standard Association. To detect clogs accurately, reset...These include DRC-MF (Digital Reality Creation Multifunction) (Sony's proprietary high-quality image technology); This means the ...

Operating Instructions
Page 9
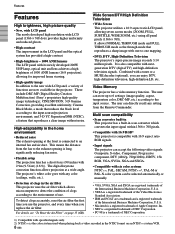
..."Replacing the Air Filter" on page 11 (GB). 9 AC IN socket Connects the supplied AC power cord. 0 Rear remote control detector (SIRCS receiver) qa Lamp cover qs Rear adjusters qd Ventilation holes (intake)/air filter About ventilation holes Notes • Do not place anything near the ventilation holes, or you... may cause internal heat build-up. This air filter cannot be burned. • To detect clogs accurately, reset the air filter the first time you use the projector, and every time when you use the adjusters, see "How to ensure optimal performance. For details on how to use...
..."Replacing the Air Filter" on page 11 (GB). 9 AC IN socket Connects the supplied AC power cord. 0 Rear remote control detector (SIRCS receiver) qa Lamp cover qs Rear adjusters qd Ventilation holes (intake)/air filter About ventilation holes Notes • Do not place anything near the ventilation holes, or you... may cause internal heat build-up. This air filter cannot be burned. • To detect clogs accurately, reset the air filter the first time you use the projector, and every time when you use the adjusters, see "How to ensure optimal performance. For details on how to use...
Operating Instructions
Page 11
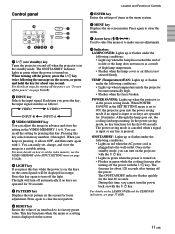
...press the I / 1 (on / standby) key Turns the projector on and off the power" on the screen, or press and hold the key for about one second. For details on steps for turning off the power, see the VIDEO MEMORY of items in the menu system. 8 MENU key Displays the... is displayed on the screen for 30 seconds. 5 PATTERN key Displays the test pattern on the screen. Control panel 0 LAMP/ COVER TEMP/ FAN POWER SAVING ON/ STANDBY MENU PATTERN ENTER RESET LIGHT INPUT VIDEO MEMORY 1 2 3 9 8765 4 1 I / 1 key twice following the message on page 20 (GB). 2 INPUT key Selects the ...
...press the I / 1 (on / standby) key Turns the projector on and off the power" on the screen, or press and hold the key for about one second. For details on steps for turning off the power, see the VIDEO MEMORY of items in the menu system. 8 MENU key Displays the... is displayed on the screen for 30 seconds. 5 PATTERN key Displays the test pattern on the screen. Control panel 0 LAMP/ COVER TEMP/ FAN POWER SAVING ON/ STANDBY MENU PATTERN ENTER RESET LIGHT INPUT VIDEO MEMORY 1 2 3 9 8765 4 1 I / 1 key twice following the message on page 20 (GB). 2 INPUT key Selects the ...

Operating Instructions
Page 17
... and other on the power. 3 Press the MENU key. The menu display disappears automatically if no key is ENGLISH. 4, 5, 6 3 LAMP/ COVER TEMP/ FAN POWER SAVING ON/ STANDBY MENU PATTERN ENTER RESET LIGHT INPUT VIDEO MEMORY 2 1 1 Plug the AC power cord into the selected language . Selecting the Menu Language You can select the language...
... and other on the power. 3 Press the MENU key. The menu display disappears automatically if no key is ENGLISH. 4, 5, 6 3 LAMP/ COVER TEMP/ FAN POWER SAVING ON/ STANDBY MENU PATTERN ENTER RESET LIGHT INPUT VIDEO MEMORY 2 1 1 Plug the AC power cord into the selected language . Selecting the Menu Language You can select the language...

Operating Instructions
Page 18
... lights in red and the projector goes into the standby mode. 2 Press the I / 1 key on the control panel or the I key on the remote commander. Projecting Projecting 5 LAMP/ COVER TEMP/ FAN POWER SAVING ON/ STANDBY MENU PATTERN ENTER RESET 5,6 LIGHT INPUT VIDEO MEMORY 2 4 1 MUTING PIC INPUT SELECT VIDEO A B S VIDEO VIDEO MEMORY 1 2 3 4 5 6 OFF MENU RESET ENTER 2 4 4 Press the INPUT...
... lights in red and the projector goes into the standby mode. 2 Press the I / 1 key on the control panel or the I key on the remote commander. Projecting Projecting 5 LAMP/ COVER TEMP/ FAN POWER SAVING ON/ STANDBY MENU PATTERN ENTER RESET 5,6 LIGHT INPUT VIDEO MEMORY 2 4 1 MUTING PIC INPUT SELECT VIDEO A B S VIDEO VIDEO MEMORY 1 2 3 4 5 6 OFF MENU RESET ENTER 2 4 4 Press the INPUT...

Operating Instructions
Page 28
... picture horizontally or vertically. DIGIT KEYSTONE Corrects the trapezoid caused by reducing the lamp wattage. LAMP TIMER Indicates how long the lamp has been turned on the next time. OFF: DIGIT KEYSTONE is reset to square the image. The INSTALL SETTING Menu The INSTALL SETTING Menu The ...INSTALL SETTING menu is reversed horizontally. FLOOR-REAR: The picture is used for the projector to change the ...
... picture horizontally or vertically. DIGIT KEYSTONE Corrects the trapezoid caused by reducing the lamp wattage. LAMP TIMER Indicates how long the lamp has been turned on the next time. OFF: DIGIT KEYSTONE is reset to square the image. The INSTALL SETTING Menu The INSTALL SETTING Menu The ...INSTALL SETTING menu is reversed horizontally. FLOOR-REAR: The picture is used for the projector to change the ...
Operating Instructions
Page 35
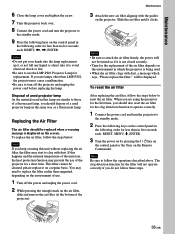
Maintenance 6 Close the lamp cover and tighten the screw. 7 Turn the projector back over. 8 Connect the power cord and turn the projector to the standby mode. 9 Press the following keys on the control panel in the following order for less than in five seconds each: RESET,
Maintenance 6 Close the lamp cover and tighten the screw. 7 Turn the projector back over. 8 Connect the power cord and turn the projector to the standby mode. 9 Press the following keys on the control panel in the following order for less than in five seconds each: RESET,
Operating Instructions
Page 42
... (GB) on a floor 29 (GB) KEYSTONE MEM 28 (GB) Index L Lamp replacement 34 (GB) LAMP TIMER 28 (GB) LANGUAGE 27 (GB) Location and function of controls connector panel...11 (GB), 27 (GB) Precautions 7 (GB) Projecting 18 (GB) PSS-610 Projector Suspension Support 30 (GB) R Remote Commander battery installation 14 (GB) location and function of ... Remote control detector front 9 (GB) rear 9 (GB) Reset resettable items 21 (GB) resetting the air filter 35 (GB) resetting the item 21 (GB) RGB ENHANCER 22 (GB) RS-... Ventilation holes exhaust 9 (GB) intake 9(GB) VIDEO MEMORY 25 (GB) V SCROLL 25 (GB) 42 (GB)
... (GB) on a floor 29 (GB) KEYSTONE MEM 28 (GB) Index L Lamp replacement 34 (GB) LAMP TIMER 28 (GB) LANGUAGE 27 (GB) Location and function of controls connector panel...11 (GB), 27 (GB) Precautions 7 (GB) Projecting 18 (GB) PSS-610 Projector Suspension Support 30 (GB) R Remote Commander battery installation 14 (GB) location and function of ... Remote control detector front 9 (GB) rear 9 (GB) Reset resettable items 21 (GB) resetting the air filter 35 (GB) resetting the item 21 (GB) RGB ENHANCER 22 (GB) RS-... Ventilation holes exhaust 9 (GB) intake 9(GB) VIDEO MEMORY 25 (GB) V SCROLL 25 (GB) 42 (GB)


