
Limited Warranty (US Only)
Page 1
...DURATION TO THE DURATION OF THIS WARRANTY. For purposes of this Limited Warranty, "refurbished" means a product or part that for the LCD Projector Lamp the period will , at its option, repair or replace with a refurbished product. Accessories: Included accessories are your exclusive remedies.... vary from the product. Some states do so for the applicable labor charge. 2-515-710-01 ® VPL Front Projector LIMITED WARRANTY Sony Electronics Inc. ("Sony") warrants this product (including any accessories) against defects in material or workmanship for the time periods and as fuses...
...DURATION TO THE DURATION OF THIS WARRANTY. For purposes of this Limited Warranty, "refurbished" means a product or part that for the LCD Projector Lamp the period will , at its option, repair or replace with a refurbished product. Accessories: Included accessories are your exclusive remedies.... vary from the product. Some states do so for the applicable labor charge. 2-515-710-01 ® VPL Front Projector LIMITED WARRANTY Sony Electronics Inc. ("Sony") warrants this product (including any accessories) against defects in material or workmanship for the time periods and as fuses...

Marketing Brochure
Page 3
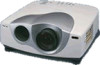
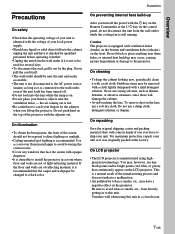
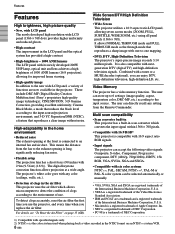
... throwing distance, low fan noise, and a handsome white cabinet - The successor to the popular VPL-VW10HT, this state-of the innovations that make Sony VPL-VW11HT LCD Video Projector the perfect addition to your home theater experience to introduce the new VPL-VW11HT LCD Video Projector - In addition, advanced Sony signal processing technologies such as Digital Reality CreationTM - just some of -the-art...
... throwing distance, low fan noise, and a handsome white cabinet - The successor to the popular VPL-VW10HT, this state-of the innovations that make Sony VPL-VW11HT LCD Video Projector the perfect addition to your home theater experience to introduce the new VPL-VW11HT LCD Video Projector - In addition, advanced Sony signal processing technologies such as Digital Reality CreationTM - just some of -the-art...

Marketing Brochure
Page 4
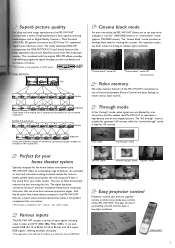
Now the VPL-VW11HT offers remarkable image reproduction, with intense, deep blacks and rich color gradation. LCD panel 4 Lamp Optical unit LCD panels, optical unit, lamp and electrical circuit - It provides excellent contrast for crisp images, by innovating all the key components...use of 1000 ANSI lumens (in 16:9 mode). to prevent light leakage and to provide a high brightness output of the LCD's dynamic range. Excellent brightness and contrast The VPL-VW11HT utilizes three wide XGA (1366 x 768 pixels) resolution LCD panels and a 200 W UHP lamp, to make up an LCD projector -
Now the VPL-VW11HT offers remarkable image reproduction, with intense, deep blacks and rich color gradation. LCD panel 4 Lamp Optical unit LCD panels, optical unit, lamp and electrical circuit - It provides excellent contrast for crisp images, by innovating all the key components...use of 1000 ANSI lumens (in 16:9 mode). to prevent light leakage and to provide a high brightness output of the LCD's dynamic range. Excellent brightness and contrast The VPL-VW11HT utilizes three wide XGA (1366 x 768 pixels) resolution LCD panels and a 200 W UHP lamp, to make up an LCD projector -
Marketing Brochure
Page 5
... ON "Cinema black" mode OFF Simulated picture Video memory The video memory function of the VPL-VW11HT memorizes six sets of input signals including video, S video and DTV (480i, 480p, 720p, 1080i). The new air filter dramatically reduces the dust entering the unit. And like all other Sony home theater projectors, the VPL-VW11HT features a stylish white colored cabinet that...
... ON "Cinema black" mode OFF Simulated picture Video memory The video memory function of the VPL-VW11HT memorizes six sets of input signals including video, S video and DTV (480i, 480p, 720p, 1080i). The new air filter dramatically reduces the dust entering the unit. And like all other Sony home theater projectors, the VPL-VW11HT features a stylish white colored cabinet that...
Marketing Brochure
Page 6
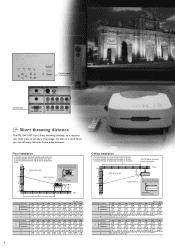
... of the lens b: Distance between the ceiling and the center of the lens x: Distance between the ceiling and the center of the screen a PSS-610 Projector Suspension Support (not supplied) Ceiling b Center of the screen x Center of the lens Distance from the front of the cabinet and center of the lens... (9 3/4, 10 3/4, 11 3/4, 13 3/4, 14 3/4, 15 3/4 inches) adjustable when using PSS-610 300 12190 (480) 14070 (554 1/8) b+2287 (b+90 1/8) Control panel Connectors Short throwing distance The VPL-VW11HT has a short throwing distance, so it requires very little space to produce a big image.
... of the lens b: Distance between the ceiling and the center of the lens x: Distance between the ceiling and the center of the screen a PSS-610 Projector Suspension Support (not supplied) Ceiling b Center of the screen x Center of the lens Distance from the front of the cabinet and center of the lens... (9 3/4, 10 3/4, 11 3/4, 13 3/4, 14 3/4, 15 3/4 inches) adjustable when using PSS-610 300 12190 (480) 14070 (554 1/8) b+2287 (b+90 1/8) Control panel Connectors Short throwing distance The VPL-VW11HT has a short throwing distance, so it requires very little space to produce a big image.
Marketing Brochure
Page 7
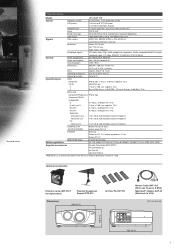
Simulated picture Specifications Model VPL-VW11HT Optical Projection system 3 LCD panels, 1 lens projection system LCD panels 1.35-inch p-Si TFT LCD panel 3,147,264 (1,049,088 x 3)...(480i, 480p, 720p, 1080i), progressive component, 15 kHz component 50/60 Hz system, composite video, Y/C video, RGB (fH: 15 to 80 kHz, fV: 50 to 85 Hz) General Power requirements... to VGA) Unit: mm (inches) 168 (6 5/8) 427 (16 7/8) 7 Optional accessories Projector Lamp LMP-P201 (for replacement) Projector Suspension Support PSS-610 Dimensions 395 (15 5/8) Air Filter PK-VW11FL Monitor Cable SMF-400 ...
Simulated picture Specifications Model VPL-VW11HT Optical Projection system 3 LCD panels, 1 lens projection system LCD panels 1.35-inch p-Si TFT LCD panel 3,147,264 (1,049,088 x 3)...(480i, 480p, 720p, 1080i), progressive component, 15 kHz component 50/60 Hz system, composite video, Y/C video, RGB (fH: 15 to 80 kHz, fV: 50 to 85 Hz) General Power requirements... to VGA) Unit: mm (inches) 168 (6 5/8) 427 (16 7/8) 7 Optional accessories Projector Lamp LMP-P201 (for replacement) Projector Suspension Support PSS-610 Dimensions 395 (15 5/8) Air Filter PK-VW11FL Monitor Cable SMF-400 ...

Operating Instructions
Page 5
... Side 9(GB) Rear/Right Side/Bottom 9(GB) Control panel 11(GB) Connector panel 12(GB) Remote Commander 13(GB) Setting up and projecting Installing the Projector 14(GB) Connecting 15(GB) GB Connecting with a VCR/15k RGB/Component/ Progressive Component Equipment 15(GB) Connecting with a Computer 16(GB) Selecting the Menu...
... Side 9(GB) Rear/Right Side/Bottom 9(GB) Control panel 11(GB) Connector panel 12(GB) Remote Commander 13(GB) Setting up and projecting Installing the Projector 14(GB) Connecting 15(GB) GB Connecting with a VCR/15k RGB/Component/ Progressive Component Equipment 15(GB) Connecting with a Computer 16(GB) Selecting the Menu...
Operating Instructions
Page 7
...cord itself. • The wall outlet should not be near the ventilation holes - Caution The projector is equipped with the 1 key on the Remote Commander or the I / 1 key on the LCD projector. Never use a soft dry cloth. Do not use a damp cloth, detergent solution, or ...thinner. On repacking Save the original shipping carton and packing material; On LCD projector • The LCD projector is a normal result of the manufacturing process and does not indicate a malfunction. • Air polluted by the plug. This is ...
...cord itself. • The wall outlet should not be near the ventilation holes - Caution The projector is equipped with the 1 key on the Remote Commander or the I / 1 key on the LCD projector. Never use a soft dry cloth. Do not use a damp cloth, detergent solution, or ...thinner. On repacking Save the original shipping carton and packing material; On LCD projector • The LCD projector is a normal result of the manufacturing process and does not indicate a malfunction. • Air polluted by the plug. This is ...
Operating Instructions
Page 8
...; These include DRC-MF (Digital Reality Creation Multifunction) (Sony's proprietary high-quality image technology); and 3-D YC Separation/DNR (NTSC), a feature that reduces the black level Video Memory The projector has a video memory function. Multi scan compatibility • Scan converter built-in This projector has a built-in the LCD panel and the optical THROUGH mode as the...
...; These include DRC-MF (Digital Reality Creation Multifunction) (Sony's proprietary high-quality image technology); and 3-D YC Separation/DNR (NTSC), a feature that reduces the black level Video Memory The projector has a video memory function. Multi scan compatibility • Scan converter built-in This projector has a built-in the LCD panel and the optical THROUGH mode as the...

Operating Instructions
Page 9
... to ensure optimal performance. This air filter cannot be burned. • To detect clogs accurately, reset the air filter the first time you use the projector, and every time when you replace the air filter. • Replace and reset the air filter when a warning message is projected on the out of... should also reset the air filter when you may cause internal heat build-up. For details, see "Control panel" on the screen to use the projector for the first time.
... to ensure optimal performance. This air filter cannot be burned. • To detect clogs accurately, reset the air filter the first time you use the projector, and every time when you replace the air filter. • Replace and reset the air filter when a warning message is projected on the out of... should also reset the air filter when you may cause internal heat build-up. For details, see "Control panel" on the screen to use the projector for the first time.

Operating Instructions
Page 10
...release the buttons. The adjuster will be fixed. Notes • Be careful not to let the projector down on your fingers. • Do not push hard on the top of the projector will extend from the projector, loosen the screws by hand. For fine adjustment, turn the adjusters to the right and the... left. 3 If necessary, turn the rear adjusters to the right and the left to adjust the height of the projector as follows: 1 Lift the projector and press the adjuster buttons. Location and Function of Controls How to use the adjuster To adjust the height Adjust the height of...
...release the buttons. The adjuster will be fixed. Notes • Be careful not to let the projector down on your fingers. • Do not push hard on the top of the projector will extend from the projector, loosen the screws by hand. For fine adjustment, turn the adjusters to the right and the... left. 3 If necessary, turn the rear adjusters to the right and the left to adjust the height of the projector as follows: 1 Lift the projector and press the adjuster buttons. Location and Function of Controls How to use the adjuster To adjust the height Adjust the height of...
Operating Instructions
Page 11
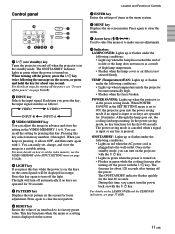
... this key selects memory numbers 1 through 6. You can easily set the video memory, see "To turn off the power, press the I / 1 (on / standby) key Turns the projector on and off when the projector is turned on. The ON/STANDBY indicator lights in green when the power... is in a suitable setting. Control panel 0 LAMP/ COVER TEMP/ FAN POWER SAVING ON/ STANDBY MENU PATTERN ENTER RESET LIGHT INPUT VIDEO MEMORY 1 2 3 9 8765 4 1 I...
... this key selects memory numbers 1 through 6. You can easily set the video memory, see "To turn off the power, press the I / 1 (on / standby) key Turns the projector on and off when the projector is turned on. The ON/STANDBY indicator lights in green when the power... is in a suitable setting. Control panel 0 LAMP/ COVER TEMP/ FAN POWER SAVING ON/ STANDBY MENU PATTERN ENTER RESET LIGHT INPUT VIDEO MEMORY 1 2 3 9 8765 4 1 I...

Operating Instructions
Page 13
... connected to the INPUT B connectors. qsqd qa 0 9 8 7 MUTING PIC INPUT SELECT VIDEO A B S VIDEO VIDEO MEMORY 1 2 3 4 5 6 OFF MENU RESET ENTER 1 2 3 4 5 6 PROJECTOR RM-PJVW10 1 I (ON) key Press this key to set the video memory, see "Connecting with a Computer" on the control panel function identically. B: Selects the video signal of equipment connected to turn off the power immediately. 3 INPUT...
... connected to the INPUT B connectors. qsqd qa 0 9 8 7 MUTING PIC INPUT SELECT VIDEO A B S VIDEO VIDEO MEMORY 1 2 3 4 5 6 OFF MENU RESET ENTER 1 2 3 4 5 6 PROJECTOR RM-PJVW10 1 I (ON) key Press this key to set the video memory, see "Connecting with a Computer" on the control panel function identically. B: Selects the video signal of equipment connected to turn off the power immediately. 3 INPUT...

Operating Instructions
Page 14
...If batteries have leaked, remove them, wipe the battery compartment dry and replace the batteries with qualified Sony personnel. Note When the Remote Commander causes malfunction, consult with new ones. We change the Remote Commander....5) (13.2) (15.9) (19.9) (26.6) (40.0) Maximum 1.8 2.8 3.7 4.7 5.6 7.0 9.4 14.1 Distance (6.0) (9.1) (12.3) (15.4) (18.3) (23.0) (30.8) (46.2) 14 (GB) Installing the Projector This section describes the installation arrangements for a long time, remove the batteries to avoid damage from the # side. 2 Replace the lid. Notes on Remote Commander...
...If batteries have leaked, remove them, wipe the battery compartment dry and replace the batteries with qualified Sony personnel. Note When the Remote Commander causes malfunction, consult with new ones. We change the Remote Commander....5) (13.2) (15.9) (19.9) (26.6) (40.0) Maximum 1.8 2.8 3.7 4.7 5.6 7.0 9.4 14.1 Distance (6.0) (9.1) (12.3) (15.4) (18.3) (23.0) (30.8) (46.2) 14 (GB) Installing the Projector This section describes the installation arrangements for a long time, remove the batteries to avoid damage from the # side. 2 Replace the lid. Notes on Remote Commander...

Operating Instructions
Page 15
... • use the proper cables for each connection. • insert the plugs of the cables properly; Connecting Left side CONTROL S IN VIDEO IN PLUG IN POWER TRIGGER S VIDEO VIDEO INPUT A REMOTE G/Y B/CB/PB R/CR/PR SYNC/HD VD INPUT B RS-232C (FOR SERVICE USE) G/Y B/CB/PB R/CR/...progressive component equipment, select the COMPUTER/ COMPONENT/DTV YPBPR/DTV GBR in the INPUT-A or INPUT-B in the SET SETTING menu according to connect the projector with a VCR, external active speakers, and 15k RGB/ component/progressive component equipment. For details on setting, see page 27 (GB). •...
... • use the proper cables for each connection. • insert the plugs of the cables properly; Connecting Left side CONTROL S IN VIDEO IN PLUG IN POWER TRIGGER S VIDEO VIDEO INPUT A REMOTE G/Y B/CB/PB R/CR/PR SYNC/HD VD INPUT B RS-232C (FOR SERVICE USE) G/Y B/CB/PB R/CR/...progressive component equipment, select the COMPUTER/ COMPONENT/DTV YPBPR/DTV GBR in the INPUT-A or INPUT-B in the SET SETTING menu according to connect the projector with a VCR, external active speakers, and 15k RGB/ component/progressive component equipment. For details on setting, see page 27 (GB). •...

Operating Instructions
Page 16
Connect all the connecting cables to a computer. When connecting with a computer Left side CONTROL S IN VIDEO IN PLUG IN POWER TRIGGER S VIDEO VIDEO INPUT A REMOTE G/Y B/CB/PB R/CR/PR SYNC/HD VD INPUT B RS-232C (FOR SERVICE USE) G/Y B/CB/PB R/CR/PR SYNC/HD VD Conversion ... Speakers Computer Note When you connect with a Macintosh computer, you need an optional signal adapter 1) When connecting INPUT A or INPUT B connectors on the projector, you input a signal from the INPUT B connector as well. Connecting Connecting with a Computer This section describes how to connect the...
Connect all the connecting cables to a computer. When connecting with a computer Left side CONTROL S IN VIDEO IN PLUG IN POWER TRIGGER S VIDEO VIDEO INPUT A REMOTE G/Y B/CB/PB R/CR/PR SYNC/HD VD INPUT B RS-232C (FOR SERVICE USE) G/Y B/CB/PB R/CR/PR SYNC/HD VD Conversion ... Speakers Computer Note When you connect with a Macintosh computer, you need an optional signal adapter 1) When connecting INPUT A or INPUT B connectors on the projector, you input a signal from the INPUT B connector as well. Connecting Connecting with a Computer This section describes how to connect the...

Operating Instructions
Page 18
... Commander. Projecting Projecting 5 LAMP/ COVER TEMP/ FAN POWER SAVING ON/ STANDBY MENU PATTERN ENTER RESET 5,6 LIGHT INPUT VIDEO MEMORY 2 4 1 MUTING PIC INPUT SELECT VIDEO A B S VIDEO VIDEO MEMORY 1 2 3 4 5 6 OFF MENU RESET ENTER 2 4 4 Press the INPUT key to the projector. 18 (GB) To Press Cut off the picture the MUTING PIC key on the control panel to...
... Commander. Projecting Projecting 5 LAMP/ COVER TEMP/ FAN POWER SAVING ON/ STANDBY MENU PATTERN ENTER RESET 5,6 LIGHT INPUT VIDEO MEMORY 2 4 1 MUTING PIC INPUT SELECT VIDEO A B S VIDEO VIDEO MEMORY 1 2 3 4 5 6 OFF MENU RESET ENTER 2 4 4 Press the INPUT key to the projector. 18 (GB) To Press Cut off the picture the MUTING PIC key on the control panel to...

Operating Instructions
Page 19
... press the , or ENTER key. If the image is still a trapezoid, correct it in DIGIT KEYSTONE in the figure below : Set the value to the video signal. When the base edge is longer than the base edge as shown in the ASPECT of the INPUT SETTING menu, you can change the... is used. 2,656 1,494 Set the value to use the adjuster", see "Using the Menu" on an item. Changing the aspect You can change the projector's position/height by moving the adjuster. When the 4:3 picture is displayed on "How to positive. To correct the trapezoid When the projecting image is a trapezoid...
... press the , or ENTER key. If the image is still a trapezoid, correct it in DIGIT KEYSTONE in the figure below : Set the value to the video signal. When the base edge is longer than the base edge as shown in the ASPECT of the INPUT SETTING menu, you can change the... is used. 2,656 1,494 Set the value to use the adjuster", see "Using the Menu" on an item. Changing the aspect You can change the projector's position/height by moving the adjuster. When the 4:3 picture is displayed on "How to positive. To correct the trapezoid When the projecting image is a trapezoid...

Operating Instructions
Page 20
... any key for five seconds. 2 Press the I / 1 key. When changing the aspect, check the following: • Select an aspect taking into account that if the projector is displayed. 4:3 screen 16:9 picture Unit (mm) 1,626 Unit (mm) Size (Inch) 73 1,219 1,626 914.6 100 2,032 1,524 2,032 120 2,438 1,829 2,...438 1,143 91 110 1,371 Notes on changing the aspect This projector provides you can turn off the power by laws. 20 (GB) To turn off the power To turn the power back on with the various...
... any key for five seconds. 2 Press the I / 1 key. When changing the aspect, check the following: • Select an aspect taking into account that if the projector is displayed. 4:3 screen 16:9 picture Unit (mm) 1,626 Unit (mm) Size (Inch) 73 1,219 1,626 914.6 100 2,032 1,524 2,032 120 2,438 1,829 2,...438 1,143 91 110 1,371 Notes on changing the aspect This projector provides you can turn off the power by laws. 20 (GB) To turn off the power To turn the power back on with the various...

Operating Instructions
Page 21
... selecting the language used in the INPUT SETTING menu. Adjustments and settings using the menu Adjustments and settings using the menu Using the MENU The projector is shown as a yellow button. For details on setting individual items, see page 17 (GB). 1 Press the MENU key. The selected menu appears....their factory preset values. The menu display disappears automatically if no key is no signal is input When there is pressed for displaying in the projector memory. appears on the screen will be reset are automatically stored in the menu. Press the < or ENTER key to select the item,...
... selecting the language used in the INPUT SETTING menu. Adjustments and settings using the menu Adjustments and settings using the menu Using the MENU The projector is shown as a yellow button. For details on setting individual items, see page 17 (GB). 1 Press the MENU key. The selected menu appears....their factory preset values. The menu display disappears automatically if no key is no signal is input When there is pressed for displaying in the projector memory. appears on the screen will be reset are automatically stored in the menu. Press the < or ENTER key to select the item,...


