Operating Instructions
Page 6
Maintenance Other Maintenance 34 (GB) Replacing the Lamp 34 (GB) Cleaning the Air Filter 35 (GB) Troubleshooting 36 (GB) Specifications 38 (GB) Index 42 (GB) 6 (GB)
Maintenance Other Maintenance 34 (GB) Replacing the Lamp 34 (GB) Cleaning the Air Filter 35 (GB) Troubleshooting 36 (GB) Specifications 38 (GB) Index 42 (GB) 6 (GB)
Operating Instructions
Page 7
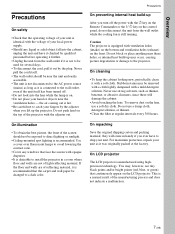
... technology. On cleaning • To keep the cabinet looking new, periodically clean it with a mild detergent solution. Use a cover over fluorescent lamps to avoid lowering the contrast ratio. • Cover any liquid or solid object fall into the lens while the... turn off . • Do not look into the cabinet, unplug the unit and have to the projector. Stubborn stains may be removed with a cloth lightly dampened with a soft cloth. On LCD projector The LCD projector is a normal result of reflecting material, it is recommended that face the screen with ventilation holes (intake...
... technology. On cleaning • To keep the cabinet looking new, periodically clean it with a mild detergent solution. Use a cover over fluorescent lamps to avoid lowering the contrast ratio. • Cover any liquid or solid object fall into the lens while the... turn off . • Do not look into the cabinet, unplug the unit and have to the projector. Stubborn stains may be removed with a cloth lightly dampened with a soft cloth. On LCD projector The LCD projector is a normal result of reflecting material, it is recommended that face the screen with ventilation holes (intake...
Operating Instructions
Page 8
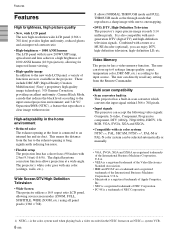
...definition television signals. definition LD, etc. These include DRC-MF (Digital Reality Creation Multifunction) (Sony's proprietary high-quality image technology); 3-D Gamma Correction, providing excellent uniformity; VGA, SVGA, ... improved contrast ratio. • High-brightness - 1000 ANSI lumens The LCD panel with its new 200W UHP lamp, optical unit and lens achieves a high brightness of 1000 ANSI lumens ... Wide Screen/DTV/High Definition Television • Wide Screen This projector utilizes a 16:9 aspect ratio LCD panel, allowing seven screen modes (ZOOM, FULL, SUBTITLE, WIDE ZOOM, etc.) ...
...definition television signals. definition LD, etc. These include DRC-MF (Digital Reality Creation Multifunction) (Sony's proprietary high-quality image technology); 3-D Gamma Correction, providing excellent uniformity; VGA, SVGA, ... improved contrast ratio. • High-brightness - 1000 ANSI lumens The LCD panel with its new 200W UHP lamp, optical unit and lens achieves a high brightness of 1000 ANSI lumens ... Wide Screen/DTV/High Definition Television • Wide Screen This projector utilizes a 16:9 aspect ratio LCD panel, allowing seven screen modes (ZOOM, FULL, SUBTITLE, WIDE ZOOM, etc.) ...
Operating Instructions
Page 9
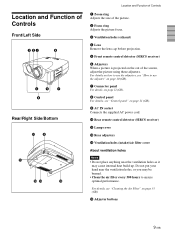
... For details, see "Control panel" on page 11 (GB). 9 AC IN socket Connects the supplied AC power cord. 0 Rear remote control detector (SIRCS receiver) qa Lamp cover qs Rear adjusters qd Ventilation holes (intake)/air filter cover About ventilation holes Notes • Do not place anything near the ventilation holes, or...
... For details, see "Control panel" on page 11 (GB). 9 AC IN socket Connects the supplied AC power cord. 0 Rear remote control detector (SIRCS receiver) qa Lamp cover qs Rear adjusters qd Ventilation holes (intake)/air filter cover About ventilation holes Notes • Do not place anything near the ventilation holes, or...
Operating Instructions
Page 11
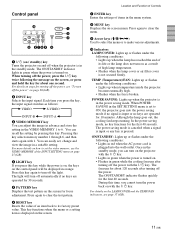
... press this key again to its factory preset value. This key functions when the menu or a setting item is displayed on and off when the projector is on, the keys on the screen, or press and hold the key for 30 seconds. 5 PATTERN key Displays the test pattern on page... 20 (GB). 2 INPUT key Selects the input signal. Control panel 0 LAMP/ COVER TEMP/ FAN POWER SAVING ON/ STANDBY MENU PATTERN ENTER RESET LIGHT INPUT VIDEO MEMORY 1 2 3 9 8765 4 1 I / 1 key twice following the message on the ...
... press this key again to its factory preset value. This key functions when the menu or a setting item is displayed on and off when the projector is on, the keys on the screen, or press and hold the key for 30 seconds. 5 PATTERN key Displays the test pattern on page... 20 (GB). 2 INPUT key Selects the input signal. Control panel 0 LAMP/ COVER TEMP/ FAN POWER SAVING ON/ STANDBY MENU PATTERN ENTER RESET LIGHT INPUT VIDEO MEMORY 1 2 3 9 8765 4 1 I / 1 key twice following the message on the ...
Operating Instructions
Page 12
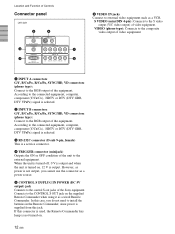
..., R/CR/PR, SYNC/HD, VD connectors (phono type): Connect to the RGB output of video equipment. In this connector is used, the Remote Commander key lamp is selected. 2 INPUT B connectors G/Y, B/CB/PB, R/CR/PR, SYNC/HD, VD connectors (phono type): Connect to the RGB output of the equipment. Connects.... 12 (GB) However, as a power source. 5 CONTROL S IN/PLUG IN POWER (DC 5V output) jack Connects to the control S out jacks of the Sony equipment. If this case, you cannot use the connector as power is output. According to the connected equipment, computer, component (Y/CB/CR), HDTV or DTV...
..., R/CR/PR, SYNC/HD, VD connectors (phono type): Connect to the RGB output of video equipment. In this connector is used, the Remote Commander key lamp is selected. 2 INPUT B connectors G/Y, B/CB/PB, R/CR/PR, SYNC/HD, VD connectors (phono type): Connect to the RGB output of the equipment. Connects.... 12 (GB) However, as a power source. 5 CONTROL S IN/PLUG IN POWER (DC 5V output) jack Connects to the control S out jacks of the Sony equipment. If this case, you cannot use the connector as power is output. According to the connected equipment, computer, component (Y/CB/CR), HDTV or DTV...

Operating Instructions
Page 17
...-A: INPUT-B: LANGUAGE: ON COMPONENT COMPONENT ENGLISH POWER SAVING: OFF SIRCS RECEIVER: FRONT&REAR 17 (GB) The menu display disappears automatically if no key is ENGLISH. 4, 5, 6 3 LAMP/ COVER TEMP/ FAN POWER SAVING ON/ STANDBY MENU PATTERN ENTER RESET LIGHT INPUT VIDEO MEMORY 2 1 1 Plug the AC power cord into the selected language . The...
...-A: INPUT-B: LANGUAGE: ON COMPONENT COMPONENT ENGLISH POWER SAVING: OFF SIRCS RECEIVER: FRONT&REAR 17 (GB) The menu display disappears automatically if no key is ENGLISH. 4, 5, 6 3 LAMP/ COVER TEMP/ FAN POWER SAVING ON/ STANDBY MENU PATTERN ENTER RESET LIGHT INPUT VIDEO MEMORY 2 1 1 Plug the AC power cord into the selected language . The...
Operating Instructions
Page 18
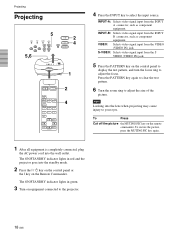
.... S-VIDEO: Selects video signal input from the INPUT B connector, such as component equipment. The ON/STANDBY indicator lights in red and the projector goes into the standby mode. 2 Press the I / 1 key on the control panel or the I key on the remote commander. To... to adjust the focus. Press the PATTERN key again to clear the test pattern. 6 Turn the zoom ring to select the input source. Projecting Projecting 5 LAMP/ COVER TEMP/ FAN POWER SAVING ON/ STANDBY MENU PATTERN ENTER RESET 5,6 LIGHT INPUT VIDEO MEMORY 2 4 1 MUTING PIC INPUT SELECT VIDEO A B S VIDEO VIDEO ...
.... S-VIDEO: Selects video signal input from the INPUT B connector, such as component equipment. The ON/STANDBY indicator lights in red and the projector goes into the standby mode. 2 Press the I / 1 key on the control panel or the I key on the remote commander. To... to adjust the focus. Press the PATTERN key again to clear the test pattern. 6 Turn the zoom ring to select the input source. Projecting Projecting 5 LAMP/ COVER TEMP/ FAN POWER SAVING ON/ STANDBY MENU PATTERN ENTER RESET 5,6 LIGHT INPUT VIDEO MEMORY 2 4 1 MUTING PIC INPUT SELECT VIDEO A B S VIDEO VIDEO ...
Operating Instructions
Page 27
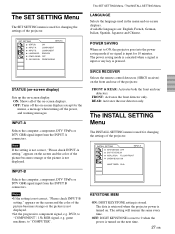
... picture is turned on the next time. 27 (GB) STATUS (on-screen display) Sets up the on the screen and the color of the projector. appears on -screen display. Note If the setting is not correct, "Please check INPUT-B setting." SET SETTING INPUT-A STATUS: ON INPUT-A: COMPONENT.... FRONT: Activates the front detector only. INSTALL SETTING INPUT-A KEYSTONE MEM: OFF DIGIT KEYSTONE: 01 INSTALLATION: FLOOR-FRONT CINEMA BLACK: ON LAMP TIMER: 234h KEYSTONE MEM ON: DIGIT KEYSTONE setting is used in the menu and on -screen displays except for changing the settings of the...
... picture is turned on the next time. 27 (GB) STATUS (on-screen display) Sets up the on the screen and the color of the projector. appears on -screen display. Note If the setting is not correct, "Please check INPUT-B setting." SET SETTING INPUT-A STATUS: ON INPUT-A: COMPONENT.... FRONT: Activates the front detector only. INSTALL SETTING INPUT-A KEYSTONE MEM: OFF DIGIT KEYSTONE: 01 INSTALLATION: FLOOR-FRONT CINEMA BLACK: ON LAMP TIMER: 234h KEYSTONE MEM ON: DIGIT KEYSTONE setting is used in the menu and on -screen displays except for changing the settings of the...

Operating Instructions
Page 28
...picture horizontally or vertically. CEILING-FRONT: The picture is not reversed. CEILING-REAR: The picture is reversed horizontally. LAMP TIMER Indicates how long the lamp has been turned on , the lamp will take 2 - 3 seconds to ON. You cannot alter the display. 28 (GB) The INSTALL SETTING Menu..."ZOOM", "FULL" or "NORMAL" have been selected in the ASPECT of installation since the picture may be reversed. CINEMA BLACK Switches the lamp wattage during projection. If the base edge is longer, set a negative value; INSTALLATION Sets to square the image. It will use the OFF...
...picture horizontally or vertically. CEILING-FRONT: The picture is not reversed. CEILING-REAR: The picture is reversed horizontally. LAMP TIMER Indicates how long the lamp has been turned on , the lamp will take 2 - 3 seconds to ON. You cannot alter the display. 28 (GB) The INSTALL SETTING Menu..."ZOOM", "FULL" or "NORMAL" have been selected in the ASPECT of installation since the picture may be reversed. CINEMA BLACK Switches the lamp wattage during projection. If the base edge is longer, set a negative value; INSTALLATION Sets to square the image. It will use the OFF...

Operating Instructions
Page 32
Lamp off automatically after one minute. • Leave space of more than 20 ...a lot of dust; Clean it up . Unsuitable Conditions for Installation NotesforInstallation Very dusty Unsuitable Installation Do not install the projector in front of the front ventilation holes, the exhaust may be obstructed. Tilting front/rear and right/left 20°... materials (curtains, draperies) that the exhaust is not blocked. Poorly ventilated • Allow adequate air circulation to the projector. Do not place the unit on its side. Toppling of the unit Avoid using as the unit tilts more than ...
Lamp off automatically after one minute. • Leave space of more than 20 ...a lot of dust; Clean it up . Unsuitable Conditions for Installation NotesforInstallation Very dusty Unsuitable Installation Do not install the projector in front of the front ventilation holes, the exhaust may be obstructed. Tilting front/rear and right/left 20°... materials (curtains, draperies) that the exhaust is not blocked. Poorly ventilated • Allow adequate air circulation to the projector. Do not place the unit on its side. Toppling of the unit Avoid using as the unit tilts more than ...
Operating Instructions
Page 34
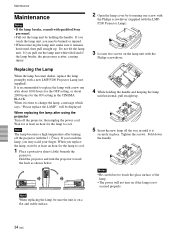
... not to change the lamp, a message which says, "Please replace the LAMP." Tighten the screws. Note When replacing the lamp, be displayed. Maintenance Maintenance Notes • If the lamp breaks, consult with qualified Sony personnel. • Pull out the lamp unit by loosening one after using the projector Turn off the projector with a new LMP-P200 Projector Lamp (not supplied).
... not to change the lamp, a message which says, "Please replace the LAMP." Tighten the screws. Note When replacing the lamp, be displayed. Maintenance Maintenance Notes • If the lamp breaks, consult with qualified Sony personnel. • Pull out the lamp unit by loosening one after using the projector Turn off the projector with a new LMP-P200 Projector Lamp (not supplied).
Operating Instructions
Page 35
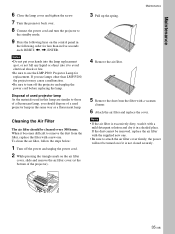
Maintenance 6 Close the lamp cover and tighten the screw. 7 Turn the projector back over. 8 Connect the power cord and turn the projector to the standby mode. 9 Press the following keys on the control panel in the following order for less than in five seconds each: RESET,
Maintenance 6 Close the lamp cover and tighten the screw. 7 Turn the projector back over. 8 Connect the power cord and turn the projector to the standby mode. 9 Press the following keys on the control panel in the following order for less than in five seconds each: RESET,
Operating Instructions
Page 36
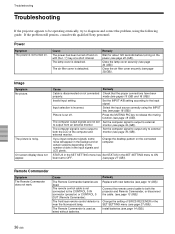
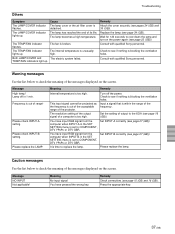
...seconds before turning on . The computer signal is not connected to the CONTROL S IN connector (projector) or CONTROL S OUT (Remote Commander). STATUS in the SET SETTING menu has Set STATUS ...signal to output to external to the input signal. The lamp cover is used as wired without batteries. Remedy Replace with qualified Sony personnel. The computer output signals are dead. The Remote ... . If you input computer signals, some noise will appear in the input signals and LCD pixels. Cause The Remote Commander batteries are not set to output to diagnose and correct ...
...seconds before turning on . The computer signal is not connected to the CONTROL S IN connector (projector) or CONTROL S OUT (Remote Commander). STATUS in the SET SETTING menu has Set STATUS ...signal to output to external to the input signal. The lamp cover is used as wired without batteries. Remedy Replace with qualified Sony personnel. The computer output signals are dead. The Remote ... . If you input computer signals, some noise will appear in the input signals and LCD pixels. Cause The Remote Commander batteries are not set to output to diagnose and correct ...
Operating Instructions
Page 37
...You have pressed the wrong key. Caution messages Use the list below to check the meaning of output to check the meaning of the projector. Message NO INPUT Not applicable! The TEMP/FAN indicator lights up . The resolution setting of the output signal of range! Meaning No...from the computer when INPUT-A in the SET SETTING menu is within the range of its life. Lamp off the power. Set INPUT-A correctly (see page 27 (GB)). Consult with qualified Sony personnel. Input a signal that is set to see if nothing is blocking the ventilation holes. Troubleshooting...
...You have pressed the wrong key. Caution messages Use the list below to check the meaning of output to check the meaning of the projector. Message NO INPUT Not applicable! The TEMP/FAN indicator lights up . The resolution setting of the output signal of range! Meaning No...from the computer when INPUT-A in the SET SETTING menu is within the range of its life. Lamp off the power. Set INPUT-A correctly (see page 27 (GB)). Consult with qualified Sony personnel. Input a signal that is set to see if nothing is blocking the ventilation holes. Troubleshooting...

Operating Instructions
Page 38
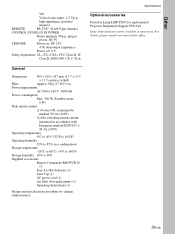
Specifications Specifications Optical characteristics Projection system 3 LCD panels, 1 lens, projection system LCD panel 1.35-inch p-Si TFT LCD panel 3,147,264 pixels (1,049,088 pixels × 3) Lens Approx. 1.2 times zoom lens f 44.6 to 53.6 mm/F 2.2 to 2.5 Lamp 200 W UHP Projection picture size Range: 40 to 300 inches (diagonal measure) Light output ANSI lumen1) 1000 lm...
Specifications Specifications Optical characteristics Projection system 3 LCD panels, 1 lens, projection system LCD panel 1.35-inch p-Si TFT LCD panel 3,147,264 pixels (1,049,088 pixels × 3) Lens Approx. 1.2 times zoom lens f 44.6 to 53.6 mm/F 2.2 to 2.5 Lamp 200 W UHP Projection picture size Range: 40 to 300 inches (diagonal measure) Light output ANSI lumen1) 1000 lm...
Operating Instructions
Page 39
Specifications Optional accessories Projector Lamp LMP-P200 (for replacement) Projector Suspension Support PSS-610 Some of the items may not be available in accordance with European standard EN55103-1: 24.3A (230V) Operating temperature 0°...6 W) Peak inrush current (1) Power ON, current probe method: 58.0A (240V) (2) Hot switching inrush current, measured in some areas. For details, please consult your nearest Sony office. 39 (GB) Other VD: Vertical sync input: 1-5 Vp-p high impedance, positive/ negative REMOTE RS-232C: D-sub 9-pin (female) CONTROL S IN/PLUG IN POWER...
Specifications Optional accessories Projector Lamp LMP-P200 (for replacement) Projector Suspension Support PSS-610 Some of the items may not be available in accordance with European standard EN55103-1: 24.3A (230V) Operating temperature 0°...6 W) Peak inrush current (1) Power ON, current probe method: 58.0A (240V) (2) Hot switching inrush current, measured in some areas. For details, please consult your nearest Sony office. 39 (GB) Other VD: Vertical sync input: 1-5 Vp-p high impedance, positive/ negative REMOTE RS-232C: D-sub 9-pin (female) CONTROL S IN/PLUG IN POWER...
Operating Instructions
Page 42
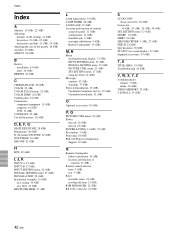
...27 (GB) INSTALLATION 28 (GB) Installation examples 29 (GB) on a ceiling 30 (GB) on a floor 29 (GB) KEYSTONE MEM 27 (GB) Index L Lamp replacement 34 (GB) LAMP TIMER 28 (GB) LANGUAGE 27 (GB) Location and function of controls connector panel 12 (GB) control panel 11 (GB) front/left side 9 (GB) rear... 22 (GB) Power turn off 20 (GB) turn on 18 (GB) POWER SAVING 11 (GB), 27 (GB) Precautions 7 (GB) Projecting 18 (GB) PSS-610 Projector Suspension Support 30 (GB) R Remote Commander battery installation 14 (GB) location and function of controls 13 (GB) Remote control detector front 9 (GB) rear 9 (GB) ...
...27 (GB) INSTALLATION 28 (GB) Installation examples 29 (GB) on a ceiling 30 (GB) on a floor 29 (GB) KEYSTONE MEM 27 (GB) Index L Lamp replacement 34 (GB) LAMP TIMER 28 (GB) LANGUAGE 27 (GB) Location and function of controls connector panel 12 (GB) control panel 11 (GB) front/left side 9 (GB) rear... 22 (GB) Power turn off 20 (GB) turn on 18 (GB) POWER SAVING 11 (GB), 27 (GB) Precautions 7 (GB) Projecting 18 (GB) PSS-610 Projector Suspension Support 30 (GB) R Remote Commander battery installation 14 (GB) location and function of controls 13 (GB) Remote control detector front 9 (GB) rear 9 (GB) ...


