Operating Instructions
Page 1
2-687-435-17 (2) Data Projector Operating Instructions VPL-FE40/FE40L VPL-FX40/FX40L VPL-FX41/FX41L © 2006 Sony Corporation
2-687-435-17 (2) Data Projector Operating Instructions VPL-FE40/FE40L VPL-FX40/FX40L VPL-FX41/FX41L © 2006 Sony Corporation

Operating Instructions
Page 4
... Controls .. 10 Top/Front/Side 10 Rear/Side/Bottom 10 Control Panel 11 Connector Panel 12 Remote Commander 14 Projecting the Picture Installing the Projector 16 Connecting the Projector 17 Connecting a Computer 17 Connecting a VCR 19 Projecting 20 Turning Off the Power 22 Convenient Functions Selecting the Menu Language .......... 23 Security Lock...
... Controls .. 10 Top/Front/Side 10 Rear/Side/Bottom 10 Control Panel 11 Connector Panel 12 Remote Commander 14 Projecting the Picture Installing the Projector 16 Connecting the Projector 17 Connecting a Computer 17 Connecting a VCR 19 Projecting 20 Turning Off the Power 22 Convenient Functions Selecting the Menu Language .......... 23 Security Lock...

Operating Instructions
Page 6
... to the next. Poorly ventilated • Allow adequate air circulation to the unit. You may rise rapidly. Also, when you use multiple LCD projectors to project onto a screen, even if they are of paper. The power will function with the message "High temp.! Highly heated and ...see tiny black points and/or bright points (red, blue, or green) that may be turned off in the following situations. Notes on the LCD projector. This is manufactured using high-precision technology. Do not place the unit on surfaces (rugs, blankets, etc.) or near materials (curtains, draperies...
... to the next. Poorly ventilated • Allow adequate air circulation to the unit. You may rise rapidly. Also, when you use multiple LCD projectors to project onto a screen, even if they are of paper. The power will function with the message "High temp.! Highly heated and ...see tiny black points and/or bright points (red, blue, or green) that may be turned off in the following situations. Notes on the LCD projector. This is manufactured using high-precision technology. Do not place the unit on surfaces (rugs, blankets, etc.) or near materials (curtains, draperies...

Operating Instructions
Page 8
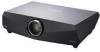
...CD-ROM) This Operating Instructions describes how to pay attention when handling and using this projector. High resolution VPL-FE40: Three 0.79-inch SXGA+ panels with the newgeneration LCD panel "BrightEra" incorporating a newly developed inorganic alignment, allows a light output of 1024...to obtain a detailed picture. VPL-FX40/FX41: Three 0.79-inch XGA panels with the Remote Commander operated away from a computer to the projector. 8 About the Supplied Manuals / Features Features High brightness and high picture performance High brightness Sony's unique optical system with ...
...CD-ROM) This Operating Instructions describes how to pay attention when handling and using this projector. High resolution VPL-FE40: Three 0.79-inch SXGA+ panels with the newgeneration LCD panel "BrightEra" incorporating a newly developed inorganic alignment, allows a light output of 1024...to obtain a detailed picture. VPL-FX40/FX41: Three 0.79-inch XGA panels with the Remote Commander operated away from a computer to the projector. 8 About the Supplied Manuals / Features Features High brightness and high picture performance High brightness Sony's unique optical system with ...

Operating Instructions
Page 9
... to connect to adjust or control each projector individually with the HDMI output. Accepts various input signals The projector accepts video signals of the composite, S video and component, and can be turned on the time for VPL-FE40, VPL-FX40 and VPL-FX41 equipped with the center of the ...• Kensington is connected to a LAN by wired or wireless connection, can also display VGA, SVGA, XGA, WXGA, SXGA, SXGA+ and UXGA (60 Hz) signals. Also, this projector is designed to the digital RGB equipment equipped with one Remote Commander when you to a computer from the installation...
... to connect to adjust or control each projector individually with the HDMI output. Accepts various input signals The projector accepts video signals of the composite, S video and component, and can be turned on the time for VPL-FE40, VPL-FX40 and VPL-FX41 equipped with the center of the ...• Kensington is connected to a LAN by wired or wireless connection, can also display VGA, SVGA, XGA, WXGA, SXGA, SXGA+ and UXGA (60 Hz) signals. Also, this projector is designed to the digital RGB equipment equipped with one Remote Commander when you to a computer from the installation...
Operating Instructions
Page 11
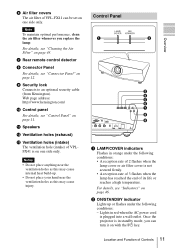
.... Notes • Do not place anything near the ventilation holes as this may cause injury. Lights in standby mode, you replace the lamp. Once the projector is in red when the AC power cord is plugged into a wall outlet. k Speakers l Ventilation holes (exhaust) m Ventilation holes (intake) The ventilation hole...air filter cover is on one side only. For details, see "Indicators" on page 43. Overview f Air filter covers The air filter of VPL-FX41 can turn it on with the ?/1 key. Note To maintain optimal performance, clean the air filter whenever you can be set on one...
.... Notes • Do not place anything near the ventilation holes as this may cause injury. Lights in standby mode, you replace the lamp. Once the projector is in red when the AC power cord is plugged into a wall outlet. k Speakers l Ventilation holes (exhaust) m Ventilation holes (intake) The ventilation hole...air filter cover is on one side only. For details, see "Indicators" on page 43. Overview f Air filter covers The air filter of VPL-FX41 can turn it on with the ?/1 key. Note To maintain optimal performance, clean the air filter whenever you can be set on one...

Operating Instructions
Page 12
... flashes in green and then lights in the menu system, select a menu, or make various adjustments. S VIDEO (mini DIN 4-pin) Connects to the projector, do not perform a lens-shift operation after the power is ready to reduce it rightward. Press the V key to move it leftward. Press the b...key to move it downward. Note When the optional accessory VPLL1008 is attached to the S video output (Y/C video output) of items in green when the projector is turned off with that of the lens by a dealer. e FOCUS key Enters the focus adjustment mode. Press again to operate. - Lights in ...
... flashes in green and then lights in the menu system, select a menu, or make various adjustments. S VIDEO (mini DIN 4-pin) Connects to the projector, do not perform a lens-shift operation after the power is ready to reduce it rightward. Press the V key to move it leftward. Press the b...key to move it downward. Note When the optional accessory VPLL1008 is attached to the S video output (Y/C video output) of items in green when the projector is turned off with that of the lens by a dealer. e FOCUS key Enters the focus adjustment mode. Press again to operate. - Lights in ...

Operating Instructions
Page 13
... this terminal when signals are to a video output connector on the supplied Remote Commander when using it as when the projector is suspended from a computer, connect via this jack to the audio output of a computer using an optional cable. ...VIDEO or S VIDEO is selected, the sound input to the AUDIO input connector of video equipment. Connects to operate the projector from this port. CAUTION For safety, do not need to install batteries in use. For details, see "Connecting a... equipment such as the power is supplied from the computer. Location and Function of Sony equipment.
... this terminal when signals are to a video output connector on the supplied Remote Commander when using it as when the projector is suspended from a computer, connect via this jack to the audio output of a computer using an optional cable. ...VIDEO or S VIDEO is selected, the sound input to the AUDIO input connector of video equipment. Connects to operate the projector from this port. CAUTION For safety, do not need to install batteries in use. For details, see "Connecting a... equipment such as the power is supplied from the computer. Location and Function of Sony equipment.

Operating Instructions
Page 14
For details, see "APA" in "The Screen Menu" on the CD-ROM). e ENTER key f RESET key Resets the value of an item to its factory preset value. g KEYSTONE (Vertical trapezoidal distortion correction) key Adjusts the vertical trapezoidal distortion of the image manually. AUDIO - Use the arrow keys (M/m/ d APA (Auto Pixel Alignment) key Automatically adjusts a picture to its clearest while a signal is displayed. When you press this key, the V Keystone menu is input from the connector of the same name as those of the Remote Commander. FREEZE ID MODE 1 2 3 1 2 3 4 5 6 ...
For details, see "APA" in "The Screen Menu" on the CD-ROM). e ENTER key f RESET key Resets the value of an item to its factory preset value. g KEYSTONE (Vertical trapezoidal distortion correction) key Adjusts the vertical trapezoidal distortion of the image manually. AUDIO - Use the arrow keys (M/m/ d APA (Auto Pixel Alignment) key Automatically adjusts a picture to its clearest while a signal is displayed. When you press this key, the V Keystone menu is input from the connector of the same name as those of the Remote Commander. FREEZE ID MODE 1 2 3 1 2 3 4 5 6 ...

Operating Instructions
Page 15
o ZOOM +/- keys Adjusts the picture focus. keys Adjusts the vertical/horizontal position of OUTPUT. r M/m/ Press again or press the VOLUME+ key to temporarily cut the audio output from the speaker or audio signal from the AUDIO jack of the picture. keys Adjusts the picture size. q SHIFT +/- key This function is not provided in this projector. n D ZOOM (Digital Zoom) +/- p FOCUS +/- Press again to restore the picture. • AUDIO: Press to restore the sound. Overview m MUTING keys Cut off the picture and sound. • PIC: Cuts off the picture.
o ZOOM +/- keys Adjusts the picture focus. keys Adjusts the vertical/horizontal position of OUTPUT. r M/m/ Press again or press the VOLUME+ key to temporarily cut the audio output from the speaker or audio signal from the AUDIO jack of the picture. keys Adjusts the picture size. q SHIFT +/- key This function is not provided in this projector. n D ZOOM (Digital Zoom) +/- p FOCUS +/- Press again to restore the picture. • AUDIO: Press to restore the sound. Overview m MUTING keys Cut off the picture and sound. • PIC: Cuts off the picture.

Operating Instructions
Page 16
Screen Distance between the screen and the center of installing the standard lens supplied with VPL-FE40/ VPL-FX40/VPL-FX41. For details on installation, See "Installation Manual for Dealers". Use the following table gives an example of the lens Unit: m (feet)....9) (32.0) (48.0) (64.1) (80.2) (96.3) There may be sure to refer to the operating instructions of the screen. B Projecting the Picture Installing the Projector The following table as a guide. The distance between the lens and the screen varies depending on the size of "Installation Manual for Dealers" on installation...
Screen Distance between the screen and the center of installing the standard lens supplied with VPL-FE40/ VPL-FX40/VPL-FX41. For details on installation, See "Installation Manual for Dealers". Use the following table gives an example of the lens Unit: m (feet)....9) (32.0) (48.0) (64.1) (80.2) (96.3) There may be sure to refer to the operating instructions of the screen. B Projecting the Picture Installing the Projector The following table as a guide. The distance between the lens and the screen varies depending on the size of "Installation Manual for Dealers" on installation...

Operating Instructions
Page 17
... connect a computer (Analog) Side When you set the output mode of your computer to SXGA+ (VPL-FE40) or XGA (VPL-FX40/ FX41) mode for the external monitor. • If you connect the projector, make sure to: • Turn off all equipment before making any connections. • Use the proper cables for ...A Stereo audio connecting cable (not supplied) (Use a no-resistance cable.) B HD D-sub 15-pin cable (not supplied) Notes • The projector accepts VGA, SVGA, XGA, WXGA, SXGA, SXGA+ and UXGA signals. to audio output Computer to pull it out by the plug, not the cable itself. However, we ...
... connect a computer (Analog) Side When you set the output mode of your computer to SXGA+ (VPL-FE40) or XGA (VPL-FX40/ FX41) mode for the external monitor. • If you connect the projector, make sure to: • Turn off all equipment before making any connections. • Use the proper cables for ...A Stereo audio connecting cable (not supplied) (Use a no-resistance cable.) B HD D-sub 15-pin cable (not supplied) Notes • The projector accepts VGA, SVGA, XGA, WXGA, SXGA, SXGA+ and UXGA signals. to audio output Computer to pull it out by the plug, not the cable itself. However, we ...

Operating Instructions
Page 18
To connect a computer (Digital) or video equipment (Digital) Side The HDMI connector of this projector is not compatible with your computer. To attach the HDMI cable Fix the cable to the cable tie holder next to the HDMI cable using a ... plug adaptor. Cable holder HDMI Cable tie (commercially available) * Use a cable tie of pins, use the HDMI cable with an HDMI logo. 18 Connecting the Projector Note To connect a Macintosh computer equipped with a video output connector of a type having two rows of less than 1.9 mm × 3.8 mm thickness. For details, refer...
To connect a computer (Digital) or video equipment (Digital) Side The HDMI connector of this projector is not compatible with your computer. To attach the HDMI cable Fix the cable to the cable tie holder next to the HDMI cable using a ... plug adaptor. Cable holder HDMI Cable tie (commercially available) * Use a cable tie of pins, use the HDMI cable with an HDMI logo. 18 Connecting the Projector Note To connect a Macintosh computer equipped with a video output connector of a type having two rows of less than 1.9 mm × 3.8 mm thickness. For details, refer...

Operating Instructions
Page 19
... to audio output (L) to video output to the input signal. For more information, refer to a VCR. Connecting a VCR This section describes how to connect the projector to the instruction manuals of the equipment you are connecting. B Video cable (not supplied) or S-Video cable (not supplied) VCR A Stereo audio connecting cable (not... output (R) VCR A Audio connecting cable (not supplied) For stereo equipment use the L (MONO) jack only. For monaural equipment use both the L and R jacks. Connecting the Projector 19
... to audio output (L) to video output to the input signal. For more information, refer to a VCR. Connecting a VCR This section describes how to connect the projector to the instruction manuals of the equipment you are connecting. B Video cable (not supplied) or S-Video cable (not supplied) VCR A Stereo audio connecting cable (not... output (R) VCR A Audio connecting cable (not supplied) For stereo equipment use the L (MONO) jack only. For monaural equipment use both the L and R jacks. Connecting the Projector 19

Operating Instructions
Page 20
...APA (Auto Pixel Alignment) adjusts the picture of the connected equipment so that it is set to the projector. The ON/STANDBY indicator flashes in green, and then lights in red and the projector goes into a wall outlet, then connect all equipment. Notes • If "Auto Input Search" is...-C connected to select the input source. You can select directly the input signal you press the INPUT key on the equipment connected to "On," the projector searches for the signals from among INPUT A, B, C, D or E on the Remote Commander. The ON/STANDBY indicator lights in green. 3 Turn on ...
...APA (Auto Pixel Alignment) adjusts the picture of the connected equipment so that it is set to the projector. The ON/STANDBY indicator flashes in green, and then lights in red and the projector goes into a wall outlet, then connect all equipment. Notes • If "Auto Input Search" is...-C connected to select the input source. You can select directly the input signal you press the INPUT key on the equipment connected to "On," the projector searches for the signals from among INPUT A, B, C, D or E on the Remote Commander. The ON/STANDBY indicator lights in green. 3 Turn on ...
Operating Instructions
Page 21
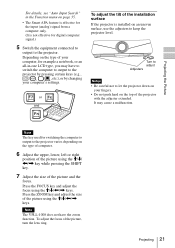
...computer signal.) 5 Switch the equipment connected to output to keep the projector level. Note The key used for switching the computer to output to the projector varies depending on an uneven surface, use the adjusters to the projector. It may have to switch the computer to output to let ... on the type of your computer, for example a notebook, or an all-in-one LCD type, you may cause a malfunction. Turn to adjust Adjusters Notes • Be careful not to the projector by pressing certain keys (e.g., / , LCD VGA / , etc.), or by changing your fingers. • Do not push hard ...
...computer signal.) 5 Switch the equipment connected to output to keep the projector level. Note The key used for switching the computer to output to the projector varies depending on an uneven surface, use the adjusters to the projector. It may have to switch the computer to output to let ... on the type of your computer, for example a notebook, or an all-in-one LCD type, you may cause a malfunction. Turn to adjust Adjusters Notes • Be careful not to the projector by pressing certain keys (e.g., / , LCD VGA / , etc.), or by changing your fingers. • Do not push hard ...
Operating Instructions
Page 23
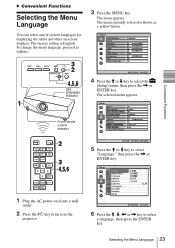
... 1 3 Press the MENU key. B Convenient Functions Selecting the Menu Language You can select one of sixteen languages for displaying the menu and other on the projector. 5 Press the M or m key to select "Language," then press the , or ENTER key. 30 6 Press the M, m, < or , key to select the (Setup) menu, then press...
... 1 3 Press the MENU key. B Convenient Functions Selecting the Menu Language You can select one of sixteen languages for displaying the menu and other on the projector. 5 Press the M or m key to select "Language," then press the , or ENTER key. 30 6 Press the M, m, < or , key to select the (Setup) menu, then press...

Operating Instructions
Page 24
... the MENU key. Be please aware that using the security lock can prevent valid usage in such cases. When you turn the power of the projector on, you are required to input the password only when you will not be able to use the security lock 1 Press the MENU key and... then, on the Function menu, turn the projector on the "Security Lock" setting. 2 Enter the password. If you do not input the correct password, you turn on after disconnecting or reconnecting the cable...
... the MENU key. Be please aware that using the security lock can prevent valid usage in such cases. When you turn the power of the projector on, you are required to input the password only when you will not be able to use the security lock 1 Press the MENU key and... then, on the Function menu, turn the projector on the "Security Lock" setting. 2 Enter the password. If you do not input the correct password, you turn on after disconnecting or reconnecting the cable...

Operating Instructions
Page 25
..., we will provide you will need to be able to enter the correct password after three tries, the projector cannot be performed without the password. Security Lock 25 If you fail to verify the projector's serial number and your identity. (This process may differ in the Function menu. 2 Enter the password. The...
..., we will provide you will need to be able to enter the correct password after three tries, the projector cannot be performed without the password. Security Lock 25 If you fail to verify the projector's serial number and your identity. (This process may differ in the Function menu. 2 Enter the password. The...

Operating Instructions
Page 26
...function is input. Note The fan does not turn in red (except with the VPL-FX41). • When the power is any obstruction between the presentation tool and the remote control detector on the projector, the presentation tool may not function properly. • A black screen may ...automatically operate for a certain time automatically. However, the Direct Power On/Off function has the same performance. It does not matter. If the projector has been on . Controlling the Computer Using a Presentation Tool, RM-PJPK1 (not supplied) (When Using the Network Presentation Function) When you ...
...function is input. Note The fan does not turn in red (except with the VPL-FX41). • When the power is any obstruction between the presentation tool and the remote control detector on the projector, the presentation tool may not function properly. • A black screen may ...automatically operate for a certain time automatically. However, the Direct Power On/Off function has the same performance. It does not matter. If the projector has been on . Controlling the Computer Using a Presentation Tool, RM-PJPK1 (not supplied) (When Using the Network Presentation Function) When you ...


